User Manual (ENGLISH)
Page 2
...with this license for product features or functions that exceed the above for all televisions. To avoid this product unit to encode and/or decode audio files conforming to the ISO/IEC 11172-3 or ISO/IEC 13818-3. U.S.A Only The product unit accompanying this product is licensed under certain intellectual... 11172-3 or ISO/IEC 13818-3 used or sold in the wide screen 16:9 ratio format, or expanded to fill the screen if your Samsung limited warranty. The license does not cover any product unit other than this product unit and the license does not extend to any unlicensed product...
...with this license for product features or functions that exceed the above for all televisions. To avoid this product unit to encode and/or decode audio files conforming to the ISO/IEC 11172-3 or ISO/IEC 13818-3. U.S.A Only The product unit accompanying this product is licensed under certain intellectual... 11172-3 or ISO/IEC 13818-3 used or sold in the wide screen 16:9 ratio format, or expanded to fill the screen if your Samsung limited warranty. The license does not cover any product unit other than this product unit and the license does not extend to any unlicensed product...
User Manual (ENGLISH)
Page 5
... connect my DTV set-top receiver to enjoy clear, sharp widescreen images and high-quality audio. 5 It is an antenna and a DTV set -top receivers. DTV receivers do not require as much signal as analog TV and works well with broadcast DTV set -top receiver to my cable... OTA broadcast DTV programs. The good news is currently incompatible with many existing TV antennas. All you need is possible that the landlord of rental units (apartments, etc.) are no noise, ghosting, static, or scratchy audio. 3. However, DTV broadcast channel assignments are on VHF (channels 2-13) or...
... connect my DTV set-top receiver to enjoy clear, sharp widescreen images and high-quality audio. 5 It is an antenna and a DTV set -top receivers. DTV receivers do not require as much signal as analog TV and works well with broadcast DTV set -top receiver to my cable... OTA broadcast DTV programs. The good news is currently incompatible with many existing TV antennas. All you need is possible that the landlord of rental units (apartments, etc.) are no noise, ghosting, static, or scratchy audio. 3. However, DTV broadcast channel assignments are on VHF (channels 2-13) or...
User Manual (ENGLISH)
Page 6
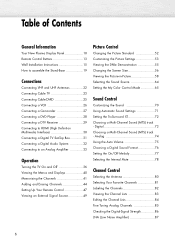
... (Low Noise Amplifier 87 6 Digital 73 Choosing a Multi-Channel Sound (MTS) track - Table of Contents General Information Your New Plasma Display Panel 10 Remote Control Buttons 13 Wall Installation Instructions 15 How to assemble the Stand-Base 19 Connections Connecting VHF and UHF Antennas...DTV Receiver 29 Connecting to HDMI (High Definition Multimedia Interface 30 Connecting a Digital TV Set-Top Box 31 Connecting a Digital Audio System 32 Connecting to an Analog Amplifier 33 Operation Turning the TV On and Off 36 Viewing the Menus and Displays 40 Memorizing the Channels 41 ...
... (Low Noise Amplifier 87 6 Digital 73 Choosing a Multi-Channel Sound (MTS) track - Table of Contents General Information Your New Plasma Display Panel 10 Remote Control Buttons 13 Wall Installation Instructions 15 How to assemble the Stand-Base 19 Connections Connecting VHF and UHF Antennas...DTV Receiver 29 Connecting to HDMI (High Definition Multimedia Interface 30 Connecting a Digital TV Set-Top Box 31 Connecting a Digital Audio System 32 Connecting to an Analog Amplifier 33 Operation Turning the TV On and Off 36 Viewing the Menus and Displays 40 Memorizing the Channels 41 ...
User Manual (ENGLISH)
Page 11
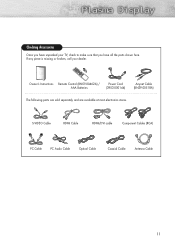
S-VIDEO Cable HDMI Cable HDMI/DVI cable Component Cables (RCA) PC Cable PC Audio Cable Optical Cable Coaxial Cable Antenna Cable 11 If any piece is missing or broken, call your TV, check to make sure that you have all the parts shown here. Owner's Instructions Remote Control (BN59-00462A) / AAA Batteries Power Cord (3903-000144) Anynet Cable (BN39-00518A) The following parts are sold separately and are available at most electronics stores. Checking Accessories Once you have unpacked your dealer.
S-VIDEO Cable HDMI Cable HDMI/DVI cable Component Cables (RCA) PC Cable PC Audio Cable Optical Cable Coaxial Cable Antenna Cable 11 If any piece is missing or broken, call your TV, check to make sure that you have all the parts shown here. Owner's Instructions Remote Control (BN59-00462A) / AAA Batteries Power Cord (3903-000144) Anynet Cable (BN39-00518A) The following parts are sold separately and are available at most electronics stores. Checking Accessories Once you have unpacked your dealer.
User Manual (ENGLISH)
Page 12
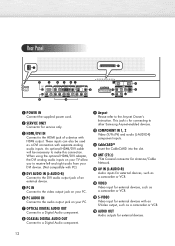
...is for connecting to other Samsung Anynet-enabled devices. ˝ COMPONENT IN 1, 2 Video (Y/PB/PR) and audio (L-AUDIO-R) component inputs. Ô CableCARDTM Insert the CableCARD into the slot. ANT (75Ω) 75Ω Coaxial connector for Antenna/Cable Network. Ò AV IN (L-AUDIO-R) Audio inputs for external devices,... your PC. Ø PC AUDIO IN Connect to the audio output jack on your TV allow you to receive left and right audio from your PC. ∏ OPTICAL DIGITAL AUDIO OUT Connect to the HDMI jack of a device with separate analog audio inputs. When using the optional ...
...is for connecting to other Samsung Anynet-enabled devices. ˝ COMPONENT IN 1, 2 Video (Y/PB/PR) and audio (L-AUDIO-R) component inputs. Ô CableCARDTM Insert the CableCARD into the slot. ANT (75Ω) 75Ω Coaxial connector for Antenna/Cable Network. Ò AV IN (L-AUDIO-R) Audio inputs for external devices,... your PC. Ø PC AUDIO IN Connect to the audio output jack on your TV allow you to receive left and right audio from your PC. ∏ OPTICAL DIGITAL AUDIO OUT Connect to the HDMI jack of a device with separate analog audio inputs. When using the optional ...
User Manual (ENGLISH)
Page 14
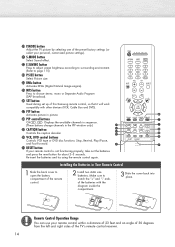
... buttons change channels in Your Remote Control 1 Slide the back cover to open the battery compartment of this Samsung remote control, so that it will work compatibly with the diagram inside the compartment. 3 Slide the cover ... (Digital Natural Image engine). ≠ MTS button Press to match the "+" and "-" ends of the TV's remote control receiver. 14 Remote Control Operation Range You can use your remote control within a distance of 23... Make sure to choose stereo, mono or Separate Audio Program (SAP broadcast). - Re-insert the batteries and try using the remote control again.
... buttons change channels in Your Remote Control 1 Slide the back cover to open the battery compartment of this Samsung remote control, so that it will work compatibly with the diagram inside the compartment. 3 Slide the cover ... (Digital Natural Image engine). ≠ MTS button Press to match the "+" and "-" ends of the TV's remote control receiver. 14 Remote Control Operation Range You can use your remote control within a distance of 23... Make sure to choose stereo, mono or Separate Audio Program (SAP broadcast). - Re-insert the batteries and try using the remote control again.
User Manual (ENGLISH)
Page 26
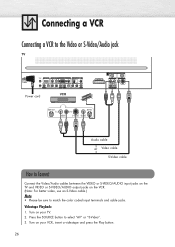
Turn on your TV. 2. Turn on your VCR, insert a videotape and press the Play button. 26 Videotape Playback: 1. Press the SOURCE button to match the color coded input terminals and cable jacks. Connecting a VCR Connecting a VCR to the Video or S-Video/Audio jack TV Power cord VCR Audio cable Video cable S-Video cable How to Connect Connect the Video/Audio cables between the VIDEO or S-VIDEO/AUDIO input jacks on the TV and VIDEO or S-VIDEO/AUDIO output jacks on the VCR. (Note: For better video, use an S-Video cable.) Note • Please be sure to select "AV" or "S-Video". 3.
Turn on your TV. 2. Turn on your VCR, insert a videotape and press the Play button. 26 Videotape Playback: 1. Press the SOURCE button to match the color coded input terminals and cable jacks. Connecting a VCR Connecting a VCR to the Video or S-Video/Audio jack TV Power cord VCR Audio cable Video cable S-Video cable How to Connect Connect the Video/Audio cables between the VIDEO or S-VIDEO/AUDIO input jacks on the TV and VIDEO or S-VIDEO/AUDIO output jacks on the VCR. (Note: For better video, use an S-Video cable.) Note • Please be sure to select "AV" or "S-Video". 3.

User Manual (ENGLISH)
Page 27
... coded input terminals and cable jacks. Connecting a Camcorder Viewing camcorder tapes TV Power cord Camcorder Audio cable Video cable S-Video cable How to Connect Connect a Video/Audio cable between the VIDEO or S-VIDEO/AUDIO input jacks on the TV and the VIDEO or S-VIDEO/AUDIO output jacks on your camcorder to OUT. 5. Set the IN/OUT...
... coded input terminals and cable jacks. Connecting a Camcorder Viewing camcorder tapes TV Power cord Camcorder Audio cable Video cable S-Video cable How to Connect Connect a Video/Audio cable between the VIDEO or S-VIDEO/AUDIO input jacks on the TV and the VIDEO or S-VIDEO/AUDIO output jacks on your camcorder to OUT. 5. Set the IN/OUT...
User Manual (ENGLISH)
Page 28
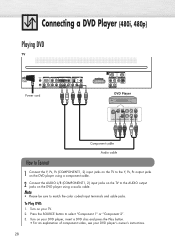
... • For an explanation of component video, see your TV. 2. Note • Please be sure to select "Component 1" or "Component 2". 3. To Play DVD: 1. Connecting a DVD Player (480i, 480p) Playing DVD TV Power cord DVD Player Component cable Audio cable How to Connect 1 Connect the Y, PB, PR (...COMPONENT1, 2) input jacks on the TV to the Y, PB, PR output jacks on the DVD player using a component cable. 2 ...
... • For an explanation of component video, see your TV. 2. Note • Please be sure to select "Component 1" or "Component 2". 3. To Play DVD: 1. Connecting a DVD Player (480i, 480p) Playing DVD TV Power cord DVD Player Component cable Audio cable How to Connect 1 Connect the Y, PB, PR (...COMPONENT1, 2) input jacks on the TV to the Y, PB, PR output jacks on the DVD player using a component cable. 2 ...
User Manual (ENGLISH)
Page 29
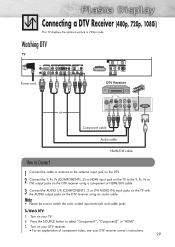
... cable jacks. To Watch DTV: 1. Connecting a DTV Receiver (480p, 720p, 1080i) This TV displays the optimum picture in 720p mode. Watching DTV TV Power cord DTV Receiver Component cable Audio cable HDMI/DVI cable How to Connect 1 Connect the cable or antenna to the antenna input...the DTV receiver using a component or HDMI/DVI cable. 3 Connect the AUDIO L/R (COMPONENT1, 2 or DVI AUDIO IN) input jacks on the TV with the AUDIO output jacks on your DTV receiver. • For an explanation of component video, see your TV. 2. Note • Please be sure to select "Component1", "Component2"...
... cable jacks. To Watch DTV: 1. Connecting a DTV Receiver (480p, 720p, 1080i) This TV displays the optimum picture in 720p mode. Watching DTV TV Power cord DTV Receiver Component cable Audio cable HDMI/DVI cable How to Connect 1 Connect the cable or antenna to the antenna input...the DTV receiver using a component or HDMI/DVI cable. 3 Connect the AUDIO L/R (COMPONENT1, 2 or DVI AUDIO IN) input jacks on the TV with the AUDIO output jacks on your DTV receiver. • For an explanation of component video, see your TV. 2. Note • Please be sure to select "Component1", "Component2"...
User Manual (ENGLISH)
Page 31
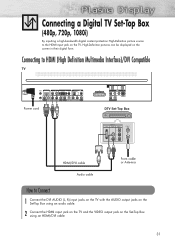
... Box using an HDMI/DVI cable. 31 Connecting a Digital TV Set-Top Box (480p, 720p, 1080i) By inputting a high-bandwidth digital content protection High-Definition picture source to Connect 1 Connect the DVI AUDIO (L, R) input jacks on the TV with the AUDIO output jacks on the Set-Top Box using an... audio cable. 2 Connect the HDMI input jack on the TV and the VIDEO output jack on the screen in their digital form.
... Box using an HDMI/DVI cable. 31 Connecting a Digital TV Set-Top Box (480p, 720p, 1080i) By inputting a high-bandwidth digital content protection High-Definition picture source to Connect 1 Connect the DVI AUDIO (L, R) input jacks on the TV with the AUDIO output jacks on the Set-Top Box using an... audio cable. 2 Connect the HDMI input jack on the TV and the VIDEO output jack on the screen in their digital form.
User Manual (ENGLISH)
Page 32
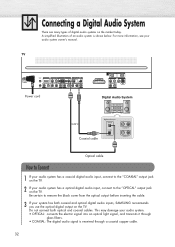
... on the market today. A simplified illustration of digital audio systems on the TV. 2 If your audio system owner's manual. Be certain to the "OPTICAL" output jack on the TV. For more information, see your audio system has a optical digital audio input, connect to remove the black cover from the... and transmits it through glass fibers. • COAXIAL: The digital audio signal is shown below. Do not connect both coaxial and optical digital audio inputs, SAMSUNG recommends you use the optical digital output on the TV. This may damage your system has both optical and coaxial cables....
... on the market today. A simplified illustration of digital audio systems on the TV. 2 If your audio system owner's manual. Be certain to the "OPTICAL" output jack on the TV. For more information, see your audio system has a optical digital audio input, connect to remove the black cover from the... and transmits it through glass fibers. • COAXIAL: The digital audio signal is shown below. Do not connect both coaxial and optical digital audio inputs, SAMSUNG recommends you use the optical digital output on the TV. This may damage your system has both optical and coaxial cables....

User Manual (ENGLISH)
Page 33
When an audio amplifier is connected to an amplifier. You must hook them up to the "AUDIO OUT (AUDIO L/R)" terminals: Decrease the gain (volume) of the audio amplifier, and adjust the volume level with the volume control on the TV. 33 Connecting to an Analog Amplifier TV Power cord Audio cable Analog Amplifier How to Connect 1 The "AUDIO OUT (AUDIO L/R)" terminals cannot be used for external speakers.
When an audio amplifier is connected to an amplifier. You must hook them up to the "AUDIO OUT (AUDIO L/R)" terminals: Decrease the gain (volume) of the audio amplifier, and adjust the volume level with the volume control on the TV. 33 Connecting to an Analog Amplifier TV Power cord Audio cable Analog Amplifier How to Connect 1 The "AUDIO OUT (AUDIO L/R)" terminals cannot be used for external speakers.

User Manual (ENGLISH)
Page 73
... press the ENTER button. ➤ Quick way to choose the language (English, Spanish, or French) you want, then press the ENTER button. TV Sound Mode : Custom √ Equalizer √ SRS TruSurround XT : Off √ Multi-Track Options √ Auto Volume : Off √...-Track Sound : SStperaenoish French 4 Press the MENU button to select "Preferred Language". Digital The digital-TV transmission system is capable of simultaneous transmission of many audio tracks (for example, simultaneous translations of these additional "multitracks" depends upon the program. 1 Press the...
... press the ENTER button. ➤ Quick way to choose the language (English, Spanish, or French) you want, then press the ENTER button. TV Sound Mode : Custom √ Equalizer √ SRS TruSurround XT : Off √ Multi-Track Options √ Auto Volume : Off √...-Track Sound : SStperaenoish French 4 Press the MENU button to select "Preferred Language". Digital The digital-TV transmission system is capable of simultaneous transmission of many audio tracks (for example, simultaneous translations of these additional "multitracks" depends upon the program. 1 Press the...

User Manual (ENGLISH)
Page 74
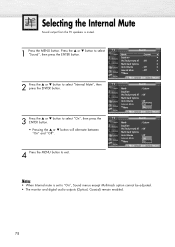
... Sound : English : SMteorenoo Stereo SAP 4 Press the MENU button to select "Multi-Track Sound", then press the ENTER button. Choosing a Multi-Channel Sound (MTS) track - TV Sound Mode : Custom √ Equalizer √ SRS TruSurround XT : Off √ Multi-Track Options √ Auto Volume : Off √ Internal Mute : Off √ † More..., then press the ENTER button. Press the ▲ or ▼ button to select "Sound", then press the ENTER button. ➤ Quick way to the Separate Audio Program, which is usually a foreign-language translation. 74
... Sound : English : SMteorenoo Stereo SAP 4 Press the MENU button to select "Multi-Track Sound", then press the ENTER button. Choosing a Multi-Channel Sound (MTS) track - TV Sound Mode : Custom √ Equalizer √ SRS TruSurround XT : Off √ Multi-Track Options √ Auto Volume : Off √ Internal Mute : Off √ † More..., then press the ENTER button. Press the ▲ or ▼ button to select "Sound", then press the ENTER button. ➤ Quick way to the Separate Audio Program, which is usually a foreign-language translation. 74

User Manual (ENGLISH)
Page 76
...Press the ▲ or ▼ button to exit. Move Enter Return Manufactured under license from the rear panel connector on your digital audio component). 1 Press the MENU button. The digital sound outputs are trademarks of Dolby Laboratories. 76 "Dolby" and the double D-symbol ...then press the ENTER button. 2 Press the ▲ or ▼ button to your TV. Choosing a Digital Sound Format Digital sound can be output from Dolby Laboratories. After connecting a digital-audio component, you must specify the transmission format (Dolby or PCM, as appropriate to select "Digital...
...Press the ▲ or ▼ button to exit. Move Enter Return Manufactured under license from the rear panel connector on your digital audio component). 1 Press the MENU button. The digital sound outputs are trademarks of Dolby Laboratories. 76 "Dolby" and the double D-symbol ...then press the ENTER button. 2 Press the ▲ or ▼ button to your TV. Choosing a Digital Sound Format Digital sound can be output from Dolby Laboratories. After connecting a digital-audio component, you must specify the transmission format (Dolby or PCM, as appropriate to select "Digital...
User Manual (ENGLISH)
Page 78
...Options √ Auto Volume : Off √ Internal Mute : Off √ † More Move Enter Return TV Sound Mode Equalizer SRS TruSurround XT Multi-Track Options Auto Volume Internal Mute † More : Custom : Off : Off : OOnff... On Move Enter Return TV Sound Mode Equalizer SRS TruSurround XT Multi-Track Options Auto Volume Internal Mute † More : Custom : Off...-track option cannot be adjusted. • The monitor and digital audio outputs (Optical, Coaxial) remain enabled. 78
...Options √ Auto Volume : Off √ Internal Mute : Off √ † More Move Enter Return TV Sound Mode Equalizer SRS TruSurround XT Multi-Track Options Auto Volume Internal Mute † More : Custom : Off : Off : OOnff... On Move Enter Return TV Sound Mode Equalizer SRS TruSurround XT Multi-Track Options Auto Volume Internal Mute † More : Custom : Off...-track option cannot be adjusted. • The monitor and digital audio outputs (Optical, Coaxial) remain enabled. 78
User Manual (ENGLISH)
Page 90
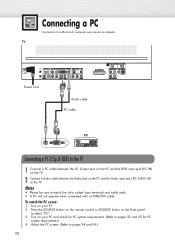
... button on the remote control or SOURCE button on your PC and check for PC system requirements.) 4. Notes • Please be sure to select "PC". 3. TV Power cord Audio cable PC cable PC Connecting a PC (15p D-SUB) to pages 92 and 93 for PC system requirements. (Refer to the... TV 1 Connect a PC cable between the PC Output jack on the PC and the RGB input jack (PC IN) on the TV. 2 Connect a Audio cable between the Audio jack on the PC and the Audio input jacks (PC AUDIO IN) on your TV. 2. Turn on the...
... button on the remote control or SOURCE button on your PC and check for PC system requirements.) 4. Notes • Please be sure to select "PC". 3. TV Power cord Audio cable PC cable PC Connecting a PC (15p D-SUB) to pages 92 and 93 for PC system requirements. (Refer to the... TV 1 Connect a PC cable between the PC Output jack on the PC and the RGB input jack (PC IN) on the TV. 2 Connect a Audio cable between the Audio jack on the PC and the Audio input jacks (PC AUDIO IN) on your TV. 2. Turn on the...
User Manual (ENGLISH)
Page 138
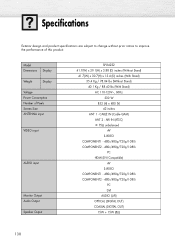
...- 480i/480p/720p/1080i PC HDMI (DVI Compatible) AV S-VIDEO COMPONENT1 - 480i/480p/720p/1080i COMPONENT2 - 480i/480p/720p/1080i PC DVI AUDIO (L/R) OPTICAL (DIGITAL OUT) COAXIAL (DIGITAL OUT) 15W + 15W (8Ω) 138 CABLE IN (Cable QAM) ANT 2 - Model Dimensions Display ... and product specifications are subject to change without prior notice to improve the performance of Pixels Screen Size ANTENNA input VIDEO input AUDIO input Monitor Output Audio Output Speaker Output SP-R4232 41.7(W) x 29.1(H) x 3.88 (D) inches (Without Stand) 41.7(W) x 30.7(H) x 13.4 (D) inches (With Stand) 35.4 Kg / ...
...- 480i/480p/720p/1080i PC HDMI (DVI Compatible) AV S-VIDEO COMPONENT1 - 480i/480p/720p/1080i COMPONENT2 - 480i/480p/720p/1080i PC DVI AUDIO (L/R) OPTICAL (DIGITAL OUT) COAXIAL (DIGITAL OUT) 15W + 15W (8Ω) 138 CABLE IN (Cable QAM) ANT 2 - Model Dimensions Display ... and product specifications are subject to change without prior notice to improve the performance of Pixels Screen Size ANTENNA input VIDEO input AUDIO input Monitor Output Audio Output Speaker Output SP-R4232 41.7(W) x 29.1(H) x 3.88 (D) inches (Without Stand) 41.7(W) x 30.7(H) x 13.4 (D) inches (With Stand) 35.4 Kg / ...

Quick Guide (ENGLISH)
Page 5
... a VCR to the Video or S-Video/Audio jack Connect the Video/Audio cables between the VIDEO or S-VIDEO/AUDIO input jacks on the TV and the VIDEO or S-VIDEO/AUDIO output jacks on the VCR. (Note: For better video, use an S-VIDEO cable.) TV Power cord • Please be sure to... match the color coded input terminals and cable jacks. Audio cable Video cable S-Video cable Connecting a Camcorder Viewing camcorder tapes Connect a Video/Audio cable between the VIDEO TV or S-VIDEO/AUDIO input jacks on the TV and VIDEO or S-VIDEO/AUDIO output jacks on the camcorder. (Note: For better ...
... a VCR to the Video or S-Video/Audio jack Connect the Video/Audio cables between the VIDEO or S-VIDEO/AUDIO input jacks on the TV and the VIDEO or S-VIDEO/AUDIO output jacks on the VCR. (Note: For better video, use an S-VIDEO cable.) TV Power cord • Please be sure to... match the color coded input terminals and cable jacks. Audio cable Video cable S-Video cable Connecting a Camcorder Viewing camcorder tapes Connect a Video/Audio cable between the VIDEO TV or S-VIDEO/AUDIO input jacks on the TV and VIDEO or S-VIDEO/AUDIO output jacks on the camcorder. (Note: For better ...

