
User Manual (user Manual) (ver.1.0) (English)
Page 15
... the [HDMI IN] port of the power cord to the DC-Adapter and plug the other end into a dedicated 220V or 110V wall outlet. (The input voltage is switched automatically.) DC 12V HDMI IN AUDIO OUT DVI IN DIGITAL AUDIO OUT POWER • When the product is connected to the [HDMI...] port on and use it. • When both the DVI () and HDMI cables are connected, you can select the input signal by pressing the button. Connect one end of the product to a PC, you can turn the product on your PC using the HDMI cable...
... the [HDMI IN] port of the power cord to the DC-Adapter and plug the other end into a dedicated 220V or 110V wall outlet. (The input voltage is switched automatically.) DC 12V HDMI IN AUDIO OUT DVI IN DIGITAL AUDIO OUT POWER • When the product is connected to the [HDMI...] port on and use it. • When both the DVI () and HDMI cables are connected, you can select the input signal by pressing the button. Connect one end of the product to a PC, you can turn the product on your PC using the HDMI cable...

User Manual (user Manual) (ver.1.0) (English)
Page 16
...] port of the product. Connect the HDMI output port of your DVD player (or digital output device). • Press the button and select as an input signal. 2-4 Installing the Product DC 12V HDMI IN AUDIO OUT DVI IN DIGITAL AUDIO OUT HDMI IN 3. 2-4 Connecting an AV Device 1.
...] port of the product. Connect the HDMI output port of your DVD player (or digital output device). • Press the button and select as an input signal. 2-4 Installing the Product DC 12V HDMI IN AUDIO OUT DVI IN DIGITAL AUDIO OUT HDMI IN 3. 2-4 Connecting an AV Device 1.
User Manual (user Manual) (ver.1.0) (English)
Page 17
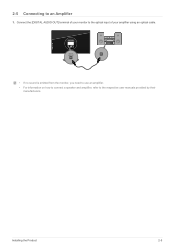
DC 12V HDMI IN AUDIO OUT DVI IN DIGITAL AUDIO OUT DIGITAL AUDIO OUT • If no sound is emitted from the monitor, you need to use an amplifier. • For information on how to connect a speaker and amplifier, refer to an Amplifier 1. Installing the Product 2-5 2-5 Connecting to the respective user manuals provided by their manufacturers. Connect the [DIGITAL AUDIO OUT] terminal of your monitor to the optical input of your amplifier using an optical cable.
DC 12V HDMI IN AUDIO OUT DVI IN DIGITAL AUDIO OUT DIGITAL AUDIO OUT • If no sound is emitted from the monitor, you need to use an amplifier. • For information on how to connect a speaker and amplifier, refer to an Amplifier 1. Installing the Product 2-5 2-5 Connecting to the respective user manuals provided by their manufacturers. Connect the [DIGITAL AUDIO OUT] terminal of your monitor to the optical input of your amplifier using an optical cable.
User Manual (user Manual) (ver.1.0) (English)
Page 22
... select the mode you press and hold the Lock function is sensitive. button down for 5 seconds, the OSD Adjustment Off: If you want. If the input source is disabled. Use these buttons to navigate the menu or to one of the Customized Key by another person. This button is activated, users...
... select the mode you press and hold the Lock function is sensitive. button down for 5 seconds, the OSD Adjustment Off: If you want. If the input source is disabled. Use these buttons to navigate the menu or to one of the Customized Key by another person. This button is activated, users...

User Manual (user Manual) (ver.1.0) (English)
Page 23
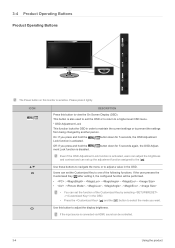
...recommended to minimize power consumption. If you press the [ ] button when there is no OSD, the input signal (Analog/Digital) is turned on , a message displaying the selected input signal appears at the top left of the screen.) Press [AUTO] button to adjust the screen settings...is performed. Please refer to the function in More Information. This function is turned on when the product works normally. When the input signal is switched by automatically adjusting the display brightness according to the surrounding environment. Press this button to select a function. Using ...
...recommended to minimize power consumption. If you press the [ ] button when there is no OSD, the input signal (Analog/Digital) is turned on , a message displaying the selected input signal appears at the top left of the screen.) Press [AUTO] button to adjust the screen settings...is performed. Please refer to the function in More Information. This function is turned on when the product works normally. When the input signal is switched by automatically adjusting the display brightness according to the surrounding environment. Press this button to select a function. Using ...

User Manual (user Manual) (ver.1.0) (English)
Page 27
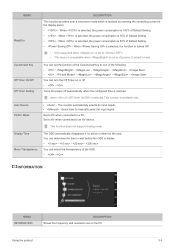
...when not viewing a movie. Using the product 3-5 MENU Response Time HDMI Black Level DESCRIPTION Accelerates the response time of your TV via HDMI and the input signal is connected to or mode. COLOR This menu is unavailable when is set -top box is . When a DVD or set to your TV by... configuring the . • • settings can only be enabled when the input source is connected via , it may cause a degradation in the screen quality, such as an increase in the black level, a low contrast, or discoloration, etc...
...when not viewing a movie. Using the product 3-5 MENU Response Time HDMI Black Level DESCRIPTION Accelerates the response time of your TV via HDMI and the input signal is connected to or mode. COLOR This menu is unavailable when is set -top box is . When a DVD or set to your TV by... configuring the . • • settings can only be enabled when the input source is connected via , it may cause a degradation in the screen quality, such as an increase in the black level, a low contrast, or discoloration, etc...

User Manual (user Manual) (ver.1.0) (English)
Page 29
...via DVI/HDMI cable • When signal resolution is 480p, 576p , 720p, 1080i, 1080p • When is displayed at the aspect ratio of the input signal. • - Displays pictures at the 16 : 9 aspect ratio. • - The picture is set as and image size is set to ... the 4 : 3 aspect ratio. • - Using the product 3-5 Analog signals • - If a 480P, 576P , 720P, 1080i or 1080P signal is input in HDMI input mode, the picture is displayed as is without truncation. • Requirements to activate • When connecting to the optimal resolution, the aspect ratio does...
...via DVI/HDMI cable • When signal resolution is 480p, 576p , 720p, 1080i, 1080p • When is displayed at the aspect ratio of the input signal. • - Displays pictures at the 16 : 9 aspect ratio. • - The picture is set as and image size is set to ... the 4 : 3 aspect ratio. • - Using the product 3-5 Analog signals • - If a 480P, 576P , 720P, 1080i or 1080P signal is input in HDMI input mode, the picture is displayed as is without truncation. • Requirements to activate • When connecting to the optimal resolution, the aspect ratio does...
User Manual (user Manual) (ver.1.0) (English)
Page 31
... function is 75% of the OSD. • - This function does not support Analog mode. Set to AV when connected to manually select an input signal. You can determine the time to wait before the OSD is set to a PC. when of Default Setting. • - Set to... Transparency The OSD automatically disappears if no action is reached. When is selected, the power consumption is available only. The monitor automatically selects an input signal. • - You can set on or off automatically when the configured time is taken by lowering the controlling current of Default Setting....
... function is 75% of the OSD. • - This function does not support Analog mode. Set to AV when connected to manually select an input signal. You can determine the time to wait before the OSD is set to a PC. when of Default Setting. • - Set to... Transparency The OSD automatically disappears if no action is reached. When is selected, the power consumption is available only. The monitor automatically selects an input signal. • - You can set on or off automatically when the configured time is taken by lowering the controlling current of Default Setting....
User Manual (user Manual) (ver.1.0) (English)
Page 37
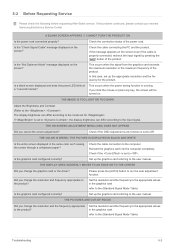
...Reinsert the graphics card into the computer completely. Set up the graphics card referring to . If the problem continues, please contact your nearest Samsung Electronics Service Center. Is a blank screen displayed and does the power LED blink at a 1 second interval? This occurs when the power... saving function is properly connected, recheck the input signal by pressing the [ ] button of the product. If is set up the appropriate resolution and the frequency for . Is the graphics card...
...Reinsert the graphics card into the computer completely. Set up the graphics card referring to . If the problem continues, please contact your nearest Samsung Electronics Service Center. Is a blank screen displayed and does the power LED blink at a 1 second interval? This occurs when the power... saving function is properly connected, recheck the input signal by pressing the [ ] button of the product. If is set up the appropriate resolution and the frequency for . Is the graphics card...

