
User Manual (user Manual) (ver.1.0) (English)
Page 12
Remote Control Batteries (AAA X 2) (Not available in all locations) Cover-Hole BNC to RCA Adaptor Jack Semi Stand USB Holder & Screw (1EA) Sold separately Screw: 4 EA Wall Mount KIT Speaker Set BNC Cable LAN Cable Front DVI Cable Your LCD Display 1) MENU Opens the on-screen menu and exits from the menu or closes the adjustment menu.
Remote Control Batteries (AAA X 2) (Not available in all locations) Cover-Hole BNC to RCA Adaptor Jack Semi Stand USB Holder & Screw (1EA) Sold separately Screw: 4 EA Wall Mount KIT Speaker Set BNC Cable LAN Cable Front DVI Cable Your LCD Display 1) MENU Opens the on-screen menu and exits from the menu or closes the adjustment menu.
User Manual (user Manual) (ver.1.0) (English)
Page 15
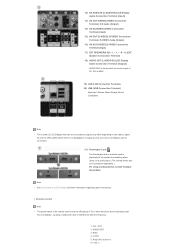
R - +] (EXT Speaker Connection Terminal) 18) AUDIO OUT [L-AUDIO-R] (LCD Display Audio Connection Terminal (Output)) AUDIO OUT is a device used to physically fix the system to something when ... [VIDEO] (VIDEO Connection Terminal) (Input) 15) AV OUT [S-VIDEO] (S-VIDEO Connection Terminal): S-VIDEO mode (Output) 16) AV IN [S-VIDEO] (S-VIDEO Connection Terminal) (Input) 17) EXT SPEAKER(8 Ω)[- - ON / OFF 2. LOCK 5. Note • See Connecting the LCD Display for sound output of purchase.
R - +] (EXT Speaker Connection Terminal) 18) AUDIO OUT [L-AUDIO-R] (LCD Display Audio Connection Terminal (Output)) AUDIO OUT is a device used to physically fix the system to something when ... [VIDEO] (VIDEO Connection Terminal) (Input) 15) AV OUT [S-VIDEO] (S-VIDEO Connection Terminal): S-VIDEO mode (Output) 16) AV IN [S-VIDEO] (S-VIDEO Connection Terminal) (Input) 17) EXT SPEAKER(8 Ω)[- - ON / OFF 2. LOCK 5. Note • See Connecting the LCD Display for sound output of purchase.

User Manual (user Manual) (ver.1.0) (English)
Page 19
SyncMaster 400DXn Mechanical Layout | Monitor Head | Stand | Speaker | Installation VESA Bracket | Wall Bracket Installation 1. Mechanical Layout NETWORK MODEL SIZE PROTECTION GLASS + NETWORK MODEL SIZE Weight z Set { 25.0 kg (with Basic Stand) { 30.5 kg (with Basic Stand / option protection glass) z Package
SyncMaster 400DXn Mechanical Layout | Monitor Head | Stand | Speaker | Installation VESA Bracket | Wall Bracket Installation 1. Mechanical Layout NETWORK MODEL SIZE PROTECTION GLASS + NETWORK MODEL SIZE Weight z Set { 25.0 kg (with Basic Stand) { 30.5 kg (with Basic Stand / option protection glass) z Package
User Manual (user Manual) (ver.1.0) (English)
Page 26
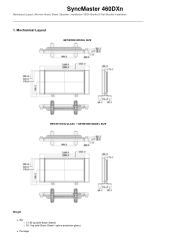
Mechanical Layout NETWORK MODEL SIZE PROTECTION GLASS + NETWORK MODEL SIZE Weight z Set { 31.30 kg (with Basic Stand) { 36.1 kg (with Basic Stand / option protection glass) z Package SyncMaster 460DXn Mechanical Layout | Monitor Head | Stand | Speaker | Installation VESA Bracket | Wall Bracket Installation 1.
Mechanical Layout NETWORK MODEL SIZE PROTECTION GLASS + NETWORK MODEL SIZE Weight z Set { 31.30 kg (with Basic Stand) { 36.1 kg (with Basic Stand / option protection glass) z Package SyncMaster 460DXn Mechanical Layout | Monitor Head | Stand | Speaker | Installation VESA Bracket | Wall Bracket Installation 1.
User Manual (user Manual) (ver.1.0) (English)
Page 37
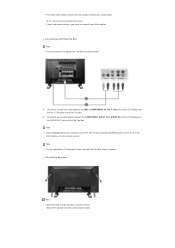
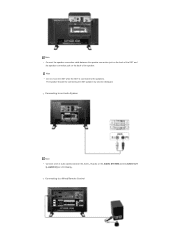
.... 2) Connect a set of Component video, see your camcorder is stereo, you need to a DTV Set Top Box using the screws. * Mount the speaker set of the LCD Display or on the remote control. Note • Select Component for a typical Set Top Box are usually included with a Camcorder. ...If your Set Top Box owner's manual. Connecting a DTV Set Top Box Note • The connections for the connection to connect a set without the speaker stand. • The audio-video cables shown here are shown below. 1) Connect a Component cable between the COMPONENT AUDIO IN [L-AUDIO-R] on the LCD ...
.... 2) Connect a set of Component video, see your camcorder is stereo, you need to a DTV Set Top Box using the screws. * Mount the speaker set of the LCD Display or on the remote control. Note • Select Component for a typical Set Top Box are usually included with a Camcorder. ...If your Set Top Box owner's manual. Connecting a DTV Set Top Box Note • The connections for the connection to connect a set without the speaker stand. • The audio-video cables shown here are shown below. 1) Connect a Component cable between the COMPONENT AUDIO IN [L-AUDIO-R] on the LCD ...
User Manual (user Manual) (ver.1.0) (English)
Page 38
Connecting to the speakers. Connecting to an Audio System Note • Connect a set of audio cables between the speaker connection jack on the back of the speaker. Note • Do not move the SET while the SET is connected to a Wired Remote Control The speaker-bracket for connecting the SET speaker my become damaged. Note • Connect the speaker connection cable between the AUX L, R jacks on the AUDIO SYSTEM and the AUDIO OUT [L-AUDIO-R] on the back of the SET and the speaker connection jack on LCD Display.
Connecting to the speakers. Connecting to an Audio System Note • Connect a set of audio cables between the speaker connection jack on the back of the speaker. Note • Do not move the SET while the SET is connected to a Wired Remote Control The speaker-bracket for connecting the SET speaker my become damaged. Note • Connect the speaker connection cable between the AUX L, R jacks on the AUDIO SYSTEM and the AUDIO OUT [L-AUDIO-R] on the back of the SET and the speaker connection jack on LCD Display.

User Manual (user Manual) (ver.1.0) (English)
Page 147
... HDMI MagicNet Mode [MENU ENTER] → [ENTER ENTER] The LCD Display has a built-in volume control between the left and right speakers. [You can be adjusted to suit your your personal preferences. 1) Bass Emphasizes low frequency audio. 2) Treble Emphasizes high frequency audio. 3)...3) Movie Selects Movie when viewing movies. 4) Speech Selects Speech when watching a show that solves the problem of playing 5.1 multichannel content over two speakers. It is fully compatible with all multichannel formats. 1) Off 2) On [The direct button on the remote control is set to 0.] Note •...
... HDMI MagicNet Mode [MENU ENTER] → [ENTER ENTER] The LCD Display has a built-in volume control between the left and right speakers. [You can be adjusted to suit your your personal preferences. 1) Bass Emphasizes low frequency audio. 2) Treble Emphasizes high frequency audio. 3)...3) Movie Selects Movie when viewing movies. 4) Speech Selects Speech when watching a show that solves the problem of playing 5.1 multichannel content over two speakers. It is fully compatible with all multichannel formats. 1) Off 2) On [The direct button on the remote control is set to 0.] Note •...
User Manual (user Manual) (ver.1.0) (English)
Page 161
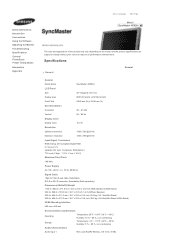
... are subject to DVI-D connector, Detachable (Sold separately) Dimensions (WxHxD)/ Weight 1132.0 x 604.0 x 311.0 mm / 44.6 x 23.8 x 12.2 inch (With Speaker & With Stand) 932.0 x 548.0 x 130.0 mm / 36.7 x 21.6 x 5.1 inch (Without Speaker) 932.0 x 604.0 x 311.0 mm / 36.7 x 23.8 x 12.2 inch, 25.0 kg / 55.1 lbs(With Stand) 932.0 x 604.0 x 317.0 mm / 36.7 x 23...
... are subject to DVI-D connector, Detachable (Sold separately) Dimensions (WxHxD)/ Weight 1132.0 x 604.0 x 311.0 mm / 44.6 x 23.8 x 12.2 inch (With Speaker & With Stand) 932.0 x 548.0 x 130.0 mm / 36.7 x 21.6 x 5.1 inch (Without Speaker) 932.0 x 604.0 x 311.0 mm / 36.7 x 23.8 x 12.2 inch, 25.0 kg / 55.1 lbs(With Stand) 932.0 x 604.0 x 317.0 mm / 36.7 x 23...

User Manual (user Manual) (ver.1.0) (English)
Page 165
... are subject to DVI-D connector, Detachable (Sold separately) Dimensions (WxHxD)/ Weight 1268.0 x 681.0 x 311.0 mm / 49.9 x 26.8 x 12.2 inch (With Speaker & With Stand) 1068.0 x 624.0 x 130.0 mm / 42.0 x 24.6 x 5.1 inch (Without Speaker) 1068.0 x 681.0 x 311.0 mm / 42.0 x 26.8 x 12.2 inch / 31.30 Kg / 69.0 lbs(With Stand) 1068.0 x 681.0 x 317.0 mm / 42...
... are subject to DVI-D connector, Detachable (Sold separately) Dimensions (WxHxD)/ Weight 1268.0 x 681.0 x 311.0 mm / 49.9 x 26.8 x 12.2 inch (With Speaker & With Stand) 1068.0 x 624.0 x 130.0 mm / 42.0 x 24.6 x 5.1 inch (Without Speaker) 1068.0 x 681.0 x 311.0 mm / 42.0 x 26.8 x 12.2 inch / 31.30 Kg / 69.0 lbs(With Stand) 1068.0 x 681.0 x 317.0 mm / 42...

Quick Start Guide
Page 3
... Remote Control Batteries (AAA X 2) (Not available in all locations) Cover-Hole BNC to RCA Adaptor Jack Sold separately Semi Stand Screw: 4 EA Wall Mount KIT Speaker Set BNC Cable Front DVI Cable Your LCD Display 1) MENU Opens the on-screen menu and exits from the menu or closes the adjustment menu...
... Remote Control Batteries (AAA X 2) (Not available in all locations) Cover-Hole BNC to RCA Adaptor Jack Sold separately Semi Stand Screw: 4 EA Wall Mount KIT Speaker Set BNC Cable Front DVI Cable Your LCD Display 1) MENU Opens the on-screen menu and exits from the menu or closes the adjustment menu...

Quick Start Guide
Page 6
... sound output of the remote control may differ depending on the cables, signal source etc. MUTE 9. Note • The number of purchase. AUTO 14. R - +] (EXT Speaker Connection Terminal) 18) AUDIO OUT [L-AUDIO-R] (LCD Display Audio Connection Terminal (Output)) AUDIO OUT is a device used to physically fix the system to something when... [VIDEO] (VIDEO Connection Terminal) (Input) 15) AV OUT [S-VIDEO] (S-VIDEO Connection Terminal): S-VIDEO mode (Output) 16) AV IN [S-VIDEO] (S-VIDEO Connection Terminal) (Input) 17) EXT SPEAKER(8 Ω)[- - P.MODE 13.
... sound output of the remote control may differ depending on the cables, signal source etc. MUTE 9. Note • The number of purchase. AUTO 14. R - +] (EXT Speaker Connection Terminal) 18) AUDIO OUT [L-AUDIO-R] (LCD Display Audio Connection Terminal (Output)) AUDIO OUT is a device used to physically fix the system to something when... [VIDEO] (VIDEO Connection Terminal) (Input) 15) AV OUT [S-VIDEO] (S-VIDEO Connection Terminal): S-VIDEO mode (Output) 16) AV IN [S-VIDEO] (S-VIDEO Connection Terminal) (Input) 17) EXT SPEAKER(8 Ω)[- - P.MODE 13.

Quick Start Guide
Page 14
.... Note • For an explanation of Component video, see your camcorder is stereo, you need to a DTV Set Top Box using the screws. * Mount the speaker set of the LCD Display or on the Set Top Box. Connecting a DTV Set Top Box Note • The connections for the connection to connect... cables. PR, Y, PB port on the LCD Display and the PR, Y, PB jacks on the front of audio cables between the BNC / COMPONENT IN - Connecting Speakers Note • Fasten the SET and the speaker using the SOURCE button on the Set Top Box. 2) Connect a set without the...
.... Note • For an explanation of Component video, see your camcorder is stereo, you need to a DTV Set Top Box using the screws. * Mount the speaker set of the LCD Display or on the Set Top Box. Connecting a DTV Set Top Box Note • The connections for the connection to connect... cables. PR, Y, PB port on the LCD Display and the PR, Y, PB jacks on the front of audio cables between the BNC / COMPONENT IN - Connecting Speakers Note • Fasten the SET and the speaker using the SOURCE button on the Set Top Box. 2) Connect a set without the...

Quick Start Guide
Page 15
The speaker-bracket for connecting the SET speaker my become damaged. Note • Connect the speaker connection cable between the AUX L, R jacks on the AUDIO SYSTEM and the AUDIO OUT [L-AUDIO-R] on the back of the SET and the speaker connection jack on LCD Display. Connecting to an Audio System Note • Connect a set of audio cables between the speaker connection jack on the back of the speaker. Connecting to the speakers. Note • Do not move the SET while the SET is connected to a Wired Remote Control
The speaker-bracket for connecting the SET speaker my become damaged. Note • Connect the speaker connection cable between the AUX L, R jacks on the AUDIO SYSTEM and the AUDIO OUT [L-AUDIO-R] on the back of the SET and the speaker connection jack on LCD Display. Connecting to an Audio System Note • Connect a set of audio cables between the speaker connection jack on the back of the speaker. Connecting to the speakers. Note • Do not move the SET while the SET is connected to a Wired Remote Control


