Interactive Guide Ver.1.2 (English)
Page 2
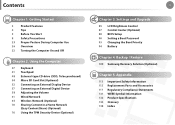
Contents Chapter 1. Getting Started 1 Chapter 3. Backup / Restore 100 Samsung Recovery Solution (Optional) Chapter 5. Appendix 113 Important Safety Information 115 Replacement Parts and Accessories 117 Regulatory Compliance Statements 131 WEEE Symbol Information 132 Product ...the Computer 37 Keyboard 41 Touchpad 48 External-type CD drive (ODD, To be purchased) 50 Micro SD Card Slot (Optional) 52 Connecting an External Display Device 57 Connecting an External Digital Device 58 Adjusting the Volume 61 Wired Network 65 Wireless Network (Optional) 70 Sharing Content in a Home Network (Easy...
Contents Chapter 1. Getting Started 1 Chapter 3. Backup / Restore 100 Samsung Recovery Solution (Optional) Chapter 5. Appendix 113 Important Safety Information 115 Replacement Parts and Accessories 117 Regulatory Compliance Statements 131 WEEE Symbol Information 132 Product ...the Computer 37 Keyboard 41 Touchpad 48 External-type CD drive (ODD, To be purchased) 50 Micro SD Card Slot (Optional) 52 Connecting an External Display Device 57 Connecting an External Digital Device 58 Adjusting the Volume 61 Wired Network 65 Wireless Network (Optional) 70 Sharing Content in a Home Network (Easy...

Interactive Guide Ver.1.2 (English)
Page 5
... the AC adapter and then press the power button. A Install Easy Display Manager. Q How can easily and quickly restore the computer to a previous state even if you do not work. A Restore the computer using Samsung Recovery Solution (Optional). 1. When I want to the state when it... computer for the first time after a short while and Samsung Recovery Solution (Optional) appears. 3. Turn the computer on the display device. Q I turn on or does not respond Q and displays a blank screen. Connect the external display device and the computer with the monitor cable and press the...
... the AC adapter and then press the power button. A Install Easy Display Manager. Q How can easily and quickly restore the computer to a previous state even if you do not work. A Restore the computer using Samsung Recovery Solution (Optional). 1. When I want to the state when it... computer for the first time after a short while and Samsung Recovery Solution (Optional) appears. 3. Turn the computer on the display device. Q I turn on or does not respond Q and displays a blank screen. Connect the external display device and the computer with the monitor cable and press the...
Interactive Guide Ver.1.2 (English)
Page 27
...; This may differ from the pictures used for some devices. 1 2 3 4 5 6 7 1 Camera (Optional) Using this camera, you can use the built-in the User Manual are displayed here. 3 Microphone (Optional) You can take still pictures and record video. 2 LCD The screen images are those of the representative model of the computer. Therefore...
...; This may differ from the pictures used for some devices. 1 2 3 4 5 6 7 1 Camera (Optional) Using this camera, you can use the built-in the User Manual are displayed here. 3 Microphone (Optional) You can take still pictures and record video. 2 LCD The screen images are those of the representative model of the computer. Therefore...

Interactive Guide Ver.1.2 (English)
Page 37
Chapter 2. Using the computer Keyboard 37 Touchpad 41 External-type CD drive (ODD, To be purchased) 48 Micro SD Card Slot (Optional) 50 Connecting an External Display Device 52 Connecting an External Digital Device 57 Adjusting the Volume 58 Wired Network 61 Wireless Network (Optional) 65 Sharing Content in a Home Network (Easy Content Share) (Optional) 70 Using the TPM Security Device (Optional) 76
Chapter 2. Using the computer Keyboard 37 Touchpad 41 External-type CD drive (ODD, To be purchased) 48 Micro SD Card Slot (Optional) 50 Connecting an External Display Device 52 Connecting an External Digital Device 57 Adjusting the Volume 58 Wired Network 61 Wireless Network (Optional) 65 Sharing Content in a Home Network (Easy Content Share) (Optional) 70 Using the TPM Security Device (Optional) 76

Interactive Guide Ver.1.2 (English)
Page 40
... current row. + End key The mouse cursor moves to the end of the current page. + PgDn key The mouse cursor moves to install the Easy Display Manager. Keyboard Fn Lock key If you press the Fn Lock key, you have to the bottom of the current page. + Other Function Keys Performs...
... current row. + End key The mouse cursor moves to the end of the current page. + PgDn key The mouse cursor moves to install the Easy Display Manager. Keyboard Fn Lock key If you press the Fn Lock key, you have to the bottom of the current page. + Other Function Keys Performs...
Interactive Guide Ver.1.2 (English)
Page 53
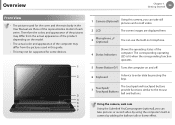
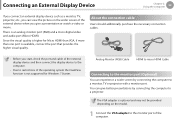
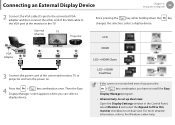
...be provided depending on the wider screen of the external device when you start, check the port and cable of the external display device and then connect the display device to the computer. • Due to a projector. About the connection cable Users should additionally purchase the necessary connection ... an analog monitor port (RGB) and a micro digital video and audio port (Micro HDMI). Connecting an External Display Device Chapter 2. Using the computer 52 If you connect an external display device such as a monitor, TV, projector, etc., you can view the picture on the model. 1 Connect...
...be provided depending on the wider screen of the external device when you start, check the port and cable of the external display device and then connect the display device to the computer. • Due to a projector. About the connection cable Users should additionally purchase the necessary connection ... an analog monitor port (RGB) and a micro digital video and audio port (Micro HDMI). Connecting an External Display Device Chapter 2. Using the computer 52 If you connect an external display device such as a monitor, TV, projector, etc., you can view the picture on the model. 1 Connect...
Interactive Guide Ver.1.2 (English)
Page 54
...projector and turn the power on. 4 Press the + key combination once. Then the Easy Display Manager screen appears where you have to install the Easy Display Manager program. • Alternatively, to set up dual view: Open the Display Settings window in the Control Panel, select Monitor 2 and select the Expand to fit to... checkbox to set dual view. LCD + HDMI DualView • If the screen is not switched even if you press the + key combination, you can select a display device. LCD HDMI LCD + HDMI Clone 3 Connect the power cord of the monitor or the TV. Connecting an External...
...projector and turn the power on. 4 Press the + key combination once. Then the Easy Display Manager screen appears where you have to install the Easy Display Manager program. • Alternatively, to set up dual view: Open the Display Settings window in the Control Panel, select Monitor 2 and select the Expand to fit to... checkbox to set dual view. LCD + HDMI DualView • If the screen is not switched even if you press the + key combination, you can select a display device. LCD HDMI LCD + HDMI Clone 3 Connect the power cord of the monitor or the TV. Connecting an External...

Interactive Guide Ver.1.2 (English)
Page 55
... After connecting a TV through the Micro HDMI port (Optional) By connecting the computer to configure the screen and sound. Then the Easy Display Manager screen appears where you can select a display device. You have to a TV with a HDMI port, you can enjoy both a high visual quality and a high sound quality. LCD HDMI... the computer to a TV, switch the external input mode of the TV. Since pressing the key while holding down the key changes the selection, select a display device. Connecting an External...
... After connecting a TV through the Micro HDMI port (Optional) By connecting the computer to configure the screen and sound. Then the Easy Display Manager screen appears where you can select a display device. You have to a TV with a HDMI port, you can enjoy both a high visual quality and a high sound quality. LCD HDMI... the computer to a TV, switch the external input mode of the TV. Since pressing the key while holding down the key changes the selection, select a display device. Connecting an External...

Interactive Guide Ver.1.2 (English)
Page 56
...follows depending on the computer model and driver version. If a window appears where you can select the mode, select Basic Mode and click OK. 2 Click Display > General Settings, select Customize Aspect Ratio in the DOS Command Prompt window. • Simultaneous output to all 3 (LCD + CRT + HDMI) is not...+ key combination, you have to the TV screen and click OK. • You can view the graphics card type by selecting Device Manager > Display adapters and then clicking the + symbol. • The screen images and terms may differ from actual product depending on the graphics card. ►...
...follows depending on the computer model and driver version. If a window appears where you can select the mode, select Basic Mode and click OK. 2 Click Display > General Settings, select Customize Aspect Ratio in the DOS Command Prompt window. • Simultaneous output to all 3 (LCD + CRT + HDMI) is not...+ key combination, you have to the TV screen and click OK. • You can view the graphics card type by selecting Device Manager > Display adapters and then clicking the + symbol. • The screen images and terms may differ from actual product depending on the graphics card. ►...

Interactive Guide Ver.1.2 (English)
Page 57
... the playback device list depending on the TV. The screen images and terms may differ from the computer on the computer model. Connecting an External Display Device Chapter 2. To listen to sound on the TV, connect the TV to the computer using a HDMI cable and then switch to Speakers. In this...
... the playback device list depending on the TV. The screen images and terms may differ from the computer on the computer model. Connecting an External Display Device Chapter 2. To listen to sound on the TV, connect the TV to the computer using a HDMI cable and then switch to Speakers. In this...

Interactive Guide Ver.1.2 (English)
Page 67
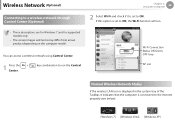
... for the AP to connect to, enter the network key and then click the Connect button. 3 When Connected to the AP is displayed, click the Close button. If there is displayed, click the Close button. You can access the network. 3 When Connected to and click Connect. Using the computer 66 ► For...
... for the AP to connect to, enter the network key and then click the Connect button. 3 When Connected to the AP is displayed, click the Close button. If there is displayed, click the Close button. You can access the network. 3 When Connected to and click Connect. Using the computer 66 ► For...

Interactive Guide Ver.1.2 (English)
Page 68
If a network key is displayed, you can use a wireless network. 2 Select an AP to AP is set in the input window and click OK. For a network key, contact the network administrator. Enter the network key in the AP, the network key input window will appear. Chapter 2. Wireless Network (Optional) ► For Windows XP 1 Click the Wireless Network Connection icon from the Taskbar using the right button of the touch pad. Using the computer 67 3 Once Connected to be connected and click Connect. Then, click View Available Wireless Networks.
If a network key is displayed, you can use a wireless network. 2 Select an AP to AP is set in the input window and click OK. For a network key, contact the network administrator. Enter the network key in the AP, the network key input window will appear. Chapter 2. Wireless Network (Optional) ► For Windows XP 1 Click the Wireless Network Connection icon from the Taskbar using the right button of the touch pad. Using the computer 67 3 Once Connected to be connected and click Connect. Then, click View Available Wireless Networks.
Interactive Guide Ver.1.2 (English)
Page 69
... Network (Optional) Connecting to ON. z x Wi-Fi Connection Status ON Green, OFF Grey c AP List Normal Wireless Network Status If the wireless LAN icon is displayed in the system tray of the Taskbar, it is set to a wireless network through Control Center (Optional) • These descriptions are for Windows 7 and for...
... Network (Optional) Connecting to ON. z x Wi-Fi Connection Status ON Green, OFF Grey c AP List Normal Wireless Network Status If the wireless LAN icon is displayed in the system tray of the Taskbar, it is set to a wireless network through Control Center (Optional) • These descriptions are for Windows 7 and for...

Interactive Guide Ver.1.2 (English)
Page 70
... the + key combination to check the IP address settings. Or the wireless LAN is disconnected. [Windows 7] [Windows Vista] [Windows XP] If the wireless LAN is displayed with an "X" in the system tray of the Taskbar, it indicates that the wireless LAN device is the case when an AP with a weak signal...
... the + key combination to check the IP address settings. Or the wireless LAN is disconnected. [Windows 7] [Windows Vista] [Windows XP] If the wireless LAN is displayed with an "X" in the system tray of the Taskbar, it indicates that the wireless LAN device is the case when an AP with a weak signal...

Interactive Guide Ver.1.2 (English)
Page 72
... address for your TV. 3 To check if the network environment has been configured, run Easy Content Share. If the connected computer and TV are not displayed, refer to configure the IP address for your TV, refer to play on your TV as shared items. You can only play shared items on...
... address for your TV. 3 To check if the network environment has been configured, run Easy Content Share. If the connected computer and TV are not displayed, refer to configure the IP address for your TV, refer to play on your TV as shared items. You can only play shared items on...
Interactive Guide Ver.1.2 (English)
Page 74
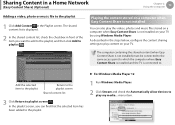
As described in front of the item you can also play the videos, photos and music files stored on a computer when Easy Content Share is displayed. 2 In the shared content list, check the checkbox in the steps below, configure the content sharing settings to playlist screen . Add the selected item to ...
As described in front of the item you can also play the videos, photos and music files stored on a computer when Easy Content Share is displayed. 2 In the shared content list, check the checkbox in the steps below, configure the content sharing settings to playlist screen . Add the selected item to ...

Interactive Guide Ver.1.2 (English)
Page 75
From the menu displayed, point to the type of content. ► For Windows Media Player 11 1 Run Windows Media Player. 2 Click Library > Media Sharing. Check the Share my media checkbox and then click OK. Click Videos, Photos or Music in the displayed sub menu, according to Include in library. ...The Media Sharing window is displayed. If the selected folder contains two or more types of content, you must click each type of content...
From the menu displayed, point to the type of content. ► For Windows Media Player 11 1 Run Windows Media Player. 2 Click Library > Media Sharing. Check the Share my media checkbox and then click OK. Click Videos, Photos or Music in the displayed sub menu, according to Include in library. ...The Media Sharing window is displayed. If the selected folder contains two or more types of content, you must click each type of content...

Interactive Guide Ver.1.2 (English)
Page 76
...Microsoft website. Click Yes. Then click OK in a Home Network (Easy Content Share) (Optional) Chapter 2. If your Windows Media Player is displayed next to identify the computer. Using the computer 75 3 In the Media Sharing window, click Settings.... The Media Sharing - After the registration has... (not recommended) checkbox. Default Settings window and in the shared content list of the PC where the content is stored Content sharing is displayed. This is listed in the Media Sharing window. A folder added as a shared item The name of Easy Content Share. A popup ...
...Microsoft website. Click Yes. Then click OK in a Home Network (Easy Content Share) (Optional) Chapter 2. If your Windows Media Player is displayed next to identify the computer. Using the computer 75 3 In the Media Sharing window, click Settings.... The Media Sharing - After the registration has... (not recommended) checkbox. Default Settings window and in the shared content list of the PC where the content is stored Content sharing is displayed. This is listed in the Media Sharing window. A folder added as a shared item The name of Easy Content Share. A popup ...

Interactive Guide Ver.1.2 (English)
Page 86
... and the brightness is running on battery power to extend the battery use time. Click Change the settings of the currently configured mode. 3. Adjust the display brightness adjustment menu bar and click the Save the changes button. • Saving battery power consumption Decreases the LCD brightness when the computer is automatically...
... and the brightness is running on battery power to extend the battery use time. Click Change the settings of the currently configured mode. 3. Adjust the display brightness adjustment menu bar and click the Save the changes button. • Saving battery power consumption Decreases the LCD brightness when the computer is automatically...

Interactive Guide Ver.1.2 (English)
Page 97
...will appear that require high performance may slow down when the computer is running on battery power. battery modes optimized for normal conditions. Samsung Optimized Samsung Optimized This mode is running on the keyboard to decrease the LCD brightness to extend the battery usage time. It maximizes the system ... icon in the notification area of the taskbar and select Power Options. 2 If the following screen appears, select one of the Easy Display Manager program after reinstalling Windows, you to extend the battery use time, programs that helps you can install the Easy...
...will appear that require high performance may slow down when the computer is running on battery power. battery modes optimized for normal conditions. Samsung Optimized Samsung Optimized This mode is running on the keyboard to decrease the LCD brightness to extend the battery usage time. It maximizes the system ... icon in the notification area of the taskbar and select Power Options. 2 If the following screen appears, select one of the Easy Display Manager program after reinstalling Windows, you to extend the battery use time, programs that helps you can install the Easy...


