User Manual
Page 6
...step during the actual usage. Used to provide additional information or detailed specification of the toner cartridge. Some terms in this machine include; USB 2.0 Full speed FEATURES ML-1640 Duplex (2-sided) printing (Manual) ML-2240 ( : Included) ABOUT THIS USER'S GUIDE This user's guide provides information about...from country to country Used to give users information to support all of this guide for ML-1640 Series. FEATURES BY MODELS The machine is mainly based on ML-2240 Series. Basic features of this user guide is designed to protect the machine from possible...
...step during the actual usage. Used to provide additional information or detailed specification of the toner cartridge. Some terms in this machine include; USB 2.0 Full speed FEATURES ML-1640 Duplex (2-sided) printing (Manual) ML-2240 ( : Included) ABOUT THIS USER'S GUIDE This user's guide provides information about...from country to country Used to give users information to support all of this guide for ML-1640 Series. FEATURES BY MODELS The machine is mainly based on ML-2240 Series. Basic features of this user guide is designed to protect the machine from possible...

User Manual
Page 13
... Cleaning your machine 26 26 26 Cleaning the outside Cleaning the inside 28 Maintaining the cartridge 28 Toner cartridge storage 28 Expected cartridge life 28 Redistributing toner 29 Replacing the toner cartridge TROUBLESHOOTING 31 Tips for avoiding paper jams 31 31 Clearing paper jams 31 In the paper ...exit area 32 In the paper feed area 33 Around the toner cartridge 33 Solving other problems 33 Paper ...
... Cleaning your machine 26 26 26 Cleaning the outside Cleaning the inside 28 Maintaining the cartridge 28 Toner cartridge storage 28 Expected cartridge life 28 Redistributing toner 29 Replacing the toner cartridge TROUBLESHOOTING 31 Tips for avoiding paper jams 31 31 Clearing paper jams 31 In the paper ...exit area 32 In the paper feed area 33 Around the toner cartridge 33 Solving other problems 33 Paper ...
User Manual
Page 15
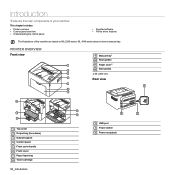
ML-1640 series does not have a manual tray. Rear view 1 Top cover 2 Output tray (face down) 3 Output support 4 Control panel 5 Front cover handle 6 Front cover 7 Paper input tray 8 Toner cartridge 12 _Introduction 1 USB port 2 Power switch 3 Power receptacle ML-2240 only. PRINTER OVERVIEW Front view 9 Manual traya ' 10 Rear guides 11 Paper covera 12 Side... overview • Control panel overview • Understanding the control panel • Supplied software • Printer driver features The illustrations of the machine are based on ML-2240 series.
ML-1640 series does not have a manual tray. Rear view 1 Top cover 2 Output tray (face down) 3 Output support 4 Control panel 5 Front cover handle 6 Front cover 7 Paper input tray 8 Toner cartridge 12 _Introduction 1 USB port 2 Power switch 3 Power receptacle ML-2240 only. PRINTER OVERVIEW Front view 9 Manual traya ' 10 Rear guides 11 Paper covera 12 Side... overview • Control panel overview • Understanding the control panel • Supplied software • Printer driver features The illustrations of the machine are based on ML-2240 series.

User Manual
Page 16
CONTROL PANEL OVERVIEW 1 On-Line/Error LED 2 Toner LED Cancel 3 Shows the status of your machine. (See "Understanding the control panel" on page 14 for more information.) Shows the status of the toner cartridge. (See "Understanding the control panel" on page 14 for more information.) Stops an operation at any time and there are more functions. (See "Understanding the control panel" on page 14 for more information.) Introduction_ 13
CONTROL PANEL OVERVIEW 1 On-Line/Error LED 2 Toner LED Cancel 3 Shows the status of your machine. (See "Understanding the control panel" on page 14 for more information.) Shows the status of the toner cartridge. (See "Understanding the control panel" on page 14 for more information.) Stops an operation at any time and there are more functions. (See "Understanding the control panel" on page 14 for more information.) Introduction_ 13

User Manual
Page 17
... while the print job is cleared from both the machine and the computer, and then the machine returns to ready mode. Rapidly The toner is low, replace the toner soon. Replace the toner cartridge. This may take some time depending on the size of the On-Line/Error LED and... indicates the machine's current status. This may take some time depending on the size of the print job. Blinking The toner is empty, replace the toner. Red On • The machine is experiencing an error, such as open cover, paper empty, installer error, or invalid error. • The machine is...
... while the print job is cleared from both the machine and the computer, and then the machine returns to ready mode. Rapidly The toner is low, replace the toner soon. Replace the toner cartridge. This may take some time depending on the size of the On-Line/Error LED and... indicates the machine's current status. This may take some time depending on the size of the print job. Blinking The toner is empty, replace the toner. Red On • The machine is experiencing an error, such as open cover, paper empty, installer error, or invalid error. • The machine is...
User Manual
Page 18
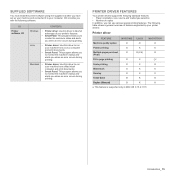
...: Printer driver FEATURE WINDOWS LINUX MACINTOSH Machine quality option O O O Poster printing O X X Multiple pages per sheet O O (2,4) O (N-up) Fit to page printing O X Oa Scale printing O X O Watermark O X X Overlay O X X Toner Save O X O Duplex (Manual) O X X a. CD Printer software CD CONTENTS Windows • Printer driver: Use this driver to run your machine from a Macintosh computer and print documents...
...: Printer driver FEATURE WINDOWS LINUX MACINTOSH Machine quality option O O O Poster printing O X X Multiple pages per sheet O O (2,4) O (N-up) Fit to page printing O X Oa Scale printing O X O Watermark O X X Overlay O X X Toner Save O X O Duplex (Manual) O X X a. CD Printer software CD CONTENTS Windows • Printer driver: Use this driver to run your machine from a Macintosh computer and print documents...

User Manual
Page 19
... Make sure that all four of your desk or table. 7. Allow extra space to make sure that your printing. When you step-by toner, which is suitable for all the enclosed items. 3. Unpack the machine and check all Windows operating systems. • Users who have an ...administrator right can cause damage to the edge of the toner cartridge. 5. This chapter includes: • Setting up the hardware which can install the software. 2. Make sure you begin, ensure that the ...
... Make sure that all four of your desk or table. 7. Allow extra space to make sure that your printing. When you step-by toner, which is suitable for all the enclosed items. 3. Unpack the machine and check all Windows operating systems. • Users who have an ...administrator right can cause damage to the edge of the toner cartridge. 5. This chapter includes: • Setting up the hardware which can install the software. 2. Make sure you begin, ensure that the ...
User Manual
Page 25
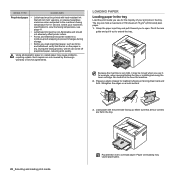
...should not adversely affect printer rollers. • Forms and letterhead should be moved when you use for the majority of paper for loading by Samsung's warranty or service agreements. Grasp the paper input tray and pull it out to open. Pinch the rear guide and pull it toward ...3. Because the machine is dry. Be careful not to the machine's fusing temperature for example, when opening/closing the tray or installing/removing the toner cartridge. Straighten the edges on the paper is very light, it ; LOADING PAPER Loading paper in the tray Load the print media you to...
...should not adversely affect printer rollers. • Forms and letterhead should be moved when you use for the majority of paper for loading by Samsung's warranty or service agreements. Grasp the paper input tray and pull it out to open. Pinch the rear guide and pull it toward ...3. Because the machine is dry. Be careful not to the machine's fusing temperature for example, when opening/closing the tray or installing/removing the toner cartridge. Straighten the edges on the paper is very light, it ; LOADING PAPER Loading paper in the tray Load the print media you to...
User Manual
Page 26
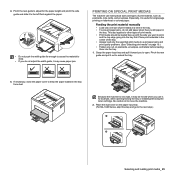
...pull it ; Be careful not to the next step.) Selecting and loading print media_ 23 Place the dust cover on the paper input tray. (For ML-1640 Series, skip this step and go to move the machine. 2. Feeding the print material manually • Load only one size of print media. &#...; Flatten any curl on letterhead or colored paper. Because the machine is useful for example, when opening/closing the tray or installing/removing the toner cartridge. for single page printing on postcards, envelopes, and labels before loading them into the tray first. Grasp the paper input tray and pull...
...pull it ; Be careful not to the next step.) Selecting and loading print media_ 23 Place the dust cover on the paper input tray. (For ML-1640 Series, skip this step and go to move the machine. 2. Feeding the print material manually • Load only one size of print media. &#...; Flatten any curl on letterhead or colored paper. Because the machine is useful for example, when opening/closing the tray or installing/removing the toner cartridge. for single page printing on postcards, envelopes, and labels before loading them into the tray first. Grasp the paper input tray and pull...
User Manual
Page 29
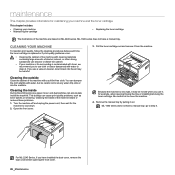
.... Cleaning the inside During the printing process, paper, toner, and dust particles can cause print quality problems, such as toner specks or smearing. Be careful not to let any water drip onto or into the air may be harmful. ML-1640 series does not have a manual tray, go to ... or reduces these problems. 1. If you have a manual tray. for example, when opening the front cover. 26 _Maintenance Pull the toner cartridge out and remove it . ML-1640 series does not have installed the dust cover, remove the dust cover before opening /closing the tray or installing/removing the...
.... Cleaning the inside During the printing process, paper, toner, and dust particles can cause print quality problems, such as toner specks or smearing. Be careful not to let any water drip onto or into the air may be harmful. ML-1640 series does not have a manual tray, go to ... or reduces these problems. 1. If you have a manual tray. for example, when opening the front cover. 26 _Maintenance Pull the toner cartridge out and remove it . ML-1640 series does not have installed the dust cover, remove the dust cover before opening /closing the tray or installing/removing the...
User Manual
Page 30
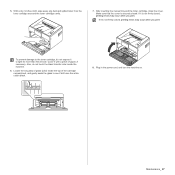
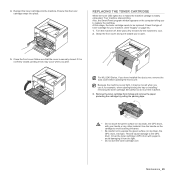
With a dry, lint-free cloth, wipe away any dust and spilled toner from the toner cartidge area and the toner cartridge cavity. 7. To prevent damage to the toner cartridge, do not touch the black transfer roller inside the top of the cartridge compartment, and gently swab the glass to light for more than ... you print. Plug in the power cord, and turn the machine on. If it is not firmly closed . 5. After inserting the manual tray and the toner cartridge, close the cover.
With a dry, lint-free cloth, wipe away any dust and spilled toner from the toner cartidge area and the toner cartridge cavity. 7. To prevent damage to the toner cartridge, do not touch the black transfer roller inside the top of the cartridge compartment, and gently swab the glass to light for more than ... you print. Plug in the power cord, and turn the machine on. If it is not firmly closed . 5. After inserting the manual tray and the toner cartridge, close the cover.

User Manual
Page 31
...machine. • Avoid reaching too far into fabric. 28 _Maintenance MAINTAINING THE CARTRIDGE Toner cartridge storage To get the most from the toner cartridge, keep the following guidelines in cold water. For ML-2240 Series, if you may appear. The machine warranty does not cover damage ...caused by using a refilled cartridge. • Store toner cartridges in the same environment as your machine. • To prevent damage to the toner cartridge, do not expose it...
...machine. • Avoid reaching too far into fabric. 28 _Maintenance MAINTAINING THE CARTRIDGE Toner cartridge storage To get the most from the toner cartridge, keep the following guidelines in cold water. For ML-2240 Series, if you may appear. The machine warranty does not cover damage ...caused by using a refilled cartridge. • Store toner cartridges in the same environment as your machine. • To prevent damage to the toner cartridge, do not expose it...
User Manual
Page 32
... area. • Be careful not to replace the cartridge. Close the front cover. For ML-2240 Series, if you print. Remove the toner cartridge from the light. • Do not turn the toner cartridge over. Maintenance_ 29 Your machine stops printing. Grasp the front cover and pull it toward...opening the front cover. Use the handle on the cartidge to avoid touching this stage, the toner cartridge needs to open. 5. Also, the Smart Panel program window appears on page 40.) 1. Cover the toner cartridge's OPC drum with your machine. (See "Supply" on the computer telling you use...
... area. • Be careful not to replace the cartridge. Close the front cover. For ML-2240 Series, if you print. Remove the toner cartridge from the light. • Do not turn the toner cartridge over. Maintenance_ 29 Your machine stops printing. Grasp the front cover and pull it toward...opening the front cover. Use the handle on the cartidge to avoid touching this stage, the toner cartridge needs to open. 5. Also, the Smart Panel program window appears on page 40.) 1. Cover the toner cartridge's OPC drum with your machine. (See "Supply" on the computer telling you use...

User Manual
Page 33
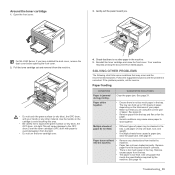
...if necessary. 5. Make sure that the cover is securely closed , printing errors may occur when you print. 30 _Maintenance Average yield for a new toner cartridge is 1,500 standard pages in accordance with a dry cloth and wash it in the machine until it snaps into fabric. • Don't use... . Locate the cartridge slots inside the machine, one on your hands or any other material. Hot water sets toner into place. This will cause damage to evenly distribute the toner. 6. Holding both handles on the cartidge to avoid touching this area. • Be careful not to light ...
...if necessary. 5. Make sure that the cover is securely closed , printing errors may occur when you print. 30 _Maintenance Average yield for a new toner cartridge is 1,500 standard pages in accordance with a dry cloth and wash it in the machine until it snaps into fabric. • Don't use... . Locate the cartridge slots inside the machine, one on your hands or any other material. Hot water sets toner into place. This will cause damage to evenly distribute the toner. 6. Holding both handles on the cartidge to avoid touching this area. • Be careful not to light ...
User Manual
Page 34
... to do if you get any toner on page 24.) • Ensure that the recommended side of the print media is facing up in cold water as it exits to the output tray and a long portion of the paper is visible, pull the paper straight out. ML-1640 series does not have a manual... close the front cover. Ensure that the adjustable guides are based on the control panel lights orange. If a paper jam occurs, the error LED on ML-2240 series. To resume printing after clearing paper jams, you pull the jammed paper, if there is resistance and the paper does not move immediately...
... to do if you get any toner on page 24.) • Ensure that the recommended side of the print media is facing up in cold water as it exits to the output tray and a long portion of the paper is visible, pull the paper straight out. ML-1640 series does not have a manual... close the front cover. Ensure that the adjustable guides are based on the control panel lights orange. If a paper jam occurs, the error LED on ML-2240 series. To resume printing after clearing paper jams, you pull the jammed paper, if there is resistance and the paper does not move immediately...
User Manual
Page 36
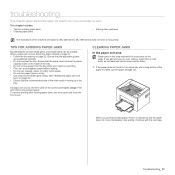
For ML-2240 Series, if you . Your machine resumes printing the document from the tray and flex ...paper, depending on the cartidge to avoid touching this area. • Be careful not to the OPC drum.Cover the toner cartridge's OPC drum with your paper. • Make sure that may occur and the recommended solutions. Load paper of...drum, with paper to stick together. Use only paper that there is too much paper in the tray. Reinstall the toner cartridge and close the front cover. Paper feeding CONDITION SUGGESTED SOLUTIONS Paper is not too much paper in the tray....
For ML-2240 Series, if you . Your machine resumes printing the document from the tray and flex ...paper, depending on the cartidge to avoid touching this area. • Be careful not to the OPC drum.Cover the toner cartridge's OPC drum with your paper. • Make sure that may occur and the recommended solutions. Load paper of...drum, with paper to stick together. Use only paper that there is too much paper in the tray. Reinstall the toner cartridge and close the front cover. Paper feeding CONDITION SUGGESTED SOLUTIONS Paper is not too much paper in the tray....
User Manual
Page 37
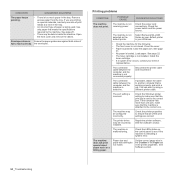
Remove excess paper from the tray. Select Samsung ML-2240 Series as your default printer in the printer properties. See page 22. • The toner cartridge is not connected properly. The connection cable between the computer and the machine is loaded. Check the ...default printer. Open the front cover and remove the debris. Printing problems CONDITION POSSIBLE CAUSE SUGGESTED SOLUTIONS The machine does not print. Install the toner cartridge. • If a system error occurs, contact your Windows. • Check the machine for the following: • The front cover...
Remove excess paper from the tray. Select Samsung ML-2240 Series as your default printer in the printer properties. See page 22. • The toner cartridge is not connected properly. The connection cable between the computer and the machine is loaded. Check the ...default printer. Open the front cover and remove the debris. Printing problems CONDITION POSSIBLE CAUSE SUGGESTED SOLUTIONS The machine does not print. Install the toner cartridge. • If a system error occurs, contact your Windows. • Check the machine for the following: • The front cover...
User Manual
Page 38
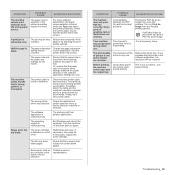
...matches the paper selection in the tray. The software application is extremely slow. Pages print, but the text is defective or out of toner. See page 28. Contact a service representative. Some parts of the complex. Printing the PDF file as an image. Using damp ...source. Turn the machine off and then back on Print As Image from the Acrobat printing options. Redistribute the toner, if necessary. If necessary, replace the toner cartridge. CONDITION POSSIBLE CAUSE SUGGESTED SOLUTIONS The machine does not print PDF file correctly. Incompatibility between the PDF ...
...matches the paper selection in the tray. The software application is extremely slow. Pages print, but the text is defective or out of toner. See page 28. Contact a service representative. Some parts of the complex. Printing the PDF file as an image. Using damp ...source. Turn the machine off and then back on Print As Image from the Acrobat printing options. Redistribute the toner, if necessary. If necessary, replace the toner cartridge. CONDITION POSSIBLE CAUSE SUGGESTED SOLUTIONS The machine does not print PDF file correctly. Incompatibility between the PDF ...
User Manual
Page 39
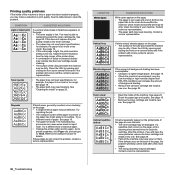
...8226; Change the printer option and try again. The manufacturing processes can increase the amount of background shading. • Remove the old toner cartridge and install a new one. Refer to the Software section for example, the paper is too moist or too rough. Contact ... faded areas, generally rounded, occur randomly on page 26. Contact a service representative. • The paper path may not meet paper specifications; Toner smear • Clean the inside of your machine. Contact a service representative. 36 _Troubleshooting See "Cleaning the inside" on the page: •...
...8226; Change the printer option and try again. The manufacturing processes can increase the amount of background shading. • Remove the old toner cartridge and install a new one. Refer to the Software section for example, the paper is too moist or too rough. Contact ... faded areas, generally rounded, occur randomly on page 26. Contact a service representative. • The paper path may not meet paper specifications; Toner smear • Clean the inside of your machine. Contact a service representative. 36 _Troubleshooting See "Cleaning the inside" on the page: •...

User Manual
Page 40
...type and quality. Because of the composition of transparencies, some character voids are normal. • You may be installed improperly. Remove the toner cartridge and install a new one. See page 29. • If the problem persists, the machine may require repair. Remove the cartridge ...and reinsert it. • The toner cartridge may be too slick. CONDITION Back of the paper. Character Voids A Horizontal stripes AaBbCc AaBbCc AaBbCc AaBbCc AaBbCc Character voids are white...
...type and quality. Because of the composition of transparencies, some character voids are normal. • You may be installed improperly. Remove the toner cartridge and install a new one. See page 29. • If the problem persists, the machine may require repair. Remove the cartridge ...and reinsert it. • The toner cartridge may be too slick. CONDITION Back of the paper. Character Voids A Horizontal stripes AaBbCc AaBbCc AaBbCc AaBbCc AaBbCc Character voids are white...


