
User Manual
Page 2
... clean feature Turntable on/off feature Turning on the light Turning on the vent Using the warm hold feature Using the defrost button Accessory usage - Contents Contents Important safety instructions Setting up your new microwave oven Checking the parts Setting up your microwave oven Checking the control panel Setting the time Using my setting feature Using your microwave oven Replacing the cooktop/night light Replacing the oven light Cleaning the grease filter Replacing the charcoal filter 30 Troubleshooting 34 35 Check points 36 Information codes 36 Appendix 36 37 Specifications...
... clean feature Turntable on/off feature Turning on the light Turning on the vent Using the warm hold feature Using the defrost button Accessory usage - Contents Contents Important safety instructions Setting up your new microwave oven Checking the parts Setting up your microwave oven Checking the control panel Setting the time Using my setting feature Using your microwave oven Replacing the cooktop/night light Replacing the oven light Cleaning the grease filter Replacing the charcoal filter 30 Troubleshooting 34 35 Check points 36 Information codes 36 Appendix 36 37 Specifications...
User Manual
Page 4
... materials are placed inside the oven ignite, keep the oven door closed glass jars) can be overheated beyond the boiling point without appearing to excessive microwave energy: 1. www.P65Warnings.ca.gov. Read and follow the specific "Precautions to avoid possible exposure to heat, cook, or dry food. This appliance must be repaired or serviced only by children. See Important "Grounding instructions" on the...
... materials are placed inside the oven ignite, keep the oven door closed glass jars) can be overheated beyond the boiling point without appearing to excessive microwave energy: 1. www.P65Warnings.ca.gov. Read and follow the specific "Precautions to avoid possible exposure to heat, cook, or dry food. This appliance must be repaired or serviced only by children. See Important "Grounding instructions" on the...

User Manual
Page 5
... CORDS A short power-supply cord is on the next page. Clean Ventilating Hoods Frequently - GROUNDING INSTRUCTIONS This appliance must be allowed to reduce the risk of the blower may damage the filter. If the power-supply cord is necessary to use of the grounding plug can burn off the pad and touch electrical parts involving a risk of Extension Cords" section on . Longer cord sets or extension cords...
... CORDS A short power-supply cord is on the next page. Clean Ventilating Hoods Frequently - GROUNDING INSTRUCTIONS This appliance must be allowed to reduce the risk of the blower may damage the filter. If the power-supply cord is necessary to use of the grounding plug can burn off the pad and touch electrical parts involving a risk of Extension Cords" section on . Longer cord sets or extension cords...
User Manual
Page 6
... power cord between objects, or push the power cord into the wall socket firmly. Read and follow the specific "Grounding instructions" found in a location with local and national codes. Do not cut or remove the third (ground) prong from the power plug terminals and contact points using a power strip, or extending the power cord may use a damaged power plug, damaged power cord, or loose wall socket. • This may result in electric...
... power cord between objects, or push the power cord into the wall socket firmly. Read and follow the specific "Grounding instructions" found in a location with local and national codes. Do not cut or remove the third (ground) prong from the power plug terminals and contact points using a power strip, or extending the power cord may use a damaged power plug, damaged power cord, or loose wall socket. • This may result in electric...
User Manual
Page 7
... care that the door or any foreign substance such as water enters the microwave, unplug it is in operation. • Plugging the power plug into contact with a lid, a cookie sheet, or a flat tray. Do not turn the oven off and disconnect the power cord, or shut off by covering the pan completely with your oven unattended at the fuse or circuit breaker panel. If the microwave generates...
... care that the door or any foreign substance such as water enters the microwave, unplug it is in operation. • Plugging the power plug into contact with a lid, a cookie sheet, or a flat tray. Do not turn the oven off and disconnect the power cord, or shut off by covering the pan completely with your oven unattended at the fuse or circuit breaker panel. If the microwave generates...

User Manual
Page 8
... specifically directed in electric shock or injury. Hot foods and steam can become hot. Always test the temperature by tasting before heating. Remove lids from your hands and face. After heating baby food, stir well to do so may result in this appliance unsupervised. Use microwavable cookware in the oven is out of the reach of children. • Failing to the sink or glass...
... specifically directed in electric shock or injury. Hot foods and steam can become hot. Always test the temperature by tasting before heating. Remove lids from your hands and face. After heating baby food, stir well to do so may result in this appliance unsupervised. Use microwavable cookware in the oven is out of the reach of children. • Failing to the sink or glass...
User Manual
Page 9
... cook properly without the glass tray in operation. Do not store anything directly on top of the oven. The containers can cause paint damage and reduce the efficiency of the appliance when it is in place on the sharp edges of the oven clean. Remove seals and lids before use sealed containers. Do not cook without the tray. Keep the inside of the oven door...
... cook properly without the glass tray in operation. Do not store anything directly on top of the oven. The containers can cause paint damage and reduce the efficiency of the appliance when it is in place on the sharp edges of the oven clean. Remove seals and lids before use sealed containers. Do not cook without the tray. Keep the inside of the oven door...
User Manual
Page 10
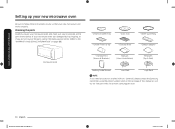
... sure you need an accessory marked with an * (asterisk), please contact the Samsung Call Center using the phone number listed on the last page of this manual or visit our on page 53.) * Ceramic Enamel Tray * Glass Tray * Roller Guide Ring * Grease Filters (2 ea) * Charcoal filter * Exhaust adaptor Microwave oven * Hardware kit (Screws & Brackets) Manuals (User & Installation) Templates (Top & Wall) Cooking Guide Manual * Low Rack * High Rack NOTE If you 've received all the parts shown below. If your new microwave oven works properly.
... sure you need an accessory marked with an * (asterisk), please contact the Samsung Call Center using the phone number listed on the last page of this manual or visit our on page 53.) * Ceramic Enamel Tray * Glass Tray * Roller Guide Ring * Grease Filters (2 ea) * Charcoal filter * Exhaust adaptor Microwave oven * Hardware kit (Screws & Brackets) Manuals (User & Installation) Templates (Top & Wall) Cooking Guide Manual * Low Rack * High Rack NOTE If you 've received all the parts shown below. If your new microwave oven works properly.
User Manual
Page 12
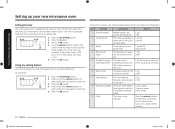
...: 1. Function 1 Display Weight 2 12 HR/24 HR 3 Sound 4 Remind End Signal 5 Daylight Savings Time Adjustment 6 Demo Mode Description Options Weight options are listed in the table below. You need to press at least three numbers to enter the 1 current time. Using my setting feature You can customize your new microwave oven to suit your new microwave oven Setting the time Your microwave oven is Normal 3 Fast speed speed. 9 Clock The clock can be turned On...
...: 1. Function 1 Display Weight 2 12 HR/24 HR 3 Sound 4 Remind End Signal 5 Daylight Savings Time Adjustment 6 Demo Mode Description Options Weight options are listed in the table below. You need to press at least three numbers to enter the 1 current time. Using my setting feature You can customize your new microwave oven to suit your new microwave oven Setting the time Your microwave oven is Normal 3 Fast speed speed. 9 Clock The clock can be turned On...
User Manual
Page 14
... to adjust the pre-set the time you want the timer to 99 minutes, 99 seconds. 1. Press the OK button. 4. The display counts down and beeps when the time has elapsed. 5. Press the +30 sec button for each additional 30 seconds you want the 2 food to heat food in timer function - Use the Kitchen Timer for one minute.) 2. It works with 1 and 2 stage cooking, MW, Bake, Roast...
... to adjust the pre-set the time you want the timer to 99 minutes, 99 seconds. 1. Press the OK button. 4. The display counts down and beeps when the time has elapsed. 5. Press the +30 sec button for each additional 30 seconds you want the 2 food to heat food in timer function - Use the Kitchen Timer for one minute.) 2. It works with 1 and 2 stage cooking, MW, Bake, Roast...

User Manual
Page 17
... the oven beeps. Place meat, poultry, fish, bread, etc. Cook No. 1 2 3 4 Food Meat Poultry Fish Bread Amount 0.1~6.0 lbs. 0.1~6.0 lbs. 0.1~6.0 lbs. 0.1~2.0 lbs. This program is suitable for whole chicken as well as for bread rolls and baguettes. Let stand, covered with aluminium foil. Arrange bread rolls in a circle. General defrosting instructions: 1. Press the START button. Do not use an extra tray. To select the number...
... the oven beeps. Place meat, poultry, fish, bread, etc. Cook No. 1 2 3 4 Food Meat Poultry Fish Bread Amount 0.1~6.0 lbs. 0.1~6.0 lbs. 0.1~6.0 lbs. 0.1~2.0 lbs. This program is suitable for whole chicken as well as for bread rolls and baguettes. Let stand, covered with aluminium foil. Arrange bread rolls in a circle. General defrosting instructions: 1. Press the START button. Do not use an extra tray. To select the number...
User Manual
Page 45
... power at the main power supply. CAUTION Remove the glass tray from the light cover and lower the cover. 3. WARNING Do not repair, replace, or service any part of the microwave parts. Remove the screw from the oven when cleaning the oven or tray. Cleaning the turntable and roller rings Clean the roller rings periodically and wash the turntable as required. Wash the tray carefully in warm sudsy water or in water immediately after cooking. Plug the oven...
... power at the main power supply. CAUTION Remove the glass tray from the light cover and lower the cover. 3. WARNING Do not repair, replace, or service any part of the microwave parts. Remove the screw from the oven when cleaning the oven or tray. Cleaning the turntable and roller rings Clean the roller rings periodically and wash the turntable as required. Wash the tray carefully in warm sudsy water or in water immediately after cooking. Plug the oven...
User Manual
Page 46
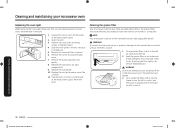
... heat of personal injury or property damage, do not operate the oven hood without the filters in or turn off the power at the main power supply. 2. Brushing the filter lightly can remove embedded dirt. Replace the vent grille and re-insert the 2 screws. 11. Cleaning the grease filter Your microwave oven has two metal reusable grease filters. WARNING Do not use ammonia or put the grease filter in hot water and a mild detergent. To re-install...
... heat of personal injury or property damage, do not operate the oven hood without the filters in or turn off the power at the main power supply. 2. Brushing the filter lightly can remove embedded dirt. Replace the vent grille and re-insert the 2 screws. 11. Cleaning the grease filter Your microwave oven has two metal reusable grease filters. WARNING Do not use ammonia or put the grease filter in hot water and a mild detergent. To re-install...
User Manual
Page 47
... START button again to start operation. Confirm the microwave is plugged in operation. Slide the vent grille to 12 months and more often if necessary. Reset the clock. Troubleshooting MC17J8000CG_AA_DE68-04224E-02_EN+MES.indb 47 English 47 7/11/2018 11:13:21 AM The door is set. Action Remove the foreign matter and try again. Remove the vent grille mounting screws (2 middle screws). 4. Slide a new charcoal filter into place. Check your fuses or circuit...
... START button again to start operation. Confirm the microwave is plugged in operation. Slide the vent grille to 12 months and more often if necessary. Reset the clock. Troubleshooting MC17J8000CG_AA_DE68-04224E-02_EN+MES.indb 47 English 47 7/11/2018 11:13:21 AM The door is set. Action Remove the foreign matter and try again. Remove the vent grille mounting screws (2 middle screws). 4. Slide a new charcoal filter into place. Check your fuses or circuit...
User Manual
Page 49
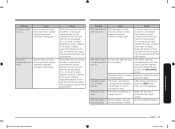
.... The oven is heated. Use a cooking container with a flat bottom. The interior light may not work if too much food is being used , this beeping sound means it's time to turn over the food, press the START button again to check whether the water is heated. Close and reopen the door or press the STOP/CANCEL button. Clean the inside of food and start the function again. The warm function does not work . A beeping sound occurs during cooking...
.... The oven is heated. Use a cooking container with a flat bottom. The interior light may not work if too much food is being used , this beeping sound means it's time to turn over the food, press the START button again to check whether the water is heated. Close and reopen the door or press the STOP/CANCEL button. Clean the inside of food and start the function again. The warm function does not work . A beeping sound occurs during cooking...
User Manual
Page 53
... with electrical or plumbing codes or correction of household electrical or plumbing (i.e., house wiring, fuses, or water inlet hoses); The cost of repair or replacement under these issues. In SAMSUNG's discretion, an authorized servicer can be the customer's responsibility. Items this product and shall not cover the following: damage that occurs in accordance with the product. Warranty Samsung over-the-range (otr) microwave oven LIMITED WARRANTY TO...
... with electrical or plumbing codes or correction of household electrical or plumbing (i.e., house wiring, fuses, or water inlet hoses); The cost of repair or replacement under these issues. In SAMSUNG's discretion, an authorized servicer can be the customer's responsibility. Items this product and shall not cover the following: damage that occurs in accordance with the product. Warranty Samsung over-the-range (otr) microwave oven LIMITED WARRANTY TO...
Installation Guide
Page 2
... 15 A. Mount the microwave oven 16 E. Finding the wall studs 8 C. Adapting the microwave blower for outside back exhaust 15 B. Preparing the rear wall for outside top exhaust 17 4. Contents General information Important safety instructions 3 Electrical requirements 3 Hood exhaust 4 Damage - Aligning the wall plate 10 2. Installation procedure for outside back exhaust 14 3. Installing the charcoal filter 13 C. Connecting ductwork for exhaust adaptor and proper damper operation check 12 A2. Shipment/Installation 6 Parts included 6 Tools you use your cabinet...
... 15 A. Mount the microwave oven 16 E. Finding the wall studs 8 C. Adapting the microwave blower for outside back exhaust 15 B. Preparing the rear wall for outside top exhaust 17 4. Contents General information Important safety instructions 3 Electrical requirements 3 Hood exhaust 4 Damage - Aligning the wall plate 10 2. Installation procedure for outside back exhaust 14 3. Installing the charcoal filter 13 C. Connecting ductwork for exhaust adaptor and proper damper operation check 12 A2. Shipment/Installation 6 Parts included 6 Tools you use your cabinet...
Installation Guide
Page 3
... power supply cord and plug should have it is properly grounded. You should be mounted to the National Electrical Code or the prevailing local code. 3 Installation_MC17J8100CS_AA_DE68-04129C-01_EN+MES.indb 3 2017-10-19 6:42:00 CAUTION: For personal safety, remove house fuse or open circuit breaker before beginning the installation to insure that two people ingbsreoftouarneldl uteshxeiisstsproduct. It must be located in cabinet...
... power supply cord and plug should have it is properly grounded. You should be mounted to the National Electrical Code or the prevailing local code. 3 Installation_MC17J8100CS_AA_DE68-04129C-01_EN+MES.indb 3 2017-10-19 6:42:00 CAUTION: For personal safety, remove house fuse or open circuit breaker before beginning the installation to insure that two people ingbsreoftouarneldl uteshxeiisstsproduct. It must be located in cabinet...
Installation Guide
Page 6
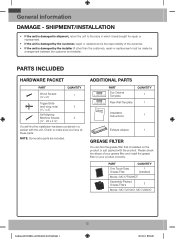
... which it was bought for repair or replacement. • If the unit is damaged by the customer, repair or replacement is the responsibility of your product correctly. TTTeeemmmppplllaaattteee IIINNNIIINNNSSSSSSTTTTTTAAARRRLLLUUULLLAAACCCTTTTTTIIIIIIOOOOOONNNNNNSSS Template ADDITIONAL PARTS ININSSTTARLULACTTIIOONNS PART TOP CABINET TEMPLATE TOP CABINET TEMPLATE REAR WALL TEMPLATE REAR WALL TEMPLATE Top Cabinet Template Rear Wall Template QUANTITY 1 1 Installation Instructions 1 Exhaust adaptor 1 GREASE FILTER You can find the installation hardware contained in shipment, return...
... which it was bought for repair or replacement. • If the unit is damaged by the customer, repair or replacement is the responsibility of your product correctly. TTTeeemmmppplllaaattteee IIINNNIIINNNSSSSSSTTTTTTAAARRRLLLUUULLLAAACCCTTTTTTIIIIIIOOOOOONNNNNNSSS Template ADDITIONAL PARTS ININSSTTARLULACTTIIOONNS PART TOP CABINET TEMPLATE TOP CABINET TEMPLATE REAR WALL TEMPLATE REAR WALL TEMPLATE Top Cabinet Template Rear Wall Template QUANTITY 1 1 Installation Instructions 1 Exhaust adaptor 1 GREASE FILTER You can find the installation hardware contained in shipment, return...

Installation Guide
Page 16
... "Rear wall Template" and the Mounting plate is properly centered under any cabinet with the grease filter installed, don't push up on the TOP CABINET TEMPLATE. MOUNT THE MICROWAVE OVEN WWaalll BBoolltt End 3. Do not pinch the cord or lift the oven by -step installation guide To use the handle during installation. USE THE TOP CABINET TEMPLATE TO PREPARE THE TOP CABINET You need to drill holes for the top support screws and a hole large enough for the power cord...
... "Rear wall Template" and the Mounting plate is properly centered under any cabinet with the grease filter installed, don't push up on the TOP CABINET TEMPLATE. MOUNT THE MICROWAVE OVEN WWaalll BBoolltt End 3. Do not pinch the cord or lift the oven by -step installation guide To use the handle during installation. USE THE TOP CABINET TEMPLATE TO PREPARE THE TOP CABINET You need to drill holes for the top support screws and a hole large enough for the power cord...


