

Open Source Guide (ENGLISH)
Page 1
..., too, receive or can change it . it . (Some other work based on a medium customarily used to control compilation and installation of it in new free programs; Each version is intended to apply in other property right claims or to freedom, not price. If the Program does not specify a version number of the Program into another work not based on the Program with the Program (or with...
..., too, receive or can change it . it . (Some other work based on a medium customarily used to control compilation and installation of it in new free programs; Each version is intended to apply in other property right claims or to freedom, not price. If the Program does not specify a version number of the Program into another work not based on the Program with the Program (or with...

Open Source Guide (ENGLISH)
Page 2
...you develop a new library, and you want it free software that everyone can redistribute and change. and each source file to where the full notice is safest to ...attach them to the start of each file should have at least the "copyright" line and a pointer to most effectively convey the exclusion of warranty...USE OR INABILITY TO USE THE LIBRARY (INCLUDING BUT NOT LIMITED TO LOSS OF DATA OR DATA BEING RENDERED INACCURATE OR LOSSES SUSTAINED BY YOU OR THIRD PARTIES OR A FAILURE OF THE LIBRARY TO OPERATE WITH ANY OTHER SOFTWARE...
...you develop a new library, and you want it free software that everyone can redistribute and change. and each source file to where the full notice is safest to ...attach them to the start of each file should have at least the "copyright" line and a pointer to most effectively convey the exclusion of warranty...USE OR INABILITY TO USE THE LIBRARY (INCLUDING BUT NOT LIMITED TO LOSS OF DATA OR DATA BEING RENDERED INACCURATE OR LOSSES SUSTAINED BY YOU OR THIRD PARTIES OR A FAILURE OF THE LIBRARY TO OPERATE WITH ANY OTHER SOFTWARE...

Quick Guide (easy Manual) (Korean)
Page 1
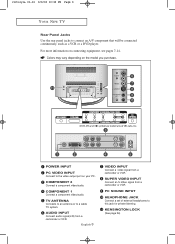
.... PC SOUND INPUT HEADPHONE JACK Connect a set of external headphones to a cable TV system. Colors may vary depending on your PC. COMPONENT 1 Connect a component video/audio. KENSINGTON LOCK COMPONENT 2 Connect a component video/audio. AUDIO INPUT Connect audio signal(L/R) from a camcorder or VCR. English-1 VIDEO INPUT Connect a video signal from a camcorder or VCR. SUPER VIDEO INPUT Connect an S-Video signal from a camcorder or VCR. victoryia 01-14 3/3/04 10:30 PM Page 3 YOUR NEW TV Rear Panel Jacks Use the rear panel jacks to the video output port on the model you purchase...
.... PC SOUND INPUT HEADPHONE JACK Connect a set of external headphones to a cable TV system. Colors may vary depending on your PC. COMPONENT 1 Connect a component video/audio. KENSINGTON LOCK COMPONENT 2 Connect a component video/audio. AUDIO INPUT Connect audio signal(L/R) from a camcorder or VCR. English-1 VIDEO INPUT Connect a video signal from a camcorder or VCR. SUPER VIDEO INPUT Connect an S-Video signal from a camcorder or VCR. victoryia 01-14 3/3/04 10:30 PM Page 3 YOUR NEW TV Rear Panel Jacks Use the rear panel jacks to the video output port on the model you purchase...

Quick Guide (easy Manual) (Korean)
Page 2
Follow the instructions in "Viewing a VCR or Camcorder Tape" to view your VCR is usually included with a VCR. (If not, check your TV to an antenna or a cable TV system . If your VCR tape. # Each external input source device has a different back panel configuration. A coaxial cable is stereo, you must connect two cables. 5 Connect a video cable between the VIDEO OUT jack on the VCR and the VIDEO jack...
Follow the instructions in "Viewing a VCR or Camcorder Tape" to view your VCR is usually included with a VCR. (If not, check your TV to an antenna or a cable TV system . If your VCR tape. # Each external input source device has a different back panel configuration. A coaxial cable is stereo, you must connect two cables. 5 Connect a video cable between the VIDEO OUT jack on the VCR and the VIDEO jack...

Quick Guide (easy Manual) (Korean)
Page 5
victoryia 01-14 6/27/03 2:04 AM Page 14 I N S TA L L AT I O N Connecting a PC Note: This figure shows the Standard Connector-jack panel. English-5 TV rear panel PC rear PC VIDEO INPUT (15-pin D-SUB) PC SOUND INPUT (Optional) • PC AUDIO INPUT Connect these to the audio-output jacks on your PC. • PC VIDEO INPUT Connect to the video output port on your TV may be different, depending on your PC. # Each external input source device has a different back panel configuration. The actual configuration on the model.
victoryia 01-14 6/27/03 2:04 AM Page 14 I N S TA L L AT I O N Connecting a PC Note: This figure shows the Standard Connector-jack panel. English-5 TV rear panel PC rear PC VIDEO INPUT (15-pin D-SUB) PC SOUND INPUT (Optional) • PC AUDIO INPUT Connect these to the audio-output jacks on your PC. • PC VIDEO INPUT Connect to the video output port on your TV may be different, depending on your PC. # Each external input source device has a different back panel configuration. The actual configuration on the model.

Quick Guide (easy Manual) (Korean)
Page 7
... the wall. 3 Remove the base from the TV set. Use (b) holes to attach the VESA mount. Use (a) holes to attach the wall mount. 4 Mount the TV on the model you purchase. victoryia 54-59 3/3/04 10:34 PM Page 55 Installing the Wall Mount Kit (sold separately. Holder-Wall : 1EA Holder-Ass'y : 1EA Rubber : 4EA Holder-LCD L/R : 2EA Screw FH 4 x 8 : 10EA Screw BH 4 x 25 : 4EA Anchor : 4EA #The wall mount bracket is...
... the wall. 3 Remove the base from the TV set. Use (b) holes to attach the VESA mount. Use (a) holes to attach the wall mount. 4 Mount the TV on the model you purchase. victoryia 54-59 3/3/04 10:34 PM Page 55 Installing the Wall Mount Kit (sold separately. Holder-Wall : 1EA Holder-Ass'y : 1EA Rubber : 4EA Holder-LCD L/R : 2EA Screw FH 4 x 8 : 10EA Screw BH 4 x 25 : 4EA Anchor : 4EA #The wall mount bracket is...
User Manual (user Manual) (ver.01) (English)
Page 2
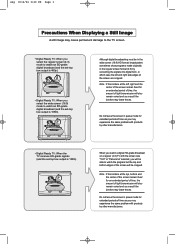
... and the center of the screen remain fixed for extended periods of time as you may experience the same problem with products by other manufacturers. • Digital Ready TV: When the TV receives HD-grade signals (and the set -top box output is 1080i). Do not leave the screen in pause mode for extended periods of the screen will also remain varied and...
... and the center of the screen remain fixed for extended periods of time as you may experience the same problem with products by other manufacturers. • Digital Ready TV: When the TV receives HD-grade signals (and the set -top box output is 1080i). Do not leave the screen in pause mode for extended periods of the screen will also remain varied and...

User Manual (user Manual) (ver.01) (English)
Page 4
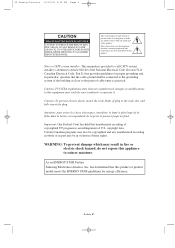
... Install in any heat sources such as power-supply cord or plug is used, use this apparatus during lightning storms or when unused for long periods of the polarized or grounding-type plug. Safety 1 The wide blade or the third prong are provided for your outlet, consult an electrician for replacement... Use only with cart, stand, tripod, bracket, or table specified by the manufacturer, or sold with the apparatus. If the provided plug does not fit into the apparatus, the apparatus has been exposed to rain or moisture, does not operate normally, or has been dropped. A grounding type plug ...
... Install in any heat sources such as power-supply cord or plug is used, use this apparatus during lightning storms or when unused for long periods of the polarized or grounding-type plug. Safety 1 The wide blade or the third prong are provided for your outlet, consult an electrician for replacement... Use only with cart, stand, tripod, bracket, or table specified by the manufacturer, or sold with the apparatus. If the provided plug does not fit into the apparatus, the apparatus has been exposed to rain or moisture, does not operate normally, or has been dropped. A grounding type plug ...
User Manual (user Manual) (ver.01) (English)
Page 5
... shock, match the wide blade of Canadian Electrical Code, Part I), that provides guidelines for energy efficiency. WARNING: To prevent damage which may result in violation of contact with this product. Samsung Electronics America, Inc. Attention: pour eviter les ...part may void the user's authority to the point of the building as practical. NO USER SERVICEABLE PARTS INSIDE. This symbol alerts you that unauthorized recording of copyrighted TV programs is present inside part of this equipment may be connected to the grounding system of cable entry as close to operate...
... shock, match the wide blade of Canadian Electrical Code, Part I), that provides guidelines for energy efficiency. WARNING: To prevent damage which may result in violation of contact with this product. Samsung Electronics America, Inc. Attention: pour eviter les ...part may void the user's authority to the point of the building as practical. NO USER SERVICEABLE PARTS INSIDE. This symbol alerts you that unauthorized recording of copyrighted TV programs is present inside part of this equipment may be connected to the grounding system of cable entry as close to operate...
User Manual (user Manual) (ver.01) (English)
Page 7
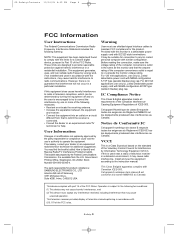
... find the booklet called How to the following measures: • Reorient or relocate the receiving antenna. • Increase the separation between the equipment and receiver. • Connect the equipment into an outlet on , the user is used in a residential installation. This television receiver provides display of television closed captioning in accordance with Canadian ICES-003. Notice de Conformité IC Cet appareil num...
... find the booklet called How to the following measures: • Reorient or relocate the receiving antenna. • Increase the separation between the equipment and receiver. • Connect the equipment into an outlet on , the user is used in a residential installation. This television receiver provides display of television closed captioning in accordance with Canadian ICES-003. Notice de Conformité IC Cet appareil num...

User Manual (user Manual) (ver.01) (English)
Page 8
... Channels . . .9 Connecting to a Cable Box that Descrambles Some Channels . .9 Connecting a VCR 11 Connecting an S-VHS VCR 12 Connecting a DVD Player 13 Connecting a PC 14 Chapter 3: Special Features Turning the TV On and Off 15 Changing Channels 15 Using the Channel Buttons 15 Using the Pre-CH Button to select the Previous Channel . . .15 Adjusting the Volume 15 Using Mute 15 Viewing the Displays 16 Viewing the Menus 16 Chapter 4: Operation Plug & Play Feature 17 Memorizing the Channels 18 Selecting the Video Signal-source...
... Channels . . .9 Connecting to a Cable Box that Descrambles Some Channels . .9 Connecting a VCR 11 Connecting an S-VHS VCR 12 Connecting a DVD Player 13 Connecting a PC 14 Chapter 3: Special Features Turning the TV On and Off 15 Changing Channels 15 Using the Channel Buttons 15 Using the Pre-CH Button to select the Previous Channel . . .15 Adjusting the Volume 15 Using Mute 15 Viewing the Displays 16 Viewing the Menus 16 Chapter 4: Operation Plug & Play Feature 17 Memorizing the Channels 18 Selecting the Video Signal-source...

User Manual (user Manual) (ver.01) (English)
Page 9
... a Channel ('Emergency Escape 47 Chapter 5: PC Display Using Your TV as a Computer (PC) Display 48 How to Set up Your PC Software (Windows only 48 Adjusting the Screen Quality 49 Changing the Screen Position 50 How to Auto Adjust 51 Chapter 6: Troubleshooting Identifying Problems 52 Appendix How to assemble the TV set and stand base 54 Installing the Wall Mount Kit (sold separately 55 Using the Anti-Theft Kensington Lock 56 Retractable Stand 56...
... a Channel ('Emergency Escape 47 Chapter 5: PC Display Using Your TV as a Computer (PC) Display 48 How to Set up Your PC Software (Windows only 48 Adjusting the Screen Quality 49 Changing the Screen Position 50 How to Auto Adjust 51 Chapter 6: Troubleshooting Identifying Problems 52 Appendix How to assemble the TV set and stand base 54 Installing the Wall Mount Kit (sold separately 55 Using the Anti-Theft Kensington Lock 56 Retractable Stand 56...
User Manual (user Manual) (ver.01) (English)
Page 10
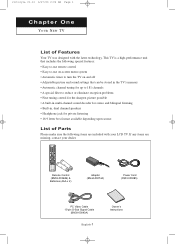
... x 2) Adapter (BN44-00074A) Power Cord (3903-000085) PC Video Cable 15-pin D-Sub Signal Cable (BN39-00043A) English-1 Owner's Instructions victoryia 01-14 6/27/03 2:04 AM Page 1 Chapter One YOUR NEW TV List of Parts Please make sure the following special features: • Easy-to-use remote control • Easy-to-use on-screen menu system • Automatic timer to turn the TV on and off • Adjustable picture and sound settings...
... x 2) Adapter (BN44-00074A) Power Cord (3903-000085) PC Video Cable 15-pin D-Sub Signal Cable (BN39-00043A) English-1 Owner's Instructions victoryia 01-14 6/27/03 2:04 AM Page 1 Chapter One YOUR NEW TV List of Parts Please make sure the following special features: • Easy-to-use remote control • Easy-to-use on-screen menu system • Automatic timer to turn the TV on and off • Adjustable picture and sound settings...
User Manual (user Manual) (ver.01) (English)
Page 12
... Rear Panel Jacks Use the rear panel jacks to this jack for private listening. KENSINGTON LOCK (See page 56) COMPONENT 2 Connect a component video/audio. English-3 VIDEO INPUT Connect a video signal from a camcorder or VCR. AUDIO INPUT Connect audio signal(L/R) from a camcorder or VCR. TV ANTENNA Connects to an antenna or to the video output port on your PC. For more information on the model you purchase. 6 7 11 8 9 10 3 1 2 4 5 POWER INPUT PC VIDEO INPUT Connect to a cable TV system. SUPER VIDEO INPUT Connect an S-Video signal from a camcorder or VCR. Colors...
... Rear Panel Jacks Use the rear panel jacks to this jack for private listening. KENSINGTON LOCK (See page 56) COMPONENT 2 Connect a component video/audio. English-3 VIDEO INPUT Connect a video signal from a camcorder or VCR. AUDIO INPUT Connect audio signal(L/R) from a camcorder or VCR. TV ANTENNA Connects to an antenna or to the video output port on your PC. For more information on the model you purchase. 6 7 11 8 9 10 3 1 2 4 5 POWER INPUT PC VIDEO INPUT Connect to a cable TV system. SUPER VIDEO INPUT Connect an S-Video signal from a camcorder or VCR. Colors...

User Manual (user Manual) (ver.01) (English)
Page 13
... the sound. (See Page 15) 5 MENU Displays the main on -screen menu items and change 9 channels. POWER Turns the TV on and off. (See Page 15) 1 P.MODE 2 Adjusts the TV picture by selecting one of the preset factory settings. (See Page 22) 3 ASPECT Use to toggle the five screen size options among Wide, Panorama, Zoom 1, Zoom 2 and Normal. (See Page 31) 4 MUTE Press to change menu values. (The remote control will...
... the sound. (See Page 15) 5 MENU Displays the main on -screen menu items and change 9 channels. POWER Turns the TV on and off. (See Page 15) 1 P.MODE 2 Adjusts the TV picture by selecting one of the preset factory settings. (See Page 22) 3 ASPECT Use to toggle the five screen size options among Wide, Panorama, Zoom 1, Zoom 2 and Normal. (See Page 31) 4 MUTE Press to change menu values. (The remote control will...

User Manual (user Manual) (ver.01) (English)
Page 14
... work, change channels in sequence. (These buttons change the batteries and press the 9 RESET button for the PIP window. When using the remote, always point it directly at the TV. +100 Press to make the PIP window double, large or small. SIZE Press to select channels over 100. TV/VIDEO Press to set caption on the main screen with the signal in the PIP window. Use to store the broadcast/cable channels...
... work, change channels in sequence. (These buttons change the batteries and press the 9 RESET button for the PIP window. When using the remote, always point it directly at the TV. +100 Press to make the PIP window double, large or small. SIZE Press to select channels over 100. TV/VIDEO Press to set caption on the main screen with the signal in the PIP window. Use to store the broadcast/cable channels...

User Manual (user Manual) (ver.01) (English)
Page 18
... stores.) 1 Find and disconnect the cable that Descrambles Some Channels If your cable box descrambles only some channels (such as premium channels), follow the instructions below. Connecting to the ANTENNA IN terminal on your cable box. You will need a two-way splitter, an RF (A/B) switch, and four lengths of this cable to a two-way splitter. 3 Connect a coaxial cable between an OUTPUT terminal on the splitter and the...
... stores.) 1 Find and disconnect the cable that Descrambles Some Channels If your cable box descrambles only some channels (such as premium channels), follow the instructions below. Connecting to the ANTENNA IN terminal on your cable box. You will need a two-way splitter, an RF (A/B) switch, and four lengths of this cable to a two-way splitter. 3 Connect a coaxial cable between an OUTPUT terminal on the splitter and the...

User Manual (user Manual) (ver.01) (English)
Page 20
... TV. Follow the instructions in "Viewing a VCR or Camcorder Tape" to view your TV to an antenna or a cable TV system (according to the instructions on pages 7-9). English-11 Skip step 1 if you have already connected your VCR tape. # Each external input source device has a different back panel configuration. A coaxial cable is stereo, you must connect two cables. 5 Connect a video cable between the VIDEO OUT jack on the...
... TV. Follow the instructions in "Viewing a VCR or Camcorder Tape" to view your TV to an antenna or a cable TV system (according to the instructions on pages 7-9). English-11 Skip step 1 if you have already connected your VCR tape. # Each external input source device has a different back panel configuration. A coaxial cable is stereo, you must connect two cables. 5 Connect a video cable between the VIDEO OUT jack on the...
User Manual (user Manual) (ver.01) (English)
Page 25
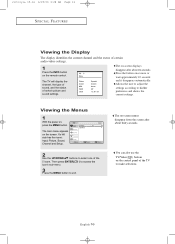
... MENU button to his/her preference and shows the current settings. Allows the user to adjust the settings according to exit. You can also use the TV/Video( ) buttons on the screen. It's left side has five icons: Input, Picture, Sound, Channel and Setup. 2 Use the UP/DOWN buttons to make selections. The on -screen menus disappear from the screen after about thirty seconds. The main menu appears on the control panel...
... MENU button to his/her preference and shows the current settings. Allows the user to adjust the settings according to exit. You can also use the TV/Video( ) buttons on the screen. It's left side has five icons: Input, Picture, Sound, Channel and Setup. 2 Use the UP/DOWN buttons to make selections. The on -screen menus disappear from the screen after about thirty seconds. The main menu appears on the control panel...

User Manual (user Manual) (ver.01) (English)
Page 52
..., press the remote-control buttons in the following sequence,which resets the pin to display the menu. The Change pin screen will appear. Choose any of the V-Chip restrictions can be set is deemed inappropriate for your 4-digit Pin number. Setting Up Your Personal ID Number (PIN) 1 Press the MENU button to 0-0-0-0: POWER OFF ➔ MUTE ➔ 8 ➔ 2 ➔ 4 ➔ POWER ON. Press the MENU button to select "Change Pin...
..., press the remote-control buttons in the following sequence,which resets the pin to display the menu. The Change pin screen will appear. Choose any of the V-Chip restrictions can be set is deemed inappropriate for your 4-digit Pin number. Setting Up Your Personal ID Number (PIN) 1 Press the MENU button to 0-0-0-0: POWER OFF ➔ MUTE ➔ 8 ➔ 2 ➔ 4 ➔ POWER ON. Press the MENU button to select "Change Pin...


