
Quick Guide (ENGLISH)
Page 5
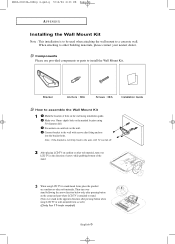
...arrow while grabbing bottom of hole on the marked location using installation guide. Connect bracket to the wall with screws after pressing button when using LCD TV in stand-based form, place the product on a cushion or other building materials, please contact your nearest dealer. BN68-00633A-06Eng ...well.) (Only for 17-inch model) English-5 Bracket Anchors : 3EA Screws : 3EA Installation Guide How to the wall, LCD TV can fall off. 2 After placing LCD TV on cushion or other soft material, turn over 35mm- Make over stand following the arrow direction below only after pressing ...
...arrow while grabbing bottom of hole on the marked location using installation guide. Connect bracket to the wall with screws after pressing button when using LCD TV in stand-based form, place the product on a cushion or other building materials, please contact your nearest dealer. BN68-00633A-06Eng ...well.) (Only for 17-inch model) English-5 Bracket Anchors : 3EA Screws : 3EA Installation Guide How to the wall, LCD TV can fall off. 2 After placing LCD TV on cushion or other soft material, turn over 35mm- Make over stand following the arrow direction below only after pressing ...

Quick Guide (ENGLISH)
Page 6
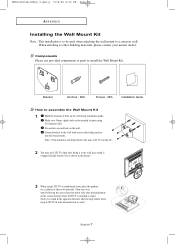
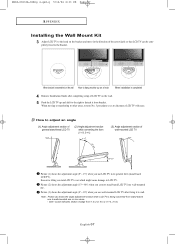
...be completely fixed to adjust an angle (1) Angle adjustment section of general stand-besd LCD TV (2) Angle abjustment section while converting the form (1->3, 3->1) (3) Angle adjustment section of the arrow(Left) so that LCD TV can turn LCD TV over which might cause damage to 2 (1->2, 3->2). Click" sound indicates section... BN68-00633A-06Eng 4.qxd.q 5/12/04 6:33 PM Page 57 APPENDIX Installing the Wall Mount Kit 3 Adjust LCD TV to the hook on the wall. 5 Push the LCD TV up on a hook When installation is being converted from bracket. When moving or transferring to other areas, reverse...
...be completely fixed to adjust an angle (1) Angle adjustment section of general stand-besd LCD TV (2) Angle abjustment section while converting the form (1->3, 3->1) (3) Angle adjustment section of the arrow(Left) so that LCD TV can turn LCD TV over which might cause damage to 2 (1->2, 3->2). Click" sound indicates section... BN68-00633A-06Eng 4.qxd.q 5/12/04 6:33 PM Page 57 APPENDIX Installing the Wall Mount Kit 3 Adjust LCD TV to the hook on the wall. 5 Push the LCD TV up on a hook When installation is being converted from bracket. When moving or transferring to other areas, reverse...

Quick Guide (ENGLISH)
Page 7
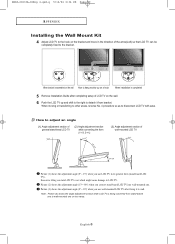
... in wall-mounted form as well.) English-7 Then turn over stand following the arrow direction below only after pressing button on the connected part where LCD TV is attached to a concrete wall. hole on the wall. BN68-00633A-06Eng 4.qxd.q 5/12/04 6:33 PM Page 58 APPENDIX Installing the Wall Mount... : This installation is to be used when attaching the wall mount to stand. (Turn over stand in the opposite direction after pressing button when using LCD TV in stand-based form, place the product on a cushion or other building materials, please contact your nearest dealer.
... in wall-mounted form as well.) English-7 Then turn over stand following the arrow direction below only after pressing button on the connected part where LCD TV is attached to a concrete wall. hole on the wall. BN68-00633A-06Eng 4.qxd.q 5/12/04 6:33 PM Page 58 APPENDIX Installing the Wall Mount... : This installation is to be used when attaching the wall mount to stand. (Turn over stand in the opposite direction after pressing button when using LCD TV in stand-based form, place the product on a cushion or other building materials, please contact your nearest dealer.

Quick Guide (ENGLISH)
Page 8
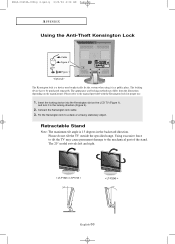
...bracket. English-8 BN68-00633A-06Eng 4.qxd.q 5/12/04 6:34 PM Page 59 APPENDIX Installing the Wall Mount Kit 4 Adjust LCD TV to the hook on the wall. 6 Push the LCD TV up on a hook When installation is completed 5 Remove Installation Guide after fixing it from stand-based one to wall.... Picture (1) shows the adjustment angle (0°~ 13°) when you use wall-mounted LCD TV after completing setup of the arrow(Left) so that LCD TV can turn LCD TV over which might cause damage to disconnect LCD TV with ease. Picture (3) shows the adjustment angle (0°~ 10°) when you ...
...bracket. English-8 BN68-00633A-06Eng 4.qxd.q 5/12/04 6:34 PM Page 59 APPENDIX Installing the Wall Mount Kit 4 Adjust LCD TV to the hook on the wall. 6 Push the LCD TV up on a hook When installation is completed 5 Remove Installation Guide after fixing it from stand-based one to wall.... Picture (1) shows the adjustment angle (0°~ 13°) when you use wall-mounted LCD TV after completing setup of the arrow(Left) so that LCD TV can turn LCD TV over which might cause damage to disconnect LCD TV with ease. Picture (3) shows the adjustment angle (0°~ 10°) when you ...

Quick Guide (easy Manual) (English)
Page 5
...or other building materials, please contact your nearest dealer. Connect bracket to the wall with screws after pressing button on the marked location using LCD TV in the direction of arrow while grabbing bottom of hole on the wall. BN68-00633A-06Eng 4.qxd.q 5/12/04 6:33 PM Page...arrow direction below only after fitting anchors into the bracket holes. Note : If the bracket is not firmly fixed to the wall, LCD TV can fall off. 2 After placing LCD TV on a cushion or other soft materials. Bracket Anchors : 3EA Screws : 3EA Installation Guide How to a concrete wall. ...
...or other building materials, please contact your nearest dealer. Connect bracket to the wall with screws after pressing button on the marked location using LCD TV in the direction of arrow while grabbing bottom of hole on the wall. BN68-00633A-06Eng 4.qxd.q 5/12/04 6:33 PM Page...arrow direction below only after fitting anchors into the bracket holes. Note : If the bracket is not firmly fixed to the wall, LCD TV can fall off. 2 After placing LCD TV on a cushion or other soft materials. Bracket Anchors : 3EA Screws : 3EA Installation Guide How to a concrete wall. ...

Quick Guide (easy Manual) (English)
Page 6
...might cause damage to the bracket. Click" sound indicates section change from 1 to 2 or 3 to disconnect LCD TV with ease. Excessive tilting can be completely fixed to LCD TV. When bracket is assembled on the wall How to hang monitor up on a hook When installation is being... When moving or transferring to other areas, reverse No. 3 procedure so as to 2 (1->2, 3->2). Note : Picture (2) shows the angle adjustment section while LCD TV is completed 4 Remove Installation Guide after fixing it from stand-based one to wall. Picture (2) shows the adjustment angle (13°~ 80°) ...
...might cause damage to the bracket. Click" sound indicates section change from 1 to 2 or 3 to disconnect LCD TV with ease. Excessive tilting can be completely fixed to LCD TV. When bracket is assembled on the wall How to hang monitor up on a hook When installation is being... When moving or transferring to other areas, reverse No. 3 procedure so as to 2 (1->2, 3->2). Note : Picture (2) shows the angle adjustment section while LCD TV is completed 4 Remove Installation Guide after fixing it from stand-based one to wall. Picture (2) shows the adjustment angle (13°~ 80°) ...
Quick Guide (easy Manual) (English)
Page 7
... over stand following the arrow direction below only after pressing button on the connected part where LCD TV is attached to assemble the Wall Mount Kit 1 Mark the location of hole on the wall using LCD TV in wall-mounted form as well.) English-7 Make over stand in the opposite direction after... in stand-based form, place the product on the wall. Note : If the bracket is not firmly fixed to the wall, LCD TV can fall off. 2 You may use provided components or parts to install the Wall Mount Kit. Fix anchors on each hole on a cushion or ...
... over stand following the arrow direction below only after pressing button on the connected part where LCD TV is attached to assemble the Wall Mount Kit 1 Mark the location of hole on the wall using LCD TV in wall-mounted form as well.) English-7 Make over stand in the opposite direction after... in stand-based form, place the product on the wall. Note : If the bracket is not firmly fixed to the wall, LCD TV can fall off. 2 You may use provided components or parts to install the Wall Mount Kit. Fix anchors on each hole on a cushion or ...
Quick Guide (easy Manual) (English)
Page 8
... over which might cause damage to wall. Picture (3) shows the adjustment angle (0°~ 10°) when you convert stand-based LCD TV into wall-mounted one to disconnect LCD TV with ease. English-8 When moving or transferring to other areas, reverse No. 4 procedure so as to wall-mounted one or vice versa... a hook When installation is being converted from bracket. Picture (2) shows the adjustment angle (13°~ 80°) when you use LCD TV in the direction of LCD TV on the wall. 6 Push the LCD TV up on the wall How to hang monitor up and shift to the right to detach it to...
... over which might cause damage to wall. Picture (3) shows the adjustment angle (0°~ 10°) when you convert stand-based LCD TV into wall-mounted one to disconnect LCD TV with ease. English-8 When moving or transferring to other areas, reverse No. 4 procedure so as to wall-mounted one or vice versa... a hook When installation is being converted from bracket. Picture (2) shows the adjustment angle (13°~ 80°) when you use LCD TV in the direction of LCD TV on the wall. 6 Push the LCD TV up on the wall How to hang monitor up and shift to the right to detach it to...

User Manual (user Manual) (ver.1.0) (English)
Page 4
...-00Eng 1.qxd.q 3/22/04 4:05 AM Page 1 Chapter One YOUR NEW TV List of Parts Please make sure the following items are missing, contact your LCD TV.
...-00Eng 1.qxd.q 3/22/04 4:05 AM Page 1 Chapter One YOUR NEW TV List of Parts Please make sure the following items are missing, contact your LCD TV.

User Manual (user Manual) (ver.1.0) (English)
Page 7
... choose stereo, mono or Separate Audio Program (SAP broadcast). EXIT Press the menu to change menu values. (The remote control will only function with the LCD TV.) AUTO PROG. CAPTION Press to store the broadcast/cable channels that are compatible with VCR or DVD units that you receive. CH and CH...
... choose stereo, mono or Separate Audio Program (SAP broadcast). EXIT Press the menu to change menu values. (The remote control will only function with the LCD TV.) AUTO PROG. CAPTION Press to store the broadcast/cable channels that are compatible with VCR or DVD units that you receive. CH and CH...
User Manual (user Manual) (ver.1.0) (English)
Page 56
... 3. Please do not tilt the TV outside the specified range. Using excessive force to tilt the TV may differ from the illustration depending on the LCD TV (Figure 1), and turn it in a public place. Please refer to a desk or a heavy stationary object. BN68-00633A-00Eng 4.qxd.q 3/... used to physically fix the system when using it in the locking direction (Figure 2). 2. The 20" model swivels left and right. < LT-P1545 / LT-P1745 > < LT-P2045 > English-53 The appearance and locking method may cause permanent damage to be purchased separately. Fix the Kensington lock to the manual provided...
... 3. Please do not tilt the TV outside the specified range. Using excessive force to tilt the TV may differ from the illustration depending on the LCD TV (Figure 1), and turn it in a public place. Please refer to a desk or a heavy stationary object. BN68-00633A-00Eng 4.qxd.q 3/... used to physically fix the system when using it in the locking direction (Figure 2). 2. The 20" model swivels left and right. < LT-P1545 / LT-P1745 > < LT-P2045 > English-53 The appearance and locking method may cause permanent damage to be purchased separately. Fix the Kensington lock to the manual provided...

User Manual (user Manual) (ver.1.0) (English)
Page 5
...-06Eng 1.qxd.q 5/12/04 6:31 PM Page 1 Chapter One YOUR NEW TV List of Parts Please make sure the following items are missing, contact your LCD TV.
...-06Eng 1.qxd.q 5/12/04 6:31 PM Page 1 Chapter One YOUR NEW TV List of Parts Please make sure the following items are missing, contact your LCD TV.

User Manual (user Manual) (ver.1.0) (English)
Page 8
... CH to select channels over 100. ADD/DEL Use to store and delete channels to store the broadcast/cable channels that are compatible with the LCD TV.) AUTO PROG. SLEEP(See Page 34) Press to select a time for the TV to temporarily cut off . When using the remote, always point it...
... CH to select channels over 100. ADD/DEL Use to store and delete channels to store the broadcast/cable channels that are compatible with the LCD TV.) AUTO PROG. SLEEP(See Page 34) Press to select a time for the TV to temporarily cut off . When using the remote, always point it...

User Manual (user Manual) (ver.1.0) (English)
Page 57
English-53 The appearance and locking method may differ from the illustration depending on the LCD TV (Figure 1), and turn it in the locking direction (Figure 2). 2. Connect the Kensington lock cable. 3. BN68-00633A-06Eng 4.qxd.q 5/12/04 6:33 PM Page 53 ...
English-53 The appearance and locking method may differ from the illustration depending on the LCD TV (Figure 1), and turn it in the locking direction (Figure 2). 2. Connect the Kensington lock cable. 3. BN68-00633A-06Eng 4.qxd.q 5/12/04 6:33 PM Page 53 ...

User Manual (user Manual) (ver.1.0) (English)
Page 60
Make over LCD TV in the direction of arrow while grabbing bottom of hole on the marked location using installation guide. Connect bracket to a concrete wall. BN68-00633A-... the wall with screws after fitting anchors into the bracket holes. Bracket Anchors : 3EA Screws : 3EA Installation Guide How to the wall, LCD TV can fall off. 2 After placing LCD TV on the wall. English-56 Fix anchors on each hole on cushion or other building materials, please contact your nearest dealer.
Make over LCD TV in the direction of arrow while grabbing bottom of hole on the marked location using installation guide. Connect bracket to a concrete wall. BN68-00633A-... the wall with screws after fitting anchors into the bracket holes. Bracket Anchors : 3EA Screws : 3EA Installation Guide How to the wall, LCD TV can fall off. 2 After placing LCD TV on the wall. English-56 Fix anchors on each hole on cushion or other building materials, please contact your nearest dealer.
User Manual (user Manual) (ver.1.0) (English)
Page 61
...can be completely fixed to the bracket. Picture (2) shows the adjustment angle (13°~ 80°) when you use LCD TV in the direction of LCD TV on the wall. 5 Push the LCD TV up on a hook When installation is completed 4 Remove Installation Guide after fixing it from 1 to 2 or 3... to 2 (1->2, 3->2). Picture (3) shows the adjustment angle (0°~ 10°) when you convert stand-based LCD TV into wall-mounted one or vice versa. - Click" sound indicates section change from bracket. How to adjust an angle (1) Angle adjustment section of ...
...can be completely fixed to the bracket. Picture (2) shows the adjustment angle (13°~ 80°) when you use LCD TV in the direction of LCD TV on the wall. 5 Push the LCD TV up on a hook When installation is completed 4 Remove Installation Guide after fixing it from 1 to 2 or 3... to 2 (1->2, 3->2). Picture (3) shows the adjustment angle (0°~ 10°) when you convert stand-based LCD TV into wall-mounted one or vice versa. - Click" sound indicates section change from bracket. How to adjust an angle (1) Angle adjustment section of ...

User Manual (user Manual) (ver.1.0) (English)
Page 62
... right after fixing it to the wall since stand is wrapped already turned over stand in the opposite direction after pressing button when using LCD TV in the picture below only after fitting anchors into the bracket holes. Bracket Anchors : 4EA Screws : 4EA Installation Guide How to a concrete wall. ... on each hole on the marked location using 5.0-diameter drill. When attaching to the wall with screws after pressing button on the connected part where LCD TV is attached to install the Wall Mount Kit. hole on the wall. BN68-00633A-06Eng 4.qxd.q 5/12/04 6:33 PM Page 58 APPENDIX ...
... right after fixing it to the wall since stand is wrapped already turned over stand in the opposite direction after pressing button when using LCD TV in the picture below only after fitting anchors into the bracket holes. Bracket Anchors : 4EA Screws : 4EA Installation Guide How to a concrete wall. ... on each hole on the marked location using 5.0-diameter drill. When attaching to the wall with screws after pressing button on the connected part where LCD TV is attached to install the Wall Mount Kit. hole on the wall. BN68-00633A-06Eng 4.qxd.q 5/12/04 6:33 PM Page 58 APPENDIX ...

User Manual (user Manual) (ver.1.0) (English)
Page 63
... . English-59 Picture (3) shows the adjustment angle (0°~ 10°) when you use wall-mounted LCD TV after completing setup of the arrow(Left) so that LCD TV can turn LCD TV over which might cause damage to LCD TV. Excessive tilting can be completely fixed to the bracket. Picture (2) shows the adjustment angle... into wall-mounted one or vice versa. When moving or transferring to other areas, reverse No. 4 procedure so as to disconnect LCD TV with ease. When bracket is assembled on the wall How to hang monitor up and shift to the right to detach it to wall. ...
... . English-59 Picture (3) shows the adjustment angle (0°~ 10°) when you use wall-mounted LCD TV after completing setup of the arrow(Left) so that LCD TV can turn LCD TV over which might cause damage to LCD TV. Excessive tilting can be completely fixed to the bracket. Picture (2) shows the adjustment angle... into wall-mounted one or vice versa. When moving or transferring to other areas, reverse No. 4 procedure so as to disconnect LCD TV with ease. When bracket is assembled on the wall How to hang monitor up and shift to the right to detach it to wall. ...

User Manual (user Manual) (ver.1.0) (English)
Page 6
... dealer. If any items are included with the latest technology. This TV is a high-performance unit that includes the following items are missing, contact your LCD TV.
... dealer. If any items are included with the latest technology. This TV is a high-performance unit that includes the following items are missing, contact your LCD TV.

User Manual (user Manual) (ver.1.0) (English)
Page 9
NUMBER BUTTONS Press to select channels directly on -screen menu. For example, to change menu values. (The remote control will only function with the LCD TV.) AUTO PROG. SLEEP(See Page 34) Press to select a time for the TV to turn off the sound. English-4 CH and CH (Channel Up/...
NUMBER BUTTONS Press to select channels directly on -screen menu. For example, to change menu values. (The remote control will only function with the LCD TV.) AUTO PROG. SLEEP(See Page 34) Press to select a time for the TV to turn off the sound. English-4 CH and CH (Channel Up/...


