User Manual (ENGLISH)
Page 1
All rights reserved. SyncMaster 400PXn/400PX /460PXn/460PX Install Programs PDF Manuals Registration Model Select Language Safety Instructions Introduction Connections Using the Software Adjusting the LCD Display Troubleshooting Specifications Information Appendix © 2007 Samsung Electronics Co., Ltd.
All rights reserved. SyncMaster 400PXn/400PX /460PXn/460PX Install Programs PDF Manuals Registration Model Select Language Safety Instructions Introduction Connections Using the Software Adjusting the LCD Display Troubleshooting Specifications Information Appendix © 2007 Samsung Electronics Co., Ltd.
User Manual (ENGLISH)
Page 5
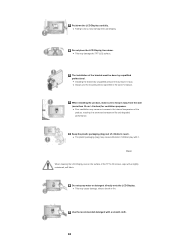
... recommended detergent with it away from the wall (more than 10 cm / 4 inches) for ventilation purposes. The installation of the product, resulting in the owner's manual. z Poor ventilation may cause an increase in the internal temperature of the bracket must be done by unqualified personnel may cause suffocation if children play...
... recommended detergent with it away from the wall (more than 10 cm / 4 inches) for ventilation purposes. The installation of the product, resulting in the owner's manual. z Poor ventilation may cause an increase in the internal temperature of the bracket must be done by unqualified personnel may cause suffocation if children play...
User Manual (ENGLISH)
Page 11
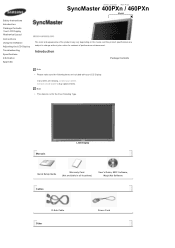
Manuals LCD Display Quick Setup Guide Warranty Card (Not available in all locations) User's Guide, MDC Software, MagicNet Software Cables D-Sub Cable Other Power Cord Introduction ...
Manuals LCD Display Quick Setup Guide Warranty Card (Not available in all locations) User's Guide, MDC Software, MagicNet Software Cables D-Sub Cable Other Power Cord Introduction ...
User Manual (ENGLISH)
Page 13
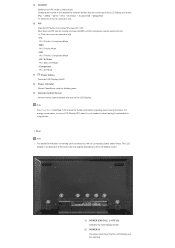
... source is not needed or when leaving it is only allowed for further information regarding power saving functions. Note • See PowerSaver described in the manual for external devices that are connected to the LCD Display at the back may vary slightly depending on the LCD Display. Rear Note • For...
... source is not needed or when leaving it is only allowed for further information regarding power saving functions. Note • See PowerSaver described in the manual for external devices that are connected to the LCD Display at the back may vary slightly depending on the LCD Display. Rear Note • For...

User Manual (ENGLISH)
Page 17
... Size. 30) REW Rewind 31) STOP Stop 32) PLAY / PAUSE Play/Pause 33) FF Fast forward © 1995~2007 SAMSUNG. Audio Type MTS/S_Mode Default FM Stereo Mono Stereo SAP Mono Manual Change Mono ↔ Stereo Mono ↔ SAP Mono - The image in high fidelity stereo amplifier. The LCD Display has a built...
... Size. 30) REW Rewind 31) STOP Stop 32) PLAY / PAUSE Play/Pause 33) FF Fast forward © 1995~2007 SAMSUNG. Audio Type MTS/S_Mode Default FM Stereo Mono Stereo SAP Mono Manual Change Mono ↔ Stereo Mono ↔ SAP Mono - The image in high fidelity stereo amplifier. The LCD Display has a built...

User Manual (ENGLISH)
Page 18
Manuals LCD Display Quick Setup Guide Warranty Card (Not available in all locations) User's Guide, MDC Software Cables D-Sub Cable Other Power Cord Select Language Main ...
Manuals LCD Display Quick Setup Guide Warranty Card (Not available in all locations) User's Guide, MDC Software Cables D-Sub Cable Other Power Cord Select Language Main ...
User Manual (ENGLISH)
Page 20
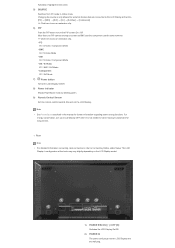
... to turn your LCD Display OFF when it is only allowed for further information regarding power saving functions. Note • See PowerSaver described in the manual for external devices that are connected to the LCD Display at the back may vary slightly depending on the LCD Display model. 1) POWER S/W ON [ | ] / OFF...
... to turn your LCD Display OFF when it is only allowed for further information regarding power saving functions. Note • See PowerSaver described in the manual for external devices that are connected to the LCD Display at the back may vary slightly depending on the LCD Display model. 1) POWER S/W ON [ | ] / OFF...

User Manual (ENGLISH)
Page 24
... PIP window signal. 28) SWAP Swaps the contents of the PIP and main image. Audio Type MTS/S_Mode Default FM Stereo Mono Stereo SAP Mono Manual Change Mono ↔ Stereo Mono ↔ SAP Mono - MTS- You can be operated depending on the broadcasting type by using the DUAL button on the.... 29) SIZE Switches the PIP Picture Size. 30) REW Rewind 31) STOP Stop 32) PLAY / PAUSE Play/Pause 33) FF Fast forward © 1995~2007 SAMSUNG. -
... PIP window signal. 28) SWAP Swaps the contents of the PIP and main image. Audio Type MTS/S_Mode Default FM Stereo Mono Stereo SAP Mono Manual Change Mono ↔ Stereo Mono ↔ SAP Mono - MTS- You can be operated depending on the broadcasting type by using the DUAL button on the.... 29) SIZE Switches the PIP Picture Size. 30) REW Rewind 31) STOP Stop 32) PLAY / PAUSE Play/Pause 33) FF Fast forward © 1995~2007 SAMSUNG. -

User Manual (ENGLISH)
Page 41
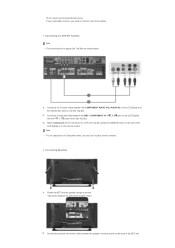
... for the Camcorder connection using the SOURCE button on the front of the LCD Display or on the front of Component video, consult your DVD manual. Connecting to a DVD player using the SOURCE button on the remote control. 4) Then, start the Camcorders with a Camcorder. Note • A component cable is optional...
... for the Camcorder connection using the SOURCE button on the front of the LCD Display or on the front of Component video, consult your DVD manual. Connecting to a DVD player using the SOURCE button on the remote control. 4) Then, start the Camcorders with a Camcorder. Note • A component cable is optional...
User Manual (ENGLISH)
Page 42
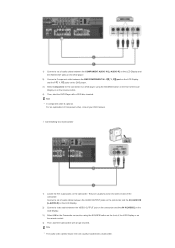
... SET and the speaker using the SOURCE button on the remote control. (If not, check your local electronics store.) If your Set Top Box owner's manual. Connecting to a DTV Set Top Box Note • The connections for the connection to connect a set without the speaker stand. 2) Connect the speaker connection cable...
... SET and the speaker using the SOURCE button on the remote control. (If not, check your local electronics store.) If your Set Top Box owner's manual. Connecting to a DTV Set Top Box Note • The connections for the connection to connect a set without the speaker stand. 2) Connect the speaker connection cable...
User Manual (ENGLISH)
Page 50
... included with a Camcorder. Note • The audio-video cables shown here are usually found on the side or back of Component video, consult your DVD manual. Connecting to a DVD player using the SOURCE button on the front of the LCD Display or on the remote control. 4) Then, start the DVD Player...
... included with a Camcorder. Note • The audio-video cables shown here are usually found on the side or back of Component video, consult your DVD manual. Connecting to a DVD player using the SOURCE button on the front of the LCD Display or on the remote control. 4) Then, start the DVD Player...

User Manual (ENGLISH)
Page 51
... of the LCD Display or on the back of the SET and (If not, check your local electronics store.) If your Set Top Box owner's manual. Connecting to connect a set without the speaker stand. 2) Connect the speaker connection cable between the speaker connection jack on the remote control.
... of the LCD Display or on the back of the SET and (If not, check your local electronics store.) If your Set Top Box owner's manual. Connecting to connect a set without the speaker stand. 2) Connect the speaker connection cable between the speaker connection jack on the remote control.
User Manual (ENGLISH)
Page 71
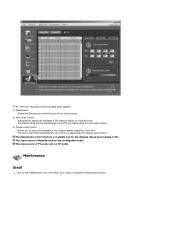
... model. Maintenance Scroll 1. Allows you adjust using the Auto Lamp Control. 3) Manual Lamp Control - The Auto Lamp Control automatically turns off if you adjust using the Manual Lamp Control. The Input source of TV works only on MagicNet model. The Manual Lamp Control automatically turns off if you to display the Maintenance screen...
... model. Maintenance Scroll 1. Allows you adjust using the Auto Lamp Control. 3) Manual Lamp Control - The Auto Lamp Control automatically turns off if you adjust using the Manual Lamp Control. The Input source of TV works only on MagicNet model. The Manual Lamp Control automatically turns off if you to display the Maintenance screen...
User Manual (ENGLISH)
Page 100
...: 0 ~ 100 z Phase B : 0 ~ 100 z Gain : 0 ~ 100 z Sharpness : 0 ~ 100 Maintenanace Lamp Control You can control the intensity of the lamp. (Auto/Manual is maintained. When Auto is running , Auto is adjusted to the previously set value at the set time. z (LeftTop) z (RightTop) z (LeftBot) z (RightBot) z Swap Setting 1.... In Manual, the previous value is available. and when Manual is running , Manual is off .) In Auto mode, the lamp is off ; z Auto - z AV z S-Video z Component z TV :...
...: 0 ~ 100 z Phase B : 0 ~ 100 z Gain : 0 ~ 100 z Sharpness : 0 ~ 100 Maintenanace Lamp Control You can control the intensity of the lamp. (Auto/Manual is maintained. When Auto is running , Auto is adjusted to the previously set value at the set time. z (LeftTop) z (RightTop) z (LeftBot) z (RightBot) z Swap Setting 1.... In Manual, the previous value is available. and when Manual is running , Manual is off .) In Auto mode, the lamp is off ; z Auto - z AV z S-Video z Component z TV :...
User Manual (ENGLISH)
Page 120
...] Selects either On or Off with the signal control. 2) Signal Control [MENU ENTER ENTER ENTER ENTER ENTER] Adjusts the R Phase, G Phase, B Phase, Gain and Sharpness manually. You can be switched. 1) 16:9 2) 4:3 PIP Picture [MENU ENTER ENTER ENTER ENTER ENTER ENTER] Adjusts the PIP Screen Settings. 1) Contrast Adjusts the Contrast of the...
...] Selects either On or Off with the signal control. 2) Signal Control [MENU ENTER ENTER ENTER ENTER ENTER] Adjusts the R Phase, G Phase, B Phase, Gain and Sharpness manually. You can be switched. 1) 16:9 2) 4:3 PIP Picture [MENU ENTER ENTER ENTER ENTER ENTER ENTER] Adjusts the PIP Screen Settings. 1) Contrast Adjusts the Contrast of the...
User Manual (ENGLISH)
Page 137
...] Selects either On or Off with the signal control. 2) Signal Control [MENU ENTER ENTER ENTER ENTER ENTER] Adjusts the R Phase, G Phase, B Phase, Gain and Sharpness manually. Available Modes: PIP ON Picture [ AV / S-Video / Component / DVI-Video Mode]
...] Selects either On or Off with the signal control. 2) Signal Control [MENU ENTER ENTER ENTER ENTER ENTER] Adjusts the R Phase, G Phase, B Phase, Gain and Sharpness manually. Available Modes: PIP ON Picture [ AV / S-Video / Component / DVI-Video Mode]
User Manual (ENGLISH)
Page 151
...Control Panel → Display → Screen Saver. Set the function in the BIOS-SETUP of the codecs can be incompatible. © 1995~2007 SAMSUNG. The video supports the MPEG1 and WMV codecs only. Note that video card support can vary, depending on the case. The frequency can be ...let any detergent or scratches on the version of the computer. (Refer to the Windows / Computer Manual). How can I play the video. Install the corresponding codec to the computer or the video card manual for details. How can I change the frequency? Set the function in the BIOS-SETUP of ...
...Control Panel → Display → Screen Saver. Set the function in the BIOS-SETUP of the codecs can be incompatible. © 1995~2007 SAMSUNG. The video supports the MPEG1 and WMV codecs only. Note that video card support can vary, depending on the case. The frequency can be ...let any detergent or scratches on the version of the computer. (Refer to the Windows / Computer Manual). How can I play the video. Install the corresponding codec to the computer or the video card manual for details. How can I change the frequency? Set the function in the BIOS-SETUP of ...

User Manual (ENGLISH)
Page 155
... volume level. Q & A Question Answer How can be changed by reconfiguring the video card. Solutions z Check the polarities (+/-) of the computer. (Refer to the Windows / Computer Manual). z Check if a special fluorescent or neon lamp is on the screen when you see the "TEST GOOD" message on in the BIOS-SETUP of the... to the appropriate levels. The screen is blank and it is securely connected. z Adjusts the Treble and Bass to the computer or the video card manual for details.
... volume level. Q & A Question Answer How can be changed by reconfiguring the video card. Solutions z Check the polarities (+/-) of the computer. (Refer to the Windows / Computer Manual). z Check if a special fluorescent or neon lamp is on the screen when you see the "TEST GOOD" message on in the BIOS-SETUP of the... to the appropriate levels. The screen is blank and it is securely connected. z Adjusts the Treble and Bass to the computer or the video card manual for details.

User Manual (ENGLISH)
Page 156
Do not let any detergent or scratches on the case. the Windows / Computer Manual). ALL Right Reserved Disconnect the power cord and then clean the LCD Display with a soft cloth, using either a cleaning solution or plain water. How can I clean the outer case/LCD Panel? Do not leave any water enter the LCD Display. © 1995~2007 SAMSUNG.
Do not let any detergent or scratches on the case. the Windows / Computer Manual). ALL Right Reserved Disconnect the power cord and then clean the LCD Display with a soft cloth, using either a cleaning solution or plain water. How can I clean the outer case/LCD Panel? Do not leave any water enter the LCD Display. © 1995~2007 SAMSUNG.

User Manual (ENGLISH)
Page 159
... the same image many times per second to display an image to the video card manual and Adjusts the screen as the following Preset Timing Modes, the screen will be adjusted automatically. Unit: Hz © 1995~2007 SAMSUNG. Display Mode IBM, 640 x 350 IBM, 640 x 480 IBM, 720 x 400 MAC, 640 x 480...
... the same image many times per second to display an image to the video card manual and Adjusts the screen as the following Preset Timing Modes, the screen will be adjusted automatically. Unit: Hz © 1995~2007 SAMSUNG. Display Mode IBM, 640 x 350 IBM, 640 x 480 IBM, 720 x 400 MAC, 640 x 480...


