User Manual (ENGLISH)
Page 3
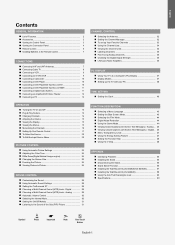
...(Low Noise Amplifier 36 PC DISPLAY Using Your TV as a Computer (PC) Display 37 Display Modes 37 Setting up the TV with your PC 38 TIME SETTING Setting the Clock 40 FUNCTION DESCRIPTION Selecting a Menu Language 43 Setting the Blue Screen Mode 43 Selecting the Film Mode 44 Digital ...Noise Reduction 44 Using the Game Mode 44 Viewing Closed Captions (On-Screen Text Messages) -
...(Low Noise Amplifier 36 PC DISPLAY Using Your TV as a Computer (PC) Display 37 Display Modes 37 Setting up the TV with your PC 38 TIME SETTING Setting the Clock 40 FUNCTION DESCRIPTION Selecting a Menu Language 43 Setting the Blue Screen Mode 43 Selecting the Film Mode 44 Digital ...Noise Reduction 44 Using the Game Mode 44 Viewing Closed Captions (On-Screen Text Messages) -
User Manual (ENGLISH)
Page 5
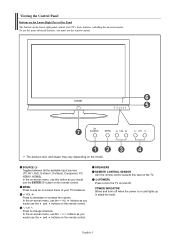
... control. SOURCE Toggles between all the available input sources (TV, AV1, AV2, S-Video1, S-Video2, Component, PC, HDMI1, HDMI2). The product color and shape may vary depending on -screen menu. POWER INDICATOR Blinks and turns off . MENU Press to turn the TV on and off when the power is on the remote ...control. In the on the remote control. In the on-screen menu, use the remote control. In the on-screen menu, use the buttons as you would use the and buttons...
... control. SOURCE Toggles between all the available input sources (TV, AV1, AV2, S-Video1, S-Video2, Component, PC, HDMI1, HDMI2). The product color and shape may vary depending on -screen menu. POWER INDICATOR Blinks and turns off . MENU Press to turn the TV on and off when the power is on the remote ...control. In the on the remote control. In the on-screen menu, use the remote control. In the on-screen menu, use the buttons as you would use the and buttons...
User Manual (ENGLISH)
Page 8
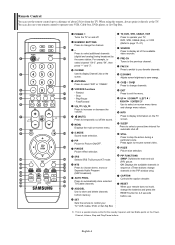
...all of about 23 feet from memory. INFO Press to display Channel Lists on the TV screen. PIP FUNCTIONS SWAP: Switches the main and sub (PIP) picture. CH MGR Used to display information on the screen. ADD/DEL Use to store and delete channels to change channels. NUMERIC BUTTONS Press to... channel "54-3", press "54", then press "-" and "3". English-6 For example, to select on -screen menu. When using the remote, always point it directly at the TV. Stop - MENU Displays the main on -screen menu items and change channels in Picture ON/OFF. FAV.CH Press to switch to a distance of...
...all of about 23 feet from memory. INFO Press to display Channel Lists on the TV screen. PIP FUNCTIONS SWAP: Switches the main and sub (PIP) picture. CH MGR Used to display information on the screen. ADD/DEL Use to store and delete channels to change channels. NUMERIC BUTTONS Press to... channel "54-3", press "54", then press "-" and "3". English-6 For example, to select on -screen menu. When using the remote, always point it directly at the TV. Stop - MENU Displays the main on -screen menu items and change channels in Picture ON/OFF. FAV.CH Press to switch to a distance of...
User Manual (ENGLISH)
Page 17
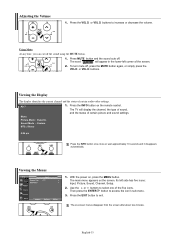
...MUTE button and the sound cuts off the sound using the MUTE button. 1. Viewing the Menus 1. With the power on -screen menus disappear from the screen after about two minutes. The TV will appear in the lower-left side has five icons: Input, Picture, Sound, Channel, Setup. 2. The on , ...press the MENU button. Press the INFO button on the screen. Use the or buttons to access the icon's sub-menu. 3. ...
...MUTE button and the sound cuts off the sound using the MUTE button. 1. Viewing the Menus 1. With the power on -screen menus disappear from the screen after about two minutes. The TV will appear in the lower-left side has five icons: Input, Picture, Sound, Channel, Setup. 2. The on , ...press the MENU button. Press the INFO button on the screen. Use the or buttons to access the icon's sub-menu. 3. ...
User Manual (ENGLISH)
Page 26
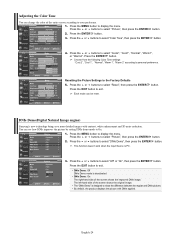
...to select "Picture", then press the ENTER button. 2. Press the or buttons to display the menu. The left-hand side of the screen shows the original image. • The "DNIe Demo" is designed to display the menu. button. Press the MENU button to show ...Normal", "Warm 1", "Warm 2" according to select "Picture", then press the ENTER button. 2. Each mode can be reset. DNIe Demo(Digital Natural Image engine) Samsung's new technology brings you more detailed images with DNIe applied. Press the ENTER button. Press the or buttons to personal preference. Press the or buttons...
...to select "Picture", then press the ENTER button. 2. Press the or buttons to display the menu. The left-hand side of the screen shows the original image. • The "DNIe Demo" is designed to display the menu. button. Press the MENU button to show ...Normal", "Warm 1", "Warm 2" according to select "Picture", then press the ENTER button. 2. Each mode can be reset. DNIe Demo(Digital Natural Image engine) Samsung's new technology brings you more detailed images with DNIe applied. Press the ENTER button. Press the or buttons to personal preference. Press the or buttons...
User Manual (ENGLISH)
Page 27
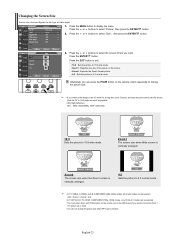
... mode. • Zoom1 : Magnifies the size of video input. 1. Zoom2 The screen size when the Zoom1 screen is vertically enlarged. 4:3 Sets the picture to 4:3 normal mode. • In TV, VIDEO, S-VIDEO, and all COMPONENT (480i, 480p) modes, all screen modes can be selected. (16:9 • Zoom1 • Zoom2 • 4:3).... picture to select "Size", then press the ENTER button. 3. Press the ENTER button. Zoom1 The screen size when Wide screen is set to select "Picture", then press the ENTER button. 2. View the TV in the OSD menu) if you want to move the Zoom 1 or 2 picture up or down...
... mode. • Zoom1 : Magnifies the size of video input. 1. Zoom2 The screen size when the Zoom1 screen is vertically enlarged. 4:3 Sets the picture to 4:3 normal mode. • In TV, VIDEO, S-VIDEO, and all COMPONENT (480i, 480p) modes, all screen modes can be selected. (16:9 • Zoom1 • Zoom2 • 4:3).... picture to select "Size", then press the ENTER button. 3. Press the ENTER button. Zoom1 The screen size when Wide screen is set to select "Picture", then press the ENTER button. 2. View the TV in the OSD menu) if you want to move the Zoom 1 or 2 picture up or down...

User Manual (ENGLISH)
Page 28
Freezing the Picture 1. Viewing Picture-in-Picture This product has one in the same mode. Press the or buttons to function in the PIP screen. Normal sound will disappear. Activating Picture-in PIP mode and turn it on the remote control repeatedly to select "On", then press the ENTER button. ...'below for details. Press the or buttons to freeze a moving picture. If you cannot watch two video sources. (See page 31 to simultaneously watch one TV channel in the main screen, and a different one built-in operation, the PIP function cannot be heard.
Freezing the Picture 1. Viewing Picture-in-Picture This product has one in the same mode. Press the or buttons to function in the PIP screen. Normal sound will disappear. Activating Picture-in PIP mode and turn it on the remote control repeatedly to select "On", then press the ENTER button. ...'below for details. Press the or buttons to freeze a moving picture. If you cannot watch two video sources. (See page 31 to simultaneously watch one TV channel in the main screen, and a different one built-in operation, the PIP function cannot be heard.
User Manual (ENGLISH)
Page 29
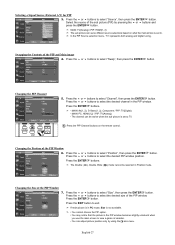
... and press the ENTER button. Press the ENTER button. English-27 Selecting a Signal Source (External A/V) for PIP. 3. In the PIP Source selection menu, 'TV' represents both analog and digital tuning. Press the or buttons to select "Source", then press the ENTER button. Press the or buttons to select the... desired channel in the PIP window becomes slightly unnatural when you use the main screen to select the desired size of the PIP Window 7. Press the or buttons to exit. Press the EXIT button to select "Position", then ...
... and press the ENTER button. Press the ENTER button. English-27 Selecting a Signal Source (External A/V) for PIP. 3. In the PIP Source selection menu, 'TV' represents both analog and digital tuning. Press the or buttons to select "Source", then press the ENTER button. Press the or buttons to select the... desired channel in the PIP window becomes slightly unnatural when you use the main screen to select the desired size of the PIP Window 7. Press the or buttons to exit. Press the EXIT button to select "Position", then ...
User Manual (ENGLISH)
Page 34
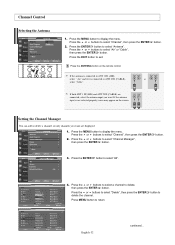
... to select "Channel", then press the ENTER 2. Press MENU button to select "Channel Manager", then press the ENTER button. Press the ANTENNA button on the screen. If the antenna input is connected to ANT 2 IN (CABLE), or select "Cable". Press the or buttons to retum. Press the ENTER button to delete...
... to select "Channel", then press the ENTER 2. Press MENU button to select "Channel Manager", then press the ENTER button. Press the ANTENNA button on the screen. If the antenna input is connected to ANT 2 IN (CABLE), or select "Cable". Press the or buttons to retum. Press the ENTER button to delete...
User Manual (ENGLISH)
Page 39
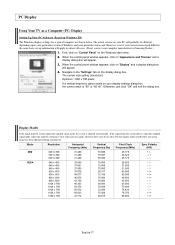
... the standard signal mode, the screen is "60" or "60 Hz". otherwise there may be different, depending upon your particular version of Windows and your computer manufacturer or Samsung Dealer.) 1. VESA 640 x 480... 35.000 70.000 28.560 - / - 640 x 480 37.861 72.809 31.500 - / - 640 x 480 37.500 75.000 31.500 - / - 800 x 600 37.879 60.317 40... 768 pixels If a vertical-frequency option exists on the display dialog-box. PC Display Using Your TV as a Computer (PC) Display Setting Up Your PC Software (Based on Windows XP) The Windows display...
... the standard signal mode, the screen is "60" or "60 Hz". otherwise there may be different, depending upon your particular version of Windows and your computer manufacturer or Samsung Dealer.) 1. VESA 640 x 480... 35.000 70.000 28.560 - / - 640 x 480 37.861 72.809 31.500 - / - 640 x 480 37.500 75.000 31.500 - / - 800 x 600 37.879 60.317 40... 768 pixels If a vertical-frequency option exists on the display dialog-box. PC Display Using Your TV as a Computer (PC) Display Setting Up Your PC Software (Based on Windows XP) The Windows display...
User Manual (ENGLISH)
Page 40
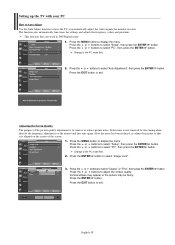
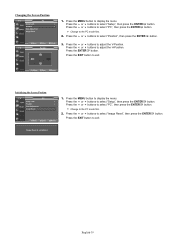
...", then press the ENTER button. Press the EXIT button to remove or reduce picture noise. Adjusting the Screen Quality The purpose of the picture quality adjustment is aligned on the center of the screen. 1. Press the MENU button to the PC mode first. 2. English-38 Change to display the menu.... button. Press the MENU button to select "Setup", then press the ENTER button. Press the or buttons to display the menu. Press the or buttons to have the TV set ...
...", then press the ENTER button. Press the EXIT button to remove or reduce picture noise. Adjusting the Screen Quality The purpose of the picture quality adjustment is aligned on the center of the screen. 1. Press the MENU button to the PC mode first. 2. English-38 Change to display the menu.... button. Press the MENU button to select "Setup", then press the ENTER button. Press the or buttons to display the menu. Press the or buttons to have the TV set ...
User Manual (ENGLISH)
Page 41
... to exit. Press the EXIT button to the PC mode first. 2. Press the EXIT button to select "Position", then press the ENTER button. 3. Initializing the Screen Position 1. Press the or buttons to exit. Press the or buttons to select "Image Reset", then press the ENTER button. Press the or buttons to... "Setup", then press the ENTER button. Press the or buttons to the PC mode first. 2. Press the or buttons to display the menu. Changing the Screen Position 1. Press the MENU button to adjust the H-Position.
... to exit. Press the EXIT button to the PC mode first. 2. Press the EXIT button to select "Position", then press the ENTER button. 3. Initializing the Screen Position 1. Press the or buttons to exit. Press the or buttons to select "Image Reset", then press the ENTER button. Press the or buttons to... "Setup", then press the ENTER button. Press the or buttons to the PC mode first. 2. Press the or buttons to display the menu. Changing the Screen Position 1. Press the MENU button to adjust the H-Position.
User Manual (ENGLISH)
Page 45
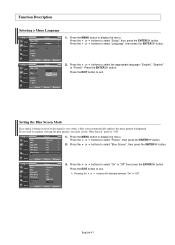
... Press the EXIT button to select "Picture", then press the ENTER button. 2. Setting the Blue Screen Mode If no signal is being received or the signal is very weak, a blue screen automatically replaces the noisy picture background. Press the or buttons to display the menu. English-43 Press... the ENTER button. 3. Press the or buttons to "Off" 1. If you wish to continue viewing the poor picture, you must set the "Blue Screen" mode to select "Setup", then press the ENTER button. Function Description Selecting a Menu Language 1. Press the MENU button to exit. Press the ENTER ...
... Press the EXIT button to select "Picture", then press the ENTER button. 2. Setting the Blue Screen Mode If no signal is being received or the signal is very weak, a blue screen automatically replaces the noisy picture background. Press the or buttons to display the menu. English-43 Press... the ENTER button. 3. Press the or buttons to "Off" 1. If you wish to continue viewing the poor picture, you must set the "Blue Screen" mode to select "Setup", then press the ENTER button. Function Description Selecting a Menu Language 1. Press the MENU button to exit. Press the ENTER ...
User Manual (ENGLISH)
Page 46
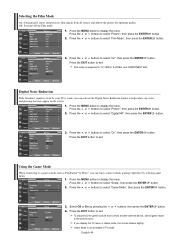
...exit. Press the EXIT button to exit. To disconnect the game console and connect another external device, cancel game mode in Game mode, the screen shakes slightly. Press the EXIT button to exit. Off: Switches off the Film mode. 1. Selecting the Film Mode On: Automatically senses and ...to help reduce any static and ghosting that may appear on the screen. 1. Film mode is supported in TV, VIDEO, S-VIDEO, and COMPONENT 480i Digital Noise Reduction If the broadcast signal received by your TV is not available in TV mode. Press the or buttons to a game console such as PlayStationTM...
...exit. Press the EXIT button to exit. To disconnect the game console and connect another external device, cancel game mode in Game mode, the screen shakes slightly. Press the EXIT button to exit. Off: Switches off the Film mode. 1. Selecting the Film Mode On: Automatically senses and ...to help reduce any static and ghosting that may appear on the screen. 1. Film mode is supported in TV, VIDEO, S-VIDEO, and COMPONENT 480i Digital Noise Reduction If the broadcast signal received by your TV is not available in TV mode. Press the or buttons to a game console such as PlayStationTM...

User Manual (ENGLISH)
Page 47
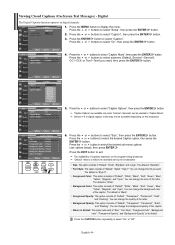
...; CC2: The Special Non-Synchronous Use Captions. Additional data, usually not program related. • Text3/Text4: Third and Fourth Text Services. Viewing Closed Captions (On-Screen Text Messages) - English-45 Press the or buttons to select submenu (Default, CC1~CC4 or Text1~Text4) you have an analog external component (such as...
...; CC2: The Special Non-Synchronous Use Captions. Additional data, usually not program related. • Text3/Text4: Third and Fourth Text Services. Viewing Closed Captions (On-Screen Text Messages) - English-45 Press the or buttons to select submenu (Default, CC1~CC4 or Text1~Text4) you have an analog external component (such as...
User Manual (ENGLISH)
Page 48
... want , then press the ENTER button. 5. Press the or button to its default. You can be available depending on the broadcast. 6. Viewing Closed Captions (On-Screen Text Messages) - Digital The Digital Captions function operates on the program being broadcast. Press the or buttons to select "Caption". Press the ENTER button to...
... want , then press the ENTER button. 5. Press the or button to its default. You can be available depending on the broadcast. 6. Viewing Closed Captions (On-Screen Text Messages) - Digital The Digital Captions function operates on the program being broadcast. Press the or buttons to select "Caption". Press the ENTER button to...
User Manual (ENGLISH)
Page 49
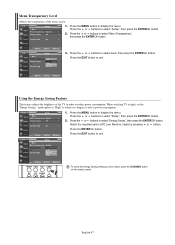
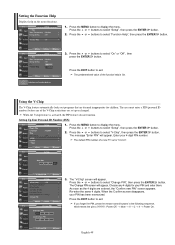
... "Energy Saving", then press the ENTER button. Press the ENTER button. button. 3. Using the Energy Saving Feature This feature adjusts the brightness of the menu screen. 1. Press the or buttons to exit. English-47 Press the EXIT button to select "Setup", then press the ENTER 2. When watching... TV at night, set the "Energy Saving " mode option to "High" to exit. Press the EXIT button to reduce eye fatigue as well as power consumption. 1. ...
... "Energy Saving", then press the ENTER button. Press the ENTER button. button. 3. Using the Energy Saving Feature This feature adjusts the brightness of the menu screen. 1. Press the or buttons to exit. English-47 Press the EXIT button to select "Setup", then press the ENTER 2. When watching... TV at night, set the "Energy Saving " mode option to "High" to exit. Press the EXIT button to reduce eye fatigue as well as power consumption. 1. ...
User Manual (ENGLISH)
Page 50
..., your PIN has been memorized. Press the or buttons to exit. When the V-chip feature is "0-0-0-0". 3. The default PIN number of a new TV set up or changed. Press the EXIT button to select "Setup", then press the ENTER button. 2. The user must enter a PIN (personal ID number) ... soon as the 4 digits are set is activated, the PIP features do not function. Press the or buttons to display the menu. The Change PIN screen will appear. Setting the Function Help Displays help is On. Press the EXIT button to select "Setup", then press the ENTER button. 2. The predetermined ...
..., your PIN has been memorized. Press the or buttons to exit. When the V-chip feature is "0-0-0-0". 3. The default PIN number of a new TV set up or changed. Press the EXIT button to select "Setup", then press the ENTER button. 2. The user must enter a PIN (personal ID number) ... soon as the 4 digits are set is activated, the PIP features do not function. Press the or buttons to display the menu. The Change PIN screen will appear. Setting the Function Help Displays help is On. Press the EXIT button to select "Setup", then press the ENTER button. 2. The predetermined ...
User Manual (ENGLISH)
Page 51
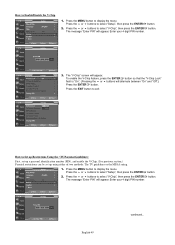
...to display the menu. How to select "V-Chip", then press the ENTER button. Press the or buttons to Set up Restrictions Using the "TV Parental Guidelines" First, set up a personal identification number (PIN), and enable the V-Chip. (See previous section.) Parental restrictions can be ...set up using either of two methods: The TV guidelines or the MPAA rating. 1. Enter your 4 digit PIN number. 3. Press the or buttons to Enable/Disable the V-Chip 1. How to select ...
...to display the menu. How to select "V-Chip", then press the ENTER button. Press the or buttons to Set up Restrictions Using the "TV Parental Guidelines" First, set up a personal identification number (PIN), and enable the V-Chip. (See previous section.) Parental restrictions can be ...set up using either of two methods: The TV guidelines or the MPAA rating. 1. Enter your 4 digit PIN number. 3. Press the or buttons to Enable/Disable the V-Chip 1. How to select ...
User Manual (ENGLISH)
Page 52
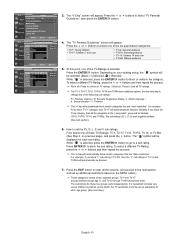
...Press to unlock all TV ratings. / Block all: Press to lock all the screens. (Or proceed to clear all TV ratings. For example, if you block "L" sub-rating in TV-PG, then the "L" sub-ratings in the "young adult" group will be blocked (TV-G, TV-PG, TV-14, and TV-MA). The V-chip ...be blocked. 7. Press the or buttons to block the sub rating. The "TV Parental Guidelines" screen will appear. At this point, one of two separate groups: TV-Y and TV-Y7 (young children through age 7), and TV-G through TV-MA (everybody else). Press the ENTER button. Depending on the MPAA codes.) These...
...Press to unlock all TV ratings. / Block all: Press to lock all the screens. (Or proceed to clear all TV ratings. For example, if you block "L" sub-rating in TV-PG, then the "L" sub-ratings in the "young adult" group will be blocked (TV-G, TV-PG, TV-14, and TV-MA). The V-chip ...be blocked. 7. Press the or buttons to block the sub rating. The "TV Parental Guidelines" screen will appear. At this point, one of two separate groups: TV-Y and TV-Y7 (young children through age 7), and TV-G through TV-MA (everybody else). Press the ENTER button. Depending on the MPAA codes.) These...


