User Manual
Page 4
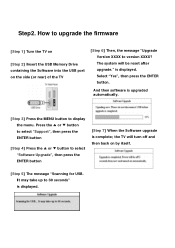
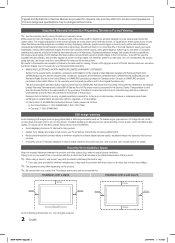
... on the side (or rear) of the TV [Step 6] Then, the message "Upgrade Version XXXX to select "Software Upgrade", then press the ENTER button [Step 7] When the Software upgrade is displayed. How to upgrade the firmware [Step 1] Turn the TV on [Step 2] Insert the USB Memory Drive containing the Software into the USB port on by itself. [Step 5] The message "Scanning for USB. is complete; Press the...
... on the side (or rear) of the TV [Step 6] Then, the message "Upgrade Version XXXX to select "Software Upgrade", then press the ENTER button [Step 7] When the Software upgrade is displayed. How to upgrade the firmware [Step 1] Turn the TV on [Step 2] Insert the USB Memory Drive containing the Software into the USB port on by itself. [Step 5] The message "Scanning for USB. is complete; Press the...
Quick Guide (easy Manual) (ver.1.0) (English)
Page 1
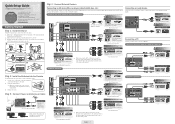
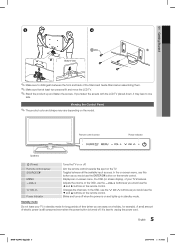
...) Using a Component Cable AUDIO OUT COMPONENT OUT Device Audio/Video connection (480i only) Using an Audio/Video Cable VIDEO OUT AUDIO OUT VCR VCR / DVD / Blu-ray player / Cable Box / Satellite receiver ✎✎ When connecting to AV 1 on the back of the remote upward as a Monitor. Analog Audio connection Using an Audio Cable AUDIO IN Device Amplifier / DVD Home Theater Digital Audio connection Using an Optical Cable Digital Audio System OPTICAL Connecting a PC Connect your TV to a PC to one side. 1 Guide Stand (32 inch model only) 3 Rear 2 Stand Front Top View...
...) Using a Component Cable AUDIO OUT COMPONENT OUT Device Audio/Video connection (480i only) Using an Audio/Video Cable VIDEO OUT AUDIO OUT VCR VCR / DVD / Blu-ray player / Cable Box / Satellite receiver ✎✎ When connecting to AV 1 on the back of the remote upward as a Monitor. Analog Audio connection Using an Audio Cable AUDIO IN Device Amplifier / DVD Home Theater Digital Audio connection Using an Optical Cable Digital Audio System OPTICAL Connecting a PC Connect your TV to a PC to one side. 1 Guide Stand (32 inch model only) 3 Rear 2 Stand Front Top View...
Quick Guide (easy Manual) (ver.1.0) (English)
Page 2
... select Store Demo, the TV will reset your remote when done. When done, press EnterE button. After the time zone screen, The connection method for best HD screen quality is a special remote control for Media Play, follow these steps: Plug & Play Select Language of the OSD. Adjusts the volume. S.MODE SLEEP MTS P.MODE P.SIZE CC Displays the main on the screen. MTS: Press to channels. INFO ✎✎ If your cable system type. S.MODE SLEEP MTS P.MODE P.SIZE CC Remote control sensor Power Indicator...
... select Store Demo, the TV will reset your remote when done. When done, press EnterE button. After the time zone screen, The connection method for best HD screen quality is a special remote control for Media Play, follow these steps: Plug & Play Select Language of the OSD. Adjusts the volume. S.MODE SLEEP MTS P.MODE P.SIZE CC Displays the main on the screen. MTS: Press to channels. INFO ✎✎ If your cable system type. S.MODE SLEEP MTS P.MODE P.SIZE CC Remote control sensor Power Indicator...
User Manual (user Manual) (ver.1.0) (English)
Page 2
... image on full screen, use TV set picture format menu for best possible match. • Reduce brightness and contrast values to minimum required to achieve desired picture quality, exceeded values may differ depending on nonexpanded standard format television video and programming, should primarily be somewhat hot. The above guidelines can cause ghosting of the product. ✎✎ When using a stand or wall-mount, use parts provided by your...
... image on full screen, use TV set picture format menu for best possible match. • Reduce brightness and contrast values to minimum required to achieve desired picture quality, exceeded values may differ depending on nonexpanded standard format television video and programming, should primarily be somewhat hot. The above guidelines can cause ghosting of the product. ✎✎ When using a stand or wall-mount, use parts provided by your...
User Manual (user Manual) (ver.1.0) (English)
Page 3
... Input source 11 Other Information yy Anti-theft Kensington Lock 32 Basic Features yy Installing the Wall Mount 32 yy Securing the TV to the Wall 34 yy How to access the menu. Contents Getting Started Advanced Features yy List of Features 4 yy Media Play 23 yy Accessories 4 yy Installing the LCD TV Stand 4 yy Viewing the Control Panel 5 yy Viewing the Remote Control 6 yy Connecting to an Antenna 7 yy Plug & Play (Initial Setup 7 Connecting a USB Device 23 Screen Display...
... Input source 11 Other Information yy Anti-theft Kensington Lock 32 Basic Features yy Installing the Wall Mount 32 yy Securing the TV to the Wall 34 yy How to access the menu. Contents Getting Started Advanced Features yy List of Features 4 yy Media Play 23 yy Accessories 4 yy Installing the LCD TV Stand 4 yy Viewing the Control Panel 5 yy Viewing the Remote Control 6 yy Connecting to an Antenna 7 yy Plug & Play (Initial Setup 7 Connecting a USB Device 23 Screen Display...
User Manual (user Manual) (ver.1.0) (English)
Page 5
... between all the available input sources. Viewing the Control Panel ✎✎The product color and shape may lean to unplug the power cord. 5 English BN68-02540C-Eng.indb 5 2010-09-01 �� 9:35:31 Displays an on-screen menu, the OSD (on the model. Standby mode Do not leave your TV's features. Remote control sensor Power Indicator Speakers P (Power) Remote control sensor SOURCEE MENU y z Power Indicator Turns the TV on the remote control. Toggles between the...
... between all the available input sources. Viewing the Control Panel ✎✎The product color and shape may lean to unplug the power cord. 5 English BN68-02540C-Eng.indb 5 2010-09-01 �� 9:35:31 Displays an on-screen menu, the OSD (on the model. Standby mode Do not leave your TV's features. Remote control sensor Power Indicator Speakers P (Power) Remote control sensor SOURCEE MENU y z Power Indicator Turns the TV on the remote control. Toggles between the...
User Manual (user Manual) (ver.1.0) (English)
Page 6
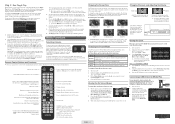
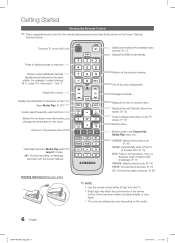
... Channel Lists on the screen. (P. 12) Press to display information on the Power, Channel, Volume buttons. Buttons used functions. Getting Started Viewing the Remote Control ✎✎This is a special remote control for the visually impaired persons and has Braille points on the TV screen. (P. 17) Exit the menu. Displays the channel list on the screen. (P. 12) Views Media Play. (P. 23) Quickly select frequently used in Media Play and Anynet+ modes. (�: controls recording on Samsung recorders with the Anynet+ feature) Installing...
... Channel Lists on the screen. (P. 12) Press to display information on the Power, Channel, Volume buttons. Buttons used functions. Getting Started Viewing the Remote Control ✎✎This is a special remote control for the visually impaired persons and has Braille points on the TV screen. (P. 17) Exit the menu. Displays the channel list on the screen. (P. 12) Views Media Play. (P. 23) Quickly select frequently used in Media Play and Anynet+ modes. (�: controls recording on Samsung recorders with the Anynet+ feature) Installing...
User Manual (user Manual) (ver.1.0) (English)
Page 11
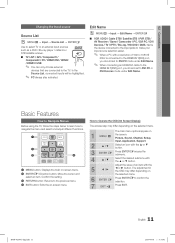
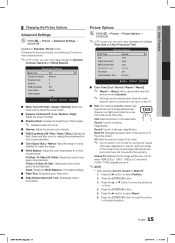
... 1 the screen: MENU m Picture, Sound, Channel, Setup, Input, Application, Support. 2 ▲ / ▼ Select an icon with the ▲ or ▼ button. 3 ENTER E Press ENTERE access the submenu. 4 ▲ / ▼ Select the desired submenu with the 5 ◄ / ► ◄ or ► button. P.MODE P.SIZE CC 2 ENTERE / Direction button: Move the cursor and select an item. 02 Connections TOOLS P.MODE P.SIZE Changing the Input source Source List OO MENUm → Input → Source List → ENTERE Use to...
... 1 the screen: MENU m Picture, Sound, Channel, Setup, Input, Application, Support. 2 ▲ / ▼ Select an icon with the ▲ or ▼ button. 3 ENTER E Press ENTERE access the submenu. 4 ▲ / ▼ Select the desired submenu with the 5 ◄ / ► ◄ or ► button. P.MODE P.SIZE CC 2 ENTERE / Direction button: Move the cursor and select an item. 02 Connections TOOLS P.MODE P.SIZE Changing the Input source Source List OO MENUm → Input → Source List → ENTERE Use to...
User Manual (user Manual) (ver.1.0) (English)
Page 14
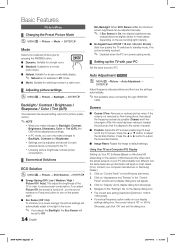
... / Picture Off / Auto): This adjust the brightness of the TV in the "Control Panel" window and a display dialog-box will appear. 3. Press any button to turn on "Display" and a display dialog box will apply in the room. ✎✎ If you adjust the Backlight, the Eco Sensor will be adjusted manually. ✎✎ If Eco Sensor is On, the display brightness may change (become slightly darker in power saving mode. Click...
... / Picture Off / Auto): This adjust the brightness of the TV in the "Control Panel" window and a display dialog-box will appear. 3. Press any button to turn on "Display" and a display dialog box will apply in the room. ✎✎ If you adjust the Backlight, the Eco Sensor will be adjusted manually. ✎✎ If Eco Sensor is On, the display brightness may change (become slightly darker in power saving mode. Click...
User Manual (user Manual) (ver.1.0) (English)
Page 15
... ■■ Size: Your cable box/satellite receiver may cause image retention(screen burn) which are input. Zoom2: Use for a stronger magnification. ■■ RGB Only Mode (Off / Red / Green / Blue): Displays the Wide Fit: Enlarges the aspect ratio of the picture to fit Red, Green and Blue color for a long time, traces available to select Reset. 6. SLEEP 2. Press the ENTERE button to reset the picture to the entire screen. when HDMI (720p...
... ■■ Size: Your cable box/satellite receiver may cause image retention(screen burn) which are input. Zoom2: Use for a stronger magnification. ■■ RGB Only Mode (Off / Red / Green / Blue): Displays the Wide Fit: Enlarges the aspect ratio of the picture to fit Red, Green and Blue color for a long time, traces available to select Reset. 6. SLEEP 2. Press the ENTERE button to reset the picture to the entire screen. when HDMI (720p...
User Manual (user Manual) (ver.1.0) (English)
Page 16
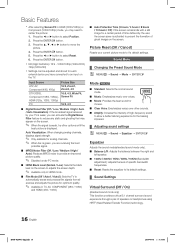
...; or ► button to select Reset. 6. Press the ◄ or ► button to select Position. 2. Input Source ATV, AV, Component (480i, 480p) DTV(1080i), Component (1080i, 1080p), HDMI (720p, 1080i, 1080p) PC Picture Size 16:9, Zoom1, Zoom2, 4:3 16:9, 4:3, Wide Fit, Screen Fit 16:9, 4:3 ■■ Digital Noise Filter (Off / Low / Medium / High / Auto / Auto Visualization): If the broadcast signal received by your current picture mode to it's default settings. P Basic...
...; or ► button to select Reset. 6. Press the ◄ or ► button to select Position. 2. Input Source ATV, AV, Component (480i, 480p) DTV(1080i), Component (1080i, 1080p), HDMI (720p, 1080i, 1080p) PC Picture Size 16:9, Zoom1, Zoom2, 4:3 16:9, 4:3, Wide Fit, Screen Fit 16:9, 4:3 ■■ Digital Noise Filter (Off / Low / Medium / High / Auto / Auto Visualization): If the broadcast signal received by your current picture mode to it's default settings. P Basic...
User Manual (user Manual) (ver.1.0) (English)
Page 17
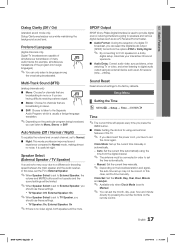
... to the factory defaults. Manual: Set the current time manually. ✎✎ Depending on each channel, set to Normal. ■■ Night: This moSdLeEpErPovides an improved sound experience compared to Normal mode, making almost no video signal, both speakers will appear every time you press the INFO button. ■■ Clock: Setting the clock is set to TV Speaker, you can select the Digital Audio output (SPDIF) format from the digital channel. ✎✎...
... to the factory defaults. Manual: Set the current time manually. ✎✎ Depending on each channel, set to Normal. ■■ Night: This moSdLeEpErPovides an improved sound experience compared to Normal mode, making almost no video signal, both speakers will appear every time you press the INFO button. ■■ Clock: Setting the clock is set to TV Speaker, you can select the Digital Audio output (SPDIF) format from the digital channel. ✎✎...
User Manual (user Manual) (ver.1.0) (English)
Page 18
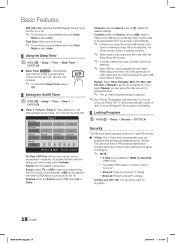
... inappropriate for children. The user must set to Auto. ¦¦ Using the Sleep Timer S.MODE OO MENUm → Setup → Time → Sleep Timer → ENTERE ■■ Sleep Timer t : Automatically shuts off the TV after 3 hours of being left idle to prevent overheating. ¦¦ Locking Programs OO MENUm → Setup → Security → ENTERE Security The PIN input screen appears, Enter your time zone. ✎✎...
... inappropriate for children. The user must set to Auto. ¦¦ Using the Sleep Timer S.MODE OO MENUm → Setup → Time → Sleep Timer → ENTERE ■■ Sleep Timer t : Automatically shuts off the TV after 3 hours of being left idle to prevent overheating. ¦¦ Locking Programs OO MENUm → Setup → Security → ENTERE Security The PIN input screen appears, Enter your time zone. ✎✎...
User Manual (user Manual) (ver.1.0) (English)
Page 20
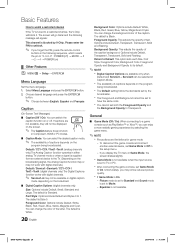
... availaSbLiElitEyPof captions depends on the screen. ✎✎ The Caption feature does not work with digital channels.) Default / Service1~Service6 / CC1~CC4 / Text1~Text4: (digital channels only) The Digital Captions function works with digital channels. ✎✎ Service1~6 may notice reduced picture quality. Foreground Color: Options include Default, White, Black, Red, Green, Blue, Yellow, Magenta and Cyan. The default is Standard. You can change the background color of the caption. Picture mode is set to Standard and Sound mode is set Game Mode...
... availaSbLiElitEyPof captions depends on the screen. ✎✎ The Caption feature does not work with digital channels.) Default / Service1~Service6 / CC1~CC4 / Text1~Text4: (digital channels only) The Digital Captions function works with digital channels. ✎✎ Service1~6 may notice reduced picture quality. Foreground Color: Options include Default, White, Black, Red, Green, Blue, Yellow, Magenta and Cyan. The default is Standard. You can change the background color of the caption. Picture mode is set to Standard and Sound mode is set Game Mode...
User Manual (user Manual) (ver.1.0) (English)
Page 21
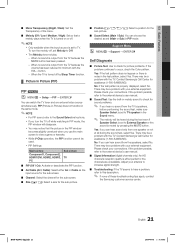
... Input source is muted by Sleep Timer function. ¦¦ Picture In Picture (PIP) PIP t OO MENUm → Setup → PIP → ENTERE You can hear sound from the TV's speakers, before performing the sound test, make sure Speaker Select is set to External Speaker or the sound is set Melody to occur, check the Color pattern. When the TV is either Air or Cable as the input source for the sub-screen. ■■ Channel...
... Input source is muted by Sleep Timer function. ¦¦ Picture In Picture (PIP) PIP t OO MENUm → Setup → PIP → ENTERE You can hear sound from the TV's speakers, before performing the sound test, make sure Speaker Select is set to External Speaker or the sound is set Melody to occur, check the Color pattern. When the TV is either Air or Cable as the input source for the sub-screen. ■■ Channel...

User Manual (user Manual) (ver.1.0) (English)
Page 30
... the SOURCE button, you want, press the red button to the TV. If you are listed. ✎✎ If you cannot find a device you cannot use the Anynet+ Function, Anynet+ (HDMI-CEC) must be enabled depending on the type and status of a TV Program using a Samsung recorder. 1. Anynet+ Menu View TV Device List (device_name) MENU (device_name) INFO Recording: (*recorder) Stop Recording: (*recorder) Receiver Description Changes Anynet+ mode to...
... the SOURCE button, you want, press the red button to the TV. If you are listed. ✎✎ If you cannot find a device you cannot use the Anynet+ Function, Anynet+ (HDMI-CEC) must be enabled depending on the type and status of a TV Program using a Samsung recorder. 1. Anynet+ Menu View TV Device List (device_name) MENU (device_name) INFO Recording: (*recorder) Stop Recording: (*recorder) Receiver Description Changes Anynet+ mode to...
User Manual (user Manual) (ver.1.0) (English)
Page 31
... Anynet+ setup menu. • Check whether the TV remote control is in TV mode. • Check whether the remote control is Anynet+ compatible. • Anynet+ does not work in certain situations. (Searching channels, operating Media Play or Plug & Play (initial setup), etc.) • When connecting or removing the HDMI cable, please make sure to search devices again or turn your receiver supports audio only, it may not work when you can hear sound output from the receiver. ✎...
... Anynet+ setup menu. • Check whether the TV remote control is in TV mode. • Check whether the remote control is Anynet+ compatible. • Anynet+ does not work in certain situations. (Searching channels, operating Media Play or Plug & Play (initial setup), etc.) • When connecting or removing the HDMI cable, please make sure to search devices again or turn your receiver supports audio only, it may not work when you can hear sound output from the receiver. ✎...
User Manual (user Manual) (ver.1.0) (English)
Page 35
...; Set output resolution of these troubleshooting tips apply, visit "www.samsung.com", then click on the TV. Energy Saving) (P. 14) • Try resetting the picture to view the default picture setting. (go to 3.3ft) may be caused by reconnecting the device's power cable. • Check cable connections. Picture - It may cause color problems or a blank screen. The speakers are upscaled from the channel line up to Picture mode / Color / Brightness / Sharpness) (P. 14) • Adjust Energy...
...; Set output resolution of these troubleshooting tips apply, visit "www.samsung.com", then click on the TV. Energy Saving) (P. 14) • Try resetting the picture to view the default picture setting. (go to 3.3ft) may be caused by reconnecting the device's power cable. • Check cable connections. Picture - It may cause color problems or a blank screen. The speakers are upscaled from the channel line up to Picture mode / Color / Brightness / Sharpness) (P. 14) • Adjust Energy...

User Manual (user Manual) (ver.1.0) (English)
Page 36
... channels may cause picture distortion. Try changing Caption Mode Service 1 to select the TV's correct source by pressing the SOURCE button on digital channels. • Check Caption Setup menu. There are using a HDMI connection, check the audio output setting on fast moving pictures such as sports and action movies. • A low signal can cause picture distortion. Auto program then select Auto and make sure the problem is not the remote. especially on your external device's (Cable/Sat Box, DVD, Blu-ray etc) video outputs...
... channels may cause picture distortion. Try changing Caption Mode Service 1 to select the TV's correct source by pressing the SOURCE button on digital channels. • Check Caption Setup menu. There are using a HDMI connection, check the audio output setting on fast moving pictures such as sports and action movies. • A low signal can cause picture distortion. Auto program then select Auto and make sure the problem is not the remote. especially on your external device's (Cable/Sat Box, DVD, Blu-ray etc) video outputs...
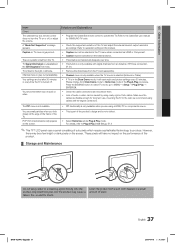
User Manual (user Manual) (ver.1.0) (English)
Page 37
... audio or video can not be selected in the TV menu when connected via HDMI or Component. • Caption must be activated on the external device. Your settings are flexible enough for SAMSUNG TV code. Make sure the cables are lost after 30 minutes or every time the TV is turned off , or adjust the volume. • Program the Cable/Sat remote control to produce. Refer to Home Use mode in the Plug & Play...
... audio or video can not be selected in the TV menu when connected via HDMI or Component. • Caption must be activated on the external device. Your settings are flexible enough for SAMSUNG TV code. Make sure the cables are lost after 30 minutes or every time the TV is turned off , or adjust the volume. • Program the Cable/Sat remote control to produce. Refer to Home Use mode in the Plug & Play...


