User Manual (ENGLISH)
Page 3
... Panel 4 Viewing the Connection Panel 5 Remote Control 7 Installing Batteries in the Remote Control 8 CONNECTIONS Connecting VHF and UHF Antennas 8 Connecting Cable TV 9 Connecting a VCR 10 Connecting an S-VHS VCR 10 Connecting a Camcorder 11 Connecting a DVD Player/Set-Top Box 11 Connecting a DVD Player...Analog Channels Analog 38 Checking the Digital-Signal Strength Digital 39 LNA (Low Noise Amplifier 39 PICTURE CONTROL Picture Control 40 Customizing the Picture Settings 41 Changing the Picture Size 43 Using the Color Weakness Enhancement Feature 44 Digital Noise Reduction 45...
... Panel 4 Viewing the Connection Panel 5 Remote Control 7 Installing Batteries in the Remote Control 8 CONNECTIONS Connecting VHF and UHF Antennas 8 Connecting Cable TV 9 Connecting a VCR 10 Connecting an S-VHS VCR 10 Connecting a Camcorder 11 Connecting a DVD Player/Set-Top Box 11 Connecting a DVD Player...Analog Channels Analog 38 Checking the Digital-Signal Strength Digital 39 LNA (Low Noise Amplifier 39 PICTURE CONTROL Picture Control 40 Customizing the Picture Settings 41 Changing the Picture Size 43 Using the Color Weakness Enhancement Feature 44 Digital Noise Reduction 45...
User Manual (ENGLISH)
Page 4
...for Each Device 99 Operating Tips 100 Recording Tips 102 Tips on stopping recording 103 File List 104 Troubleshooting (D-Net 106 PC DISPLAY Using Your TV as a Computer (PC) Display 110 Setting Up Your PC Software (Windows Only 111 Display Modes 111 Adjusting the Picture Quality 112 Changing ...Settings 117 APPENDIX Identifying Problems 118 Installing the Stand 119 Disconnecting the Stand 119 Stand Swivel Function 119 Installing the Wall Mount Kit (LN-S4096D 120 Installing the Wall Mount Kit (LN-S4696D 121 Using the Anti-Theft Kensington Lock 123 Specifications 123 Dimensions...
...for Each Device 99 Operating Tips 100 Recording Tips 102 Tips on stopping recording 103 File List 104 Troubleshooting (D-Net 106 PC DISPLAY Using Your TV as a Computer (PC) Display 110 Setting Up Your PC Software (Windows Only 111 Display Modes 111 Adjusting the Picture Quality 112 Changing ...Settings 117 APPENDIX Identifying Problems 118 Installing the Stand 119 Disconnecting the Stand 119 Stand Swivel Function 119 Installing the Wall Mount Kit (LN-S4096D 120 Installing the Wall Mount Kit (LN-S4696D 121 Using the Anti-Theft Kensington Lock 123 Specifications 123 Dimensions...
User Manual (ENGLISH)
Page 5
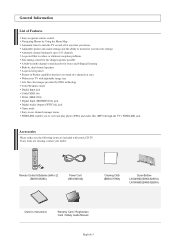
... contact your dealer. Remote Control & Batteries (AAA x 2) (BN59-00529A) Power Cord (3903-000144) Cleaning Cloth (BN63-01798A) Cover-Bottom LN-S4096D (BN63-02491A) LN-S4696D (BN63-02624A) Owner's Instructions Warranty Card / Registration Card / Safety Guide Manual English-3 If any time you choose Adjustable picture and sound ...image size Life-like clear images provided by Using the Menu Map Automatic timer to turn the TV on and off at any items are included with your LCD TV. General Information List of Features Easy-to-operate remote control Navigating Menus by DNle technology Color...
... contact your dealer. Remote Control & Batteries (AAA x 2) (BN59-00529A) Power Cord (3903-000144) Cleaning Cloth (BN63-01798A) Cover-Bottom LN-S4096D (BN63-02491A) LN-S4696D (BN63-02624A) Owner's Instructions Warranty Card / Registration Card / Safety Guide Manual English-3 If any time you choose Adjustable picture and sound ...image size Life-like clear images provided by Using the Menu Map Automatic timer to turn the TV on and off at any items are included with your LCD TV. General Information List of Features Easy-to-operate remote control Navigating Menus by DNle technology Color...

User Manual (ENGLISH)
Page 6
... . SPEAKERS (POWER) Press to see an on-screen menu of the Panel The buttons on the lower-right panel control your TV's features. SOURCE Toggles between all the available input sources (TV, AV1, AV2, S-Video, Component1, Component2, PC, HDMI1, HDMI2). In the on-screen menu, use the buttons as you... would use this spot on the TV. In the on-screen menu, use the and buttons on the remote control. English-4 Viewing ...
... . SPEAKERS (POWER) Press to see an on-screen menu of the Panel The buttons on the lower-right panel control your TV's features. SOURCE Toggles between all the available input sources (TV, AV1, AV2, S-Video, Component1, Component2, PC, HDMI1, HDMI2). In the on-screen menu, use the buttons as you... would use this spot on the TV. In the on-screen menu, use the and buttons on the remote control. English-4 Viewing ...

User Manual (ENGLISH)
Page 7
...)/ANT 2 IN (CABLE) Connect to the video and audio output jacks on connecting equipment, see pages 8-14. PC IN Connect to an antenna or cable TV system. CableCARDTM Insert a CableCARD into the slot. (Refer to page 14) English-5 You should use a locking device, contact the dealer where you purchased the...
...)/ANT 2 IN (CABLE) Connect to the video and audio output jacks on connecting equipment, see pages 8-14. PC IN Connect to an antenna or cable TV system. CableCARDTM Insert a CableCARD into the slot. (Refer to page 14) English-5 You should use a locking device, contact the dealer where you purchased the...
User Manual (ENGLISH)
Page 9
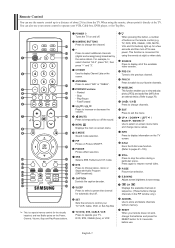
.../from memory. PIP Picture-in the PIP window only.) ADD/DEL Use to store and delete channels to save energy. CAPTION Controls the caption decoder. TV, DVD, STB, CABLE, VCR, MUTE, VOL and CH buttons) light up to a distance of about 23 feet from an external device. (Refer... buttons. This is convenient for using the remote, always point it directly at night or when dark. Stop - MENU Displays the main on the TV screen. WISELINK This function enables you to select a preset time interval for 2-3 seconds before use. ANTENNA Press to select additional channels (digital and ...
.../from memory. PIP Picture-in the PIP window only.) ADD/DEL Use to store and delete channels to save energy. CAPTION Controls the caption decoder. TV, DVD, STB, CABLE, VCR, MUTE, VOL and CH buttons) light up to a distance of about 23 feet from an external device. (Refer... buttons. This is convenient for using the remote, always point it directly at night or when dark. Stop - MENU Displays the main on the TV screen. WISELINK This function enables you to select a preset time interval for 2-3 seconds before use. ANTENNA Press to select additional channels (digital and ...

User Manual (ENGLISH)
Page 10
...antenna has a set of leads that looks like this , see "Antennas with the diagram inside the compartment. 3. Place the wires from the TV. (Assuming typical TV usage, the batteries last for about 23 feet from the twin leads under the screws on ? 2. Plug the adaptor into the ANT 2 IN... "Separate VHF and UHF Antennas". Is there a power outage, or is the power cord unplugged? 5. Connect both antenna leads to tighten the screws. Is the TV power on a 300-75 Ω adapter (not supplied). Antennas with 300 Ω Flat Twin Leads" below . 1. UHF VHF ANT 1 IN (AIR) ...
...antenna has a set of leads that looks like this , see "Antennas with the diagram inside the compartment. 3. Place the wires from the TV. (Assuming typical TV usage, the batteries last for about 23 feet from the twin leads under the screws on ? 2. Plug the adaptor into the ANT 2 IN... "Separate VHF and UHF Antennas". Is there a power outage, or is the power cord unplugged? 5. Connect both antenna leads to tighten the screws. Is the TV power on a 300-75 Ω adapter (not supplied). Antennas with 300 Ω Flat Twin Leads" below . 1. UHF VHF ANT 1 IN (AIR) ...

User Manual (ENGLISH)
Page 11
... ANT IN terminal on the RF (A/B) Switch. Plug the incoming cable into the ANT 2 IN (CABLE) terminal on the back of the TV. Connecting to tune your cable box descrambles only some channels (such as premium channels), follow the instructions below . ANT 2 IN (CABLE) ... (When you set the A/B Switch to the "A" position for normal viewing. Incoming cable Splitter Incoming cable Splitter Cable Box 3. Connecting Cable TV To connect to a cable TV system, follow the instructions below . Cable without a Cable Box ANT 2 IN (CABLE) 1. Because this cable to a two-way splitter...
... ANT IN terminal on the RF (A/B) Switch. Plug the incoming cable into the ANT 2 IN (CABLE) terminal on the back of the TV. Connecting to tune your cable box descrambles only some channels (such as premium channels), follow the instructions below . ANT 2 IN (CABLE) ... (When you set the A/B Switch to the "A" position for normal viewing. Incoming cable Splitter Incoming cable Splitter Cable Box 3. Connecting Cable TV To connect to a cable TV system, follow the instructions below . Cable without a Cable Box ANT 2 IN (CABLE) 1. Because this cable to a two-way splitter...

User Manual (ENGLISH)
Page 12
... two cables. English-10 Connect the cable or antenna to the right and left audio input jacks of the VCR. 3. Connecting an S-VHS VCR Your Samsung TV can be connected to your VCR and your VCR tape. We recommend the use a Y-connector (not supplied) to hook up to the ANT IN terminal... on pages 8-9). Skip step 1 if you have not yet connected to the instructions on the back of the TV. ANT 1 IN ANT 2 IN (AIR) (CABLE) 1. Connecting a VCR These instructions assume that you have already connected your VCR is usually included with an S-VHS VCR...
... two cables. English-10 Connect the cable or antenna to the right and left audio input jacks of the VCR. 3. Connecting an S-VHS VCR Your Samsung TV can be connected to your VCR and your VCR tape. We recommend the use a Y-connector (not supplied) to hook up to the ANT IN terminal... on pages 8-9). Skip step 1 if you have not yet connected to the instructions on the back of the TV. ANT 1 IN ANT 2 IN (AIR) (CABLE) 1. Connecting a VCR These instructions assume that you have already connected your VCR is usually included with an S-VHS VCR...
User Manual (ENGLISH)
Page 13
... Camcorder, match the color of cables with a Ferrite Core. Connect Audio Cables between the COMPONENT IN 1 or 2 [Y, PB, PR] jacks on the TV and the COMPONENT [Y, PB, PR] jacks on the DVD player. 2. Component video separates the video into Y (Luminance (brightness)), Pb (Blue) and Pr... (Red) for enhanced video quality. Each Camcorder has a different back panel configuration. TV Side Panel Camcorder 1 Video Cable (Not supplied) 2 Audio Cable (Not supplied) 1. For example, if connecting the video cable to COMPONENT IN 1, connect...
... Camcorder, match the color of cables with a Ferrite Core. Connect Audio Cables between the COMPONENT IN 1 or 2 [Y, PB, PR] jacks on the TV and the COMPONENT [Y, PB, PR] jacks on the DVD player. 2. Component video separates the video into Y (Luminance (brightness)), Pb (Blue) and Pr... (Red) for enhanced video quality. Each Camcorder has a different back panel configuration. TV Side Panel Camcorder 1 Video Cable (Not supplied) 2 Audio Cable (Not supplied) 1. For example, if connecting the video cable to COMPONENT IN 1, connect...

User Manual (ENGLISH)
Page 14
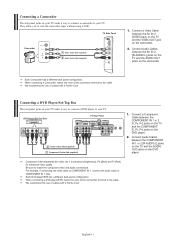
... made if there is an HDMI Output connector on the DVD player/ Set-Top Box. The difference between the DVI IN [R-AUDIO-L] jack on the TV and the AUDIO OUT jacks on the external device. HDMI Cable (Not supplied) What is HDMI? • HDMI, or high-definition multimedia interface, is a ... We recommend the use of cables with a Ferrite Core. 1. Connect an HDMI Cable between the HDMI/DVI IN 1 or HDMI/DVI IN 2 connector on the TV and the DVI connector on the DVD player/Set-Top Box. 2. When connecting a DVD player/STB, match the color of digital audio (5.1 channels). DVD Player...
... made if there is an HDMI Output connector on the DVD player/ Set-Top Box. The difference between the DVI IN [R-AUDIO-L] jack on the TV and the AUDIO OUT jacks on the external device. HDMI Cable (Not supplied) What is HDMI? • HDMI, or high-definition multimedia interface, is a ... We recommend the use of cables with a Ferrite Core. 1. Connect an HDMI Cable between the HDMI/DVI IN 1 or HDMI/DVI IN 2 connector on the TV and the DVI connector on the DVD player/Set-Top Box. 2. When connecting a DVD player/STB, match the color of digital audio (5.1 channels). DVD Player...
User Manual (ENGLISH)
Page 15
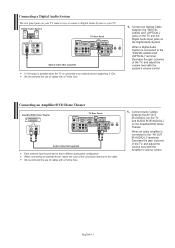
... (Not supplied) Each external input source device has a different back panel configuration. Connect Audio Cables between the "DIGITAL AUDIO OUT (OPTICAL)" jacks on the TV and the Digital Audio Input jacks on the Amplifier/DVD Home Theater. Connect an Optical Cable between the AV OUT [R-AUDIO-L] on the... TV and AUDIO IN [R-AUDIO-L] on the Digital Audio System. When an audio amplifier is connected to the "DIGITAL AUDIO OUT (OPTICAL)" terminal: Decrease the gain...
... (Not supplied) Each external input source device has a different back panel configuration. Connect Audio Cables between the "DIGITAL AUDIO OUT (OPTICAL)" jacks on the TV and the Digital Audio Input jacks on the Amplifier/DVD Home Theater. Connect an Optical Cable between the AV OUT [R-AUDIO-L] on the... TV and AUDIO IN [R-AUDIO-L] on the Digital Audio System. When an audio amplifier is connected to the "DIGITAL AUDIO OUT (OPTICAL)" terminal: Decrease the gain...

User Manual (ENGLISH)
Page 16
...displayed. If the channel information does not already exist, the message "Updating Channel List" is now updated. Incoming Cable or Antenna Connecting a PC PC TV Rear Panel 2 PC Audio Cable (Not supplied) 1 D-Sub Cable (Not supplied) 1. The HDMI/DVI jacks do not support PC connection. Each... indicates that the channel list is displayed during channel information configuration. 2. Connect a PC Audio Cable between PC IN [PC] connector on the TV and the PC output connector on your computer. 2. Connect a D-Sub Cable between PC IN [AUDIO] jack on the screen. English-14 ...
...displayed. If the channel information does not already exist, the message "Updating Channel List" is now updated. Incoming Cable or Antenna Connecting a PC PC TV Rear Panel 2 PC Audio Cable (Not supplied) 1 D-Sub Cable (Not supplied) 1. The HDMI/DVI jacks do not support PC connection. Each... indicates that the channel list is displayed during channel information configuration. 2. Connect a PC Audio Cable between PC IN [PC] connector on the TV and the PC output connector on your computer. 2. Connect a D-Sub Cable between PC IN [AUDIO] jack on the screen. English-14 ...

User Manual (ENGLISH)
Page 17
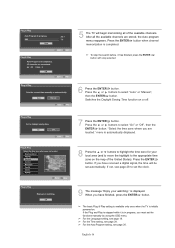
... initially powered on, two basic settings proceed automatically and subsequently: 1 Press the POWER button on the side panel of the TV for five seconds to return to Dynamic (Home) mode. 3 Press the ENTER button to enter the language. If the unit is automatically displayed. 2 Press the ... "Select the language of the OSD" menu is accidentally set ." If both ANT 1 (AIR) and ANT 2 (CABLE) are connected, select "Air + Cable". Operation Turning the TV On and Off Press the POWER button on the front of the panel. We recommend setting the...
... initially powered on, two basic settings proceed automatically and subsequently: 1 Press the POWER button on the side panel of the TV for five seconds to return to Dynamic (Home) mode. 3 Press the ENTER button to enter the language. If the unit is automatically displayed. 2 Press the ... "Select the language of the OSD" menu is accidentally set ." If both ANT 1 (AIR) and ANT 2 (CABLE) are connected, select "Air + Cable". Operation Turning the TV On and Off Press the POWER button on the front of the panel. We recommend setting the...
User Manual (ENGLISH)
Page 18
...memorizing all the available channels are located." After all of the United States). The basic Plug & Play setting is available only once when the TV is displayed. Press the or buttons to select "On" or "Off", then the ENTER button. is initially powered on. When you have ...finished, press the ENTER button. For the Time setting, see page 19. 5 The TV will be set automatically. Press the or buttons to select "Auto" or "Manual", then the ENTER button. For the Language setting, see page 28...
...memorizing all the available channels are located." After all of the United States). The basic Plug & Play setting is available only once when the TV is displayed. Press the or buttons to select "On" or "Off", then the ENTER button. is initially powered on. When you have ...finished, press the ENTER button. For the Time setting, see page 19. 5 The TV will be set automatically. Press the or buttons to select "Auto" or "Manual", then the ENTER button. For the Language setting, see page 28...
User Manual (ENGLISH)
Page 19
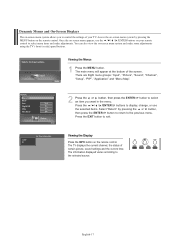
... MENU button on the remote control. button to select Press the / / / /ENTER buttons to select menu items and make some adjustments using the TV's front (or side) panel buttons. Press the EXIT button to the selected source. ```````` English-17 You can also view the on your...Picture", "Sound", "Channel", "Setup", "PIP", "Application" and "Menu Map". 2 Press the or button, then press the ENTER an item you to the previous menu. The TV displays the current channel, the status of the screen. Viewing the Display Press the INFO button on -screen menu system allows you want in the...
... MENU button on the remote control. button to select Press the / / / /ENTER buttons to select menu items and make some adjustments using the TV's front (or side) panel buttons. Press the EXIT button to the selected source. ```````` English-17 You can also view the on your...Picture", "Sound", "Channel", "Setup", "PIP", "Application" and "Menu Map". 2 Press the or button, then press the ENTER an item you to the previous menu. The TV displays the current channel, the status of the screen. Viewing the Display Press the INFO button on -screen menu system allows you want in the...
User Manual (ENGLISH)
Page 22
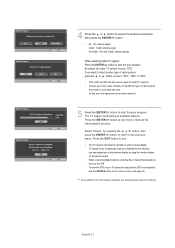
... or button to select "Auto Program", then press the ENTER button. This eliminates the need to the TV (i.e., an antenna or cable system). 1 Press the MENU button. English-20 continued... Memorizing Channels Your TV can begin memorizing the available channels, you must specify the type of the available channels for memorizing channels...
... or button to select "Auto Program", then press the ENTER button. This eliminates the need to the TV (i.e., an antenna or cable system). 1 Press the MENU button. English-20 continued... Memorizing Channels Your TV can begin memorizing the available channels, you must specify the type of the available channels for memorizing channels...
User Manual (ENGLISH)
Page 23
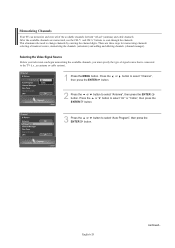
...set to interrupt the memorization process. To view the STB on your particular area. By default, the cable TV system is deleted from the memory, you want to select another type of cable system, press the or button...select "STD", "HRC" or "IRC". • STD, HRC and IRC identify various types of cable TV systems. Contact your local cable company to identify the type of cable system that channel directly by pressing the...button to return to the previous menu. If you can always tune to that exists in your TV, select the Input jack the STB is done on the remote control. (see page 32) All...
...set to interrupt the memorization process. To view the STB on your particular area. By default, the cable TV system is deleted from the memory, you want to select another type of cable system, press the or button...select "STD", "HRC" or "IRC". • STD, HRC and IRC identify various types of cable TV systems. Contact your local cable company to identify the type of cable system that channel directly by pressing the...button to return to the previous menu. If you can always tune to that exists in your TV, select the Input jack the STB is done on the remote control. (see page 32) All...

User Manual (ENGLISH)
Page 24
...is used to select stations that were either erased or not memorized. The TV changes to the last channel you press the second number. The TV will not see all the channels that the TV has memorized. (The TV must have memorized at least three channels.) You will change channels. HD ... then "-", then "1". Using the Previous Channel Press the PRE-CH button. When you press the CH or CH button, the TV changes channels in sequence. SD indicates the TV is receiving a Digital High Definition signal. Using the Number Buttons Use the number buttons to quickly switch to a channel. You will...
...is used to select stations that were either erased or not memorized. The TV changes to the last channel you press the second number. The TV will not see all the channels that the TV has memorized. (The TV must have memorized at least three channels.) You will change channels. HD ... then "-", then "1". Using the Previous Channel Press the PRE-CH button. When you press the CH or CH button, the TV changes channels in sequence. SD indicates the TV is receiving a Digital High Definition signal. Using the Number Buttons Use the number buttons to quickly switch to a channel. You will...
User Manual (ENGLISH)
Page 25
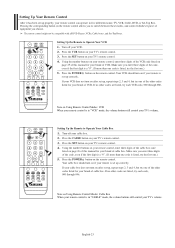
... your brand of VCR. Make sure you choose. Turn off your cable box. 2. Press the SET button on page 25 of this manual for your TV's remote control. 4. Make sure you enter three digits of the code, even if the first digit is a "0". (If more than one code is listed, try... buttons on your remote control, enter three digits of the VCR code listed on your brand of VCR. If no other codes listed for your TV's volume. English-23 Setting Up Your Remote Control After it has been set up , repeat steps 2, 3 and 4, but try one of the other codes are...
... your brand of VCR. Make sure you choose. Turn off your cable box. 2. Press the SET button on page 25 of this manual for your TV's remote control. 4. Make sure you enter three digits of the code, even if the first digit is a "0". (If more than one code is listed, try... buttons on your remote control, enter three digits of the VCR code listed on your brand of VCR. If no other codes listed for your TV's volume. English-23 Setting Up Your Remote Control After it has been set up , repeat steps 2, 3 and 4, but try one of the other codes are...


