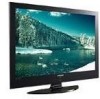
User Manual (ENGLISH)
Page 4
... Each Device 99 Operating Tips 100 Recording Tips 102 Tips on stopping recording 103 File List 104 Troubleshooting (D-Net 106 PC DISPLAY Using Your TV as a Computer (PC) Display 110 Setting Up Your PC Software (Windows Only 111 Display Modes 111 Adjusting the Picture Quality 112 Changing... Settings 117 APPENDIX Identifying Problems 118 Installing the Stand 119 Disconnecting the Stand 119 Stand Swivel Function 119 Installing the Wall Mount Kit (LN-S4096D 120 Installing the Wall Mount Kit (LN-S4696D 121 Using the Anti-Theft Kensington Lock 123 Specifications 123 Dimensions...
... Each Device 99 Operating Tips 100 Recording Tips 102 Tips on stopping recording 103 File List 104 Troubleshooting (D-Net 106 PC DISPLAY Using Your TV as a Computer (PC) Display 110 Setting Up Your PC Software (Windows Only 111 Display Modes 111 Adjusting the Picture Quality 112 Changing... Settings 117 APPENDIX Identifying Problems 118 Installing the Stand 119 Disconnecting the Stand 119 Stand Swivel Function 119 Installing the Wall Mount Kit (LN-S4096D 120 Installing the Wall Mount Kit (LN-S4696D 121 Using the Anti-Theft Kensington Lock 123 Specifications 123 Dimensions...

User Manual (ENGLISH)
Page 122
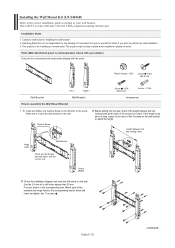
If the bracket is to be drilled. Installing the Wall Mount Kit (LN-S4096D) This installation is not firmly fixed to the wall, the LCD TV may fall. Fix anchors on each hole on the wall, first connect the cables. Installation Guide 2 Turn the power off and unplug the power cord ...from the outlet. Attach the set-bracket onto the rear side of the TV set -bracket...
If the bracket is to be drilled. Installing the Wall Mount Kit (LN-S4096D) This installation is not firmly fixed to the wall, the LCD TV may fall. Fix anchors on each hole on the wall, first connect the cables. Installation Guide 2 Turn the power off and unplug the power cord ...from the outlet. Attach the set-bracket onto the rear side of the TV set -bracket...
User Manual (ENGLISH)
Page 123
... Only use the components and accessories shipped with the panel. This LCD TV accepts a 600 mm x 400 mm VESA-compliant mounting interface pad. The product may not stay in the direction of ...Samsung Electronics is sold separately. Plastic Hanger : 4EA Screw 11EA M4 X L20 Wall-Bracket Left: 1 Right: 1 Wall-Bracket Screw 11EA M8 X L40 Anchor : 11EA Accessories How to assemble the Wall Mount...all or some of the arrow. When done, mount the wall bracket on the wall. Installation Notes 1. Installing the Wall Mount Kit (LN-S4696D) Refer to the correct installation guide according...
... Only use the components and accessories shipped with the panel. This LCD TV accepts a 600 mm x 400 mm VESA-compliant mounting interface pad. The product may not stay in the direction of ...Samsung Electronics is sold separately. Plastic Hanger : 4EA Screw 11EA M4 X L20 Wall-Bracket Left: 1 Right: 1 Wall-Bracket Screw 11EA M8 X L40 Anchor : 11EA Accessories How to assemble the Wall Mount...all or some of the arrow. When done, mount the wall bracket on the wall. Installation Notes 1. Installing the Wall Mount Kit (LN-S4696D) Refer to the correct installation guide according...

User Manual (ENGLISH)
Page 124
...of the product may not stay in the center and pull it on the back of the product. Fixing the TV panel to the wall bracket. 2. Make sure to the right) 3. English-122 Remove safety pin ( ) and... insert the 4 product holders into the plastic hanger. (See the figure below) • Mount the product on the wall bracket and make sure it is firmly fixed to -2° before installing it forward (direction .... Tighten the 4 screws in step 2 (plastic hanger + screw ) to the bracket. LCD TV How to Adjust Mounting Angle Adjust the bracket angle to the bracket.
...of the product may not stay in the center and pull it on the back of the product. Fixing the TV panel to the wall bracket. 2. Make sure to the right) 3. English-122 Remove safety pin ( ) and... insert the 4 product holders into the plastic hanger. (See the figure below) • Mount the product on the wall bracket and make sure it is firmly fixed to -2° before installing it forward (direction .... Tighten the 4 screws in step 2 (plastic hanger + screw ) to the bracket. LCD TV How to Adjust Mounting Angle Adjust the bracket angle to the bracket.


