

Quick Guide (easy Manual) (ver.1.0) (English)
Page 5
...) on the TV. 2 Connect the stereo audio cable to "AUDIO" (PC IN) on the TV and the other ends to "Audio Out" of the sound card on the computer. Connecting a PC PC TV Rear Panel 2 PC Audio Cable (Option) 1 PC...
...) on the TV. 2 Connect the stereo audio cable to "AUDIO" (PC IN) on the TV and the other ends to "Audio Out" of the sound card on the computer. Connecting a PC PC TV Rear Panel 2 PC Audio Cable (Option) 1 PC...

Quick Guide (easy Manual) (ver.1.0) (English)
Page 4
...HDMI 14 Connecting a DVD Player 15 Connecting a Digital Audio System 15 Connecting an Amplifier/DVD Home Theater 16 Connecting a PC 16 Connecting Cable CARD 17 Chapter 3: Operation Turning the TV On and Off 18 Changing Channels 18 Using the Channel Buttons 18 Using the PRE-CH Button to ...Display 19 Viewing the Menus 19 Plug & Play Feature 20 If you want to reset this feature 23 Memorizing the Channels 24 Selecting the Video Signal-source 24 Storing Channels in Memory (Automatic Method 25 Adding and Erasing Channels (Manual Method 27 Setting Up Your Remote Control 28 Remote...
...HDMI 14 Connecting a DVD Player 15 Connecting a Digital Audio System 15 Connecting an Amplifier/DVD Home Theater 16 Connecting a PC 16 Connecting Cable CARD 17 Chapter 3: Operation Turning the TV On and Off 18 Changing Channels 18 Using the Channel Buttons 18 Using the PRE-CH Button to ...Display 19 Viewing the Menus 19 Plug & Play Feature 20 If you want to reset this feature 23 Memorizing the Channels 24 Selecting the Video Signal-source 24 Storing Channels in Memory (Automatic Method 25 Adding and Erasing Channels (Manual Method 27 Setting Up Your Remote Control 28 Remote...

Quick Guide (easy Manual) (ver.1.0) (English)
Page 9
...VCR. POWER INPUT Connect the supplied power cord. Anynet OUTPUT Refer to a cable TV system. (See page 7~10) CABLE CARD Insert the cableCARD into the slot. AV IN Video and audio inputs for private listening. ANT IN Connect to an antenna or to "Anynet AV Owner's Instructions". AUDIO OUT ...an A/V component that will be adjusted. For more information on DVI-IN for external devices with HDMI output. PC IN Connect to HDMI connection. S-VIDEO IN Video inputs for sound output. - Use the HDMI/DVI terminal for DVI connection to HDMI) for the connection, and the 'R -AUDIO -L' terminal ...
...VCR. POWER INPUT Connect the supplied power cord. Anynet OUTPUT Refer to a cable TV system. (See page 7~10) CABLE CARD Insert the cableCARD into the slot. AV IN Video and audio inputs for private listening. ANT IN Connect to an antenna or to "Anynet AV Owner's Instructions". AUDIO OUT ...an A/V component that will be adjusted. For more information on DVI-IN for external devices with HDMI output. PC IN Connect to HDMI connection. S-VIDEO IN Video inputs for sound output. - Use the HDMI/DVI terminal for DVI connection to HDMI) for the connection, and the 'R -AUDIO -L' terminal ...
Quick Guide (easy Manual) (ver.1.0) (English)
Page 72
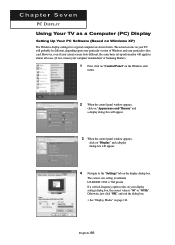
...your actual screens look different, the same basic set-up information will apply in almost all cases. (If not, contact your computer manufacturer or Samsung Dealer.) 1 First, click on "Control Panel" on the Windows start menu. 2 When the control panel window appears, click on "Appearance ...your particular version of Windows and your particular video card. Otherwise, just click "OK" and exit the dialog box. * See "Display Modes" on Windows XP) The Windows display-settings for a typical computer are shown below. The correct size setting (resolution) LN-R408D: 1360 x 768 pixels If a vertical-...
...your actual screens look different, the same basic set-up information will apply in almost all cases. (If not, contact your computer manufacturer or Samsung Dealer.) 1 First, click on "Control Panel" on the Windows start menu. 2 When the control panel window appears, click on "Appearance ...your particular version of Windows and your particular video card. Otherwise, just click "OK" and exit the dialog box. * See "Display Modes" on Windows XP) The Windows display-settings for a typical computer are shown below. The correct size setting (resolution) LN-R408D: 1360 x 768 pixels If a vertical-...


