

Quick Guide (easy Manual) (ver.1.0) (English)
Page 1
Remote Control (BN59-00460A) & Batteries (AAA x 2) RF Cable (AA39-00039A) Power Cord (3303-000085) Cleaning Cloth (BN63-001798A) Owner's Instructions Anynet AV Owner's Instructions Cover-Bottom LN-R408D (BN63-01640A) Anynet Cable (BN39-00518B) BN68-00515U-00 If any items are included with your dealer. BN68-00515U-X0Eng.qxd 1/5/05 10:00 PM Page 1 List of Parts Accessories Please make sure the following items are missing, contact your LCD TV.
Remote Control (BN59-00460A) & Batteries (AAA x 2) RF Cable (AA39-00039A) Power Cord (3303-000085) Cleaning Cloth (BN63-001798A) Owner's Instructions Anynet AV Owner's Instructions Cover-Bottom LN-R408D (BN63-01640A) Anynet Cable (BN39-00518B) BN68-00515U-00 If any items are included with your dealer. BN68-00515U-X0Eng.qxd 1/5/05 10:00 PM Page 1 List of Parts Accessories Please make sure the following items are missing, contact your LCD TV.

Quick Guide (easy Manual) (ver.1.0) (English)
Page 2
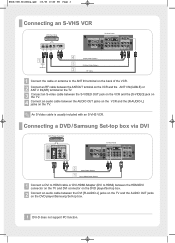
... into the ANT1 IN (CABLE) terminal on the bottom of the RF cable straight to avoid bending it. Connecting a VCR VCR Rear Panel TV Rear Panel 1 Cable or Antenna 4 Audio Cable (Option) 3 Video Cable (Option) 2 RF Cable 1 Connect the cable or antenna to the ANT IN terminal on the ...back of the owner's manual. For more detailed antenna/cable TV connections, see pages 7-10 of the VCR. 2 Connect an RF cable between the ANT OUT terminal on the VCR and the ANT1 IN (CABLE) or...
... into the ANT1 IN (CABLE) terminal on the bottom of the RF cable straight to avoid bending it. Connecting a VCR VCR Rear Panel TV Rear Panel 1 Cable or Antenna 4 Audio Cable (Option) 3 Video Cable (Option) 2 RF Cable 1 Connect the cable or antenna to the ANT IN terminal on the ...back of the owner's manual. For more detailed antenna/cable TV connections, see pages 7-10 of the VCR. 2 Connect an RF cable between the ANT OUT terminal on the VCR and the ANT1 IN (CABLE) or...
Quick Guide (easy Manual) (ver.1.0) (English)
Page 3
... Cable or Antenna 4 Audio Cable (Option) 3 S-Video Cable (Option) 2 RF Cable 1 Connect the cable or antenna to HDMI) between the HDMI/DVI connector on the TV and DVI connector on the DVD player/Set-top box. 2 Connect an audio cable between the AUDIO OUT jacks on the VCR and the [R-AUDIO...-L] jacks on the DVD player/Samsung Set-top box. An S-Video cable is usually included with an S-VHS VCR. Connecting a DVD / Samsung Set-top box via DVI DVD Player Rear Panel TV Rear Panel 2 Audio Cable (Option) 1 DVI to HDMI Cable (Option) 1 Connect a DVI ...
... Cable or Antenna 4 Audio Cable (Option) 3 S-Video Cable (Option) 2 RF Cable 1 Connect the cable or antenna to HDMI) between the HDMI/DVI connector on the TV and DVI connector on the DVD player/Set-top box. 2 Connect an audio cable between the AUDIO OUT jacks on the VCR and the [R-AUDIO...-L] jacks on the DVD player/Samsung Set-top box. An S-Video cable is usually included with an S-VHS VCR. Connecting a DVD / Samsung Set-top box via DVI DVD Player Rear Panel TV Rear Panel 2 Audio Cable (Option) 1 DVI to HDMI Cable (Option) 1 Connect a DVI ...
Quick Guide (easy Manual) (ver.1.0) (English)
Page 4
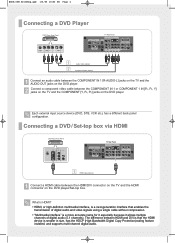
...player. 2 Connect a component video cable between the COMPONENT IN 1 or COMPONENT 1 IN [PR, PB, Y] jacks on the TV and the COMPONENT [Y, PB, PR] jacks on the DVD player/Set-top box. What is HDMI? • HDMI, or ...has a different back panel configuration. The difference between the HDMI/DVI connector on the TV and the HDMI connector on the DVD player. Connecting a DVD / Set-top box via HDMI DVD Player Rear Panel... TV Rear Panel 1 HDMI Cable (Option) 1 Connect a HDMI cable between HDMI and DVI is that...
...player. 2 Connect a component video cable between the COMPONENT IN 1 or COMPONENT 1 IN [PR, PB, Y] jacks on the TV and the COMPONENT [Y, PB, PR] jacks on the DVD player/Set-top box. What is HDMI? • HDMI, or ...has a different back panel configuration. The difference between the HDMI/DVI connector on the TV and the HDMI connector on the DVD player. Connecting a DVD / Set-top box via HDMI DVD Player Rear Panel... TV Rear Panel 1 HDMI Cable (Option) 1 Connect a HDMI cable between HDMI and DVI is that...

Quick Guide (easy Manual) (ver.1.0) (English)
Page 5
... in jacks on the Amplifier or DVD Home Theater. BN68-00515U-X0Eng.qxd 1/5/05 10:00 PM Page 5 Connecting a Digital Audio System Digital Audio System TV Rear Panel 1 Optical Cable (Option) 1 Connect an audio Optical between the AUDIO OUT [R-AUDIO-L] jacks on the rear of the sound card on the Digital... Audio System. Connecting an Amplifier/DVD Home Theater Amplifier/DVD Home Theater TV Rear Panel 1 Audio Cable (Option) 1 Connect an audio cables between the DIGITAL AUDIO OUT (OPTICAL) jack on the...
... in jacks on the Amplifier or DVD Home Theater. BN68-00515U-X0Eng.qxd 1/5/05 10:00 PM Page 5 Connecting a Digital Audio System Digital Audio System TV Rear Panel 1 Optical Cable (Option) 1 Connect an audio Optical between the AUDIO OUT [R-AUDIO-L] jacks on the rear of the sound card on the Digital... Audio System. Connecting an Amplifier/DVD Home Theater Amplifier/DVD Home Theater TV Rear Panel 1 Audio Cable (Option) 1 Connect an audio cables between the DIGITAL AUDIO OUT (OPTICAL) jack on the...
Quick Guide (easy Manual) (ver.1.0) (English)
Page 6
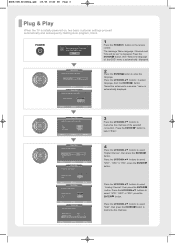
... ENTER button to select "STD", "HRC" or "IRC", press the ENTER button. BN68-00515U-X0Eng.qxd 1/5/05 10:00 PM Page 6 Plug & Play When the TV is displayed. Press the ENTER button to select "Start". 4 Press the UP/DOWN buttons to enter the language.
... ENTER button to select "STD", "HRC" or "IRC", press the ENTER button. BN68-00515U-X0Eng.qxd 1/5/05 10:00 PM Page 6 Plug & Play When the TV is displayed. Press the ENTER button to select "Start". 4 Press the UP/DOWN buttons to enter the language.

Quick Guide (easy Manual) (ver.1.0) (English)
Page 7
... on the map of the available channels. is auto matically displayed. 6 Press the ENTER button. BN68-00515U-X0Eng.qxd 1/5/05 10:01 PM Page 7 5 The TV will begin memorizing all the available channels are stored, the Auto program menu reappears. After all of the United States). Press the ENTER button when...
... on the map of the available channels. is auto matically displayed. 6 Press the ENTER button. BN68-00515U-X0Eng.qxd 1/5/05 10:01 PM Page 7 5 The TV will begin memorizing all the available channels are stored, the Auto program menu reappears. After all of the United States). Press the ENTER button when...
Quick Guide (easy Manual) (ver.1.0) (English)
Page 8
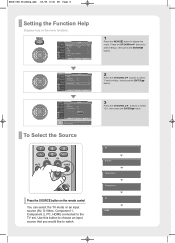
... ENTER button. BN68-00515U-X0Eng.qxd 1/5/05 10:01 PM Page 8 Setting the Function Help Displays help on the remote control You can select the TV mode or an input source (AV, S-Video, Component 1, Component 2, PC, HDMI) connected to the...
... ENTER button. BN68-00515U-X0Eng.qxd 1/5/05 10:01 PM Page 8 Setting the Function Help Displays help on the remote control You can select the TV mode or an input source (AV, S-Video, Component 1, Component 2, PC, HDMI) connected to the...

Quick Guide (easy Manual) (ver.1.0) (English)
Page 9
...'s DVD, VCR or Cable box, see information on -screen menu. Press to select additional channels (digital and analog) being broadcast by the Samsung remote control (TV, VCR, CABLE, DVD or Samsung Set-top box) Press to your remote does not work, change channels in -Picture ON/OFF. MUTE Press to improve the digital..., STB LED, VCR LED, CATV LED, or DVD LED is illuminated. Press again to bring up the Anynet menu. TV, VCR, CABLE, DVD or Samsung Set-top box. CH and CH (Channel UP/Down) Press CH or CH to change the channel. Rewind - Play/Pause - CH.LIST Displays the channel ...
...'s DVD, VCR or Cable box, see information on -screen menu. Press to select additional channels (digital and analog) being broadcast by the Samsung remote control (TV, VCR, CABLE, DVD or Samsung Set-top box) Press to your remote does not work, change channels in -Picture ON/OFF. MUTE Press to improve the digital..., STB LED, VCR LED, CATV LED, or DVD LED is illuminated. Press again to bring up the Anynet menu. TV, VCR, CABLE, DVD or Samsung Set-top box. CH and CH (Channel UP/Down) Press CH or CH to change the channel. Rewind - Play/Pause - CH.LIST Displays the channel ...
Quick Guide (easy Manual) (ver.1.0) (English)
Page 10
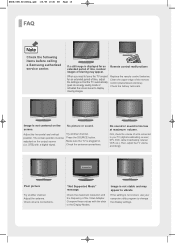
...values with a digital signal. BN68-00515U-X0Eng.qxd 1/5/05 10:01 PM Page 10 FAQ Check the following items before calling a Samsung authorized service center. Image is plugged in the Display Modes. STB) with the data in . Try another channel. Then, adjust the... control batteries. Check the battery terminals. No picture or sound. Check the antenna connections. No sound or sound is not correct, use your TV (digital broadcasting receiver, DTV, DVD, cable broadcasting receiver, VCR, etc.). Check the maximum resolution and the frequency of the remote control (transmission...
...values with a digital signal. BN68-00515U-X0Eng.qxd 1/5/05 10:01 PM Page 10 FAQ Check the following items before calling a Samsung authorized service center. Image is plugged in the Display Modes. STB) with the data in . Try another channel. Then, adjust the... control batteries. Check the battery terminals. No picture or sound. Check the antenna connections. No sound or sound is not correct, use your TV (digital broadcasting receiver, DTV, DVD, cable broadcasting receiver, VCR, etc.). Check the maximum resolution and the frequency of the remote control (transmission...
Quick Guide (easy Manual) (ver.1.0) (English)
Page 2
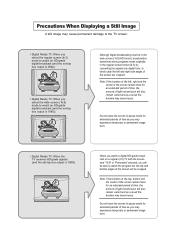
... not leave the screen in pause mode for extended periods of time as you may experience temporary or permanent image burn. • Digital Ready TV: When the TV receives HD-grade signals (and the set -top box output is 1080i). Do not leave the screen in which case the left , right ... varied and as a result the borders may leave traces. Precautions When Displaying a Still Image A still image may cause permanent damage to the TV screen. • Digital Ready TV: When you select the regular screen (4:3) mode to watch an SD-grade digital broadcast (and the set-top box output is 480p). •...
... not leave the screen in pause mode for extended periods of time as you may experience temporary or permanent image burn. • Digital Ready TV: When the TV receives HD-grade signals (and the set -top box output is 1080i). Do not leave the screen in which case the left , right ... varied and as a result the borders may leave traces. Precautions When Displaying a Still Image A still image may cause permanent damage to the TV screen. • Digital Ready TV: When you select the regular screen (4:3) mode to watch an SD-grade digital broadcast (and the set-top box output is 480p). •...
Quick Guide (easy Manual) (ver.1.0) (English)
Page 3
...DVD player, computer or a game console to the TV and select the 4:3 screen mode. • Integrated Digital TV (Wide-screen): When the TV receives SD-grade (regular) broadcasting signals (receives 480p regular signals). • Digital Ready TV (wide-screen): digital TV: When the TV receives SD-grade (regular) broadcasting signals (with a... set-top box). • When you watch an analog (regular) broadcast on a wide-screen TV (with the 4:3 screen mode selected). • When you watch a movie or play a game in regular (4:3) or wide (21:9) screen ...
...DVD player, computer or a game console to the TV and select the 4:3 screen mode. • Integrated Digital TV (Wide-screen): When the TV receives SD-grade (regular) broadcasting signals (receives 480p regular signals). • Digital Ready TV (wide-screen): digital TV: When the TV receives SD-grade (regular) broadcasting signals (with a... set-top box). • When you watch an analog (regular) broadcast on a wide-screen TV (with the 4:3 screen mode selected). • When you watch a movie or play a game in regular (4:3) or wide (21:9) screen ...

Quick Guide (easy Manual) (ver.1.0) (English)
Page 4
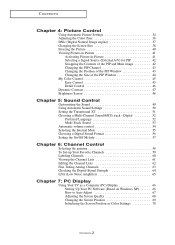
... Connecting VHF and UHF Antennas 7 Antennas with 300-ohm Flat Twin Leads 7 Antennas with 75-ohm Round Leads 8 Separate VHF and UHF Antennas 8 Connecting Cable TV 8 Cable without a Cable Box 8 Connecting to a Cable Box that Descrambles All Channels . . . . 9 Connecting to a Cable Box that Descrambles Some Channels ... Digital Audio System 15 Connecting an Amplifier/DVD Home Theater 16 Connecting a PC 16 Connecting Cable CARD 17 Chapter 3: Operation Turning the TV On and Off 18 Changing Channels 18 Using the Channel Buttons 18 Using the PRE-CH Button to select the Previous Channel . . ...
... Connecting VHF and UHF Antennas 7 Antennas with 300-ohm Flat Twin Leads 7 Antennas with 75-ohm Round Leads 8 Separate VHF and UHF Antennas 8 Connecting Cable TV 8 Cable without a Cable Box 8 Connecting to a Cable Box that Descrambles All Channels . . . . 9 Connecting to a Cable Box that Descrambles Some Channels ... Digital Audio System 15 Connecting an Amplifier/DVD Home Theater 16 Connecting a PC 16 Connecting Cable CARD 17 Chapter 3: Operation Turning the TV On and Off 18 Changing Channels 18 Using the Channel Buttons 18 Using the PRE-CH Button to select the Previous Channel . . ...
Quick Guide (easy Manual) (ver.1.0) (English)
Page 5
... the Channel Lists 62 Fine Tuning Analog Channels 63 Checking the Digital-Signal Strength 64 LNA (Low Noise Amplifier 65 Chapter 7: PC Display Using Your TV as a Computer (PC) Display 66 Setting Up Your PC Software (Based on Windows XP 66 How to Auto Adjust 67 Adjusting the Screen Quality 68...
... the Channel Lists 62 Fine Tuning Analog Channels 63 Checking the Digital-Signal Strength 64 LNA (Low Noise Amplifier 65 Chapter 7: PC Display Using Your TV as a Computer (PC) Display 66 Setting Up Your PC Software (Based on Windows XP 66 How to Auto Adjust 67 Adjusting the Screen Quality 68...
Quick Guide (easy Manual) (ver.1.0) (English)
Page 6
... the V-Chip 90 Setting Up Your Personal ID Number(PIN 90 How to Enable/Disable the V-Chip 91 How to Set up Restrictions using the "TV Parental Guidelines" 92 How to Set up Restrictions using the MPAA Ratings: G, PG, PG-13, R, NC-17, X, NR 94 How to Reset the... Problems 107 Disconnecting the stand 109 Installing the Wall Mount Kit 110 Using the Anti-Theft Kensington Lock 111 Using Your TV in Another Country 111 CableCARD and Digital Cable Ready TVs 112 Specifications 113 Display Modes 114 Contents-3 CONTENTS Chapter 8: Time Setting Setting the Clock 71 Option 1:Setting the Clock ...
... the V-Chip 90 Setting Up Your Personal ID Number(PIN 90 How to Enable/Disable the V-Chip 91 How to Set up Restrictions using the "TV Parental Guidelines" 92 How to Set up Restrictions using the MPAA Ratings: G, PG, PG-13, R, NC-17, X, NR 94 How to Reset the... Problems 107 Disconnecting the stand 109 Installing the Wall Mount Kit 110 Using the Anti-Theft Kensington Lock 111 Using Your TV in Another Country 111 CableCARD and Digital Cable Ready TVs 112 Specifications 113 Display Modes 114 Contents-3 CONTENTS Chapter 8: Time Setting Setting the Clock 71 Option 1:Setting the Clock ...
Quick Guide (easy Manual) (ver.1.0) (English)
Page 7
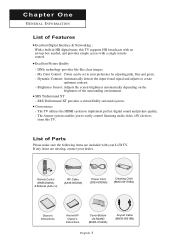
...The TV utilizes the HDMI system to create optimum contrast. - Remote Control (BN59-00460A) & Batteries (AAA x 2) RF Cable (AA39-00039A) Power Cord (3903-000085) Cleaning Cloth (BN63-001798A) Owner's Instructions Anynet AV Owner's Instructions Cover-Bottom LN-R408D (...I O N List of Features Excellent Digital Interface & Networking : With a built-in HD digital tuner, this TV. The Anynet system enables you to easily control Samsung audio-video (AV) devices from this TV supports HD broadcasts with no set to your LCD TV. DNIe technology provides life-like clear images. - Convenience -
...The TV utilizes the HDMI system to create optimum contrast. - Remote Control (BN59-00460A) & Batteries (AAA x 2) RF Cable (AA39-00039A) Power Cord (3903-000085) Cleaning Cloth (BN63-001798A) Owner's Instructions Anynet AV Owner's Instructions Cover-Bottom LN-R408D (...I O N List of Features Excellent Digital Interface & Networking : With a built-in HD digital tuner, this TV. The Anynet system enables you to easily control Samsung audio-video (AV) devices from this TV supports HD broadcasts with no set to your LCD TV. DNIe technology provides life-like clear images. - Convenience -
Quick Guide (easy Manual) (ver.1.0) (English)
Page 8
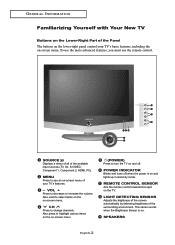
... Sensor is on and lights up in stand-by detecting brightness of the surrounding environment. Also used to see an on-screen menu of your TV's basic features, including the on-screen menu. SOURCE Displays a menu of all of the screen automatically by mode. G E N E R A L I N F O R M AT... towards this spot on . SPEAKERS English-2 VOL + Press to change channels. LIGHT DETECTING SENSOR Adjusts the brightness of the available input sources (TV, AV, S-VIDEO, Component 1, Component 2, HDMI, PC). To use the more advanced features, you must use the remote control. CH Press...
... Sensor is on and lights up in stand-by detecting brightness of the surrounding environment. Also used to see an on-screen menu of your TV's basic features, including the on-screen menu. SOURCE Displays a menu of all of the screen automatically by mode. G E N E R A L I N F O R M AT... towards this spot on . SPEAKERS English-2 VOL + Press to change channels. LIGHT DETECTING SENSOR Adjusts the brightness of the available input sources (TV, AV, S-VIDEO, Component 1, Component 2, HDMI, PC). To use the more advanced features, you must use the remote control. CH Press...

Quick Guide (easy Manual) (ver.1.0) (English)
Page 9
... IN Connect to an antenna or to connect an A/V component that will be adjusted. G E N E R A L I N F O R M AT I O N Rear Panel Jacks Use the rear panel jacks to a cable TV system. (See page 7~10) CABLE CARD Insert the cableCARD into the slot. For more information on page 111. PC IN Connect to a Digital Audio component...
... IN Connect to an antenna or to connect an A/V component that will be adjusted. G E N E R A L I N F O R M AT I O N Rear Panel Jacks Use the rear panel jacks to a cable TV system. (See page 7~10) CABLE CARD Insert the cableCARD into the slot. For more information on page 111. PC IN Connect to a Digital Audio component...
Quick Guide (easy Manual) (ver.1.0) (English)
Page 10
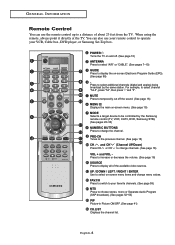
... the on-screen Electronic Program Guide (EPG). (See page 98) Press to select additional channels (digital and analog) being broadcast by the Samsung remote control (TV, VCR, CATV, DVD, Samsung STB). (See pages 28~30) NUMERIC BUTTONS Press to change channels. (See page 18) VOL + and VOL Press to increase or ...decrease the volume. (See page 18) SOURCE Press to display all of about 23 feet from the TV. PRE-CH Tunes to the previous channel....
... the on-screen Electronic Program Guide (EPG). (See page 98) Press to select additional channels (digital and analog) being broadcast by the Samsung remote control (TV, VCR, CATV, DVD, Samsung STB). (See pages 28~30) NUMERIC BUTTONS Press to change channels. (See page 18) VOL + and VOL Press to increase or ...decrease the volume. (See page 18) SOURCE Press to display all of about 23 feet from the TV. PRE-CH Tunes to the previous channel....

Quick Guide (easy Manual) (ver.1.0) (English)
Page 11
... DNIe image. Refer to stop the action during a particular scene. Stop - G E N E R A L I N F O R M AT I O N Anynet Press the Anynet button to exit the menu. Rewind - English-5 TV, VCR, CABLE, DVD, or Samsung Set-top box. (See pages 28~30) INFO Use to see information on the current broadcast. (See page 19) EXIT Press to bring...
... DNIe image. Refer to stop the action during a particular scene. Stop - G E N E R A L I N F O R M AT I O N Anynet Press the Anynet button to exit the menu. Rewind - English-5 TV, VCR, CABLE, DVD, or Samsung Set-top box. (See pages 28~30) INFO Use to see information on the current broadcast. (See page 19) EXIT Press to bring...


