
User Manual (ENGLISH)
Page 4
... Set-top box 15 Connecting an Amplifier/DVD Home Theater 15 Connecting a DVD/Set-top box via DVI 16 Connecting a DVD/Set-top box via HDMI 17 Connecting a PC 18 Chapter 3: Operation Turning the TV On and Off 19 Changing Channels 19 Using the Channel Buttons 19 Using the Number Buttons...
... Set-top box 15 Connecting an Amplifier/DVD Home Theater 15 Connecting a DVD/Set-top box via DVI 16 Connecting a DVD/Set-top box via HDMI 17 Connecting a PC 18 Chapter 3: Operation Turning the TV On and Off 19 Changing Channels 19 Using the Channel Buttons 19 Using the Number Buttons...
User Manual (ENGLISH)
Page 6
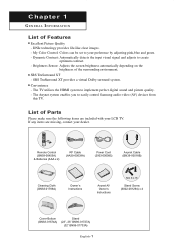
... pink,blue and green. - SRS TruSurround XT - The Anynet system enables you to implement perfect digital sound and picture quality. - The TV utilizes the HDMI system to easily control Samsung audio-video (AV) devices from this TV. Convenience - Chapter 1 G E N E R A L I N F O R M AT I O N List of the surrounding environment. DNIe technology provides life-like clear images...
... pink,blue and green. - SRS TruSurround XT - The Anynet system enables you to implement perfect digital sound and picture quality. - The TV utilizes the HDMI system to easily control Samsung audio-video (AV) devices from this TV. Convenience - Chapter 1 G E N E R A L I N F O R M AT I O N List of the surrounding environment. DNIe technology provides life-like clear images...
User Manual (ENGLISH)
Page 7
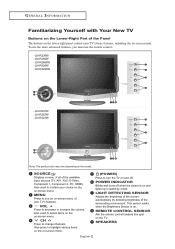
..., you must use the remote control. - LN-R3228W - SOURCE Displays a menu of all of the surrounding environment. POWER INDICATOR Blinks and turns off . LN-R267W - VOL + Press to change channels. SPEAKERS English-2 LN-R328W - LN-R2668W - MENU Press to turn the TV ...on the model. Also used to confirm your choice on the on -screen menu of your TV's basic features, including the on and lights up in stand-by detecting brightness of the available input sources (TV, AV1, AV2, S-Video, Component 1, Component 2, PC, HDMI...
..., you must use the remote control. - LN-R3228W - SOURCE Displays a menu of all of the surrounding environment. POWER INDICATOR Blinks and turns off . LN-R267W - VOL + Press to change channels. SPEAKERS English-2 LN-R328W - LN-R2668W - MENU Press to turn the TV ...on the model. Also used to confirm your choice on the on -screen menu of your TV's basic features, including the on and lights up in stand-by detecting brightness of the available input sources (TV, AV1, AV2, S-Video, Component 1, Component 2, PC, HDMI...
User Manual (ENGLISH)
Page 8
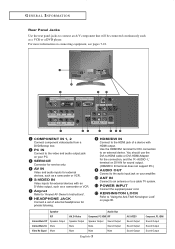
.... HEADPHONE JACK Connect a set of a device with an S-Video output, such as a camcorder or VCR. For more information on page 80. HDMI/DVI IN Connect to the audio input jack on your amplifier. Speaker RF Internal Mute Off Speaker Output Internal Mute On Mute Video No Signal... that will be connected continuously such as a VCR or a DVD player. ANT IN Connect to an antenna or to "Anynet AV Owner's Instructions". Use the HDMI/DVI terminal for private listening. S-VIDEO IN Video inputs for service only. G E N E R A L I N F O R M AT I O N Rear Panel Jacks Use the rear panel...
.... HEADPHONE JACK Connect a set of a device with an S-Video output, such as a camcorder or VCR. For more information on page 80. HDMI/DVI IN Connect to the audio input jack on your amplifier. Speaker RF Internal Mute Off Speaker Output Internal Mute On Mute Video No Signal... that will be connected continuously such as a VCR or a DVD player. ANT IN Connect to an antenna or to "Anynet AV Owner's Instructions". Use the HDMI/DVI terminal for private listening. S-VIDEO IN Video inputs for service only. G E N E R A L I N F O R M AT I O N Rear Panel Jacks Use the rear panel...

User Manual (ENGLISH)
Page 21
DVD Player Rear Panel TV Rear Panel DVI-to-HDMI Cable (Option) 2 Connect an audio cable between the HDMI/DVI connector on the TV and the DVI connector on the DVD player/Set-top box. CONNECTIONS Connecting a DVD/Set-top box via DVI This can be applied only if there is the DVI Output connector on the external device. 1 Connect a DVI-to-HDMI cable or DVI-HDMI adapter between the DVI IN [R-AUDIO-L] jack on the TV and the AUDIO OUT jacks on the DVD player/Set-top box. DVD Player Rear Panel TV Rear Panel Audio Cable (Option) DVI-to-HDMI Cable (Option) English-16
DVD Player Rear Panel TV Rear Panel DVI-to-HDMI Cable (Option) 2 Connect an audio cable between the HDMI/DVI connector on the TV and the DVI connector on the DVD player/Set-top box. CONNECTIONS Connecting a DVD/Set-top box via DVI This can be applied only if there is the DVI Output connector on the external device. 1 Connect a DVI-to-HDMI cable or DVI-HDMI adapter between the DVI IN [R-AUDIO-L] jack on the TV and the AUDIO OUT jacks on the DVD player/Set-top box. DVD Player Rear Panel TV Rear Panel Audio Cable (Option) DVI-to-HDMI Cable (Option) English-16
User Manual (ENGLISH)
Page 22
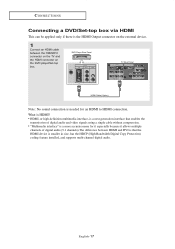
...the transmission of digital audio (5.1 channels).The difference between the HDMI/DVI connector on the TV and the HDMI connector on the DVD player/Set-top box. CONNECTIONS Connecting a DVD/Set-top box via HDMI This can be applied only if there is needed for it... single cable without compression. • "Multimedia interface" is a more accurate name for an HDMI to HDMI connection. What is HDMI? • HDMI, or high-definition multimedia interface, is a next-generation interface that the HDMI device is smaller in size, has the HDCP (High Bandwidth Digital Copy Protection) coding feature ...
...the transmission of digital audio (5.1 channels).The difference between the HDMI/DVI connector on the TV and the HDMI connector on the DVD player/Set-top box. CONNECTIONS Connecting a DVD/Set-top box via HDMI This can be applied only if there is needed for it... single cable without compression. • "Multimedia interface" is a more accurate name for an HDMI to HDMI connection. What is HDMI? • HDMI, or high-definition multimedia interface, is a next-generation interface that the HDMI device is smaller in size, has the HDCP (High Bandwidth Digital Copy Protection) coding feature ...
User Manual (ENGLISH)
Page 33
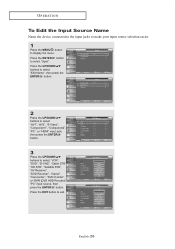
.../DOWN buttons to select "Edit Name", then press the ENTER button. 2 Press the UP/DOWN buttons to select "AV1", "AV2", "S-Video", "Component1", "Component2", "PC", or "HDMI" input jack, then press the ENTER button. 3 Press the UP/DOWN buttons to display the menu. Press the EXIT button to select "Input". Press the...
.../DOWN buttons to select "Edit Name", then press the ENTER button. 2 Press the UP/DOWN buttons to select "AV1", "AV2", "S-Video", "Component1", "Component2", "PC", or "HDMI" input jack, then press the ENTER button. 3 Press the UP/DOWN buttons to display the menu. Press the EXIT button to select "Input". Press the...

User Manual (ENGLISH)
Page 46
... the UP/DOWN buttons to select "Swap", then press the ENTER button. Source selection is possible only when PC or HDMI is set to select "Source", then press the ENTER button. [PC/HDMI modes only] Select the source of the PIP and Main image 4 Press the UP/DOWN buttons to select "Channel...) by pressing the UP/DOWN buttons and press the ENTER button. When the main picture is set to TV/ AV1/AV2/S-Video/Component1/ Component2, only HDMI can be selected and when the main picture is connected. PICTURE CONTROL Selecting a Signal Source (External A/V) for PIP 3 Press the UP/DOWN buttons to PC...
... the UP/DOWN buttons to select "Swap", then press the ENTER button. Source selection is possible only when PC or HDMI is set to select "Source", then press the ENTER button. [PC/HDMI modes only] Select the source of the PIP and Main image 4 Press the UP/DOWN buttons to select "Channel...) by pressing the UP/DOWN buttons and press the ENTER button. When the main picture is set to TV/ AV1/AV2/S-Video/Component1/ Component2, only HDMI can be selected and when the main picture is connected. PICTURE CONTROL Selecting a Signal Source (External A/V) for PIP 3 Press the UP/DOWN buttons to PC...
User Manual (ENGLISH)
Page 47
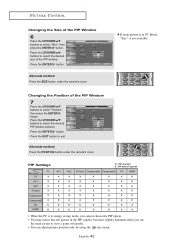
... select the desired PIP window position. PIP Settings Sub Picture TV Main Picture TV X AV1 X AV2 X S-Video X Component1 X Component2 X PC O HDMI O AV1 X X X X X X O O AV2 X X X X X X O O O : PIP operates X : PIP doesn't operate S-Video Component1 Component2 PC HDMI X X X X O X X X X O X X X X O X X X X O X X X X O X X X X O O O O X X O O O X X • When the PC is in energy saving mode, you cannot choose the PIP option. • You may notice...
... select the desired PIP window position. PIP Settings Sub Picture TV Main Picture TV X AV1 X AV2 X S-Video X Component1 X Component2 X PC O HDMI O AV1 X X X X X X O O AV2 X X X X X X O O O : PIP operates X : PIP doesn't operate S-Video Component1 Component2 PC HDMI X X X X O X X X X O X X X X O X X X X O X X X X O X X X X O O O O X X O O O X X • When the PC is in energy saving mode, you cannot choose the PIP option. • You may notice...


