
User Manual
Page 2
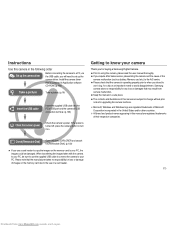
.... Instructions Use this camera in the following order Set up the camera driver Before connecting the camera to a PC, via the USB cable, you will need to avoid disappointment. Check [Removable Disk] Open Windows EXPLORER and search for buying a Samsung Digital Camera. ● Prior to using this camera, please read the user manual thoroughly. ● If you intend to use of images on the memory card due to your PC, the images could be sure to use a card reader...
.... Instructions Use this camera in the following order Set up the camera driver Before connecting the camera to a PC, via the USB cable, you will need to avoid disappointment. Check [Removable Disk] Open Windows EXPLORER and search for buying a Samsung Digital Camera. ● Prior to using this camera, please read the user manual thoroughly. ● If you intend to use of images on the memory card due to your PC, the images could be sure to use a card reader...

User Manual
Page 4
... correct specification for a long period of time. Battery may leak corrosive electrolyte and permanently damage the camera's components. ● Do not fire the flash while it continuously. Do not short circuit, heat or dispose of features 008 Front & Top 009 Back 010 Bottom 010 5 Function button 012 Connecting to a Power Source 015 Inserting the memory card 016 Instructions on when you capture an image...
... correct specification for a long period of time. Battery may leak corrosive electrolyte and permanently damage the camera's components. ● Do not fire the flash while it continuously. Do not short circuit, heat or dispose of features 008 Front & Top 009 Back 010 Bottom 010 5 Function button 012 Connecting to a Power Source 015 Inserting the memory card 016 Instructions on when you capture an image...

User Manual
Page 5
... Pre-set focus frame 041 Composite shooting 043 Photo Frame 044 Fn button 044 How to use the Fn menu 045 Size 045 Quality / Frame rate 046 Metering 046 Drive mode 047 ISO 048 White balance 049 Exposure compensation 049 Long Time shutter 050 Movie Clip frame stabiliser 050 Using the LCD monitor to adjust the camera settings 051 Sharpness 051 Contrast 051 Auto Focus type 052 Voice Memo 052 Voice Recording 053 Recording the movie...
... Pre-set focus frame 041 Composite shooting 043 Photo Frame 044 Fn button 044 How to use the Fn menu 045 Size 045 Quality / Frame rate 046 Metering 046 Drive mode 047 ISO 048 White balance 049 Exposure compensation 049 Long Time shutter 050 Movie Clip frame stabiliser 050 Using the LCD monitor to adjust the camera settings 051 Sharpness 051 Contrast 051 Auto Focus type 052 Voice Memo 052 Voice Recording 053 Recording the movie...

User Manual
Page 6
... Date / Time / Date type 057 World Time 058 Imprinting the recording date 058 LCD brightness 058 Auto Focus lamp 058 Start up image 059 Setup menu 2 059 Quick view 059 Auto power off 059 LCD save 060 Selecting Video out type 061 Formatting a memory 061 Initialisation PLAY 062 Starting play mode 062 Playing back a still image 062 Playing back a movie clip 063 Movie clip capture function 063 On camera movie trimming 064 Playing back a recorded voice 064 Playing back a voice memo 065 LCD monitor Indicator 065 Using the camera buttons to set the camera...
... Date / Time / Date type 057 World Time 058 Imprinting the recording date 058 LCD brightness 058 Auto Focus lamp 058 Start up image 059 Setup menu 2 059 Quick view 059 Auto power off 059 LCD save 060 Selecting Video out type 061 Formatting a memory 061 Initialisation PLAY 062 Starting play mode 062 Playing back a still image 062 Playing back a movie clip 063 Movie clip capture function 063 On camera movie trimming 064 Playing back a recorded voice 064 Playing back a voice memo 065 LCD monitor Indicator 065 Using the camera buttons to set the camera...

User Manual
Page 20
... camera. Starting the recording mode How to use the Auto mode Select this mode for selecting recording menu will be stored in the internal memory. Press the shutter button to capture an image. ●If the auto focus frame turns to capture an image clearly. ●Avoid obstructing the lens or the flash when you press the shutter button down half way, it is set. Changing the recording mode You can select a mode by pressing the 5 function button. If the memory card...
... camera. Starting the recording mode How to use the Auto mode Select this mode for selecting recording menu will be stored in the internal memory. Press the shutter button to capture an image. ●If the auto focus frame turns to capture an image clearly. ●Avoid obstructing the lens or the flash when you press the shutter button down half way, it is set. Changing the recording mode You can select a mode by pressing the 5 function button. If the memory card...

User Manual
Page 24
... speed. - To take pictures against the sun, please use a tripod, support the camera on the LCD monitor. When photographing a subject that has little contrast. - Lightly press the shutter button to flash shot mode. ● Shooting against the light : Please do not take a picture against the sun. In this case, use the [BACKLIGHT] in the scene shooting mode (see page 49). ● Avoid obstructing the lens or the flash when you capture an image...
... speed. - To take pictures against the sun, please use a tripod, support the camera on the LCD monitor. When photographing a subject that has little contrast. - Lightly press the shutter button to flash shot mode. ● Shooting against the light : Please do not take a picture against the sun. In this case, use the [BACKLIGHT] in the scene shooting mode (see page 49). ● Avoid obstructing the lens or the flash when you capture an image...

User Manual
Page 30
... Super Macro is selected, flash is displayed on the LCD monitor. Press the Flash button until the desired flash mode indicator is fixed as the FLASH button. [Selecting the Auto flash] ■ Selecting the flash mode 1. When the menu is displayed on the subject. 3. The image to avoid taking an unwanted picture. 3. With the SHUTTER button still pressed down to be cancelled. 1. Press the SHUTTER button halfway and focus on the LCD monitor, pressing the LEFT button makes the...
... Super Macro is selected, flash is displayed on the LCD monitor. Press the Flash button until the desired flash mode indicator is fixed as the FLASH button. [Selecting the Auto flash] ■ Selecting the flash mode 1. When the menu is displayed on the subject. 3. The image to avoid taking an unwanted picture. 3. With the SHUTTER button still pressed down to be cancelled. 1. Press the SHUTTER button halfway and focus on the LCD monitor, pressing the LEFT button makes the...

User Manual
Page 31
... capturing images in a poorly lit condition, the camera shake warning indicator ( ) will be a white speck in flash The flash fires regardless of flash). Red-eye reduction When a shot with a slow shutter speed to obtain a balanced correct exposure. If the battery is weak, the charging time will be longer. ● In the ASR mode, [LANDSCAPE], [CLOSE UP], [TEXT], [SUNSET], [DAWN], [FIREWORK], [SELF SHOT], [FOOD], [CAFÉ] scene modes and the Movie clip mode, the flash function...
... capturing images in a poorly lit condition, the camera shake warning indicator ( ) will be a white speck in flash The flash fires regardless of flash). Red-eye reduction When a shot with a slow shutter speed to obtain a balanced correct exposure. If the battery is weak, the charging time will be longer. ● In the ASR mode, [LANDSCAPE], [CLOSE UP], [TEXT], [SUNSET], [DAWN], [FIREWORK], [SELF SHOT], [FOOD], [CAFÉ] scene modes and the Movie clip mode, the flash function...

User Manual
Page 42
... image. ■ Press the E button in an available recording mode. (p.34) FUN Composite Move EE Exit Composite OEK Set 1. Composite Composite Composite Composite Composite OEK Set [Composite 1] Composite OEK Set [Composite 2] Composite OEK Set [Composite 3] Composite OEK Set [Composite 4] 2. E (Effect) button : FUN Composite shooting You can use the flash, self-timer, macro focus and the Zoom W / T button during the composite shooting. ● If you press the Play mode, MENU, E button or Mode button during the composite shots...
... image. ■ Press the E button in an available recording mode. (p.34) FUN Composite Move EE Exit Composite OEK Set 1. Composite Composite Composite Composite Composite OEK Set [Composite 1] Composite OEK Set [Composite 2] Composite OEK Set [Composite 3] Composite OEK Set [Composite 4] 2. E (Effect) button : FUN Composite shooting You can use the flash, self-timer, macro focus and the Zoom W / T button during the composite shooting. ● If you press the Play mode, MENU, E button or Mode button during the composite shots...

User Manual
Page 47
... exposure (+1/3EV). [Interval Shooting]: You can select continuous shot, and AEB (Auto Exposure Bracketing). [Single] : Take one picture only. [Continuous] : Images will be taken continuously until the shutter button is released. [Motion Capture] : This takes 7 shots per second, DRIVE when the shutter is better to take images with interval and number of images set before the camera was turned off . * Before using the Interval shot, charge the battery fully. The maximum number of shots is 30 and the image size is fixed...
... exposure (+1/3EV). [Interval Shooting]: You can select continuous shot, and AEB (Auto Exposure Bracketing). [Single] : Take one picture only. [Continuous] : Images will be taken continuously until the shutter button is released. [Motion Capture] : This takes 7 shots per second, DRIVE when the shutter is better to take images with interval and number of images set before the camera was turned off . * Before using the Interval shot, charge the battery fully. The maximum number of shots is 30 and the image size is fixed...

User Manual
Page 74
... the Left/Right button. 3. Change the contrast by pressing the Left/Right button. 3. Contrast Move OK Set 《73》 Downloaded from the captured image. 1. E (Effect) button : Image editing 1. Red Eye Fix OK Set E Back Brightness control You can change the brightness of the image. 1. Brightness Move OK Set Contrast control You can change the contrast of the image. 1. The [Proccessing!] message displays and the image is saved as a new file name. Select ( ) by...
... the Left/Right button. 3. Change the contrast by pressing the Left/Right button. 3. Contrast Move OK Set 《73》 Downloaded from the captured image. 1. E (Effect) button : Image editing 1. Red Eye Fix OK Set E Back Brightness control You can change the brightness of the image. 1. Brightness Move OK Set Contrast control You can change the contrast of the image. 1. The [Proccessing!] message displays and the image is saved as a new file name. Select ( ) by...

User Manual
Page 86
... protected from being accidentally erased (Lock). When you print the image. Press the Up / Down button and select the [Protect] menu tab. If you to make. ■The DPOF indicator will be printed on DPOF printers, or at a photo lab, request that your memory card's MISC folder. Unlock Lock OK Confirm DPOF ■DPOF(Digital Print Order Format) allows you protect an image, the protect icon will display on the LCD monitor. (An unprotected image has no indicator...
... protected from being accidentally erased (Lock). When you print the image. Press the Up / Down button and select the [Protect] menu tab. If you to make. ■The DPOF indicator will be printed on DPOF printers, or at a photo lab, request that your memory card's MISC folder. Unlock Lock OK Confirm DPOF ■DPOF(Digital Print Order Format) allows you protect an image, the protect icon will display on the LCD monitor. (An unprotected image has no indicator...

User Manual
Page 87
... an image carries DPOF instructions, the DPOF indicator ( ) will be printed in index format. 4. If [Yes] is selected : The image will show. OK Set - Press the Right button again and [Index] sub PLAYBACK Standard Index Size menu will display. 3. Select a desired sub menu by pressing the UP / DOWN button. ◀ Back If [No] is displayed. - W 0 Images T OK Set ■ Index Images (except for all pictures W 0 Images T except movie and voice files. Select...
... an image carries DPOF instructions, the DPOF indicator ( ) will be printed in index format. 4. If [Yes] is selected : The image will show. OK Set - Press the Right button again and [Index] sub PLAYBACK Standard Index Size menu will display. 3. Select a desired sub menu by pressing the UP / DOWN button. ◀ Back If [No] is displayed. - W 0 Images T OK Set ■ Index Images (except for all pictures W 0 Images T except movie and voice files. Select...
User Manual
Page 91
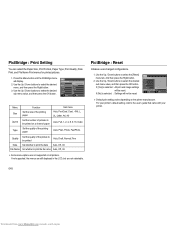
... Images Size Layout Type Quality Date ◀ Back Auto PostCard Card 4×6 L 2L OK Set Menu Size Layout Function Set the size of the printing paper Set the number of pictures to be printed on the printer manufacturer. Use the Up / Down buttons to print the file name Auto, Off, On ※ Some menu options are not selectable. If [No] is selected : All print and image settings will display. 2. PictBridge : Reset Initialises user-changed configurations. 1. Use the Up / Down buttons to the user's guide...
... Images Size Layout Type Quality Date ◀ Back Auto PostCard Card 4×6 L 2L OK Set Menu Size Layout Function Set the size of the printing paper Set the number of pictures to be printed on the printer manufacturer. Use the Up / Down buttons to print the file name Auto, Off, On ※ Some menu options are not selectable. If [No] is selected : All print and image settings will display. 2. PictBridge : Reset Initialises user-changed configurations. 1. Use the Up / Down buttons to the user's guide...

User Manual
Page 95
... default settings →Reset the date and time correctly The camera buttons do not operate ㆍCamera malfunction → Remove/re-insert battery and switch the camera on A card error has occurred while the memory card is in the camera. ㆍIncorrect memory card format → Re-format the memory card The images don't play back ㆍIncorrect file name (Violation of DCF format) → Do not change the image file name Colour of image is different to the original scene ㆍWhite balance...
... default settings →Reset the date and time correctly The camera buttons do not operate ㆍCamera malfunction → Remove/re-insert battery and switch the camera on A card error has occurred while the memory card is in the camera. ㆍIncorrect memory card format → Re-format the memory card The images don't play back ㆍIncorrect file name (Violation of DCF format) → Do not change the image file name Colour of image is different to the original scene ㆍWhite balance...

User Manual
Page 97
..., Custom Voice Recording - Normal, B&W, Sepia, Red, Blue, Green, Negative, Custom Color White Balance - Voice Memo in flash, Slow sync, Flash off, Red-eye Fix - Recharging Time : Approx. 4 sec Sharpness - Media ·Internal memory : 19MB flash memory ·External Memory (Optional) : MMC plus (up to 2GB guaranteed) SD/SDHC (up to 3.0X (Voice Recording On during Optical zoom usage) ·Movie stabilizer(User selectable) ·Movie Editing (Embedded) : Pause during recording, Still Image Capture - Modes : Auto, Auto & Red-eye reduction...
..., Custom Voice Recording - Normal, B&W, Sepia, Red, Blue, Green, Negative, Custom Color White Balance - Voice Memo in flash, Slow sync, Flash off, Red-eye Fix - Recharging Time : Approx. 4 sec Sharpness - Media ·Internal memory : 19MB flash memory ·External Memory (Optional) : MMC plus (up to 2GB guaranteed) SD/SDHC (up to 3.0X (Voice Recording On during Optical zoom usage) ·Movie stabilizer(User selectable) ·Movie Editing (Embedded) : Pause during recording, Still Image Capture - Modes : Auto, Auto & Red-eye reduction...

User Manual
Page 100
... manuals search engine You can download, view, edit and save your computer. A USB Driver for MAC is not included with this software. You can find [Removable Disk] in the CD-ROM Drive root directory. ■ Camera driver : This enables images to transfer between the camera and PC. This software is only compatible with Mac OS 10.0~10.4. ■ Samsung Master : This is provided only for Windows. After installing the driver and connecting this camera...
... manuals search engine You can download, view, edit and save your computer. A USB Driver for MAC is not included with this software. You can find [Removable Disk] in the CD-ROM Drive root directory. ■ Camera driver : This enables images to transfer between the camera and PC. This software is only compatible with Mac OS 10.0~10.4. ■ Samsung Master : This is provided only for Windows. After installing the driver and connecting this camera...

User Manual
Page 103
... upgrade the Internet Explorer. Select USB Computer Printer OK Confirm 《102》 Downloaded from www.Manualslib.com manuals search engine In this mode, you can download stored images to be installed. Setting up the application software ● If you have installed the camera driver, the [Found New Hardware Wizard] may appear. Search the PDF files with Windows explorer. Starting PC mode If you connect the USB cable to a USB port on the LCD...
... upgrade the Internet Explorer. Select USB Computer Printer OK Confirm 《102》 Downloaded from www.Manualslib.com manuals search engine In this mode, you can download stored images to be installed. Setting up the application software ● If you have installed the camera driver, the [Found New Hardware Wizard] may appear. Search the PDF files with Windows explorer. Starting PC mode If you connect the USB cable to a USB port on the LCD...

User Manual
Page 111
... Windows 98SE PC, remove the camera driver also, restart the PC, and then reinstall the camera driver. Case 8 The camera is connected to the camera. Sometimes, the camera may malfunction when it is an unexpected error during file transfer. → Turn the camera power off the camera, remove the USB cable, plug in Device Manager. → Install the camera driver correctly. Wherever possible, connect the camera to temporarily disable the program. Case 5 Are other USB cable, and connect only one USB cable...
... Windows 98SE PC, remove the camera driver also, restart the PC, and then reinstall the camera driver. Case 8 The camera is connected to the camera. Sometimes, the camera may malfunction when it is an unexpected error during file transfer. → Turn the camera power off the camera, remove the USB cable, plug in Device Manager. → Install the camera driver correctly. Wherever possible, connect the camera to temporarily disable the program. Case 5 Are other USB cable, and connect only one USB cable...
User Manual
Page 112
.../mac) 2) Click the [Free Download] menu on the top right side of the window then download windows appears. 3) Check the version of this codec. If the problem happens continuously, set the Legacy USB Support to the GNU General Public License and everyone can 't be extracted or an error message displays during the file transfer. → If you install only the Samsung Master, the problems mentioned above occasionally happen. - The Legacy USB Support...
.../mac) 2) Click the [Free Download] menu on the top right side of the window then download windows appears. 3) Check the version of this codec. If the problem happens continuously, set the Legacy USB Support to the GNU General Public License and everyone can 't be extracted or an error message displays during the file transfer. → If you install only the Samsung Master, the problems mentioned above occasionally happen. - The Legacy USB Support...


