Hpr4252 No Picture - Samsung HP R4252
Hpr4252 No Picture

Related Manual Pages


Similar Questions

Picture Jumping
Hi Could anyone advise on how I can stop the picture jumping it jumps on everyb channel.I have disco...
Hi Could anyone advise on how I can stop the picture jumping it jumps on everyb channel.I have disco...
(Posted by djhodges31 3 years ago)

Samsung Tv Picture Quality
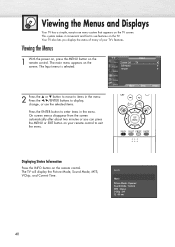
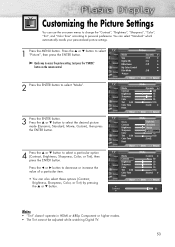
how do I adjust my picture settings to get a better quality picture. also how do I access or change ...
how do I adjust my picture settings to get a better quality picture. also how do I access or change ...
(Posted by kovacs29a 10 years ago)

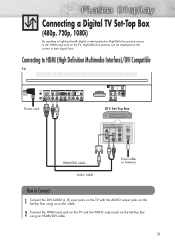
Samsung 42 Inch Tv Modle4252 No Sound No Picture Displays No Signal
(Posted by brucecolumbus7 11 years ago)

Picture Goes Out But The Sound Is Still On
Picture goes out but the sound is still on
Picture goes out but the sound is still on
(Posted by vickivn 12 years ago)

There Is No Picture In My Tv When I Turned It On I Hear Just The Sound
there is no picture im my samsung plazama 50 PH-T5054 I hear just the sound
there is no picture im my samsung plazama 50 PH-T5054 I hear just the sound
(Posted by salemsale 13 years ago)