User Manual (ENGLISH)
Page 1
Instruction Manual DVD-V9700 DVD-V9700 www.samsung.com
Instruction Manual DVD-V9700 DVD-V9700 www.samsung.com
User Manual (ENGLISH)
Page 4
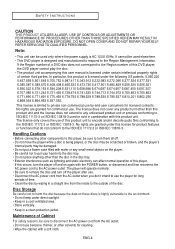
... a disc is being played, or the disc may be scratched or broken, and the player's internal parts may be used elsewhere. • This DVD player is highly vulnerable to the environment. • Do not keep under direct sunlight. • Keep in a cool ventilated area. • Store... the AC power cord to the Region Management Information. ENG-4 No rights are granted under this user manual is licensed under certain intellectual property rights of this DVD player, the DVD player cannot play the disc. • The product unit accompanying this license for licensed contents. Maintenance...
... a disc is being played, or the disc may be scratched or broken, and the player's internal parts may be used elsewhere. • This DVD player is highly vulnerable to the environment. • Do not keep under direct sunlight. • Keep in a cool ventilated area. • Store... the AC power cord to the Region Management Information. ENG-4 No rights are granted under this user manual is licensed under certain intellectual property rights of this DVD player, the DVD player cannot play the disc. • The product unit accompanying this license for licensed contents. Maintenance...

User Manual (ENGLISH)
Page 6
... Setup General Features...8 Disc Type and Characteristics ...9 Description...10 Tour of the Remote Control...12 Chapter 2: Connections Before Connecting the DVD-VCR ...13 Connecting a STB to the DVD-VCR ...13 Connection to a TV ...14 Connecting to a TV with an HDMI Jack 14 Connecting to a TV (Progressive)...16 ... 3: Initial Setup Selecting a Menu Language ...22 Setting the Clock ...23 Setting the Clock Manually ...23 Setting the Front Panel Display ...24 Setting the Auto Power Off ...25 Chapter 4: DVD Operations Playing a Disc ...26 Using the Search and Skip Functions ...28 Using the Display...
... Setup General Features...8 Disc Type and Characteristics ...9 Description...10 Tour of the Remote Control...12 Chapter 2: Connections Before Connecting the DVD-VCR ...13 Connecting a STB to the DVD-VCR ...13 Connection to a TV ...14 Connecting to a TV with an HDMI Jack 14 Connecting to a TV (Progressive)...16 ... 3: Initial Setup Selecting a Menu Language ...22 Setting the Clock ...23 Setting the Clock Manually ...23 Setting the Front Panel Display ...24 Setting the Auto Power Off ...25 Chapter 4: DVD Operations Playing a Disc ...26 Using the Search and Skip Functions ...28 Using the Display...
User Manual (ENGLISH)
Page 11
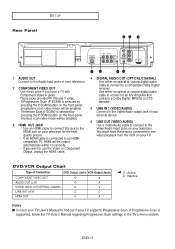
...SCAN button on the front panel, progressive scan video mode will be enabled. - DVD/VCR Output Chart Type of your television. 2 COMPONENT VIDEO OUT - Notes ■ Consult your TV User's Manual to a compatible Dolby Digital receiver. - HDMI OUT JACK - These jacks provide .../Audio output jack of your external device. 6 LINE OUT (VIDEO/AUDIO) Use a Video/Audio cable to connect to the Audio input jacks of Connection DVD Output Jacks VCR Output Jacks COMPONENT VIDEO OUT O X AUDIO OUT (L,R) O X DIGITAL AUDIO OUT (OPTICAL, COAXIAL) O X LINE OUT (A/V) O O HDMI OUT O...
...SCAN button on the front panel, progressive scan video mode will be enabled. - DVD/VCR Output Chart Type of your television. 2 COMPONENT VIDEO OUT - Notes ■ Consult your TV User's Manual to a compatible Dolby Digital receiver. - HDMI OUT JACK - These jacks provide .../Audio output jack of your external device. 6 LINE OUT (VIDEO/AUDIO) Use a Video/Audio cable to connect to the Audio input jacks of Connection DVD Output Jacks VCR Output Jacks COMPONENT VIDEO OUT O X AUDIO OUT (L,R) O X DIGITAL AUDIO OUT (OPTICAL, COAXIAL) O X LINE OUT (A/V) O O HDMI OUT O...
User Manual (ENGLISH)
Page 13
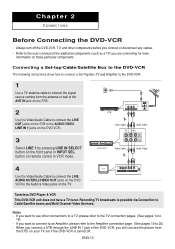
... from the STB on your TV set if the DVD-VCR is possible via Connection to the AUDIO/VIDEO LINE IN 1 jacks on the DVD-VCR.. Chapter 2 CONNECTIONS Before Connecting the DVD-VCR - Refer to 20) - DVD-V9700 Video Cable Audio Cable 4 Use the Video/Audio ...Cable to connect the LINE AUDIO OUT(R/L)/VIDEO OUT jacks on those particular components. Notes - If you want to connect to an Amplifier, please refer to the Amplifier connection page. (See pages 19 to the user's manual of the DVD-VCR...
... from the STB on your TV set if the DVD-VCR is possible via Connection to the AUDIO/VIDEO LINE IN 1 jacks on the DVD-VCR.. Chapter 2 CONNECTIONS Before Connecting the DVD-VCR - Refer to 20) - DVD-V9700 Video Cable Audio Cable 4 Use the Video/Audio ...Cable to connect the LINE AUDIO OUT(R/L)/VIDEO OUT jacks on those particular components. Notes - If you want to connect to an Amplifier, please refer to the Amplifier connection page. (See pages 19 to the user's manual of the DVD-VCR...
User Manual (ENGLISH)
Page 14
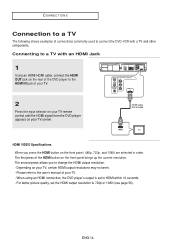
...HDMI VIDEO Specifications When you to change the HDMI output resolution. - When using an HDMI connection, the DVD player's output is set the HDMI output resolution to HDMI within 10 seconds. - Connecting to a TV ... on the front panel, 480p, 720p, and 1080i are selected in order. Please refer to the user's manual of the HDMI button on the front panel brings up the current resolution. ENG-14 The first press of ... a TV The following shows examples of connections commonly used to connect the DVD-VCR with an HDMI Jack 1 Using an HDMI-HDMI cable, connect the HDMI OUT jack on the rear of the...
...HDMI VIDEO Specifications When you to change the HDMI output resolution. - When using an HDMI connection, the DVD player's output is set the HDMI output resolution to HDMI within 10 seconds. - Connecting to a TV ... on the front panel, 480p, 720p, and 1080i are selected in order. Please refer to the user's manual of the HDMI button on the front panel brings up the current resolution. ENG-14 The first press of ... a TV The following shows examples of connections commonly used to connect the DVD-VCR with an HDMI Jack 1 Using an HDMI-HDMI cable, connect the HDMI OUT jack on the rear of the...

User Manual (ENGLISH)
Page 16
... in Stop mode, set the video output to P-SCAN by pressing the P.SCAN button on the front panel until the Component signal from the DVD-VCR appears on your TV remote control until the Progressive Scan mode prompt screen appears. Progressive scan has twice as many scanning lines as the interlace...connection method may differ from the illustration above. Then press ENTER and progressive will be output. Consult your TV User's Manual to the AUDIO (red and white) IN jacks of the DVD-VCR to find out if your TV. To see the progressive video output, - Depending on the rear of your TV ...
... in Stop mode, set the video output to P-SCAN by pressing the P.SCAN button on the front panel until the Component signal from the DVD-VCR appears on your TV remote control until the Progressive Scan mode prompt screen appears. Progressive scan has twice as many scanning lines as the interlace...connection method may differ from the illustration above. Then press ENTER and progressive will be output. Consult your TV User's Manual to the AUDIO (red and white) IN jacks of the DVD-VCR to find out if your TV. To see the progressive video output, - Depending on the rear of your TV ...

User Manual (ENGLISH)
Page 17
... on the front panel until the Component signal from the VCR, you want to connect to an Amplifier, please refer to the Amplifier connection page. (See pages 19 to the user's manual of the DVD-VCR to I-SCAN by pressing the P.SCAN button on the DVD-VCR and TV. 3 With the unit in Stop mode,... set . ENG-17 VCR audio only outputs through the audio out or line out audio). 1 Using Component video...
... on the front panel until the Component signal from the VCR, you want to connect to an Amplifier, please refer to the Amplifier connection page. (See pages 19 to the user's manual of the DVD-VCR to I-SCAN by pressing the P.SCAN button on the DVD-VCR and TV. 3 With the unit in Stop mode,... set . ENG-17 VCR audio only outputs through the audio out or line out audio). 1 Using Component video...

User Manual (ENGLISH)
Page 18
...video/audio cables, connect the VIDEO (yellow)/AUDIO (red and white) OUT jacks on the rear of the DVD-VCR to the VIDEO (yellow)/AUDIO (red and white) IN jacks of jacks may be generated if the audio ...mode changes in the following sequence: (I-SCAN, P-SCAN, Composite) - If you press the P.SCAN button when DVD-VCR is in Stop mode or no disc is one audio input jack on your TV set has been turned off.... Please refer to the user's manual of your TV set although the DVD-VCR set . If you want to connect to an Amplifier, please refer to the Amplifier ...
...video/audio cables, connect the VIDEO (yellow)/AUDIO (red and white) OUT jacks on the rear of the DVD-VCR to the VIDEO (yellow)/AUDIO (red and white) IN jacks of jacks may be generated if the audio ...mode changes in the following sequence: (I-SCAN, P-SCAN, Composite) - If you press the P.SCAN button when DVD-VCR is in Stop mode or no disc is one audio input jack on your TV set has been turned off.... Please refer to the user's manual of your TV set although the DVD-VCR set . If you want to connect to an Amplifier, please refer to the Amplifier ...

User Manual (ENGLISH)
Page 19
...turn the volume down when you turn on the Amplifier. Please refer to your Amplifier's user manual to set the audio in order to hear sound from the DVD-VCR. ENG-19 Refer to your Amplifier's user manual . - Notes - The position of your ears. - CONNECTIONS Connection to an Audio System ...Connecting to an Audio System (2 Channel Amplifier, Analog) 1 Using the audio cables, connect the (LINE) AUDIO (red and white) OUT jacks on the rear of the DVD-VCR to the AUDIO (...
...turn the volume down when you turn on the Amplifier. Please refer to your Amplifier's user manual to set the audio in order to hear sound from the DVD-VCR. ENG-19 Refer to your Amplifier's user manual . - Notes - The position of your ears. - CONNECTIONS Connection to an Audio System ...Connecting to an Audio System (2 Channel Amplifier, Analog) 1 Using the audio cables, connect the (LINE) AUDIO (red and white) OUT jacks on the rear of the DVD-VCR to the AUDIO (...

User Manual (ENGLISH)
Page 20
... button of the Amplifier. Notes - Sudden loud sound may vary depending on the DVD-VCR, TV, and Amplifier. ENG-20 Refer to hear sound from the DVD-VCR. The jack position may cause damage to the speakers and your Amplifier's user manual to set the audio in the menu screen according to the Amplifier. (See... input. If it is set the DTS to 18. Please refer to the user's manual of the Amplifier to select external input in order to your ears. - When you turn the volume down when you connect the DVD-VCR to a DTS Amplifier and play a DTS disc, set to 53) - Please turn on ...
... button of the Amplifier. Notes - Sudden loud sound may vary depending on the DVD-VCR, TV, and Amplifier. ENG-20 Refer to hear sound from the DVD-VCR. The jack position may cause damage to the speakers and your Amplifier's user manual to set the audio in the menu screen according to the Amplifier. (See... input. If it is set the DTS to 18. Please refer to the user's manual of the Amplifier to select external input in order to your ears. - When you turn the volume down when you connect the DVD-VCR to a DTS Amplifier and play a DTS disc, set to 53) - Please turn on ...

User Manual (ENGLISH)
Page 23
INITIAL SETUP Setting the Clock This menu is used to set the date and time manually. Setting the Clock Manually If Auto Setup fails to set the DVD-VCR's internal clock by locating a local TV station, follow these steps to select each of the following options, then use timer recording.... Note: For accurate Timer Recording, your DVD-VCR's internal clock must be set correctly. 1 Press the MENU button....
INITIAL SETUP Setting the Clock This menu is used to set the date and time manually. Setting the Clock Manually If Auto Setup fails to set the DVD-VCR's internal clock by locating a local TV station, follow these steps to select each of the following options, then use timer recording.... Note: For accurate Timer Recording, your DVD-VCR's internal clock must be set correctly. 1 Press the MENU button....
User Manual (ENGLISH)
Page 56
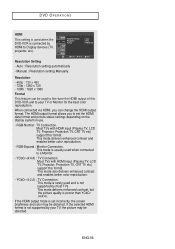
...This mode also delivers enhanced contrast and enables better color reproduction. - The HDMI output format allows you can be used when the DVD-VCR is connected by your TV or Monitor for the best color reproduction. This mode delivers enhanced contrast and enables better color reproduction. ...with HDMI input (Plasma TV, LCD TV, Projector, Projection TV, CRT TV etc) support this format. DVD OPERATIONS HDMI This setting is used to fine-tune the HDMI output of this DVD-VCR unit to your TV, the picture may be distorted. Resolution Setting - YCbCr-(4:4:4) : TV Connection. Resolution -...
...This mode also delivers enhanced contrast and enables better color reproduction. - The HDMI output format allows you can be used when the DVD-VCR is connected by your TV or Monitor for the best color reproduction. This mode delivers enhanced contrast and enables better color reproduction. ...with HDMI input (Plasma TV, LCD TV, Projector, Projection TV, CRT TV etc) support this format. DVD OPERATIONS HDMI This setting is used to fine-tune the HDMI output of this DVD-VCR unit to your TV, the picture may be distorted. Resolution Setting - YCbCr-(4:4:4) : TV Connection. Resolution -...
User Manual (ENGLISH)
Page 57
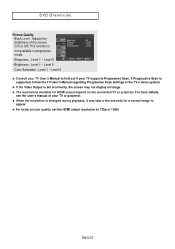
... Level 1 ~ Level 5 - ENG-57 If Progressive Scan is supported, follow the TV User's Manual regarding Progressive Scan settings in the TV's menu system. ● If the Video Output is set ...connected TV or projector. Color Saturation : Level 1 ~ Level 5 ● Consult your TV User's Manual to 720p or 1080i. For more details, see the user's manual of the screen. (On or Off) This function is changed during playback, it may not display an.... - Brightness : Level 1 ~ Level 5 - Black Level : Adjusts the brightness of your TV supports Progressive Scan. DVD OPERATIONS Picture Quality -
... Level 1 ~ Level 5 - ENG-57 If Progressive Scan is supported, follow the TV User's Manual regarding Progressive Scan settings in the TV's menu system. ● If the Video Output is set ...connected TV or projector. Color Saturation : Level 1 ~ Level 5 ● Consult your TV User's Manual to 720p or 1080i. For more details, see the user's manual of the screen. (On or Off) This function is changed during playback, it may not display an.... - Brightness : Level 1 ~ Level 5 - Black Level : Adjusts the brightness of your TV supports Progressive Scan. DVD OPERATIONS Picture Quality -

User Manual (ENGLISH)
Page 65
... the tape begins to solve this problem. You may also set tracking manually. 1 Insert and play , the VCR begins automatic tracking. The TRK button will automatically align the recorded tracks with the playback heads to play a video cassette tape. VCR OPERATIONS Using Automatic Tracking The Tracking adjustment removes the white lines that sometimes...
... the tape begins to solve this problem. You may also set tracking manually. 1 Insert and play , the VCR begins automatic tracking. The TRK button will automatically align the recorded tracks with the playback heads to play a video cassette tape. VCR OPERATIONS Using Automatic Tracking The Tracking adjustment removes the white lines that sometimes...


