

User Manual (user Manual) (ver.1.0) (English)
Page 4
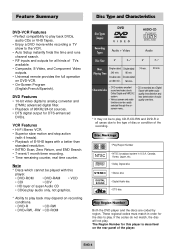
...28 Auto Play 28 S-VHS Playback 29 Variable Search System 29 10 - DVD Setup Disc Menu Language 14 Audio Language 15 Subtitle Language 15 Digital Output 16 DTS 16 Dynamic Compression 17 PCM Down Sampling 17 TV Aspect Ratio 18... View 24 Subtitle 24 A to Set a Timer Recording 31 Function(VCR 32 Appendix - Advanced Connections Selecting the Cassette Type 7 S-Video/Component Video Connections (for DVD) . . . . 7 Monitor TV Connections 8 Connecting Other Video Equipment 8 • 4 - Table of Contents • Safety Important Safety Instructions 2 ...
...28 Auto Play 28 S-VHS Playback 29 Variable Search System 29 10 - DVD Setup Disc Menu Language 14 Audio Language 15 Subtitle Language 15 Digital Output 16 DTS 16 Dynamic Compression 17 PCM Down Sampling 17 TV Aspect Ratio 18... View 24 Subtitle 24 A to Set a Timer Recording 31 Function(VCR 32 Appendix - Advanced Connections Selecting the Cassette Type 7 S-Video/Component Video Connections (for DVD) . . . . 7 Monitor TV Connections 8 Connecting Other Video Equipment 8 • 4 - Table of Contents • Safety Important Safety Instructions 2 ...
User Manual (user Manual) (ver.1.0) (English)
Page 5
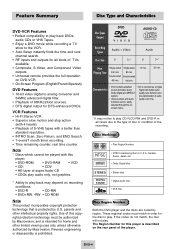
... the rear panel of TVs available. • Composite, S-Video, and Component Video outputs. • Universal remote provides the full operation on recording conditions. • DVD-R • CD-RW • DVD+RW, -RW • CD-ROM Disc Type and Characteristics Disc Types (Logos) DVD V I D E O AUDIO-CD Recording Types Audio + Video Audio Disc Size 5" 31/2" 5" 31...
... the rear panel of TVs available. • Composite, S-Video, and Component Video outputs. • Universal remote provides the full operation on recording conditions. • DVD-R • CD-RW • DVD+RW, -RW • CD-ROM Disc Type and Characteristics Disc Types (Logos) DVD V I D E O AUDIO-CD Recording Types Audio + Video Audio Disc Size 5" 31/2" 5" 31...
User Manual (user Manual) (ver.1.0) (English)
Page 8
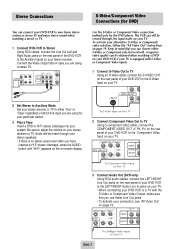
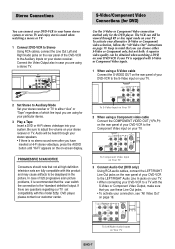
... "Alt Video Out" on Your TV ENG-7 To Left/Right Audio Inputs on page 19. Connect the Video Output also in mind that you use these Line Out jacks. • To activate your DVD-VCR to the S-Video Input on the rear panel of which line input you have inserted a Hi-Fi... with S-Video or Component Video inputs. 1 Connect S-Video Out to TV Using an S-Video cable, connect the S-VIDEO OUT on the rear panel of your DVD-VCR to a TV with the S-Video or Component Video Output, make sure that you are using a stereo TV.
... "Alt Video Out" on Your TV ENG-7 To Left/Right Audio Inputs on page 19. Connect the Video Output also in mind that you use these Line Out jacks. • To activate your DVD-VCR to the S-Video Input on the rear panel of which line input you have inserted a Hi-Fi... with S-Video or Component Video inputs. 1 Connect S-Video Out to TV Using an S-Video cable, connect the S-VIDEO OUT on the rear panel of your DVD-VCR to a TV with the S-Video or Component Video Output, make sure that you are using a stereo TV.
User Manual (user Manual) (ver.1.0) (English)
Page 9
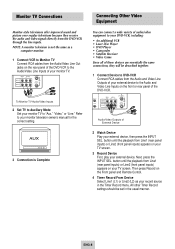
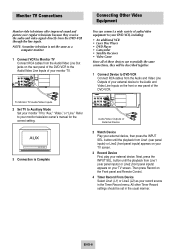
...Next, press the INPUT SEL. All other Timer Record settings should be described together. 1 Connect Device to DVD-VCR Connect RCA cables from the Audio and Video Line Outputs of your monitor TV. Then press Record on the front or rear panel of External Device 2 Watch Device...inputs) appears on your TV screen. 3 Record Device First, play your external device. NOTE: A monitor television is Complete Audio/Video Outputs of the DVD-VCR. Monitor TV Connections Monitor-style televisions offer improved sound and picture over regular televisions because they will be set in the Timer ...
...Next, press the INPUT SEL. All other Timer Record settings should be described together. 1 Connect Device to DVD-VCR Connect RCA cables from the Audio and Video Line Outputs of your monitor TV. Then press Record on the front or rear panel of External Device 2 Watch Device...inputs) appears on your TV screen. 3 Record Device First, play your external device. NOTE: A monitor television is Complete Audio/Video Outputs of the DVD-VCR. Monitor TV Connections Monitor-style televisions offer improved sound and picture over regular televisions because they will be set in the Timer ...
User Manual (user Manual) (ver.1.0) (English)
Page 17
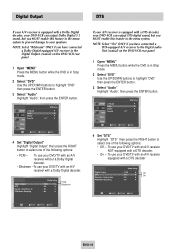
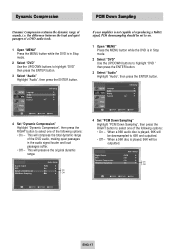
...• Bitstream -To use your speakers. To use your DVD/TV with an A/V receiver equipped with a Dolby Digital decoder, your DVD/TV with an A/V receiver NOT equipped with a Dolby Digital decoder. To use your DVD-VCR can output DTS digital sound, but you MUST enable this feature in...you have connected a Dolby Digital-equipped A/V receiver to the Digital Output (coaxial) on the DVD-VCR rear panel. 1 Open "MENU" Press the MENU button while the DVD is in Stop mode. 2 Select "DVD" Use the UP/DOWN buttons to highlight "DVD" then press the ENTER button. 3 Select "Audio" Highlight ...
...• Bitstream -To use your speakers. To use your DVD/TV with an A/V receiver equipped with a Dolby Digital decoder, your DVD/TV with an A/V receiver NOT equipped with a Dolby Digital decoder. To use your DVD-VCR can output DTS digital sound, but you MUST enable this feature in...you have connected a Dolby Digital-equipped A/V receiver to the Digital Output (coaxial) on the DVD-VCR rear panel. 1 Open "MENU" Press the MENU button while the DVD is in Stop mode. 2 Select "DVD" Use the UP/DOWN buttons to highlight "DVD" then press the ENTER button. 3 Select "Audio" Highlight ...
User Manual (user Manual) (ver.1.0) (English)
Page 18
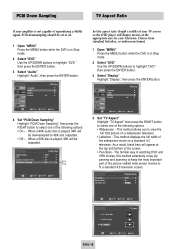
... - If your amplifier is not capable of reproducing a 96kHz signal, PCM downsampling should be outputted. On On On PCM Down Sampling : Ofnf Off 4 Set "PCM Down Sampling" Highlight "PCM Down Sampling", then press the RIGHT button to highlight "DVD" then press the ENTER button. 3 Select "Audio" Highlight "Audio", then press the ENTER...
... - If your amplifier is not capable of reproducing a 96kHz signal, PCM downsampling should be outputted. On On On PCM Down Sampling : Ofnf Off 4 Set "PCM Down Sampling" Highlight "PCM Down Sampling", then press the RIGHT button to highlight "DVD" then press the ENTER button. 3 Select "Audio" Highlight "Audio", then press the ENTER...
User Manual (user Manual) (ver.1.0) (English)
Page 20
... mode will work, and Video and S-Video will be viewed through the RF or line outputs. 1 Open "MENU" Press the MENU button while the DVD is in Stop mode. 2 Select "DVD" Use the UP/DOWN buttons to highlight "DVD," then press the ENTER button. 3 Select "Display" Highlight "Display", then press the ENTER button. &#...this if you are using the S-Video OUT jack on the rear panel to connect to a Progressive(480p) or Interlaced (480i) TV. • See your DVD-VCR to a TV using the S-VIDEO OUT or COMPONENT VIDEO OUT jacks. • Use the S-Video or Component Video connection method only for the...
... mode will work, and Video and S-Video will be viewed through the RF or line outputs. 1 Open "MENU" Press the MENU button while the DVD is in Stop mode. 2 Select "DVD" Use the UP/DOWN buttons to highlight "DVD," then press the ENTER button. 3 Select "Display" Highlight "Display", then press the ENTER button. &#...this if you are using the S-Video OUT jack on the rear panel to connect to a Progressive(480p) or Interlaced (480i) TV. • See your DVD-VCR to a TV using the S-VIDEO OUT or COMPONENT VIDEO OUT jacks. • Use the S-Video or Component Video connection method only for the...
User Manual (user Manual) (ver.1.0) (English)
Page 31
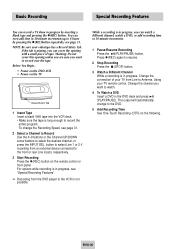
... recording time in the DVD deck and press ❿ll (PLAY/PAUSE). For options while recording is not possible. Using your TV remote control, Change the channel you can even add time in progress by pressing the (REC)button repeatedly; The output will automatically change the Recording...up to 4 hours by inserting a blank tape and pressing the (REC) button. You can watch a different channel, watch . 4 To Watch a DVD Insert a DVD in 30-minute increments. 1 Pause/Resume Recording Press the ❿ll(PLAY/PAUSE) button. Warning: Do not cover this opening with a small piece ...
... recording time in the DVD deck and press ❿ll (PLAY/PAUSE). For options while recording is not possible. Using your TV remote control, Change the channel you can even add time in progress by pressing the (REC)button repeatedly; The output will automatically change the Recording...up to 4 hours by inserting a blank tape and pressing the (REC) button. You can watch a different channel, watch . 4 To Watch a DVD Insert a DVD in 30-minute increments. 1 Pause/Resume Recording Press the ❿ll(PLAY/PAUSE) button. Warning: Do not cover this opening with a small piece ...

User Manual (user Manual) (ver.1.0) (English)
Page 34
... AUDIO TRACK Normal: 1 track; Hi-Fi: 2 track PLAY/RECORD TIME T-180 tape: SP 3 hours, SLP 9 hours FF/REW TIME T-120 tape: aTeccxzhnical Specifications Inputs Outputs VCR DVD SYSTEM AUDIO 2 Stereo audio inputs, RCA Connector, -8dbm, 47KΩ, front and rear VIDEO 2 Composite video inputs, RCA Connector, 75Ω, 1Vp-p RF Antenna or...
... AUDIO TRACK Normal: 1 track; Hi-Fi: 2 track PLAY/RECORD TIME T-180 tape: SP 3 hours, SLP 9 hours FF/REW TIME T-120 tape: aTeccxzhnical Specifications Inputs Outputs VCR DVD SYSTEM AUDIO 2 Stereo audio inputs, RCA Connector, -8dbm, 47KΩ, front and rear VIDEO 2 Composite video inputs, RCA Connector, 75Ω, 1Vp-p RF Antenna or...
User Manual (user Manual) (ver.1.0) (English)
Page 4
... Menu Language 11 Manual Clock Set 11 Tuner Band Setting 12 RF Output Channel 12 Auto Channel Memory 13 Channel Add/Delete 13 Front Panel Dimmer 14 Auto Power Off 14 7 - DVD Operations Special Playback Features 21 Disc Menu Navigation 22 EZ View 22 ... Summary 4 Disc Type and Characteristics 4 1 - Getting Started Basic Connections/Auto Setup 6 3 - DVD Sound Setup A/V Receiver Connections 9 5 - DVD Setup Disc Menu Language 15 Audio Language 15 Subtitle Language 16 Digital Output 16 DTS 17 Dynamic Compression 17 PCM Down Sampling 18 TV Aspect Ratio 18 Black Level 19...
... Menu Language 11 Manual Clock Set 11 Tuner Band Setting 12 RF Output Channel 12 Auto Channel Memory 13 Channel Add/Delete 13 Front Panel Dimmer 14 Auto Power Off 14 7 - DVD Operations Special Playback Features 21 Disc Menu Navigation 22 EZ View 22 ... Summary 4 Disc Type and Characteristics 4 1 - Getting Started Basic Connections/Auto Setup 6 3 - DVD Sound Setup A/V Receiver Connections 9 5 - DVD Setup Disc Menu Language 15 Audio Language 15 Subtitle Language 16 Digital Output 16 DTS 17 Dynamic Compression 17 PCM Down Sampling 18 TV Aspect Ratio 18 Black Level 19...
User Manual (user Manual) (ver.1.0) (English)
Page 5
...the on the rear panel of TVs available. • Composite, S-Video, and Component Video outputs. • Universal remote provides the full operation on recording conditions. • DVD-R • CD-RW • DVD+RW, -RW • CD-ROM Note This product incorporates copyright protection technology that is prohibited....bit sources. • DTS digital output for all cases due to the type of disc or condition of audio • Various screen and audio quality over time. Double-sided Double-sided 480 min. 160 min. 74 min. 20 min. • DVD contains excellent • CD is ...
...the on the rear panel of TVs available. • Composite, S-Video, and Component Video outputs. • Universal remote provides the full operation on recording conditions. • DVD-R • CD-RW • DVD+RW, -RW • CD-ROM Note This product incorporates copyright protection technology that is prohibited....bit sources. • DTS digital output for all cases due to the type of disc or condition of audio • Various screen and audio quality over time. Double-sided Double-sided 480 min. 160 min. 74 min. 20 min. • DVD contains excellent • CD is ...
User Manual (user Manual) (ver.1.0) (English)
Page 7
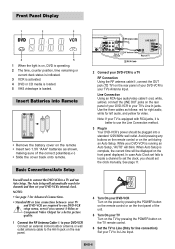
...Slide the cover back onto remote. In case Auto Clock set fails to locate a channel to set the clock, you connect S-Video or Component Video Output for video. ENG-6 Avoid pressing any buttons on the remote control or on the TV remote control. 6 Set the TV to Line (Only for...is loaded. Insert Batteries into a standard 120V/60Hz wall outlet. Use the three cables as shown, making sure of your DVD-VCR to its Line Input. Note: If your DVD-VCR is complete, the current time will blink. Basic Connections/Auto Setup You will automatically search for line connection) Set your...
...Slide the cover back onto remote. In case Auto Clock set fails to locate a channel to set the clock, you connect S-Video or Component Video Output for video. ENG-6 Avoid pressing any buttons on the remote control or on the TV remote control. 6 Set the TV to Line (Only for...is loaded. Insert Batteries into a standard 120V/60Hz wall outlet. Use the three cables as shown, making sure of your DVD-VCR to its Line Input. Note: If your DVD-VCR is complete, the current time will blink. Basic Connections/Auto Setup You will automatically search for line connection) Set your...
User Manual (user Manual) (ver.1.0) (English)
Page 8
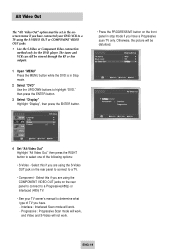
...Connect the COMPONENT VIDEO OUT (Y,Pb,Pr) on the rear panel of your DVD-VCR to the LEFT/RIGHT Audio Line In jacks on your TV. • When connecting your DVD-VCR to the "standard definition"output. Connect the Video Output also in mind that you can be heard through RF or line input...stereo receiver. To S-Video Input on Your TV 2 When using a stereo TV. Audio will be obtained when watching a DVD on your DVD-VCR if your TV is equipped with the S-Video or Component Video Output, make sure that you use these Line Out jacks. • To activate your connection, see "Alt Video Out...
...Connect the COMPONENT VIDEO OUT (Y,Pb,Pr) on the rear panel of your DVD-VCR to the LEFT/RIGHT Audio Line In jacks on your TV. • When connecting your DVD-VCR to the "standard definition"output. Connect the Video Output also in mind that you can be heard through RF or line input...stereo receiver. To S-Video Input on Your TV 2 When using a stereo TV. Audio will be obtained when watching a DVD on your DVD-VCR if your TV is equipped with the S-Video or Component Video Output, make sure that you use these Line Out jacks. • To activate your connection, see "Alt Video Out...
User Manual (user Manual) (ver.1.0) (English)
Page 9
... • Laser Disc Player • DVD Player • Camcorder • Satellite Receiver • Video Game Since all of these devices use essentially the same connections, they receive the audio and video signals directly from the Audio and Video Line Outputs of your external device to the Audio/...from Line1 (rear panel inputs) or Line2 (front panel inputs) appears on the front or rear panel of the DVD-VCR. NOTE: A monitor television is Complete Audio/Video Outputs of External Device 2 Watch Device Play your external device, then press the INPUT SEL. Monitor TV Connections Monitor-...
... • Laser Disc Player • DVD Player • Camcorder • Satellite Receiver • Video Game Since all of these devices use essentially the same connections, they receive the audio and video signals directly from the Audio and Video Line Outputs of your external device to the Audio/...from Line1 (rear panel inputs) or Line2 (front panel inputs) appears on the front or rear panel of the DVD-VCR. NOTE: A monitor television is Complete Audio/Video Outputs of External Device 2 Watch Device Play your external device, then press the INPUT SEL. Monitor TV Connections Monitor-...
User Manual (user Manual) (ver.1.0) (English)
Page 13
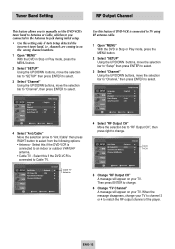
...move the selection bar to "Channel," then press ENTER to match the RF output channel of the player. ENG-12 Ant./Cable : Antenna RF Output CH : 3CH Auto Channel Memory Channel Add/Delete Cable TV Antenna Use this if the DVD-VCR is connected to TV using RF antenna cable. 1 Open "MENU" ...With the DVD in on your TV. Select this feature if DVD-VCR is connected to change your TV...
...move the selection bar to "Channel," then press ENTER to match the RF output channel of the player. ENG-12 Ant./Cable : Antenna RF Output CH : 3CH Auto Channel Memory Channel Add/Delete Cable TV Antenna Use this if the DVD-VCR is connected to TV using RF antenna cable. 1 Open "MENU" ...With the DVD in on your TV. Select this feature if DVD-VCR is connected to change your TV...

User Manual (user Manual) (ver.1.0) (English)
Page 14
Ant./Cable : Antenna RF Output CH : 3CH Auto Channel Memory Channel Add/Delete 5 Select Channel to Add/Delete Use the CH / buttons to tune in the channel number you wish to remove. 1 Open "MENU" With the DVD in Stop or Play mode, press the MENU button. 2 Select "SETUP" Using the...select. 3 Select "Channel" Using the UP/DOWN buttons, move the selection bar to "Channel", then press ENTER to select. Ant./Cable : Antenna RF Output CH : 3CH Auto Channel Memory Channel Add/Delete 4 Select "Channel Add/Delete" Move the selection bar to "Channel Add/Delete," then press ENTER to ...
Ant./Cable : Antenna RF Output CH : 3CH Auto Channel Memory Channel Add/Delete 5 Select Channel to Add/Delete Use the CH / buttons to tune in the channel number you wish to remove. 1 Open "MENU" With the DVD in Stop or Play mode, press the MENU button. 2 Select "SETUP" Using the...select. 3 Select "Channel" Using the UP/DOWN buttons, move the selection bar to "Channel", then press ENTER to select. Ant./Cable : Antenna RF Output CH : 3CH Auto Channel Memory Channel Add/Delete 4 Select "Channel Add/Delete" Move the selection bar to "Channel Add/Delete," then press ENTER to ...

User Manual (user Manual) (ver.1.0) (English)
Page 17
...your preferred language, follow these steps. To use your DVD/TV with an A/V receiver without a Dolby Digital decoder. • Bitstream -To use your DVD/TV with an A/V receiver with a Dolby Digital decoder, your DVD-VCR can output Dolby Digital 5.1 sound, but you MUST enable this feature... preferred language for subtitles, then press the ENTER button. Subtitle Language Digital Output To set to the language you have connected a Dolby Digital-equipped A/V receiver to the Digital Output (coaxial) on a DVD, your Subtitle Language will automatically be set the Subtitle Language to select one...
...your preferred language, follow these steps. To use your DVD/TV with an A/V receiver without a Dolby Digital decoder. • Bitstream -To use your DVD/TV with an A/V receiver with a Dolby Digital decoder, your DVD-VCR can output Dolby Digital 5.1 sound, but you MUST enable this feature... preferred language for subtitles, then press the ENTER button. Subtitle Language Digital Output To set to the language you have connected a Dolby Digital-equipped A/V receiver to the Digital Output (coaxial) on a DVD, your Subtitle Language will automatically be set the Subtitle Language to select one...

User Manual (user Manual) (ver.1.0) (English)
Page 18
... Off ENG-17 To use your DVD-VCR can output DTS digital sound, but you have connected a DTS-equipped A/V receiver to the Digital audio Out (coaxial) on the DVD-VCR rear panel. 1 Open "MENU" Press the MENU button while the DVD is in Stop mode. 2 Select "DVD" Use the UP/DOWN buttons to... highlight "DVD" then press the ENTER button. 3 Select...
... Off ENG-17 To use your DVD-VCR can output DTS digital sound, but you have connected a DTS-equipped A/V receiver to the Digital audio Out (coaxial) on the DVD-VCR rear panel. 1 Open "MENU" Press the MENU button while the DVD is in Stop mode. 2 Select "DVD" Use the UP/DOWN buttons to... highlight "DVD" then press the ENTER button. 3 Select...
User Manual (user Manual) (ver.1.0) (English)
Page 19
When a 96K disc is in Stop mode. 2 Select "DVD" Use the UP/DOWN buttons to 48K and outputted. • Off - Display Setup ENG-18 As a result, black bars will display movies at the top and bottom of the screen. • Pan-Scan - PCM ... audio disc is played, 96K will be outputted. PCM Down Sampling TV Aspect Ratio If your amplifier is not capable of reproducing a 96kHz signal, PCM downsampling should be set to on. 1 Open "MENU" Press the MENU button while the DVD is in Stop mode. 2 Select "DVD" Use the UP/DOWN buttons to highlight...
When a 96K disc is in Stop mode. 2 Select "DVD" Use the UP/DOWN buttons to 48K and outputted. • Off - Display Setup ENG-18 As a result, black bars will display movies at the top and bottom of the screen. • Pan-Scan - PCM ... audio disc is played, 96K will be outputted. PCM Down Sampling TV Aspect Ratio If your amplifier is not capable of reproducing a 96kHz signal, PCM downsampling should be set to on. 1 Open "MENU" Press the MENU button while the DVD is in Stop mode. 2 Select "DVD" Use the UP/DOWN buttons to highlight...
User Manual (user Manual) (ver.1.0) (English)
Page 20
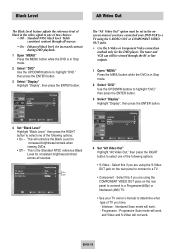
.... 3 Select "Display" Highlight "Display", then press the ENTER button. Interlace : Interlaced Scan mode will enhance the Black Level for the DVD player. The "Alt Video Out" option must be viewed through all sources. Select this if you have. - ENG-19 Yields consistent contrast... through the RF or line outputs. 1 Open "MENU" Press the MENU button while the DVD is in Stop mode. 2 Select "DVD" Use the UP/DOWN buttons to highlight "DVD," then press the ENTER button. 3 Select "Display" Highlight "Display", then press...
.... 3 Select "Display" Highlight "Display", then press the ENTER button. Interlace : Interlaced Scan mode will enhance the Black Level for the DVD player. The "Alt Video Out" option must be viewed through all sources. Select this if you have. - ENG-19 Yields consistent contrast... through the RF or line outputs. 1 Open "MENU" Press the MENU button while the DVD is in Stop mode. 2 Select "DVD" Use the UP/DOWN buttons to highlight "DVD," then press the ENTER button. 3 Select "Display" Highlight "Display", then press...