

User Manual (user Manual) (ver.1.0) (English)
Page 3
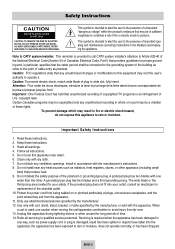
...consult an electrician for proper ground ing and, in particular, specifies that provides guidelines for replacement of cable entry as power-supply cord or plug is required when the apparatus has been damaged in the literature accompanying the appliance. ENG-2 Read these ...instructions. 3. Follow all warnings. 4. A polarized plug has two blades with the manufacturer's instructions. 8. Protect the power cord from being walked on or pinched particularly at plugs, convenience receptacles, and the point where they exit from tip-over. 13. Use...
...consult an electrician for proper ground ing and, in particular, specifies that provides guidelines for replacement of cable entry as power-supply cord or plug is required when the apparatus has been damaged in the literature accompanying the appliance. ENG-2 Read these ...instructions. 3. Follow all warnings. 4. A polarized plug has two blades with the manufacturer's instructions. 8. Protect the power cord from being walked on or pinched particularly at plugs, convenience receptacles, and the point where they exit from tip-over. 13. Use...

User Manual (user Manual) (ver.1.0) (English)
Page 4
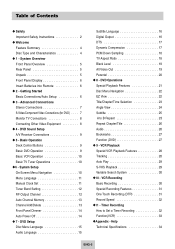
... 13 Front Panel Dimmer 13 Auto Power Off 14 • 7 - VCR Playback Special VCR Playback Features 27 Tracking 28 Auto Play 28 S-VHS Playback 29 Variable Search System 29 10 - Help Technical Specifications 33 ENG-3 Advanced Connections Selecting the Cassette Type 7 S-Video/Component Video Connections (for DVD) . . . . 7 Monitor TV Connections 8 Connecting Other...
... 13 Front Panel Dimmer 13 Auto Power Off 14 • 7 - VCR Playback Special VCR Playback Features 27 Tracking 28 Auto Play 28 S-VHS Playback 29 Variable Search System 29 10 - Help Technical Specifications 33 ENG-3 Advanced Connections Selecting the Cassette Type 7 S-Video/Component Video Connections (for DVD) . . . . 7 Monitor TV Connections 8 Connecting Other...
User Manual (user Manual) (ver.1.0) (English)
Page 6
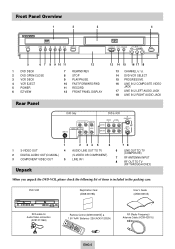
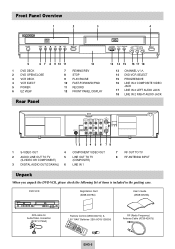
...& 1.5V "AAA" Batteries- 2EA (AC43-12002H) RF (Radio Frequency) Antenna Cable (AC39-42001J) ENG-5 Front Panel Overview 1 2 3 4 5 6 7 8 9 10 11 12 1 DVD DECK 2 DVD OPEN/CLOSE 3 VCR DECK 4 VCR EJECT 5 POWER 6 EZ VIEW 7 REWIND/REV 8 STOP 9 PLAY/PAUSE 10 FAST-FORWARD/FWD 11 RECORD 12 FRONT PANEL DISPLAY Rear Panel 13 14 15... 16 17 18 13 CHANNEL / 14 DVD-VCR SELECT 15 PROGRESSIVE 16 LINE IN 2 COMPOSITE VIDEO JACK 17 LINE IN 2 LEFT ...
...& 1.5V "AAA" Batteries- 2EA (AC43-12002H) RF (Radio Frequency) Antenna Cable (AC39-42001J) ENG-5 Front Panel Overview 1 2 3 4 5 6 7 8 9 10 11 12 1 DVD DECK 2 DVD OPEN/CLOSE 3 VCR DECK 4 VCR EJECT 5 POWER 6 EZ VIEW 7 REWIND/REV 8 STOP 9 PLAY/PAUSE 10 FAST-FORWARD/FWD 11 RECORD 12 FRONT PANEL DISPLAY Rear Panel 13 14 15... 16 17 18 13 CHANNEL / 14 DVD-VCR SELECT 15 PROGRESSIVE 16 LINE IN 2 COMPOSITE VIDEO JACK 17 LINE IN 2 LEFT ...
User Manual (user Manual) (ver.1.0) (English)
Page 7
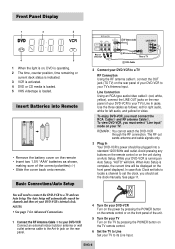
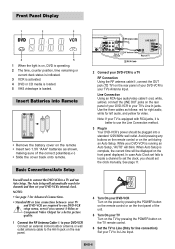
... as shown, making sure of the unit. 5 Turn On your TV. The RF out sends antenna and cable signals only. 3 Plug In Your DVD-VCR's power should set the clock manually. In case Auto Clock set fails to locate a channel to set your TV's Line In jacks. Avoid pressing any buttons... is loaded. REMARK : You cannot watch the DVD-VCR through the RF connection. Insert Batteries into a standard 120V/60Hz wall outlet. See page 11. 3 4 Turn On your DVD-VCR Turn on the power by pressing the POWER button on the front panel displayed. To enjoy DVD-VCR, you must connect the RCA Cable➂...
... as shown, making sure of the unit. 5 Turn On your TV. The RF out sends antenna and cable signals only. 3 Plug In Your DVD-VCR's power should set the clock manually. In case Auto Clock set fails to locate a channel to set your TV's Line In jacks. Avoid pressing any buttons... is loaded. REMARK : You cannot watch the DVD-VCR through the RF connection. Insert Batteries into a standard 120V/60Hz wall outlet. See page 11. 3 4 Turn On your DVD-VCR Turn on the power by pressing the POWER button on the front panel displayed. To enjoy DVD-VCR, you must connect the RCA Cable➂...
User Manual (user Manual) (ver.1.0) (English)
Page 10
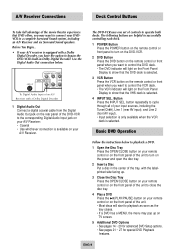
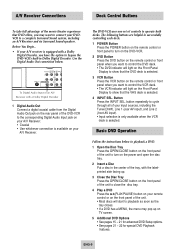
... A/V receiver is equipped with a Dolby Digital Decoder, you have the option to bypass the DVD-VCR's built-in successfully controlling each deck. 1 POWER Button Press the POWER button on the remote control or front panel to turn on the power and open the disc tray. 2 Insert a Disc Put a disc in the center of ...the tray, with a Dolby Digital Decoder 1 Digital Audio Out Connect a digital coaxial cable from the Digital Audio Out jack on the rear panel of the DVD-VCR to the corresponding Digital ...
... A/V receiver is equipped with a Dolby Digital Decoder, you have the option to bypass the DVD-VCR's built-in successfully controlling each deck. 1 POWER Button Press the POWER button on the remote control or front panel to turn on the power and open the disc tray. 2 Insert a Disc Put a disc in the center of ...the tray, with a Dolby Digital Decoder 1 Digital Audio Out Connect a digital coaxial cable from the Digital Audio Out jack on the rear panel of the DVD-VCR to the corresponding Digital ...
User Manual (user Manual) (ver.1.0) (English)
Page 11
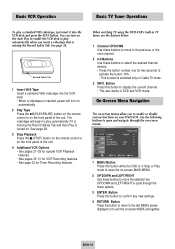
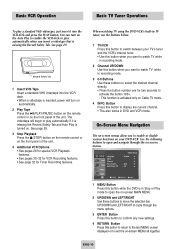
...selection bar UP/DOWN and LEFT/RIGHT to cycle through the on-screen menus. Language : English Front Display Auto Power Off : Auto : Off 1 MENU Button Press this button while the DVD is in Stop or Play mode to open and navigate through the menu options. 3 ENTER Button Press this button...these buttons to select the desired channel directly. • Press the button number one for Timer Recording features. When watching TV using the DVD-VCR's built-in DVD and VCR mode. Basic VCR Operation Basic TV Tuner Operations To play a standard VHS videotape, just insert it into the VCR deck. ...
...selection bar UP/DOWN and LEFT/RIGHT to cycle through the on-screen menus. Language : English Front Display Auto Power Off : Auto : Off 1 MENU Button Press this button while the DVD is in Stop or Play mode to open and navigate through the menu options. 3 ENTER Button Press this button...these buttons to select the desired channel directly. • Press the button number one for Timer Recording features. When watching TV using the DVD-VCR's built-in DVD and VCR mode. Basic VCR Operation Basic TV Tuner Operations To play a standard VHS videotape, just insert it into the VCR deck. ...
User Manual (user Manual) (ver.1.0) (English)
Page 12
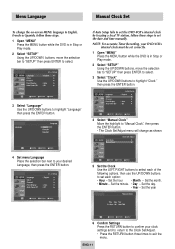
... menu will change the on-screen MENU language to English, French or Spanish, follow these steps. 1 Open "MENU" Press the MENU button while the DVD is in Stop or Play mode. 2 Select "SETUP" Using the UP/DOWN buttons, move the selection bar to "SETUP" then press ENTER to select.... 3 Select "Clock" Use the UP/DOWN buttons to highlight "Clock " then press the ENTER button. Language : English Front Display Auto Power Off : Auto : Off 5 Set the Clock Use the LEFT/RIGHT buttons to select each option: • Hour - NOTE: For accurate Timer Recording, your ...
... menu will change the on-screen MENU language to English, French or Spanish, follow these steps. 1 Open "MENU" Press the MENU button while the DVD is in Stop or Play mode. 2 Select "SETUP" Using the UP/DOWN buttons, move the selection bar to "SETUP" then press ENTER to select.... 3 Select "Clock" Use the UP/DOWN buttons to highlight "Clock " then press the ENTER button. Language : English Front Display Auto Power Off : Auto : Off 5 Set the Clock Use the LEFT/RIGHT buttons to select each option: • Hour - NOTE: For accurate Timer Recording, your ...

User Manual (user Manual) (ver.1.0) (English)
Page 13
... "Channel" Using the UP/DOWN buttons, move the selection bar to "Channel", then press ENTER to select. • The DVD-VCR will be displayed. Language : English Front Display Auto Power Off : Auto : Off 4 Select "Ant./Cable" Move the selection arrow to "Ant./Cable" then press RIGHT button to the... Antenna In jack during initial setup. • Use this setting only if Auto Setup detected the incorrect tuner band, i.e. Indicates that the DVD-VCR is ...
... "Channel" Using the UP/DOWN buttons, move the selection bar to "Channel", then press ENTER to select. • The DVD-VCR will be displayed. Language : English Front Display Auto Power Off : Auto : Off 4 Select "Ant./Cable" Move the selection arrow to "Ant./Cable" then press RIGHT button to the... Antenna In jack during initial setup. • Use this setting only if Auto Setup detected the incorrect tuner band, i.e. Indicates that the DVD-VCR is ...

User Manual (user Manual) (ver.1.0) (English)
Page 14
... : Cable TV Auto Channel Memory Channel Add/Delete You can set the Front Panel Display to be bright all the time, dim during power off . 1 Open " MENU" With the DVD in Stop or Play mode, press the MENU button. 2 Select "SETUP" Using the UP/DOWN buttons, move the selection bar to "SETUP...
... : Cable TV Auto Channel Memory Channel Add/Delete You can set the Front Panel Display to be bright all the time, dim during power off . 1 Open " MENU" With the DVD in Stop or Play mode, press the MENU button. 2 Select "SETUP" Using the UP/DOWN buttons, move the selection bar to "SETUP...
User Manual (user Manual) (ver.1.0) (English)
Page 15
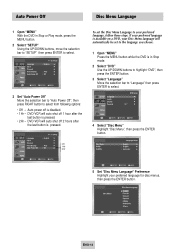
...the selection bar to "SETUP" then press ENTER to select from following options: • Off - Auto power off 2 hours after the last button is disabled. • 1Hr - ENG-14 DVD-VCR will automatically be set the Disc Menu Language to select. 4 Select "Disc Menu" Highlight "Disc ..., follow these steps. Language : English Front Display Auto Power Off : Auto : Off 3 Set "Auto Power Off" Move the selection bar to "Auto Power Off", then press RIGHT button to select. If your preferred language is available on a DVD, your Disc Menu Language will auto shut off is pressed...
...the selection bar to "SETUP" then press ENTER to select from following options: • Off - Auto power off 2 hours after the last button is disabled. • 1Hr - ENG-14 DVD-VCR will automatically be set the Disc Menu Language to select. 4 Select "Disc Menu" Highlight "Disc ..., follow these steps. Language : English Front Display Auto Power Off : Auto : Off 3 Set "Auto Power Off" Move the selection bar to "Auto Power Off", then press RIGHT button to select. If your preferred language is available on a DVD, your Disc Menu Language will auto shut off is pressed...
User Manual (user Manual) (ver.1.0) (English)
Page 21
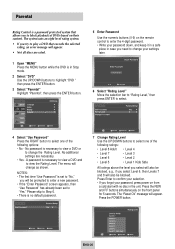
No password is necessary to view a DVD or to view the Rating Level. Press the POWER button. Parental Rating Control is a password protected system that exceeds the selected rating, an error message will appear. • Not all discs are necessary. • .... • If the "Enter Password" screen appears, then "Use Password" has already been set to Step 6. • There is necessary to view a DVD and to change your password, press power on from a cold start with no default password. The system uses an eight level rating system. • If you try to play...
No password is necessary to view a DVD or to view the Rating Level. Press the POWER button. Parental Rating Control is a password protected system that exceeds the selected rating, an error message will appear. • Not all discs are necessary. • .... • If the "Enter Password" screen appears, then "Use Password" has already been set to Step 6. • There is necessary to view a DVD and to change your password, press power on from a cold start with no default password. The system uses an eight level rating system. • If you try to play...
User Manual (user Manual) (ver.1.0) (English)
Page 31
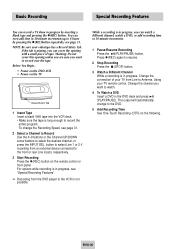
... change the Recording Speed, see page 31. To change to select the desired channel, or press the INPUT SEL. Before You Begin... • Power on the DVD-VCR • Power on the TV 1 Insert Tape Insert a blank VHS tape into the VCR deck. • Make sure the tape is in progress, Change the... connection of tape. see page 31. 2 Select a Channel to Record Use the 0-9 buttons or the Channel UP/DOWN arrow buttons to the DVD. 5 Add ...
... change the Recording Speed, see page 31. To change to select the desired channel, or press the INPUT SEL. Before You Begin... • Power on the DVD-VCR • Power on the TV 1 Insert Tape Insert a blank VHS tape into the VCR deck. • Make sure the tape is in progress, Change the... connection of tape. see page 31. 2 Select a Channel to Record Use the 0-9 buttons or the Channel UP/DOWN arrow buttons to the DVD. 5 Add ...

User Manual (user Manual) (ver.1.0) (English)
Page 33
... turn on and begin recording at the time you want to set the timer program, press the ENTER key Timer Program 1 Open "MENU" In the DVD in Stop or Play mode, press the MENU button. 2 Select "FUNCTION" Use the UP/DOWN buttons to highlight "FUNCTION" then press the ENTER button....00: 00]" Highlight "Go to "AUTO". See below. 5 Daily/Weekly Date Programming Press the RETURN button to set . To stop the timer recording, press the POWER button or press the ■ (STOP) button twice. Forward Intro Scan Highlight "Forward Intro Scan", then press the ENTER button. - How to Set a Timer ...
... turn on and begin recording at the time you want to set the timer program, press the ENTER key Timer Program 1 Open "MENU" In the DVD in Stop or Play mode, press the MENU button. 2 Select "FUNCTION" Use the UP/DOWN buttons to highlight "FUNCTION" then press the ENTER button....00: 00]" Highlight "Go to "AUTO". See below. 5 Daily/Weekly Date Programming Press the RETURN button to set . To stop the timer recording, press the POWER button or press the ■ (STOP) button twice. Forward Intro Scan Highlight "Forward Intro Scan", then press the ENTER button. - How to Set a Timer ...

User Manual (user Manual) (ver.1.0) (English)
Page 34
...track; Hi-Fi: 2 track PLAY/RECORD TIME T-180 tape: SP 3 hours, SLP 9 hours FF/REW TIME T-120 tape: aTeccxzhnical Specifications Inputs Outputs VCR DVD SYSTEM AUDIO 2 Stereo audio inputs, RCA Connector, -8dbm, 47KΩ, front and rear VIDEO 2 Composite video inputs, RCA Connector, 75Ω, 1Vp-p RF... Antenna or CATV Input, F-Connector, 75Ω AUDIO 1 Stereo audio outputs, RCA Connector, -8dbm, 1.5KΩ AUDIO (DVD only) 1 Digital audio output (1 coaxial) 1 pair Stereo audio outputs VIDEO 1 Composite video output, RCA Connector, 75Ω, 1Vp-p VIDEO...
...track; Hi-Fi: 2 track PLAY/RECORD TIME T-180 tape: SP 3 hours, SLP 9 hours FF/REW TIME T-120 tape: aTeccxzhnical Specifications Inputs Outputs VCR DVD SYSTEM AUDIO 2 Stereo audio inputs, RCA Connector, -8dbm, 47KΩ, front and rear VIDEO 2 Composite video inputs, RCA Connector, 75Ω, 1Vp-p RF... Antenna or CATV Input, F-Connector, 75Ω AUDIO 1 Stereo audio outputs, RCA Connector, -8dbm, 1.5KΩ AUDIO (DVD only) 1 Digital audio output (1 coaxial) 1 pair Stereo audio outputs VIDEO 1 Composite video output, RCA Connector, 75Ω, 1Vp-p VIDEO...
User Manual (user Manual) (ver.1.0) (English)
Page 3
... moving the cart/apparatus combination to operate it. Clean only with the manufacturer's instructions. 8. Install in accordance with dry cloth. 7. Protect the power cord from being walked on or pinched particularly at plugs, convenience receptacles, and the point where they exit from tip-over. 13. Only use ...in fire or electric shock hazard, do not expose this apparatus during lightning storms or when unused for long periods of cable entry as power-supply cord or plug is provided to call CATV system installer's attention to rain or moisture, does not operate normally, or has been ...
... moving the cart/apparatus combination to operate it. Clean only with the manufacturer's instructions. 8. Install in accordance with dry cloth. 7. Protect the power cord from being walked on or pinched particularly at plugs, convenience receptacles, and the point where they exit from tip-over. 13. Only use ...in fire or electric shock hazard, do not expose this apparatus during lightning storms or when unused for long periods of cable entry as power-supply cord or plug is provided to call CATV system installer's attention to rain or moisture, does not operate normally, or has been ...
User Manual (user Manual) (ver.1.0) (English)
Page 4
... 11 Tuner Band Setting 12 RF Output Channel 12 Auto Channel Memory 13 Channel Add/Delete 13 Front Panel Dimmer 14 Auto Power Off 14 7 - DVD Setup Disc Menu Language 15 Audio Language 15 Subtitle Language 16 Digital Output 16 DTS 17 Dynamic Compression 17 PCM Down Sampling...(OTR 31 Record Speed 32 11 - System Overview Front Panel Overview 5 Rear Panel 5 Unpack 5 Front Panel Display 6 Insert Batteries into Remote 6 2 - DVD Operations Special Playback Features 21 Disc Menu Navigation 22 EZ View 22 Title/Chapter/Time Selection 23 Angle View 24 Subtitle 25 A to Set a Timer...
... 11 Tuner Band Setting 12 RF Output Channel 12 Auto Channel Memory 13 Channel Add/Delete 13 Front Panel Dimmer 14 Auto Power Off 14 7 - DVD Setup Disc Menu Language 15 Audio Language 15 Subtitle Language 16 Digital Output 16 DTS 17 Dynamic Compression 17 PCM Down Sampling...(OTR 31 Record Speed 32 11 - System Overview Front Panel Overview 5 Rear Panel 5 Unpack 5 Front Panel Display 6 Insert Batteries into Remote 6 2 - DVD Operations Special Playback Features 21 Disc Menu Navigation 22 EZ View 22 Title/Chapter/Time Selection 23 Angle View 24 Subtitle 25 A to Set a Timer...
User Manual (user Manual) (ver.1.0) (English)
Page 6
...& 1.5V "AAA" Batteries- 2EA (AC43-12002H) RF (Radio Frequency) Antenna Cable (AC39-42001J) ENG-5 Front Panel Overview 1 2 3 4 5 6 7 8 9 10 11 12 1 DVD DECK 2 DVD OPEN/CLOSE 3 VCR DECK 4 VCR EJECT 5 POWER 6 EZ VIEW 7 REWIND/REV 8 STOP 9 PLAY/PAUSE 10 FAST-FORWARD/FWD 11 RECORD 12 FRONT PANEL DISPLAY Rear Panel 13 14 15... 16 17 18 13 CHANNEL / 14 DVD-VCR SELECT 15 PROGRESSIVE 16 LINE IN 2 COMPOSITE VIDEO JACK 17 LINE IN 2 LEFT ...
...& 1.5V "AAA" Batteries- 2EA (AC43-12002H) RF (Radio Frequency) Antenna Cable (AC39-42001J) ENG-5 Front Panel Overview 1 2 3 4 5 6 7 8 9 10 11 12 1 DVD DECK 2 DVD OPEN/CLOSE 3 VCR DECK 4 VCR EJECT 5 POWER 6 EZ VIEW 7 REWIND/REV 8 STOP 9 PLAY/PAUSE 10 FAST-FORWARD/FWD 11 RECORD 12 FRONT PANEL DISPLAY Rear Panel 13 14 15... 16 17 18 13 CHANNEL / 14 DVD-VCR SELECT 15 PROGRESSIVE 16 LINE IN 2 COMPOSITE VIDEO JACK 17 LINE IN 2 LEFT ...
User Manual (user Manual) (ver.1.0) (English)
Page 7
...the three cables as shown, making sure of your DVD-VCR to use the Line Connection method. 3 Plug In Your DVD-VCR's power should set your TV's Line In jacks. See page 11. 3 4 Turn On your DVD-VCR Turn on the power by pressing the POWER button on the remote control or on the front ...rear panel of the unit. 5 Turn On your TV Turn on the TV by pressing the POWER button on , DVD is operating. 2 The time, counter position, time remaining or current deck status is indicated. 3 VCR is activated. 4 DVD or CD media is loaded. 5 VHS videotape is running an Auto Setup, "AUTO" will automatically...
...the three cables as shown, making sure of your DVD-VCR to use the Line Connection method. 3 Plug In Your DVD-VCR's power should set your TV's Line In jacks. See page 11. 3 4 Turn On your DVD-VCR Turn on the power by pressing the POWER button on the remote control or on the front ...rear panel of the unit. 5 Turn On your TV Turn on the TV by pressing the POWER button on , DVD is operating. 2 The time, counter position, time remaining or current deck status is indicated. 3 VCR is activated. 4 DVD or CD media is loaded. 5 VHS videotape is running an Auto Setup, "AUTO" will automatically...
User Manual (user Manual) (ver.1.0) (English)
Page 10
... DVD deck. • The DVD indicator will light on your input sources, including the Tuner(Ch##), Line 1 (rear AV input), and Line 2 (front AV input). • Input selection is only available when the VCR deck is selected. 4 INPUT SEL. The following buttons are helpful in successfully controlling each deck. 1 POWER Button Press the POWER...
... DVD deck. • The DVD indicator will light on your input sources, including the Tuner(Ch##), Line 1 (rear AV input), and Line 2 (front AV input). • Input selection is only available when the VCR deck is selected. 4 INPUT SEL. The following buttons are helpful in successfully controlling each deck. 1 POWER Button Press the POWER...
User Manual (user Manual) (ver.1.0) (English)
Page 11
... 29. 3 Stop Playback Press the I (STOP) button on the remote control or on the front panel of the unit. Language : English Front Display Auto Power Off : Auto : Off 1 MENU Button Press this button to return to the last MENU screen displayed or to exit the on -screen menus. The videotape... your TV's tuner and the VCR's internal tuner. • Use this button when you to display the current channel. • This also works in DVD and VCR mode. This function is missing the Record Safety Tab. ENG-10 See page 29. 1 Insert VHS Tape Insert a standard VHS videotape into the...
... 29. 3 Stop Playback Press the I (STOP) button on the remote control or on the front panel of the unit. Language : English Front Display Auto Power Off : Auto : Off 1 MENU Button Press this button to return to the last MENU screen displayed or to exit the on -screen menus. The videotape... your TV's tuner and the VCR's internal tuner. • Use this button when you to display the current channel. • This also works in DVD and VCR mode. This function is missing the Record Safety Tab. ENG-10 See page 29. 1 Insert VHS Tape Insert a standard VHS videotape into the...
