

User Manual (user Manual) (ver.1.0) (English)
Page 2
... make any kind of the building as close to its normal operation. When installing an outside antenna system should be sure the service technician has used replacement parts specified by a qualified technician to restore the product to the point of fire or electric shock. 19. f When the product exhibits a distinct change in fire, electric shock, or other electric light or power...
... make any kind of the building as close to its normal operation. When installing an outside antenna system should be sure the service technician has used replacement parts specified by a qualified technician to restore the product to the point of fire or electric shock. 19. f When the product exhibits a distinct change in fire, electric shock, or other electric light or power...
User Manual (user Manual) (ver.1.0) (English)
Page 3
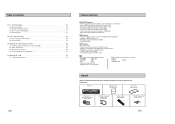
... Auto Channel Memory 21 s Channel Add/Delete 22 s Front Panel Dimmer 23 s Auto Power Off 24 4 Table of Contents x Safety 2 s Important Safety Instructions 2 x Welcome 7 s Feature Summary 7 s Unpack 7 s Disc Type and Characteristics 8 x 1 - DVD Setup 25 s Disc Menu Language 25 s Audio Language 25 s Subtitle Language 26 s Digital Output 27 s DTS 28 s Dynamic Compression 29 s PCM Down Sampling 30 s TV Aspect Ratio 31 s Black Level 32 s Alt Video Out 33 s Parental 34 x 6 - VCR Playback 52 s Special VCR Playback Features 52 s Tracking 52 s Auto Play 53 s S-VHS Playback...
... Auto Channel Memory 21 s Channel Add/Delete 22 s Front Panel Dimmer 23 s Auto Power Off 24 4 Table of Contents x Safety 2 s Important Safety Instructions 2 x Welcome 7 s Feature Summary 7 s Unpack 7 s Disc Type and Characteristics 8 x 1 - DVD Setup 25 s Disc Menu Language 25 s Audio Language 25 s Subtitle Language 26 s Digital Output 27 s DTS 28 s Dynamic Compression 29 s PCM Down Sampling 30 s TV Aspect Ratio 31 s Black Level 32 s Alt Video Out 33 s Parental 34 x 6 - VCR Playback 52 s Special VCR Playback Features 52 s Tracking 52 s Auto Play 53 s S-VHS Playback...
User Manual (user Manual) (ver.1.0) (English)
Page 4
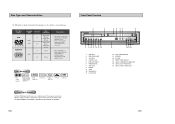
... time counter. VCR Recording 55 s Basic Recording 55 s Special Recording Features 56 s One Touch Recording (OTR 57 s Record Speed 57 x 10 - Advanced Connections 60 s S-Video/Component Video Connections (for Audio/Video connection (AC99-10500H) RF (Radio Frequency) Antenna Cable (AC39-42001J) Remote Control (AK59-00008A) 1.5V "AAA" Batteries- 2EA (AC43-12002H) OPEN/CLOSE POWER 7 VCR Features • Hi-Fi Stereo VCR. • Superior slow motion and stop action (with 4 heads). • Playback of S-VHS tapes with this player...
... time counter. VCR Recording 55 s Basic Recording 55 s Special Recording Features 56 s One Touch Recording (OTR 57 s Record Speed 57 x 10 - Advanced Connections 60 s S-Video/Component Video Connections (for Audio/Video connection (AC99-10500H) RF (Radio Frequency) Antenna Cable (AC39-42001J) Remote Control (AK59-00008A) 1.5V "AAA" Batteries- 2EA (AC43-12002H) OPEN/CLOSE POWER 7 VCR Features • Hi-Fi Stereo VCR. • Superior slow motion and stop action (with 4 heads). • Playback of S-VHS tapes with this player...
User Manual (user Manual) (ver.1.0) (English)
Page 5
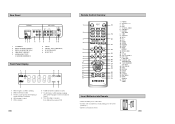
... 56 7 DVD/VCR PROGRESSIVE EJECT 8 9 10 11 12 13 14 1 DVD DECK 2 DVD OPEN/CLOSE 3 VCR DECK 4 CHANNEL / 5 DVD-VCR SELECT 6 PROGRESSIVE 7 VCR EJECT 8 POWER 9 STOP 10 REWIND/REV 11 PLAY/PAUSE 15 16 17 18 12 FAST-FORWARD/FWD 13 RECORD 14 EZ VIEW 15 FRONT PANEL DISPLAY 16 LINE IN 2 COMPOSITE VIDEO JACK 17 LINE IN 2 LEFT AUDIO JACK 18 LINE IN 2 RIGHT AUDIO JACK 9 The Region Number for the disc to Dolby Digital and MPEG-2 system. • Various screen and audio functions can...
... 56 7 DVD/VCR PROGRESSIVE EJECT 8 9 10 11 12 13 14 1 DVD DECK 2 DVD OPEN/CLOSE 3 VCR DECK 4 CHANNEL / 5 DVD-VCR SELECT 6 PROGRESSIVE 7 VCR EJECT 8 POWER 9 STOP 10 REWIND/REV 11 PLAY/PAUSE 15 16 17 18 12 FAST-FORWARD/FWD 13 RECORD 14 EZ VIEW 15 FRONT PANEL DISPLAY 16 LINE IN 2 COMPOSITE VIDEO JACK 17 LINE IN 2 LEFT AUDIO JACK 18 LINE IN 2 RIGHT AUDIO JACK 9 The Region Number for the disc to Dolby Digital and MPEG-2 system. • Various screen and audio functions can...
User Manual (user Manual) (ver.1.0) (English)
Page 6
..., time remaining or current deck status is indicated. 4 VHS videotape is loaded. 5 VCR is loaded. 7 The Hi-Fi track of the correct polarities(+/-) • Slide the cover back onto remote. 11 AUDIO 6 VOLUME +/- 7 REWIND SKIP BACK 8 STOP 9 SUBTITLE 10 MENU 11 UP 12 LEFT 13 DOWN 14 SPEED 15 RECORD 16 CLEAR 17 MODE REPEAT 18 OPEN/CLOSE 19 0-9 20 TV/VCR 21 VCR, TV SELECT 22 INPUT SEL. STEREO 7 8 6 A DVD...
..., time remaining or current deck status is indicated. 4 VHS videotape is loaded. 5 VCR is loaded. 7 The Hi-Fi track of the correct polarities(+/-) • Slide the cover back onto remote. 11 AUDIO 6 VOLUME +/- 7 REWIND SKIP BACK 8 STOP 9 SUBTITLE 10 MENU 11 UP 12 LEFT 13 DOWN 14 SPEED 15 RECORD 16 CLEAR 17 MODE REPEAT 18 OPEN/CLOSE 19 0-9 20 TV/VCR 21 VCR, TV SELECT 22 INPUT SEL. STEREO 7 8 6 A DVD...

User Manual (user Manual) (ver.1.0) (English)
Page 7
... the Remote Control Basic Connections/Auto Setup Your VCR remote control will work on the front panel. Your DVD-VCR's power should set the clock, you encounter problems, operate the television directly. 12 13 Using the TV Buttons on the back panel of your DVD-VCR to your TV's Antenna 3 TOSHIBA 09 EMERSON 21 Input. Setup. Connect an external indoor/outdoor antenna or wall outlet antenna Brand Codes Brand Codes cable to the Ant-In jack on the rear panel. 3 SAMSUNG 01...
... the Remote Control Basic Connections/Auto Setup Your VCR remote control will work on the front panel. Your DVD-VCR's power should set the clock, you encounter problems, operate the television directly. 12 13 Using the TV Buttons on the back panel of your DVD-VCR to your TV's Antenna 3 TOSHIBA 09 EMERSON 21 Input. Setup. Connect an external indoor/outdoor antenna or wall outlet antenna Brand Codes Brand Codes cable to the Ant-In jack on the rear panel. 3 SAMSUNG 01...
User Manual (user Manual) (ver.1.0) (English)
Page 8
... VHS deck is inserted, power will light on the Front Panel Display to playback a DVD. 1 Open the Disc Tray Press the OPEN/CLOSE button on your remote control or on the front panel of the unit. 5 Additional VCR Options • See pages 52~54 for special VCR Playback features. • See pages 55~57 for VCR Recording features. • See page 58 for Timer Recording features. EJECT DVD/VCR PROGRESSIVE 1 3 2 DVD/VCR PROGRESSIVE EJECT 4 15 button repeatedly to cycle through all of controls to play...
... VHS deck is inserted, power will light on the Front Panel Display to playback a DVD. 1 Open the Disc Tray Press the OPEN/CLOSE button on your remote control or on the front panel of the unit. 5 Additional VCR Options • See pages 52~54 for special VCR Playback features. • See pages 55~57 for VCR Recording features. • See page 58 for Timer Recording features. EJECT DVD/VCR PROGRESSIVE 1 3 2 DVD/VCR PROGRESSIVE EJECT 4 15 button repeatedly to cycle through all of controls to play...
User Manual (user Manual) (ver.1.0) (English)
Page 9
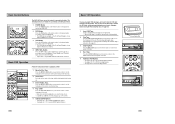
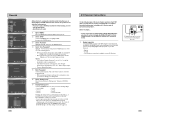
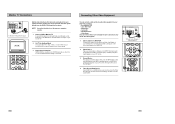
... open the on-screen MAIN MENU. 2 Up/Down and Left/Right Use these buttons to select the desired channel directly. 4 4 100+ Button Press this button to tune to channels 100 and above. Basic TV Tuner Operations When watching TV using the DVD-VCR's built-in TV tuner, use the numeric buttons (0-9) to enter the 2 remaining digits of the channel number desired. • This button is activated only in Cable TV Mode. 5 INFO. Button Press this button to display...
... open the on-screen MAIN MENU. 2 Up/Down and Left/Right Use these buttons to select the desired channel directly. 4 4 100+ Button Press this button to tune to channels 100 and above. Basic TV Tuner Operations When watching TV using the DVD-VCR's built-in TV tuner, use the numeric buttons (0-9) to enter the 2 remaining digits of the channel number desired. • This button is activated only in Cable TV Mode. 5 INFO. Button Press this button to display...

User Manual (user Manual) (ver.1.0) (English)
Page 10
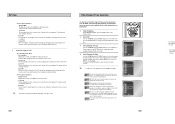
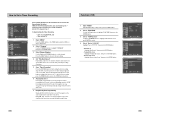
.../DOWN buttons to Cable TV. 1 3 Language : English Front Display Auto Power Off : Auto : Off Language : English Front Display Auto Power Off : Auto : Off Language : English Front Display Auto Power Off : Auto : Off Ant./Cable : Antenna RF Output CH : 3CH Auto Channel Memory Channel Add/Delete Antenna Cable TV 18 19 channels are coming in on the wrong channel numbers. 1 Open "MENU" With the DVD in Stop or Play mode. 2 Select "SETUP" Using the UP/DOWN buttons, move the selection bar to "Channel", then press ENTER to select. 4 Select "Ant/Cable" Move the selection arrow...
.../DOWN buttons to Cable TV. 1 3 Language : English Front Display Auto Power Off : Auto : Off Language : English Front Display Auto Power Off : Auto : Off Language : English Front Display Auto Power Off : Auto : Off Ant./Cable : Antenna RF Output CH : 3CH Auto Channel Memory Channel Add/Delete Antenna Cable TV 18 19 channels are coming in on the wrong channel numbers. 1 Open "MENU" With the DVD in Stop or Play mode. 2 Select "SETUP" Using the UP/DOWN buttons, move the selection bar to "Channel", then press ENTER to select. 4 Select "Ant/Cable" Move the selection arrow...
User Manual (user Manual) (ver.1.0) (English)
Page 16
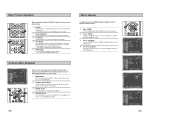
..., black bars will appear at the appropriate size for your TV screen so the DVD player will be outputted. This method displays the full width of the screen. • Pan-Scan - On PCM Down Sampling : On Off Language : English Front Display Auto Power Off : Auto : Off Display Setup 30 31 This method allows you to fit a standard 4:3 television screen. When a 96K audio disc is in Stop mode. 2 Select "DVD" Use the UP/DOWN buttons to highlight "DVD...
..., black bars will appear at the appropriate size for your TV screen so the DVD player will be outputted. This method displays the full width of the screen. • Pan-Scan - On PCM Down Sampling : On Off Language : English Front Display Auto Power Off : Auto : Off Display Setup 30 31 This method allows you to fit a standard 4:3 television screen. When a 96K audio disc is in Stop mode. 2 Select "DVD" Use the UP/DOWN buttons to highlight "DVD...
User Manual (user Manual) (ver.1.0) (English)
Page 17
... connected your DVD-VCR to a TV using the S-Video OUT jack on the rear panel to connect to a TV. • Component - Select this if you have a Progressive scan TV only. Otherwise, the picture will enhance the Black Level for the DVD player. Yields consistent contrast through the RF or line outputs. 1 Open "MENU" Press the MENU button while the DVD is in Stop mode. 2 Select "DVD" Use the UP/DOWN buttons to highlight "DVD," then press the ENTER button. 3 Select "Display" Highlight "Display...
... connected your DVD-VCR to a TV using the S-Video OUT jack on the rear panel to connect to a TV. • Component - Select this if you have a Progressive scan TV only. Otherwise, the picture will enhance the Black Level for the DVD player. Yields consistent contrast through the RF or line outputs. 1 Open "MENU" Press the MENU button while the DVD is in Stop mode. 2 Select "DVD" Use the UP/DOWN buttons to highlight "DVD," then press the ENTER button. 3 Select "Display" Highlight "Display...
User Manual (user Manual) (ver.1.0) (English)
Page 18
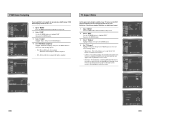
... panel of the DVD-VCR to their content. Use the DIGITAL AUDIO OUT connection below. 1 Digital Audio Out Connect EITHER an optical cable OR a digital coaxial cable from a cold start with no Default Password. 5 Enter Password Use the numeric buttons (0-9) on the remote control to enter the 4-digit password. • Write your A/V Receiver. No additional settings are rated. 1 Open "MENU" Press the MENU button while the DVD is in the unit. Please skip to Step 5. • There no disc in Stop mode. 2 Select "DVD" Use...
... panel of the DVD-VCR to their content. Use the DIGITAL AUDIO OUT connection below. 1 Digital Audio Out Connect EITHER an optical cable OR a digital coaxial cable from a cold start with no Default Password. 5 Enter Password Use the numeric buttons (0-9) on the remote control to enter the 4-digit password. • Write your A/V Receiver. No additional settings are rated. 1 Open "MENU" Press the MENU button while the DVD is in the unit. Please skip to Step 5. • There no disc in Stop mode. 2 Select "DVD" Use...
User Manual (user Manual) (ver.1.0) (English)
Page 21
..., black bars will be used to eight different soundtracks. Most DVD discs are cut off and the full screen appears. For 16:9 aspect ratio discs • 4:3 Letter Box Displays the content of the DVD title in the format H:MM:SS (H = Hours, M = Minutes, S = Seconds). To access the desired title when there is more than one in English 5.1CH. A surround sound effect is played in Title the disc. button during DVD playback. Subtitle You...
..., black bars will be used to eight different soundtracks. Most DVD discs are cut off and the full screen appears. For 16:9 aspect ratio discs • 4:3 Letter Box Displays the content of the DVD title in the format H:MM:SS (H = Hours, M = Minutes, S = Seconds). To access the desired title when there is more than one in English 5.1CH. A surround sound effect is played in Title the disc. button during DVD playback. Subtitle You...
User Manual (user Manual) (ver.1.0) (English)
Page 24
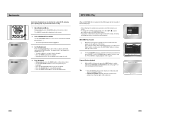
... DVD, allowing you have more than two types of the song file. With the MP3 in Stop mode, press the MODE button to select a song file. Bookmarks 3 1 = - - 1 - - Program/Random playback 1. Use the UP/DOWN buttons to 8 music folders can be displayed at a time. MP3/WMA Play Function 1. CLEAR Up to a number (1, 2 or 3). • You may not work. 4 Play Bookmark • During playback, press the MARK button on the screen. 2. When the first song file...
... DVD, allowing you have more than two types of the song file. With the MP3 in Stop mode, press the MODE button to select a song file. Bookmarks 3 1 = - - 1 - - Program/Random playback 1. Use the UP/DOWN buttons to 8 music folders can be displayed at a time. MP3/WMA Play Function 1. CLEAR Up to a number (1, 2 or 3). • You may not work. 4 Play Bookmark • During playback, press the MARK button on the screen. 2. When the first song file...

User Manual (user Manual) (ver.1.0) (English)
Page 25
... recording WMA files. Getting audio CD quality sound requires an analog/digital sampling rate, that is conversion to MP3 format, of compression/decompression you choose. Program Play & Random Play Program Play (CD/MP3/WMA) 1. Press the ENTER button. 3. With the MP3 in Stop mode, press the MODE button. 2. Use the LEFT/ RIGHT buttons to 192Kbps. General name format of the player to the program. Sound quality with WMA files basically depends on the disc...
... recording WMA files. Getting audio CD quality sound requires an analog/digital sampling rate, that is conversion to MP3 format, of compression/decompression you choose. Program Play & Random Play Program Play (CD/MP3/WMA) 1. Press the ENTER button. 3. With the MP3 in Stop mode, press the MODE button. 2. Use the LEFT/ RIGHT buttons to 192Kbps. General name format of the player to the program. Sound quality with WMA files basically depends on the disc...
User Manual (user Manual) (ver.1.0) (English)
Page 29
... two programs in a row, set the counter to 0:00:00. see page 57. 2 Select a Channel to Record Use the 0-9 buttons or the Channel Up/Down arrow buttons to select the desired channel, or press the INPUT SEL. button to select Line 1 or 2 if recording from the DVD player to the VCR is long enough to record over the tape. Variable Search System Forward Reverse Press the SEARCH button to display the search screen...
... two programs in a row, set the counter to 0:00:00. see page 57. 2 Select a Channel to Record Use the 0-9 buttons or the Channel Up/Down arrow buttons to select the desired channel, or press the INPUT SEL. button to select Line 1 or 2 if recording from the DVD player to the VCR is long enough to record over the tape. Variable Search System Forward Reverse Press the SEARCH button to display the search screen...
User Manual (user Manual) (ver.1.0) (English)
Page 31
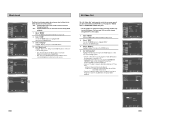
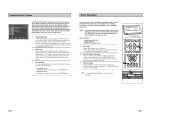
...the VCR deck. How to Set a Timer Recording Language : English Front Display Auto Power Off : Auto : Off Timer Program If you set. With the Timer Recording function, you can be set for a timer recording in Stop or Play mode. 2 Select "Program" Use the UP/DOWN buttons to highlight "PROGRAM" then press the ENTER button. 3 Select Channel Number Use the Right and UP/DOWN buttons to set start in Stop or Play mode, press the MENU button. 2 Select "FUNCTION" Use the Up/Down buttons to highlight "FUNCTION" then press the ENTER button. 3 Select "VCR Function" Using the UP/DOWN buttons to...
...the VCR deck. How to Set a Timer Recording Language : English Front Display Auto Power Off : Auto : Off Timer Program If you set. With the Timer Recording function, you can be set for a timer recording in Stop or Play mode. 2 Select "Program" Use the UP/DOWN buttons to highlight "PROGRAM" then press the ENTER button. 3 Select Channel Number Use the Right and UP/DOWN buttons to set start in Stop or Play mode, press the MENU button. 2 Select "FUNCTION" Use the Up/Down buttons to highlight "FUNCTION" then press the ENTER button. 3 Select "VCR Function" Using the UP/DOWN buttons to...

User Manual (user Manual) (ver.1.0) (English)
Page 32
... Inputs on -screen display. 60 61 Audio will be heard through the RF or line inputs. Connect the Video Output also in mind that you have inserted a Hi-Fi stereo videotape, press the Audio button until "Hi-Fi" appears on the on your alternative (S-Video or Component) video selection, follow the "Alt Video Out" instructions on Your TV Use the S-Video or Component Video connection method only for the DVD player. The tuner and VCR...
... Inputs on -screen display. 60 61 Audio will be heard through the RF or line inputs. Connect the Video Output also in mind that you have inserted a Hi-Fi stereo videotape, press the Audio button until "Hi-Fi" appears on the on your alternative (S-Video or Component) video selection, follow the "Alt Video Out" instructions on Your TV Use the S-Video or Component Video connection method only for the DVD player. The tuner and VCR...
User Manual (user Manual) (ver.1.0) (English)
Page 33
... press Record on the VCR deck. 4 Timer Record From Device Select LINE1 (L1) or LINE2 (L2) as if the TV/VCR button were always set in the Timer Record menu. button until the playback from LINE1 (rear panel inputs) or LINE2 (front panel inputs) appears on your TV screen. Refer to your monitor television owner's manual for the correct setting. 3 Connection is not the same as a computer monitor. 1 Connect VCR to Monitor TV Connect RCA cables from the Audio/Video...
... press Record on the VCR deck. 4 Timer Record From Device Select LINE1 (L1) or LINE2 (L2) as if the TV/VCR button were always set in the Timer Record menu. button until the playback from LINE1 (rear panel inputs) or LINE2 (front panel inputs) appears on your TV screen. Refer to your monitor television owner's manual for the correct setting. 3 Connection is not the same as a computer monitor. 1 Connect VCR to Monitor TV Connect RCA cables from the Audio/Video...

User Manual (user Manual) (ver.1.0) (English)
Page 34
... Specifications AUDIO Inputs VIDEO RF AUDIO AUDIO (DVD only) Outputs VIDEO VIDEO (DVD only) RF VIDEO SYSTEM AUDIO TRACK PLAY/RECORD TIME VCR FF/REW TIME HEADS WOW & FLUTTER FREQ. RESPONSE S/N RATIO DYNAMIC RANGE THD POWER REQUIREMENT ENVIRONMENT WEIGHT 2 Stereo audio inputs, RCA Connector, -8dbm, 47KΩ, front and rear 2 Composite video inputs, RCA Connector, 75Ω, 1Vp-p Antenna or CATV Input, F-Connector, 75Ω 1 Stereo audio outputs, RCA Connector, -8dbm, 1.5KΩ 2 Digital audio outputs (1 optical, 1 coaxial) 1 Stereo audio outputs 1 Composite video output...
... Specifications AUDIO Inputs VIDEO RF AUDIO AUDIO (DVD only) Outputs VIDEO VIDEO (DVD only) RF VIDEO SYSTEM AUDIO TRACK PLAY/RECORD TIME VCR FF/REW TIME HEADS WOW & FLUTTER FREQ. RESPONSE S/N RATIO DYNAMIC RANGE THD POWER REQUIREMENT ENVIRONMENT WEIGHT 2 Stereo audio inputs, RCA Connector, -8dbm, 47KΩ, front and rear 2 Composite video inputs, RCA Connector, 75Ω, 1Vp-p Antenna or CATV Input, F-Connector, 75Ω 1 Stereo audio outputs, RCA Connector, -8dbm, 1.5KΩ 2 Digital audio outputs (1 optical, 1 coaxial) 1 Stereo audio outputs 1 Composite video output...


