
Quick Guide (easy Manual) (ver.1.0) (English)
Page 2
...SURE TO OPERATE RECORDER CORRECTLY AS INSTRUCTED. English I This unit can be used elsewhere. If the Region number of a HDD & DVD disc does not correspond to the Region number of plug to other limited viewing uses only unless otherwise authorized by Macrovision.Reverse engineering or ... in fire or electric shock hazard, do not expose this copyright protection technology must be used only where the power supply is protected by U.S. I This HDD & DVD recorder is designed and manufactured to respond to rain or moisture. This symbol indicates "dangerous voltage" inside the ...
...SURE TO OPERATE RECORDER CORRECTLY AS INSTRUCTED. English I This unit can be used elsewhere. If the Region number of a HDD & DVD disc does not correspond to the Region number of plug to other limited viewing uses only unless otherwise authorized by Macrovision.Reverse engineering or ... in fire or electric shock hazard, do not expose this copyright protection technology must be used only where the power supply is protected by U.S. I This HDD & DVD recorder is designed and manufactured to respond to rain or moisture. This symbol indicates "dangerous voltage" inside the ...
Quick Guide (easy Manual) (ver.1.0) (English)
Page 3
...soft cloth. The wide blade or the third prong are provided for cleaning. • Wipe the cabinet with the DVD POWER button, or disconnect and then reconnect the AC power cord to rain or moisture, does not operate normally, or has been dropped. Handling Cautions • Before connecting other... handy for long periods of time. 14) Refer all servicing to disconnect the AC power cord from magnets. To avioid losing important data, observe the following precautions. • Do not use the HDD & DVD RECORDER in a place subject to extreame changes in temperature. • Do not apply...
...soft cloth. The wide blade or the third prong are provided for cleaning. • Wipe the cabinet with the DVD POWER button, or disconnect and then reconnect the AC power cord to rain or moisture, does not operate normally, or has been dropped. Handling Cautions • Before connecting other... handy for long periods of time. 14) Refer all servicing to disconnect the AC power cord from magnets. To avioid losing important data, observe the following precautions. • Do not use the HDD & DVD RECORDER in a place subject to extreame changes in temperature. • Do not apply...
Quick Guide (easy Manual) (ver.1.0) (English)
Page 4
...suddenly from the first layer to change the hard disk. If this HDD & DVD RECORDER may be damaged. Disc Storage Be careful not to harm the disc because the data on these discs is equipped with the power on before atttempting playback. • Be careful not to two hours with MPEG-2.... • Keep in a cool ventilated area. • Store vertically. • Keep in a malfunction. Getting Started • Do not disconnect the AC power cord while the power is performed. Also, do not use cleaners or cloths for one to harm the disc because the data on the operating parts and lens...
...suddenly from the first layer to change the hard disk. If this HDD & DVD RECORDER may be damaged. Disc Storage Be careful not to harm the disc because the data on these discs is equipped with the power on before atttempting playback. • Be careful not to two hours with MPEG-2.... • Keep in a cool ventilated area. • Store vertically. • Keep in a malfunction. Getting Started • Do not disconnect the AC power cord while the power is performed. Also, do not use cleaners or cloths for one to harm the disc because the data on the operating parts and lens...
Quick Guide (easy Manual) (ver.1.0) (English)
Page 8
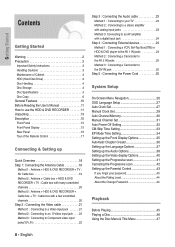
...3 Disc Handling 4 Disc Storage 4 Disc Specifications 4 Disc Copy 6 General Features 10 Before Reading the User's Manual 11 How to use the HDD & DVD RECORDER 11 Unpacking 13 Description 15 Front Panel 15 Front Panel Display 15 Rear Panel 16 Tour of the Remote Control 17 Connecting & Setting up...jacks 24 Method 2 : Connecting a Camcorder to the AV 2 IN jacks 25 Method 3 : Connecting a Camcorder to the DV IN jack 25 Step 5 : Connecting the Power Cord 25 System Setup On-Screen Menu Navigation 26 OSD Language Setup 27 Auto Clock Set 27 Manual Clock Set 29 Auto Channel Memory 30...
...3 Disc Handling 4 Disc Storage 4 Disc Specifications 4 Disc Copy 6 General Features 10 Before Reading the User's Manual 11 How to use the HDD & DVD RECORDER 11 Unpacking 13 Description 15 Front Panel 15 Front Panel Display 15 Rear Panel 16 Tour of the Remote Control 17 Connecting & Setting up...jacks 24 Method 2 : Connecting a Camcorder to the AV 2 IN jacks 25 Method 3 : Connecting a Camcorder to the DV IN jack 25 Step 5 : Connecting the Power Cord 25 System Setup On-Screen Menu Navigation 26 OSD Language Setup 27 Auto Clock Set 27 Manual Clock Set 29 Auto Channel Memory 30...

Quick Guide (easy Manual) (ver.1.0) (English)
Page 13
... Remote Control (AAA Size) Instruction Manual Quick Guide Preparing the Remote Control Install Batteries in the household trash. English - 13 Control function buttons involve: TV POWER, CH , TV VOL + -, number buttons, TV MUTE, INPUT button. Make sure that the polarities (+ and -) are drained. • Check if remote sensor is blocked by...
... Remote Control (AAA Size) Instruction Manual Quick Guide Preparing the Remote Control Install Batteries in the household trash. English - 13 Control function buttons involve: TV POWER, CH , TV VOL + -, number buttons, TV MUTE, INPUT button. Make sure that the polarities (+ and -) are drained. • Check if remote sensor is blocked by...

Quick Guide (easy Manual) (ver.1.0) (English)
Page 14
...IMPERIAL JVC LG LOEWE LOEWE OPTA MAGNAVOX METZ MITSUBISHI MIVAR NEC NEWSAN NOBLEX NOKIA NORDMENDE PANASONIC PHILIPS PHONOLA PIONEER RADIOLA RADIOMARELLI RCA REX SABA SALORA SAMSUNG SANYO SCHNEIDER BUTTON 82 10, 11, 12, 13, 14, 15, 16, 17, 18 57 71 73 57 52 75 19,...72, 73, 74, 75 74 01,02,03,04,05,06,07,08,09 41, 42, 43, 44, 48 06 14 - Button TV POWER INPUT TV VOL (+ -) CH ( ) TV MUTE 0~9 Function Used to toggle the sound on and off . Used to select an external source... on and off. Used to switch the television on the remote control. Press and hold the TV POWER button. 2.
...IMPERIAL JVC LG LOEWE LOEWE OPTA MAGNAVOX METZ MITSUBISHI MIVAR NEC NEWSAN NOBLEX NOKIA NORDMENDE PANASONIC PHILIPS PHONOLA PIONEER RADIOLA RADIOMARELLI RCA REX SABA SALORA SAMSUNG SANYO SCHNEIDER BUTTON 82 10, 11, 12, 13, 14, 15, 16, 17, 18 57 71 73 57 52 75 19,...72, 73, 74, 75 74 01,02,03,04,05,06,07,08,09 41, 42, 43, 44, 48 06 14 - Button TV POWER INPUT TV VOL (+ -) CH ( ) TV MUTE 0~9 Function Used to toggle the sound on and off . Used to select an external source... on and off. Used to switch the television on the remote control. Press and hold the TV POWER button. 2.
Quick Guide (easy Manual) (ver.1.0) (English)
Page 15
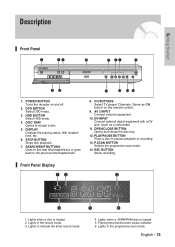
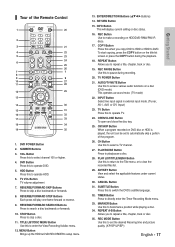
... equipment with a DV jack. (such as CH button on and off. 2. Front Panel Display 1. Lights when a disc is loaded. 5. DVD BUTTON Select DVD mode. 3. AV 2 INPUT Connect external equipment. 10. P.SCAN BUTTON Selects the progressive scan mode. 14. Lights in the progressive scan mode.... English - 15 Getting Started Description Front Panel 1 23 4 5 67 8 9 10 1. POWER BUTTON Turns the recorder on the remote control. 9....
... equipment with a DV jack. (such as CH button on and off. 2. Front Panel Display 1. Lights when a disc is loaded. 5. DVD BUTTON Select DVD mode. 3. AV 2 INPUT Connect external equipment. 10. P.SCAN BUTTON Selects the progressive scan mode. 14. Lights in the progressive scan mode.... English - 15 Getting Started Description Front Panel 1 23 4 5 67 8 9 10 1. POWER BUTTON Turns the recorder on the remote control. 9....

Quick Guide (easy Manual) (ver.1.0) (English)
Page 16
... having a digital coaxial audio input jack. 3. AV 1 VIDEO IN Connects the output of external equipment using a video cable. 9. To watch a DVD on . English COMPONENT VIDEO OUT(best video quality) Connects to an amplifier having Component video input jacks. 7. Ensure a minimum of 4" clear space on... OUT Connects to an amplifier having a digital optical audio input jack. 2. Rear Panel Getting Started Fan The fan always revolves when the power is on NOTE your TV, you must connect audio/video cables. 16 - DIGITAL AUDIO OUT(OPTICAL) Connects to the audio input of...
... having a digital coaxial audio input jack. 3. AV 1 VIDEO IN Connects the output of external equipment using a video cable. 9. To watch a DVD on . English COMPONENT VIDEO OUT(best video quality) Connects to an amplifier having Component video input jacks. 7. Ensure a minimum of 4" clear space on... OUT Connects to an amplifier having a digital optical audio input jack. 2. Rear Panel Getting Started Fan The fan always revolves when the power is on NOTE your TV, you must connect audio/video cables. 16 - DIGITAL AUDIO OUT(OPTICAL) Connects to the audio input of...
Quick Guide (easy Manual) (ver.1.0) (English)
Page 17
...press the COPY button on DVD disc or HDD is played, the unit can be set the desired Recoring time and picture quality. (XP/SP/LP/EP) English - 17 Getting Started TV POWER Button 21. TV Button ...Allows you to view the recorded files list. 29. CANCEL Button 31. MARKER Button Use this when you copy DVD to HDD or HDD to bookmark a position while playing a disc. 34. REVERSE/FORWARD SEARCH Buttons Press to directly... input signal in external input mode. (Tuner, AV1, AV2 or DV Input) 23. DVD POWER Button 2. REC Button Use to enter the View Recording list/disc menu. 12. ANYKEY ...
...press the COPY button on DVD disc or HDD is played, the unit can be set the desired Recoring time and picture quality. (XP/SP/LP/EP) English - 17 Getting Started TV POWER Button 21. TV Button ...Allows you to view the recorded files list. 29. CANCEL Button 31. MARKER Button Use this when you copy DVD to HDD or HDD to bookmark a position while playing a disc. 34. REVERSE/FORWARD SEARCH Buttons Press to directly... input signal in external input mode. (Tuner, AV1, AV2 or DV Input) 23. DVD POWER Button 2. REC Button Use to enter the View Recording list/disc menu. 12. ANYKEY ...
Quick Guide (easy Manual) (ver.1.0) (English)
Page 18
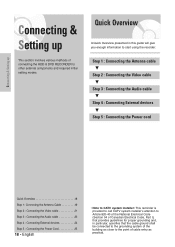
... A Quick Overview presented in particular, specifies that the cable ground shall be connected to the grounding system of connecting the HDD & DVD RECORDER to other external components and required initial setting modes. Step 1 : Connecting the Antenna cable † Step 2 : Connecting ...the Video cable † Step 3 : Connecting the Audio cable † Step 4 : Connecting External devices † Step 5 : Connecting the Power cord Quick Overview 18 Step 1: Connecting the Antenna Cable 19 Step 2 : Connecting the Video cable 21 Step 3 : Connecting the Audio cable 23 Step 4...
... A Quick Overview presented in particular, specifies that the cable ground shall be connected to the grounding system of connecting the HDD & DVD RECORDER to other external components and required initial setting modes. Step 1 : Connecting the Antenna cable † Step 2 : Connecting ...the Video cable † Step 3 : Connecting the Audio cable † Step 4 : Connecting External devices † Step 5 : Connecting the Power cord Quick Overview 18 Step 1: Connecting the Antenna Cable 19 Step 2 : Connecting the Video cable 21 Step 3 : Connecting the Audio cable 23 Step 4...
Quick Guide (easy Manual) (ver.1.0) (English)
Page 25
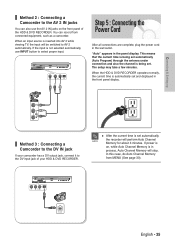
... a Camcorder to the DV IN jack If your camcorder has a DV output jack, connect it to the DV input jack of the HDD & DVD RECORDER. If power is in the front panel display. If the input is being set and displayed in process, Auto Channel Memory will stop. This means that...recorder will be switched to AV 2 automatically. In this case, do Auto Channel Memory from connected equipment, such as a camcorder. When the HDD & DVD RECORDER operates normally, the current time is inserted into AV 2 while viewing TV, the input will perform Auto Channel NOTE Memory for about 3 minutes. When...
... a Camcorder to the DV IN jack If your camcorder has a DV output jack, connect it to the DV input jack of the HDD & DVD RECORDER. If power is in the front panel display. If the input is being set and displayed in process, Auto Channel Memory will stop. This means that...recorder will be switched to AV 2 automatically. In this case, do Auto Channel Memory from connected equipment, such as a camcorder. When the HDD & DVD RECORDER operates normally, the current time is inserted into AV 2 while viewing TV, the input will perform Auto Channel NOTE Memory for about 3 minutes. When...
Quick Guide (easy Manual) (ver.1.0) (English)
Page 26
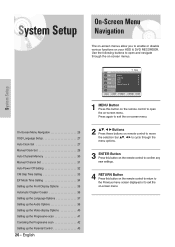
...-Screen Menu Navigation 26 OSD Language Setup 27 Auto Clock Set 27 Manual Clock Set 29 Auto Channel Memory 30 Manual Channel Set 31 Auto Power Off Setting 32 CM Skip Time Setting 33 EP Mode Time Setting 34 Setting up the Front Display Options 35 Automatic Chapter Creator 36 Setting... Press this button on the remote control to return to the Previous menu screen displayed or to enable or disable various functions on your HDD & DVD RECORDER. On-Screen Menu System Setup Navigation The on-screen menus allow you to exit the on-screen menu. Press again to exit the on...
...-Screen Menu Navigation 26 OSD Language Setup 27 Auto Clock Set 27 Manual Clock Set 29 Auto Channel Memory 30 Manual Channel Set 31 Auto Power Off Setting 32 CM Skip Time Setting 33 EP Mode Time Setting 34 Setting up the Front Display Options 35 Automatic Chapter Creator 36 Setting... Press this button on the remote control to return to the Previous menu screen displayed or to enable or disable various functions on your HDD & DVD RECORDER. On-Screen Menu System Setup Navigation The on-screen menus allow you to exit the on-screen menu. Press again to exit the on...

Quick Guide (easy Manual) (ver.1.0) (English)
Page 27
...the ENTER or √ button. • System menu will only appear when you plug in the recorder for the first time.) 1 Press the DVD POWER button. 2 Press a number button to use . HDD Title Music Photo Timer Record System Language Audio Video Parental Control Setup Setup MOVE SELECT RETURN ...mode, press the MENU button. System Setup OSD Language Setup Auto Clock Set After plugging in the recorder, the first time you press the POWER button, this screen comes up. (This screen will be displayed. HDD Title Music Photo Timer Record Setup System Clock Set √ Channel...
...the ENTER or √ button. • System menu will only appear when you plug in the recorder for the first time.) 1 Press the DVD POWER button. 2 Press a number button to use . HDD Title Music Photo Timer Record System Language Audio Video Parental Control Setup Setup MOVE SELECT RETURN ...mode, press the MENU button. System Setup OSD Language Setup Auto Clock Set After plugging in the recorder, the first time you press the POWER button, this screen comes up. (This screen will be displayed. HDD Title Music Photo Timer Record Setup System Clock Set √ Channel...

Quick Guide (easy Manual) (ver.1.0) (English)
Page 29
... to select Manual Clock Set, then press the ENTER or √ button. When the current time is stored in memory and then the set is powered off, the current time will appear in the front panel display. ...† : Sets the value You can set the value using the number buttons. ... Date and Current Time, and then press the ENTER button. HDD Title Music Photo Timer Record Setup System Clock Set √ Channel Set √ Auto Power Off : Off √ CM Skip Time : 15 Sec √ EP Mode Time : 6 Hour √ Front Display : Auto Dim √ Chapter Creator : Off √ MOVE...
... to select Manual Clock Set, then press the ENTER or √ button. When the current time is stored in memory and then the set is powered off, the current time will appear in the front panel display. ...† : Sets the value You can set the value using the number buttons. ... Date and Current Time, and then press the ENTER button. HDD Title Music Photo Timer Record Setup System Clock Set √ Channel Set √ Auto Power Off : Off √ CM Skip Time : 15 Sec √ EP Mode Time : 6 Hour √ Front Display : Auto Dim √ Chapter Creator : Off √ MOVE...

Quick Guide (easy Manual) (ver.1.0) (English)
Page 30
..., then press the ENTER or √ button. NOTE 30 - English HDD Title Music Photo Timer Record Setup System Clock Set √ Channel Set √ Auto Power Off : Off √ CM Skip Time : 15 Sec √ EP Mode Time : 6 Hour √ Front Display : Auto Dim √ Chapter Creator : Off √ MOVE SELECT...
..., then press the ENTER or √ button. NOTE 30 - English HDD Title Music Photo Timer Record Setup System Clock Set √ Channel Set √ Auto Power Off : Off √ CM Skip Time : 15 Sec √ EP Mode Time : 6 Hour √ Front Display : Auto Dim √ Chapter Creator : Off √ MOVE SELECT...

Quick Guide (easy Manual) (ver.1.0) (English)
Page 31
... to select Setup, then press the ENTER or √ button. HDD Title Music Photo Timer Record Setup System Clock Set √ Channel Set √ Auto Power Off : Off √ CM Skip Time : 15 Sec √ EP Mode Time : 6 Hour √ Front Display : Auto Dim √ Chapter Creator : Off √ MOVE SELECT...
... to select Setup, then press the ENTER or √ button. HDD Title Music Photo Timer Record Setup System Clock Set √ Channel Set √ Auto Power Off : Off √ CM Skip Time : 15 Sec √ EP Mode Time : 6 Hour √ Front Display : Auto Dim √ Chapter Creator : Off √ MOVE SELECT...

Quick Guide (easy Manual) (ver.1.0) (English)
Page 32
... MOVE SELECT RETURN EXIT System Setup 3 Press the ...† buttons to select Auto Power Off, then press the ENTER or √ button. Auto Power Off Setting This feature automatically turns off your HDD & DVD RECORDER, if you do not press any button for the selected time. 1 With ... then press the ENTER or √ button. • Off : Auto power off is disabled. • 2 Hour : HDD & DVD RECORDER will automatically turns off for 2 hours after the last button is pressed. • 6 Hour : HDD & DVD RECORDER will automatically turns off function is reached during a playback or recording, ...
... MOVE SELECT RETURN EXIT System Setup 3 Press the ...† buttons to select Auto Power Off, then press the ENTER or √ button. Auto Power Off Setting This feature automatically turns off your HDD & DVD RECORDER, if you do not press any button for the selected time. 1 With ... then press the ENTER or √ button. • Off : Auto power off is disabled. • 2 Hour : HDD & DVD RECORDER will automatically turns off for 2 hours after the last button is pressed. • 6 Hour : HDD & DVD RECORDER will automatically turns off function is reached during a playback or recording, ...

Quick Guide (easy Manual) (ver.1.0) (English)
Page 33
... CM Skip Time, then press the ENTER or √ button. HDD Title Music Photo Timer Record Setup System Clock Set √ Channel Set √ Auto Power Off : Off √ CM Skip Time : 15 Sec √ EP Mode Time : 6 Hour √ Front Display : Auto Dim √ Chapter Creator...scene, a last title, or a last track that is played. I CM Skip may not operate with some DVD-Video discs. HDD Title Music Photo Timer Record Setup System Clock Set √ Channel Set √ Auto Power Off : Off √ CM Skip Time : 1515SeScec √ EP Mode Time : 6 3H0oSurec √ ...
... CM Skip Time, then press the ENTER or √ button. HDD Title Music Photo Timer Record Setup System Clock Set √ Channel Set √ Auto Power Off : Off √ CM Skip Time : 15 Sec √ EP Mode Time : 6 Hour √ Front Display : Auto Dim √ Chapter Creator...scene, a last title, or a last track that is played. I CM Skip may not operate with some DVD-Video discs. HDD Title Music Photo Timer Record Setup System Clock Set √ Channel Set √ Auto Power Off : Off √ CM Skip Time : 1515SeScec √ EP Mode Time : 6 3H0oSurec √ ...

Quick Guide (easy Manual) (ver.1.0) (English)
Page 34
HDD Title Music Photo Timer Record Setup System Clock Set √ Channel Set √ Auto Power Off : Off √ CM Skip Time : 15 Sec √ EP Mode Time : 6 6HoHuorur √ Front Display : Au8tHooDuimr √ Chapter Creator : Off √ MOVE SELECT ... the desired time, then press the ENTER or √ button. HDD Title Music Photo Timer Record Setup System Clock Set √ Channel Set √ Auto Power Off : Off √ CM Skip Time : 15 Sec √ EP Mode Time : 6 Hour √ Front Display : Auto Dim √ Chapter Creator : Off √ MOVE ...
HDD Title Music Photo Timer Record Setup System Clock Set √ Channel Set √ Auto Power Off : Off √ CM Skip Time : 15 Sec √ EP Mode Time : 6 6HoHuorur √ Front Display : Au8tHooDuimr √ Chapter Creator : Off √ MOVE SELECT ... the desired time, then press the ENTER or √ button. HDD Title Music Photo Timer Record Setup System Clock Set √ Channel Set √ Auto Power Off : Off √ CM Skip Time : 15 Sec √ EP Mode Time : 6 Hour √ Front Display : Auto Dim √ Chapter Creator : Off √ MOVE ...

Quick Guide (easy Manual) (ver.1.0) (English)
Page 35
System HDD Title Clock Set √ Channel Set √ Music Auto Power Off : Off √ Photo CM Skip Time : 15 Sec √ EP Mode Time : 6 Hour √...8730; button. System menu will be displayed. HDD Title Music Photo Timer Record Setup System Clock Set √ Channel Set √ Auto Power Off : Off √ CM Skip Time : 15 Sec √ EP Mode Time : 6 Hour √ Front Display : Auto Dim... the brightness of the unit's front panel display. 1 With the unit in power off. 3 Press the ...† buttons to select System, then press the ENTER or √ button.
System HDD Title Clock Set √ Channel Set √ Music Auto Power Off : Off √ Photo CM Skip Time : 15 Sec √ EP Mode Time : 6 Hour √...8730; button. System menu will be displayed. HDD Title Music Photo Timer Record Setup System Clock Set √ Channel Set √ Auto Power Off : Off √ CM Skip Time : 15 Sec √ EP Mode Time : 6 Hour √ Front Display : Auto Dim... the brightness of the unit's front panel display. 1 With the unit in power off. 3 Press the ...† buttons to select System, then press the ENTER or √ button.
