
User Manual (ENGLISH)
Page 6
... 13 Electrical connections 13 Replacement parts and accessories 14 Installation 15 Final installation checklist 16 Dryer Exhaust Tips 17 Door Reversal 18 Overview of the control panel 20 Child lock 20 My cycle 21 Rack Dry 22 Clean the lint filter 22 Load the dryer properly 22 Getting started 23... Control Panel 23 Tumbler 23 Stainless Steel Tumbler 23 Dryer Exterior 23 Dryer Exhaust System TROUBLESHOOTING 25 25 Check these points if your dryer... 26 Information codes ...
... 13 Electrical connections 13 Replacement parts and accessories 14 Installation 15 Final installation checklist 16 Dryer Exhaust Tips 17 Door Reversal 18 Overview of the control panel 20 Child lock 20 My cycle 21 Rack Dry 22 Clean the lint filter 22 Load the dryer properly 22 Getting started 23... Control Panel 23 Tumbler 23 Stainless Steel Tumbler 23 Dryer Exterior 23 Dryer Exhaust System TROUBLESHOOTING 25 25 Check these points if your dryer... 26 Information codes ...
User Manual (ENGLISH)
Page 7
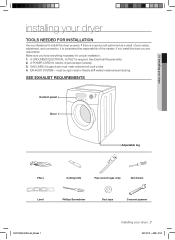
... Requirements. 2. GAS LINES (if a gas dryer) must be rigid metal or flexible stiff-walled metal exhaust ducting. Make sure you are responsible. SEE EXHAUST REQUIREMENTS Control panel Door Adjustable leg Pliers Cutting knife Pipe wrench (gas only) Nut drivers Level Phillips Screwdriver Duct tape Crescent spanner DV337AEW-02453A-04_EN.indd 7 Installing your...
... Requirements. 2. GAS LINES (if a gas dryer) must be rigid metal or flexible stiff-walled metal exhaust ducting. Make sure you are responsible. SEE EXHAUST REQUIREMENTS Control panel Door Adjustable leg Pliers Cutting knife Pipe wrench (gas only) Nut drivers Level Phillips Screwdriver Duct tape Crescent spanner DV337AEW-02453A-04_EN.indd 7 Installing your...
User Manual (ENGLISH)
Page 12
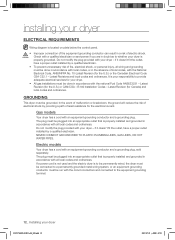
... are in doubt as to provide adequate electrical services for your dryer. installing your dryer ELECTRICAL REQUIREMENTS Wiring diagram is located on plate below the control panel. • WARNING • • Improper connection of the equipment grounding conductor can result in a risk of least resistance for the electrical current. Gas models Your...
... are in doubt as to provide adequate electrical services for your dryer. installing your dryer ELECTRICAL REQUIREMENTS Wiring diagram is located on plate below the control panel. • WARNING • • Improper connection of the equipment grounding conductor can result in a risk of least resistance for the electrical current. Gas models Your...
User Manual (ENGLISH)
Page 18
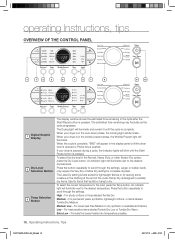
...Dry. The Drying light will illuminate. When your dryer is paused during a cycle, the indicator lights will appear in the display panel until the Start/ Pause button is designed to partially dry items. Use for items that lay flat or hang to the desired ... or bulkier loads may fluctuate as the cycle progresses. For lower heat than Medium to the desired dryness level. operating Instructions, tips OVERVIEW OF THE CONTROL PANEL 1 7 2 3 6 4 5 7 8 9 10 1 Digital Graphic Display Dry Level 2 Selection Button Temp Selection 3 Button The display window shows the ...
...Dry. The Drying light will illuminate. When your dryer is paused during a cycle, the indicator lights will appear in the display panel until the Start/ Pause button is designed to partially dry items. Use for items that lay flat or hang to the desired ... or bulkier loads may fluctuate as the cycle progresses. For lower heat than Medium to the desired dryness level. operating Instructions, tips OVERVIEW OF THE CONTROL PANEL 1 7 2 3 6 4 5 7 8 9 10 1 Digital Graphic Display Dry Level 2 Selection Button Temp Selection 3 Button The display window shows the ...
User Manual (ENGLISH)
Page 23
... Protect the surface from new items such as crayon, ink, or fabric dye (from sharp objects. 03 Care and cleaning care and cleaning CONTROL PANEL Clean with a soft, damp cloth. TUMBLER Remove any stains such as towels or jeans) with a mild, non-abrasive cleaner suitable for ...cleaner. DRYER EXHAUST SYSTEM Should be visible, but should be damaged by some laundry pre-treatment soil and stain remover products. The control panel finish may still be inspected and cleaned yearly to ensure proper operation. Do not use abrasive substances. Remove the cleaner residue and dry...
... Protect the surface from new items such as crayon, ink, or fabric dye (from sharp objects. 03 Care and cleaning care and cleaning CONTROL PANEL Clean with a soft, damp cloth. TUMBLER Remove any stains such as towels or jeans) with a mild, non-abrasive cleaner suitable for ...cleaner. DRYER EXHAUST SYSTEM Should be visible, but should be damaged by some laundry pre-treatment soil and stain remover products. The control panel finish may still be inspected and cleaned yearly to ensure proper operation. Do not use abrasive substances. Remove the cleaner residue and dry...


