

Owners Instructions
Page 2
... or to repair it can cause uneven aging of "dangerous voltage" inside the product. Caution CAUTION RISK OF ELECTRIC SHOCK DO NOT OPEN CAUTION: TO PREVENT ELECTRICAL SHOCK, DO NOT REMOVE REAR COVER, NO USER SERVICEABLE PARTS INSIDE. Do NOT expose the television to any ...television to direct sunlight. If the remote control is a warning sign alerting you of time, remove the batteries and store it in the television picture. REFER SERVICING TO QUALIFIED SERVICE PERSONNEL. ☛ Main voltage : 220V-240V~, 50Hz (or Indicated on the rear of the TV set). 2 The lightning flash ...
... or to repair it can cause uneven aging of "dangerous voltage" inside the product. Caution CAUTION RISK OF ELECTRIC SHOCK DO NOT OPEN CAUTION: TO PREVENT ELECTRICAL SHOCK, DO NOT REMOVE REAR COVER, NO USER SERVICEABLE PARTS INSIDE. Do NOT expose the television to any ...television to direct sunlight. If the remote control is a warning sign alerting you of time, remove the batteries and store it in the television picture. REFER SERVICING TO QUALIFIED SERVICE PERSONNEL. ☛ Main voltage : 220V-240V~, 50Hz (or Indicated on the rear of the TV set). 2 The lightning flash ...
Owners Instructions
Page 3
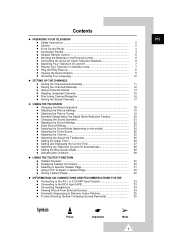
... x PREPARING YOUR TELEVISION ENG s Safety Instructions 2 s Caution ... 2 s Front Control Panel 4 s Connection Panels 4 s Infrared Remote Control 5 s Inserting the Batteries in the Remote Control 6 s Connecting the Aerial (or Cable Television Network 6 s Switching Your Television On and Off 7 s Placing Your Television in Standby mode 7 s Plug and Play Feature 8 s Viewing the Demonstration 9 s Choosing Your Language 10 x SETTING UP THE CHANNELS s Storing the Channels Automatically 11 s Storing the Channels Manually 12 s Giving Channels Names 14...
... x PREPARING YOUR TELEVISION ENG s Safety Instructions 2 s Caution ... 2 s Front Control Panel 4 s Connection Panels 4 s Infrared Remote Control 5 s Inserting the Batteries in the Remote Control 6 s Connecting the Aerial (or Cable Television Network 6 s Switching Your Television On and Off 7 s Placing Your Television in Standby mode 7 s Plug and Play Feature 8 s Viewing the Demonstration 9 s Choosing Your Language 10 x SETTING UP THE CHANNELS s Storing the Channels Automatically 11 s Storing the Channels Manually 12 s Giving Channels Names 14...

Owners Instructions
Page 4
Front Control Panel ENG ➣ Buttons and markings are subject to change. MENU DISPLAY CHANNEL SELECTION STAND BY/TIMER INDICATOR VOLUME ADJUSTMENT REMOTE CONTROL SENSOR POWER Connection Panels Front of TV Rear of TV HEADPHONE JACK RCA AUDIO/VIDEO INPUT CONNECTORS SCART AUDIO/VIDEO INPUT/OUTPUT CONNECTORS 75 Ω COAXIAL CONNECTOR FOR AERIAL/CABLE NETWORK 4
Front Control Panel ENG ➣ Buttons and markings are subject to change. MENU DISPLAY CHANNEL SELECTION STAND BY/TIMER INDICATOR VOLUME ADJUSTMENT REMOTE CONTROL SENSOR POWER Connection Panels Front of TV Rear of TV HEADPHONE JACK RCA AUDIO/VIDEO INPUT CONNECTORS SCART AUDIO/VIDEO INPUT/OUTPUT CONNECTORS 75 Ω COAXIAL CONNECTOR FOR AERIAL/CABLE NETWORK 4

Owners Instructions
Page 5
... SOUND SWITCH-OFF SOUND MENU DISPLAY VOLUME DECREASE PREVIOUS CHANNEL/ TELETEXT PREVIOUS PAGE ? 1 1 TELETEXT DISPLAY/MIX TUNER/CABLE NETWORK SELECTION EXTERNAL INPUT SELECTION/ TELETEXT LIST/FLOF MODE SELECTION ON-SCREEN DISPLAY/ TELETEXT REVEAL AUTOMATIC SWITCH-OFF/ TELETEXT STORE SOUND MODE SELECTION (STEREO/MONO/DUAL-I/II)/ TELETEXT SUB-PAGE PICTURE STANDARD SOUND STANDARD PICTURE SIZE/TELETEXT SIZE NEXT CHANNEL/ TELETEXT NEXT PAGE VOLUME INCREASE MENU DISPLAY/ PROGRAMME SELECTION BY NAME ➣ Operation of remote control may be affected by bright artificial light near to change...
... SOUND SWITCH-OFF SOUND MENU DISPLAY VOLUME DECREASE PREVIOUS CHANNEL/ TELETEXT PREVIOUS PAGE ? 1 1 TELETEXT DISPLAY/MIX TUNER/CABLE NETWORK SELECTION EXTERNAL INPUT SELECTION/ TELETEXT LIST/FLOF MODE SELECTION ON-SCREEN DISPLAY/ TELETEXT REVEAL AUTOMATIC SWITCH-OFF/ TELETEXT STORE SOUND MODE SELECTION (STEREO/MONO/DUAL-I/II)/ TELETEXT SUB-PAGE PICTURE STANDARD SOUND STANDARD PICTURE SIZE/TELETEXT SIZE NEXT CHANNEL/ TELETEXT NEXT PAGE VOLUME INCREASE MENU DISPLAY/ PROGRAMME SELECTION BY NAME ➣ Operation of remote control may be affected by bright artificial light near to change...

Owners Instructions
Page 6
... Batteries in the Remote Control ENG PRESS You must be received by the set from one of the following sources: x An outdoor aerial x A cable television network Plug the aerial or cable network input cable to respect the polarities: x + on the remote control x - PRESS Connecting the Aerial (or Cable Television Network) To view television channels correctly, a signal must insert or replace the batteries in the remote control when you : x Purchase the television. on the remote control 3 Replace the cover by pressing...
... Batteries in the Remote Control ENG PRESS You must be received by the set from one of the following sources: x An outdoor aerial x A cable television network Plug the aerial or cable network input cable to respect the polarities: x + on the remote control x - PRESS Connecting the Aerial (or Cable Television Network) To view television channels correctly, a signal must insert or replace the batteries in the remote control when you : x Purchase the television. on the remote control 3 Replace the cover by pressing...

Owners Instructions
Page 7
..., for long periods of the television. Result: The Standby indicator lights up . 2 To switch the screen back on, simply press the POWER button again on the remote control. ➣ Do not leave your television off, press the " " (ON/OFF) button again on the front of time (when you are away on the remote control. selected automatically. 4 To switch your television in standby mode for example). Result: The programme...
..., for long periods of the television. Result: The Standby indicator lights up . 2 To switch the screen back on, simply press the POWER button again on the remote control. ➣ Do not leave your television off, press the " " (ON/OFF) button again on the front of time (when you are away on the remote control. selected automatically. 4 To switch your television in standby mode for example). Result: The programme...

Owners Instructions
Page 8
... that the antenna is in Standby mode (red light visible on the television front panel), press the POWER button on page 27). 6 When you want to reset this feature... 1 Press the MENU button. 2 Press the v or w button to the TV. Ant. Result: The message "Plug & Play" is displayed. 8 And then press the + or - Press the MENU button to select required language. button (refer to "Setting and Displaying the Current Time" on the remote control.
... that the antenna is in Standby mode (red light visible on the television front panel), press the POWER button on page 27). 6 When you want to reset this feature... 1 Press the MENU button. 2 Press the v or w button to the TV. Ant. Result: The message "Plug & Play" is displayed. 8 And then press the + or - Press the MENU button to select required language. button (refer to "Setting and Displaying the Current Time" on the remote control.
Owners Instructions
Page 12
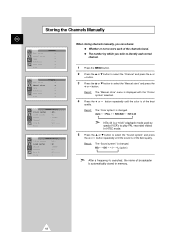
... : Auto Sound system : BG Search : 138MHz Channel : S 6 Prog.No. : P12 ----- Result: The "Manual store" menu is changed . Result: The "Color system" is of the best quality. x The number by special VCR's to identify each of broadcaster is automatically stored in NTSC mode. 5 Press the v or w button to select the "Manual store" and press the + or - button repeatedly until the sound is a "trick" playback mode used by...
... : Auto Sound system : BG Search : 138MHz Channel : S 6 Prog.No. : P12 ----- Result: The "Manual store" menu is changed . Result: The "Color system" is of the best quality. x The number by special VCR's to identify each of broadcaster is automatically stored in NTSC mode. 5 Press the v or w button to select the "Manual store" and press the + or - button repeatedly until the sound is a "trick" playback mode used by...
Owners Instructions
Page 15
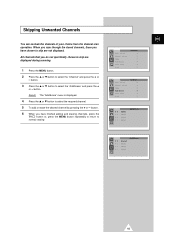
... button or, press the MENU button repeatedly to return to skip are displayed during scanning. 1 Press the MENU button. Result: The "Add/Erase" menu is displayed. 4 Press the v or w button to select the "Add/Erase" and press the + or - Auto store Manual store Name Add/Erase Fine tune Sort Channel 2 Press the v or w button to skip are not displayed. button. 6 When you have chosen to normal viewing...
... button or, press the MENU button repeatedly to return to skip are displayed during scanning. 1 Press the MENU button. Result: The "Add/Erase" menu is displayed. 4 Press the v or w button to select the "Add/Erase" and press the + or - Auto store Manual store Name Add/Erase Fine tune Sort Channel 2 Press the v or w button to skip are not displayed. button. 6 When you have chosen to normal viewing...
Owners Instructions
Page 17
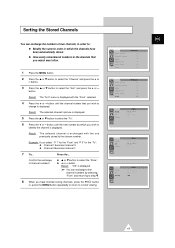
... numbers of channel numbers x v or w button to the chosen number. Result: The "Sort" menu is displayed. button. button. From To Store Sort : P 3 ----: P 1 ----: OK 8 When you select " P 1" for the "From" and "P 3" for the "To": x Channel 1 becomes channel 3. Auto store Manual store Name Add/Erase Fine tune Sort Channel 4 Press the + or - Auto store Manual store Name Add/Erase Fine tune Sort Channel ENG 1 Press the MENU button. 2 Press the v or w button...
... numbers of channel numbers x v or w button to the chosen number. Result: The "Sort" menu is displayed. button. button. From To Store Sort : P 3 ----: P 1 ----: OK 8 When you select " P 1" for the "From" and "P 3" for the "To": x Channel 1 becomes channel 3. Auto store Manual store Name Add/Erase Fine tune Sort Channel 4 Press the + or - Auto store Manual store Name Add/Erase Fine tune Sort Channel ENG 1 Press the MENU button. 2 Press the v or w button...
Owners Instructions
Page 19
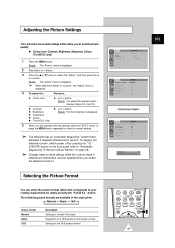
...) 1 Press the MENU button. Setting for normal 4:3 format. button. Adjusting the Picture Settings ENG Your television has several settings which best corresponds to your viewing requirements by pressing the " " (ON/OFF) button on the front panel (refer to "Automatic Degaussing To Remove Colour Patches" on page 35.). ➣ Changes made to these settings while the Custom mode is selected are memorized, and are recalled when you switch the television back on...
...) 1 Press the MENU button. Setting for normal 4:3 format. button. Adjusting the Picture Settings ENG Your television has several settings which best corresponds to your viewing requirements by pressing the " " (ON/OFF) button on the front panel (refer to "Automatic Degaussing To Remove Colour Patches" on page 35.). ➣ Changes made to these settings while the Custom mode is selected are memorized, and are recalled when you switch the television back on...

Owners Instructions
Page 22
... displayed. 4 Press the + or - Change a setting v or w button. button. button. 3 Press the v or w button to select the "Equalizer". ➣ When select the "Mode" to suit your personal preferences. Result: The "Equalizer" menu is selected are memorized, and are recalled when you switch the television back on. 22 Move to the previous setting - Move back to the next setting + button. Press the... Mode Equalizer Auto volume Melody Pseudo stereo Sound...
... displayed. 4 Press the + or - Change a setting v or w button. button. button. 3 Press the v or w button to select the "Equalizer". ➣ When select the "Mode" to suit your personal preferences. Result: The "Equalizer" menu is selected are memorized, and are recalled when you switch the television back on. 22 Move to the previous setting - Move back to the next setting + button. Press the... Mode Equalizer Auto volume Melody Pseudo stereo Sound...
Owners Instructions
Page 24
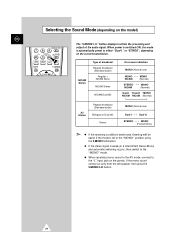
... signal is switched ON, the mode ? x When receiving mono sound in the AV mode, connect to the "MONO" mode. Type of the audio signal. is set to either "Dual-I -II button. Selecting the Sound Mode (depending on the model) ENG The "S.MODE I -II button. 24 If the mono sound comes out only from the left speaker, then press the S.MODE I -II" button displays/controls the processing and output of broadcast On-screen indication Regular broadcast (Standard audio...
... signal is switched ON, the mode ? x When receiving mono sound in the AV mode, connect to the "MONO" mode. Type of the audio signal. is set to either "Dual-I -II button. Selecting the Sound Mode (depending on the model) ENG The "S.MODE I -II button. 24 If the mono sound comes out only from the left speaker, then press the S.MODE I -II" button displays/controls the processing and output of broadcast On-screen indication Regular broadcast (Standard audio...

Owners Instructions
Page 25
... before, press the MUTE button again (or either of sound (and includes other channel, simply press the TURBO button on the front panel x If there is a power failure. button to decrease the volume (cursor moves to the left) ➣ The volume setting is switched off using the " " (ON/OFF) button on the remote control. Result: The sound is retained: x When you switch the television to standby mode x When you may...
... before, press the MUTE button again (or either of sound (and includes other channel, simply press the TURBO button on the front panel x If there is a power failure. button to decrease the volume (cursor moves to the left) ➣ The volume setting is switched off using the " " (ON/OFF) button on the remote control. Result: The sound is retained: x When you switch the television to standby mode x When you may...

Owners Instructions
Page 26
The screen displays... 1 Already set Word "Off". 2 Press the SLEEP button repeatedly and cycle through the preset time intervals (30, 60, 90, 120, 150, 180). Result: If the sleep timer is... Setting the Sleep Timer ENG You can select a time period of between 30 and 180 minutes after which the television automatically switches to standby mode when the timer reaches 0. 3 To cancel the sleep timer function, press the SLEEP button repeatedly and...
The screen displays... 1 Already set Word "Off". 2 Press the SLEEP button repeatedly and cycle through the preset time intervals (30, 60, 90, 120, 150, 180). Result: If the sleep timer is... Setting the Sleep Timer ENG You can select a time period of between 30 and 180 minutes after which the television automatically switches to standby mode when the timer reaches 0. 3 To cancel the sleep timer function, press the SLEEP button repeatedly and...

Owners Instructions
Page 28
... the MENU button repeatedly to return to normal viewing. ➣ Fuzzy Power Off If no function buttons (including remote control buttons or front panel buttons) are displayed. 6 Press the v or w button to select the "On time". 7 Set the time at which you wish the television to be switched Off. 9 When you select ➣ The first step is displayed. 1 Press the MENU button. 2 Press the v or w button to "Setting and Displaying the Current Time" on...
... the MENU button repeatedly to return to normal viewing. ➣ Fuzzy Power Off If no function buttons (including remote control buttons or front panel buttons) are displayed. 6 Press the v or w button to select the "On time". 7 Set the time at which you wish the television to be switched Off. 9 When you select ➣ The first step is displayed. 1 Press the MENU button. 2 Press the v or w button to "Setting and Displaying the Current Time" on...

Owners Instructions
Page 29
... Time Plug & Play Blue screen : Off Childlock : Off Demonstration 3 Press the v or w button to normal viewing. ➣ ➣ Keep the remote control away from your children so that you cannot enter the "Channel" menu (the message "Not available" is very weak, a blue screen automatically replaces the noisy picture background. Setting the Blue Screen Mode ENG If no signal is being received or the signal is displayed). or + button. 3 Press the v or w button...
... Time Plug & Play Blue screen : Off Childlock : Off Demonstration 3 Press the v or w button to normal viewing. ➣ ➣ Keep the remote control away from your children so that you cannot enter the "Channel" menu (the message "Not available" is very weak, a blue screen automatically replaces the noisy picture background. Setting the Blue Screen Mode ENG If no signal is being received or the signal is displayed). or + button. 3 Press the v or w button...

Owners Instructions
Page 31
... ( ) PAGE UP ( 1 ) PAGE DOWN ( 1 ) SIZE ( ) x Once x Twice x Normal screen x Three times ENG ? 1 1 31 To freeze the display on the remote control to enter the page number directly: 1 Enter the three-digit page number listed in the contents by entering its 4-digit number x The next page x The previous page x Double-size letters in sequence. Selecting a Specific Teletext Page Press the number buttons on a given page, press the...
... ( ) PAGE UP ( 1 ) PAGE DOWN ( 1 ) SIZE ( ) x Once x Twice x Normal screen x Three times ENG ? 1 1 31 To freeze the display on the remote control to enter the page number directly: 1 Enter the three-digit page number listed in the contents by entering its 4-digit number x The next page x The previous page x Double-size letters in sequence. Selecting a Specific Teletext Page Press the number buttons on a given page, press the...

Owners Instructions
Page 34
... of the channel required. 34 Result: The sound is displayed. ➢ Depending on the source selected, the pictures may damage your hearing. Connecting Headphones ENG Front of TV You can view the different sources by selecting the appropriate input. 1 Check that all the necessary connections have been made. 2 Switch the television on and if necessary, press the VIDEO button one or more times until the...
... of the channel required. 34 Result: The sound is displayed. ➢ Depending on the source selected, the pictures may damage your hearing. Connecting Headphones ENG Front of TV You can view the different sources by selecting the appropriate input. 1 Check that all the necessary connections have been made. 2 Switch the television on and if necessary, press the VIDEO button one or more times until the...
Owners Instructions
Page 35
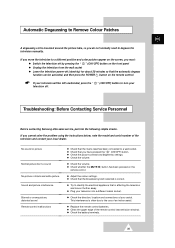
... MUTE remote control. This interference is mounted around the picture tube, so you must: x Switch the television off by pressing the " " (ON/OFF) button on the front panel x Unplug the television from the wall socket x Leave the television power-off (stand-by) for about 30 minutes so that the mains lead has been connected to a wall socket. Troubleshooting: Before Contacting Service Personnel Before contacting Samsung after-sales service, perform...
... MUTE remote control. This interference is mounted around the picture tube, so you must: x Switch the television off by pressing the " " (ON/OFF) button on the front panel x Unplug the television from the wall socket x Leave the television power-off (stand-by) for about 30 minutes so that the mains lead has been connected to a wall socket. Troubleshooting: Before Contacting Service Personnel Before contacting Samsung after-sales service, perform...


