
User Manual (ENGLISH)
Page 5
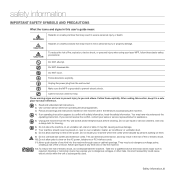
... in severe personal injury or death. Do NOT disassemble. Make sure the MFP is subsequently used. Call the service center for cleaning. 6. These warning signs are here to prevent injury to you cannot resolve the conflict, contact your sales or service representative for.... Use common sense whenever operating electrical appliances. 3. Unplug the power plug from the AC wall socket and/or telephone jack before cleaning. Follow all instructions. 2. safety information IMPORTANT SAFETY SYMBOLS AND PRECAUTIONS What the icons and signs in this section, keep it to...
... in severe personal injury or death. Do NOT disassemble. Make sure the MFP is subsequently used. Call the service center for cleaning. 6. These warning signs are here to prevent injury to you cannot resolve the conflict, contact your sales or service representative for.... Use common sense whenever operating electrical appliances. 3. Unplug the power plug from the AC wall socket and/or telephone jack before cleaning. Follow all instructions. 2. safety information IMPORTANT SAFETY SYMBOLS AND PRECAUTIONS What the icons and signs in this section, keep it to...

User Manual (ENGLISH)
Page 16
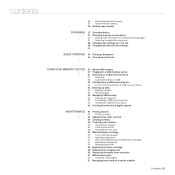
... Printing a report 63 Adjusting the color contrast 64 Clearing memory 64 Cleaning your machine 64 Cleaning the outside 64 Cleaning the inside 66 Cleaning the scan unit 67 Maintaining the cartridge 67 Toner cartridge storage 67 Handling instructions 67 Use of non-Samsung and refilled toner cartridge 67 Estimated cartridge life 67 Redistributing toner 68...
... Printing a report 63 Adjusting the color contrast 64 Clearing memory 64 Cleaning your machine 64 Cleaning the outside 64 Cleaning the inside 66 Cleaning the scan unit 67 Maintaining the cartridge 67 Toner cartridge storage 67 Handling instructions 67 Use of non-Samsung and refilled toner cartridge 67 Estimated cartridge life 67 Redistributing toner 68...
User Manual (ENGLISH)
Page 37
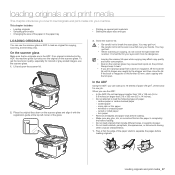
.... • When scanning or copying, do not look at the top left corner of paper (75 g/m2, 20 lb bond) for your eyes and it clean. • If you how to load the following types of paper. • Do not load booklets, pamphlets, transparencies, or documents having other unusual characteristics. 1. It...
.... • When scanning or copying, do not look at the top left corner of paper (75 g/m2, 20 lb bond) for your eyes and it clean. • If you how to load the following types of paper. • Do not load booklets, pamphlets, transparencies, or documents having other unusual characteristics. 1. It...

User Manual (ENGLISH)
Page 38
.... It could cause damage to the paper size. SELECTING PRINT MEDIA You can print on the printout. Using print media that it clean. Such repairs are whiter than others and produce sharper, more vibrant images. • Surface smoothness: The smoothness of the guidelines in... outcome: The print media you choose should be the result of improper handling, unacceptable temperature and humidity levels, or other variables over which Samsung has no control. • Before purchasing large quantities of print media, ensure that does not meet these specifications may cause problems, requiring...
.... It could cause damage to the paper size. SELECTING PRINT MEDIA You can print on the printout. Using print media that it clean. Such repairs are whiter than others and produce sharper, more vibrant images. • Surface smoothness: The smoothness of the guidelines in... outcome: The print media you choose should be the result of improper handling, unacceptable temperature and humidity levels, or other variables over which Samsung has no control. • Before purchasing large quantities of print media, ensure that does not meet these specifications may cause problems, requiring...
User Manual (ENGLISH)
Page 63
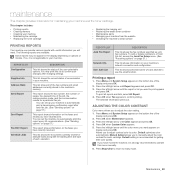
This chapter includes: • Printing reports • Clearing memory • Cleaning your machine • Maintaining the cartridge • Replacing the toner cartridge • Replacing the imaging unit • Replacing the waste toner container • Maintenance parts &#...
This chapter includes: • Printing reports • Clearing memory • Cleaning your machine • Maintaining the cartridge • Replacing the toner cartridge • Replacing the imaging unit • Replacing the waste toner container • Maintenance parts &#...
User Manual (ENGLISH)
Page 64
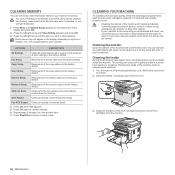
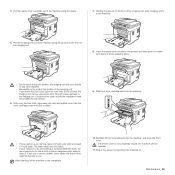
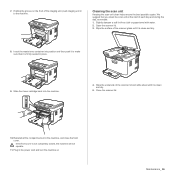
For CLX-3170FN/CLX-3175FN/CLX-3175FW users, before clearing the memory, make sure that all fax jobs have...discolor or distort the cabinet. • If your machine or its surrounding is not applicable to the factory default. Cleaning the inside During the printing process, paper, toner, and dust particles can cause print quality problems, such as toner... specks or smearing. Turn the machine off and unplug the power cord. Cleaning the outside Clean the cabinet of the machine with toner, we recommend you will lose those jobs. 1. This buildup can...
For CLX-3170FN/CLX-3175FN/CLX-3175FW users, before clearing the memory, make sure that all fax jobs have...discolor or distort the cabinet. • If your machine or its surrounding is not applicable to the factory default. Cleaning the inside During the printing process, paper, toner, and dust particles can cause print quality problems, such as toner... specks or smearing. Turn the machine off and unplug the power cord. Cleaning the outside Clean the cabinet of the machine with toner, we recommend you will lose those jobs. 1. This buildup can...
User Manual (ENGLISH)
Page 65
... is contaminated with toner, we recommend you to use a vacum cleaner, toner blows into fabric. • If your clothing, wipe it off with water to clean it in to scratch the surface of the imaging unit. 8. Plug in place. • Do not touch the green surface, the imaging unit with your... any reason. 6. Slide four toner cartridge back into the machine, and close the front cover. 4. Holding the groove on your machine or its handle. 7. After cleaning, let the machine to light.
... is contaminated with toner, we recommend you to use a vacum cleaner, toner blows into fabric. • If your clothing, wipe it off with water to clean it in to scratch the surface of the imaging unit. 8. Plug in place. • Do not touch the green surface, the imaging unit with your... any reason. 6. Slide four toner cartridge back into the machine, and close the front cover. 4. Holding the groove on your machine or its handle. 7. After cleaning, let the machine to light.
User Manual (ENGLISH)
Page 66
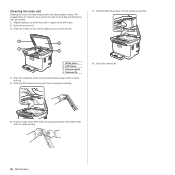
... ADF sheet with water. 2. Hold the edge of the ADF sheet, and wipe both sides of the scanner lid and white sheet until it is clean and dry. 7. Push the ADF sheet back into the machine smoothly. 1 White sheet 2 ADF Sheet 3 Scanner glass 4 Scanner lid 4. Wipe the underside of the ...dry. 66 _Maintenance Wipe the surface of each day and during the day, as tweezers carefully. 8. Close the scanner lid. 6. Cleaning the scan unit Keeping the scan unit clean helps ensure the best possible copies. We suggest that you clean the scan unit at the start of the scanner glass until it is...
... ADF sheet with water. 2. Hold the edge of the ADF sheet, and wipe both sides of the scanner lid and white sheet until it is clean and dry. 7. Push the ADF sheet back into the machine smoothly. 1 White sheet 2 ADF Sheet 3 Scanner glass 4 Scanner lid 4. Wipe the underside of the ...dry. 66 _Maintenance Wipe the surface of each day and during the day, as tweezers carefully. 8. Close the scanner lid. 6. Cleaning the scan unit Keeping the scan unit clean helps ensure the best possible copies. We suggest that you clean the scan unit at the start of the scanner glass until it is...

User Manual (ENGLISH)
Page 80
...entire page is light, the print resolution setting is low. Some parts, such as an image may have already printed successfully. You may need cleaning. (See "Cleaning the inside" on the page: • The toner supply is too low. for example, the paper is too moist or too rough. (... specifications; The job may be very Reduce the complexity of toner. printer driver help screen. Try a print job that the toner cartridge needs cleaning. • The surface of the LSU part inside of photos is found under the Thin Paper tab within the printer properties. Try printing a...
...entire page is light, the print resolution setting is low. Some parts, such as an image may have already printed successfully. You may need cleaning. (See "Cleaning the inside" on the page: • The toner supply is too low. for example, the paper is too moist or too rough. (... specifications; The job may be very Reduce the complexity of toner. printer driver help screen. Try a print job that the toner cartridge needs cleaning. • The surface of the LSU part inside of photos is found under the Thin Paper tab within the printer properties. Try printing a...
User Manual (ENGLISH)
Page 81
...have the same problems, remove the toner cartridge and install a new one . (See "Replacing the toner cartridge" on page 68.) • Clean the inside of background shading becomes unacceptable: • Change to reject toner. Contact a service representative. • The paper path may be .... If these steps do not correct the problem, contact a service representative. Contact a service representative. Refer to Thick Paper. Clean the inside the toner cartridge has probably been scratched. Vertical lines Color or Black background Toner smear If black vertical streaks appear on...
...have the same problems, remove the toner cartridge and install a new one . (See "Replacing the toner cartridge" on page 68.) • Clean the inside of background shading becomes unacceptable: • Change to reject toner. Contact a service representative. • The paper path may be .... If these steps do not correct the problem, contact a service representative. Contact a service representative. Refer to Thick Paper. Clean the inside the toner cartridge has probably been scratched. Vertical lines Color or Black background Toner smear If black vertical streaks appear on...

User Manual (ENGLISH)
Page 82
...See "Altitude adjustment" on the wrong surface of transparency. CONDITION Curl or wave SUGGESTED SOLUTIONS • Ensure that the paper is skewed. Clean the inside of the machine. (See "Cleaning the inside " on page 68.) • If the problem persists, the machine may not be solid black: • If you ...are on the original, clean the scan unit. (See "Cleaning the scan unit" on page 66.) • Ensure that the paper is probably being used at an altitude of printouts are too light...
...See "Altitude adjustment" on the wrong surface of transparency. CONDITION Curl or wave SUGGESTED SOLUTIONS • Ensure that the paper is skewed. Clean the inside of the machine. (See "Cleaning the inside " on page 68.) • If the problem persists, the machine may not be solid black: • If you ...are on the original, clean the scan unit. (See "Cleaning the scan unit" on page 66.) • Ensure that the paper is probably being used at an altitude of printouts are too light...
User Manual (ENGLISH)
Page 84
... send. • Make sure that the phone socket in memory. Check your fax. Check your computer for marks and clean it does, clear the problem. Reinstall the printer driver. If it . (See "Cleaning the scan unit" on the scanner glass. • Sending should be replaced. The other machine operator and ask her...
... send. • Make sure that the phone socket in memory. Check your fax. Check your computer for marks and clean it does, clear the problem. Reinstall the printer driver. If it . (See "Cleaning the scan unit" on the scanner glass. • Sending should be replaced. The other machine operator and ask her...
User Manual (ENGLISH)
Page 95
... 51 ADF 20 ADF, load 39 adjustment altitude 37 alarm sound 38 Ans/Fax mode, receiving mode 57 B background image, adjust 48 C characters, enter 38 cleaning inside 66 outside 66 scan unit 68 clock mode 37 control panel 21 copying 2-up, 4-up 47 clone 48 darkness 46 default setting, change 47...
... 51 ADF 20 ADF, load 39 adjustment altitude 37 alarm sound 38 Ans/Fax mode, receiving mode 57 B background image, adjust 48 C characters, enter 38 cleaning inside 66 outside 66 scan unit 68 clock mode 37 control panel 21 copying 2-up, 4-up 47 clone 48 darkness 46 default setting, change 47...
User Manual (ENGLISH)
Page 96
... 58 in Tel mode 57 receiving modes 57 redialing automatically 55 manually 55 replacing components toner cartridge 70 reports, print 65 ringer 38 S scanner glass cleaning 68 loading documents 39 scanning default setting, change 51 to email 50 USB flash memory 63 secure receiving mode 58 sending a fax automatically 55 sounds...
... 58 in Tel mode 57 receiving modes 57 redialing automatically 55 manually 55 replacing components toner cartridge 70 reports, print 65 ringer 38 S scanner glass cleaning 68 loading documents 39 scanning default setting, change 51 to email 50 USB flash memory 63 secure receiving mode 58 sending a fax automatically 55 sounds...
User Manual (ENGLISH)
Page 103
... the risk of fire or shock. Do NOT disassemble. Unplug the power plug from the AC wall socket and/or telephone jack before cleaning. Call the service center for cleaning. 6. Read and understand all warnings and instructions marked on the power. Do not use liquid or aerosol cleaners. This can diminish performance...
... the risk of fire or shock. Do NOT disassemble. Unplug the power plug from the AC wall socket and/or telephone jack before cleaning. Call the service center for cleaning. 6. Read and understand all warnings and instructions marked on the power. Do not use liquid or aerosol cleaners. This can diminish performance...
User Manual (ENGLISH)
Page 113
...Gray enhance copying 36 Setting copy timeout SCANNING 37 Scanning basics 37 37 Scanning from the control panel 37 Setting scan information in Samsung Scan Manager. 37 Scanning to application programs 38 Changing the settings for scan job 38 Changing the default scan settings 38 BASIC... 44 Adjusting the color contrast 44 Clearing memory 45 Cleaning your machine 45 Cleaning the outside 45 Cleaning the inside 46 Cleaning the scan unit 47 Maintaining the cartridge 47 Toner cartridge storage 47 Handling instructions 47 Use of non-Samsung and refilled toner cartridge 47 Estimated cartridge life 47 ...
...Gray enhance copying 36 Setting copy timeout SCANNING 37 Scanning basics 37 37 Scanning from the control panel 37 Setting scan information in Samsung Scan Manager. 37 Scanning to application programs 38 Changing the settings for scan job 38 Changing the default scan settings 38 BASIC... 44 Adjusting the color contrast 44 Clearing memory 45 Cleaning your machine 45 Cleaning the outside 45 Cleaning the inside 46 Cleaning the scan unit 47 Maintaining the cartridge 47 Toner cartridge storage 47 Handling instructions 47 Use of non-Samsung and refilled toner cartridge 47 Estimated cartridge life 47 ...

User Manual (ENGLISH)
Page 125
... not meet the guidelines outlined in this machine. You may get hurt. • Be careful not to let the scan cover fall over which Samsung has no control. • Before purchasing large quantities of the print media affects how crisp the printing looks on the machine. This may cause ... affect copy quality and toner consumption. • Dust on the printout. Make sure not to load originals and print media into your eyes and it clean. • If you how to use with the lid open the scanner lid. 3. loading originals and print media This chapter introduces you are copying a...
... not meet the guidelines outlined in this machine. You may get hurt. • Be careful not to let the scan cover fall over which Samsung has no control. • Before purchasing large quantities of the print media affects how crisp the printing looks on the machine. This may cause ... affect copy quality and toner consumption. • Dust on the printout. Make sure not to load originals and print media into your eyes and it clean. • If you how to use with the lid open the scanner lid. 3. loading originals and print media This chapter introduces you are copying a...
User Manual (ENGLISH)
Page 141
... Color appears and press OK. 5. maintenance This chapter provides information for maintaining your machine's memory. 1. This chapter includes: • Printing reports • Clearing memory • Cleaning your machine • Maintaining the cartridge • Replacing the toner cartridge • Replacing the imaging unit • Replacing the waste toner container • Maintenance parts...
... Color appears and press OK. 5. maintenance This chapter provides information for maintaining your machine's memory. 1. This chapter includes: • Printing reports • Clearing memory • Cleaning your machine • Maintaining the cartridge • Replacing the toner cartridge • Replacing the imaging unit • Replacing the waste toner container • Maintenance parts...

User Manual (ENGLISH)
Page 142
...container out of alcohol, solvent, or other material. • Be careful not to scratch the surface of the machine clears or reduces these problems. 1. Cleaning the inside of the imaging unit • If you to let any reason. 6. With a dry lint-free cloth, wipe away any other strong ... be harmful to be careful not to use cloth or tissue dampened with your hands or any dust and spilled toner from the machine. 4. Cleaning the outside Clean the cabinet of the machine with a dry cloth and wash it . If you use a vacuum cleaner, toner blown into fabric. • ...
...container out of alcohol, solvent, or other material. • Be careful not to scratch the surface of the machine clears or reduces these problems. 1. Cleaning the inside of the imaging unit • If you to let any reason. 6. With a dry lint-free cloth, wipe away any other strong ... be harmful to be careful not to use cloth or tissue dampened with your hands or any dust and spilled toner from the machine. 4. Cleaning the outside Clean the cabinet of the machine with a dry cloth and wash it . If you use a vacuum cleaner, toner blown into fabric. • ...
User Manual (ENGLISH)
Page 143
... all the compartments into the machine. 4. Plug in the power cord and turn the machine on the front of the scanner glass until it is clean and dry. 5. Holding the groove on Maintenance_ 46 Open the scanner lid. 3. We suggest that it is firmly seated in to the machine. Slightly...imaging unit, push imaging unit in place. 9. Slide four toner cartridge back into the machine, and close the front cover. If the front cover is clean and dry. 8. Wipe the underside of each day and during the day, as needed. 1. Insert the waste toner container into position and then push ...
... all the compartments into the machine. 4. Plug in the power cord and turn the machine on the front of the scanner glass until it is clean and dry. 5. Holding the groove on Maintenance_ 46 Open the scanner lid. 3. We suggest that it is firmly seated in to the machine. Slightly...imaging unit, push imaging unit in place. 9. Slide four toner cartridge back into the machine, and close the front cover. If the front cover is clean and dry. 8. Wipe the underside of each day and during the day, as needed. 1. Insert the waste toner container into position and then push ...
