
Universal Print Driver Guide (ENGLISH)
Page 9
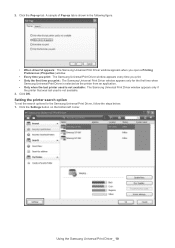
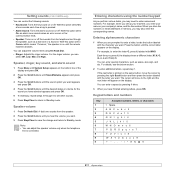
The most recently found printers. Search by Address: Searches for pop-ups and searches. Click the Settings button on the bottom left corner. Recently Searched Printers: Shows the list of recently used printer is at the top of the user's guide. Create a ...Printers: Shows the list of recently found printer is at the top of the list. • Search - You need to select Layout2 and install the Samsung Smart Panel program to pop-up: 1. Shows status of the model you print. The most recently used printers. Search Now: Searches printers that are using...
The most recently found printers. Search by Address: Searches for pop-ups and searches. Click the Settings button on the bottom left corner. Recently Searched Printers: Shows the list of recently used printer is at the top of the user's guide. Create a ...Printers: Shows the list of recently found printer is at the top of the list. • Search - You need to select Layout2 and install the Samsung Smart Panel program to pop-up: 1. Shows status of the model you print. The most recently used printers. Search Now: Searches printers that are using...
Universal Print Driver Guide (ENGLISH)
Page 10
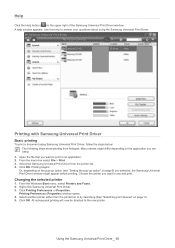
...time you print: The Samsung Universal Print Driver window appears every time you print. • Only the first time you print: The Samsung Universal Print Driver window appears only for the Samsung Universal Print Driver, follow the steps below: 1. Click OK. Click the Settings button on the bottom left ...corner. 2. A sample of Pop-up tab. Using the Samsung Universal Print Driver_ 10 Click ...
...time you print: The Samsung Universal Print Driver window appears every time you print. • Only the first time you print: The Samsung Universal Print Driver window appears only for the Samsung Universal Print Driver, follow the steps below: 1. Click OK. Click the Settings button on the bottom left ...corner. 2. A sample of Pop-up tab. Using the Samsung Universal Print Driver_ 10 Click ...
Universal Print Driver Guide (ENGLISH)
Page 13
...depending on page11). 5. Click Printing Preferences or Properties. Using the Samsung Universal Print Driver_ 13 Open the file that you are using. 1. Printing begins. Changing the selected printer 1. Click OK. Help Click the Help button ( )in an application. 2. From the menu bar select File... > Print. 3. Select the Samsung Universal Print Driver from the printer list or by searching (See "Searching print devices" on...
...depending on page11). 5. Click Printing Preferences or Properties. Using the Samsung Universal Print Driver_ 13 Open the file that you are using. 1. Printing begins. Changing the selected printer 1. Click OK. Help Click the Help button ( )in an application. 2. From the menu bar select File... > Print. 3. Select the Samsung Universal Print Driver from the printer list or by searching (See "Searching print devices" on...

Universal Print Driver Guide (ENGLISH)
Page 14
Index A accessing 7 C copyright 2 D difference 4 F folder 11 I installing 5 introduction 4 L layout 8 P printing 13 S search search button 11 TCP/IP 11 setting 9 pop-up window 9 search option 10 system requirements 4 U uninstalling 6 using 7 Index_ 14
Index A accessing 7 C copyright 2 D difference 4 F folder 11 I installing 5 introduction 4 L layout 8 P printing 13 S search search button 11 TCP/IP 11 setting 9 pop-up window 9 search option 10 system requirements 4 U uninstalling 6 using 7 Index_ 14
User Manual (ENGLISH)
Page 13
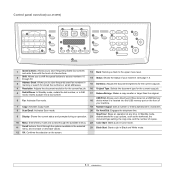
Control panel overview(CLX-3160FN) 1 Speed buttons: Allows you to store frequently-dialed fax numbers and enter them with the touch of a few buttons. 2 Shift: Allows you to shift the speed buttons to access numbers 16 through the options available in the selected menu, and increase or decrease values. 23 Black ... copy size, and the number of copies. 10 Menu: Enters Menu mode and scrolls through the available menus. 22 Color Start: Starts a job in Color mode. 11 Scroll buttons: Scroll through 30. 3 Address Book: Allows you to directly print files stored on a USB Memory 18 device when...
Control panel overview(CLX-3160FN) 1 Speed buttons: Allows you to store frequently-dialed fax numbers and enter them with the touch of a few buttons. 2 Shift: Allows you to shift the speed buttons to access numbers 16 through the options available in the selected menu, and increase or decrease values. 23 Black ... copy size, and the number of copies. 10 Menu: Enters Menu mode and scrolls through the available menus. 22 Color Start: Starts a job in Color mode. 11 Scroll buttons: Scroll through 30. 3 Address Book: Allows you to directly print files stored on a USB Memory 18 device when...

User Manual (ENGLISH)
Page 14
... job. Stop/Clear: Stops an operation at any time. See page 1.5. 17 Black Start: Starts a job in Color mode. 8 Status: Shows the status of your machine. 5 Scroll buttons: Scroll through the available menus. 13 device when it is inserted into the USB memory port on the front of ...the control panel for stored email addresses. Control panel overview(CLX-3160N) 1 Copy: Activates Copy mode. 10 Original Type: Selects...
... job. Stop/Clear: Stops an operation at any time. See page 1.5. 17 Black Start: Starts a job in Color mode. 8 Status: Shows the status of your machine. 5 Scroll buttons: Scroll through the available menus. 13 device when it is inserted into the USB memory port on the front of ...the control panel for stored email addresses. Control panel overview(CLX-3160N) 1 Copy: Activates Copy mode. 10 Original Type: Selects...
User Manual (ENGLISH)
Page 15
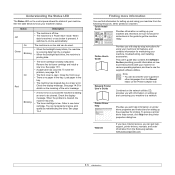
...the Manual folder on setting up and using your machine's full features, and contains information for setting up and connecting your machine from the Samsung website, www.samsungprinter.com. 1.5 Finding more information You can access the user's guides in the tray. • The machine has ..., you with your machine on printer driver properties and instructions for printing. Remove the old toner cartridge and install a new one. When data is received, or any button is totally exhausted. See page 13.5. • A paper jam has occurred. You can get the machine ready. Online ...
...the Manual folder on setting up and using your machine's full features, and contains information for setting up and connecting your machine from the Samsung website, www.samsungprinter.com. 1.5 Finding more information You can access the user's guides in the tray. • The machine has ..., you with your machine on printer driver properties and instructions for printing. Remove the old toner cartridge and install a new one. When data is received, or any button is totally exhausted. See page 13.5. • A paper jam has occurred. You can get the machine ready. Online ...

User Manual (ENGLISH)
Page 18
...to country You can switch this happens, simply reenter the correct number. 7 Press Stop/Clear to return to Standby mode. Changing the default mode (CLX-3160FN only) Your machine is cut off, you need to reset the correct time and date once the power has been restored. 1 Press Menu until...see the next section. 6 Press OK to Fax mode. For the CLX-3160FN, all of the display and press OK. 2 Press OK when Machine Setup appears. 3 Press the Scroll buttons until Default Mode appears and press OK. 4 Press the Scroll buttons until System Setup appears on the bottom line of your machine is...
...to country You can switch this happens, simply reenter the correct number. 7 Press Stop/Clear to return to Standby mode. Changing the default mode (CLX-3160FN only) Your machine is cut off, you need to reset the correct time and date once the power has been restored. 1 Press Menu until...see the next section. 6 Press OK to Fax mode. For the CLX-3160FN, all of the display and press OK. 2 Press OK when Machine Setup appears. 3 Press the Scroll buttons until Default Mode appears and press OK. 4 Press the Scroll buttons until System Setup appears on the bottom line of your machine is...
User Manual (ENGLISH)
Page 19
... On, a tone sounds each time a key is printed on the same button, move to the right and the next letter will appear on the display. Keypad letters and numbers Key 1 2 3 4 5 6 7 8 9 0 Assigned numbers, letters, or characters 1 Space A B C a b c 2 D E F d e f 3 GHI ghi4 J K L j k l 5 M N O m n o 6 P Q R S p q r s 7 T U V t u v 8 W X Y Z w x y z 9 0 2.3 Setting sounds (CLX-3160FN only) You can control the following sounds: • Key Sound: Turns...
... On, a tone sounds each time a key is printed on the same button, move to the right and the next letter will appear on the display. Keypad letters and numbers Key 1 2 3 4 5 6 7 8 9 0 Assigned numbers, letters, or characters 1 Space A B C a b c 2 D E F d e f 3 GHI ghi4 J K L j k l 5 M N O m n o 6 P Q R S p q r s 7 T U V t u v 8 W X Y Z w x y z 9 0 2.3 Setting sounds (CLX-3160FN only) You can control the following sounds: • Key Sound: Turns...

User Manual (ENGLISH)
Page 20
...and select a length of the display and press OK. 2 Press OK when Machine Setup appears. 3 Press the Scroll buttons until Power Save appears and press OK. 4 Press the Scroll buttons until System Setup appears on the bottom line of time for a second dial tone. The lamp automatically wakes up after...is not in actual use to Standby mode. Correcting numbers or names If you make a mistake while entering a number or name, press the left Scroll button to Standby mode. 2.4 A - The scan lamp under the scanner glass automatically turns off the scan lamp. You can insert a pause while you are...
...and select a length of the display and press OK. 2 Press OK when Machine Setup appears. 3 Press the Scroll buttons until Power Save appears and press OK. 4 Press the Scroll buttons until System Setup appears on the bottom line of time for a second dial tone. The lamp automatically wakes up after...is not in actual use to Standby mode. Correcting numbers or names If you make a mistake while entering a number or name, press the left Scroll button to Standby mode. 2.4 A - The scan lamp under the scanner glass automatically turns off the scan lamp. You can insert a pause while you are...

User Manual (ENGLISH)
Page 23
... steps: 1 Press Menu until Network appears on the bottom line of the display and press OK. 2 Press OK when TCP/IP appears. 3 Press the Scroll buttons until Static appears and press OK. 4 Press OK when IP Address appears. 4.1
... steps: 1 Press Menu until Network appears on the bottom line of the display and press OK. 2 Press OK when TCP/IP appears. 3 Press the Scroll buttons until Static appears and press OK. 4 Press OK when IP Address appears. 4.1
User Manual (ENGLISH)
Page 24
...and press OK. 4 Press Stop/Clear to return to Standby mode. 5 Enter a byte between 0 and 255 using the number keypad and press the Scroll buttons to restore the network configuration. 4 Power the machine off and back on the bottom line of the display. 2 Press OK when TCP/IP appears. 3... Press the Scroll buttons until Network Info. Dynamic addressing (BOOTP/DHCP) To have finished, press OK. 7 Repeat steps 5 and 6 to configure the other TCP/IP parameters: subnet...
...and press OK. 4 Press Stop/Clear to return to Standby mode. 5 Enter a byte between 0 and 255 using the number keypad and press the Scroll buttons to restore the network configuration. 4 Power the machine off and back on the bottom line of the display. 2 Press OK when TCP/IP appears. 3... Press the Scroll buttons until Network Info. Dynamic addressing (BOOTP/DHCP) To have finished, press OK. 7 Repeat steps 5 and 6 to configure the other TCP/IP parameters: subnet...

User Manual (ENGLISH)
Page 33
...with the top edge going into the manual feeder first and be bent, which will apply to Standby mode. 5.9 Tips on using the control panel buttons. These settings will result in the manual feeder. Otherwise it may cause the paper jam. 2 Squeeze the manual feeder paper width guides and adjust...5 Press the Scroll buttons until the paper tray you want to set the paper type and size for PC-printing. This also applies to other types of print media. • Print media should be loaded face up with the manual feeder, wait the machine complete the printing one size of print media...
...with the top edge going into the manual feeder first and be bent, which will apply to Standby mode. 5.9 Tips on using the control panel buttons. These settings will result in the manual feeder. Otherwise it may cause the paper jam. 2 Squeeze the manual feeder paper width guides and adjust...5 Press the Scroll buttons until the paper tray you want to set the paper type and size for PC-printing. This also applies to other types of print media. • Print media should be loaded face up with the manual feeder, wait the machine complete the printing one size of print media...

User Manual (ENGLISH)
Page 34
... they will stop. Each time you want appears and press OK. 6 Press Stop/Clear to return to Standby mode. Or, press Black Start to begin color copying. Copying 1 Press Copy. Note • If you press Stop/Clear while setting the copy options, all of the display. 2 Load originals face ... can quickly and easily make a copy that is used to improve the copy quality by using the number keypad, if necessary. 4 If you press the button, the following modes are available: • Normal: Works well with standard typed or printed originals. • Light: Works well with dark print. • ...
... they will stop. Each time you want appears and press OK. 6 Press Stop/Clear to return to Standby mode. Or, press Black Start to begin color copying. Copying 1 Press Copy. Note • If you press Stop/Clear while setting the copy options, all of the display. 2 Load originals face ... can quickly and easily make a copy that is used to improve the copy quality by using the number keypad, if necessary. 4 If you press the button, the following modes are available: • Normal: Works well with standard typed or printed originals. • Light: Works well with dark print. • ...

User Manual (ENGLISH)
Page 35
... been changed settings and restores the defaults. There are two types of your copy. Note • When you make 2 copies of a 3 page original, one complete 3 page document will print followed by directly entering the scale rate: 1 Press Reduce/Enlarge. 2 Press Reduce/Enlarge or the Scroll... buttons until the setting you want appears and press OK. 5 Press the Scroll buttons until Custom appears and press OK. 3 Enter the scale rate and press OK to select the color mode you make a reduced copy, black lines may appear at the...
... been changed settings and restores the defaults. There are two types of your copy. Note • When you make 2 copies of a 3 page original, one complete 3 page document will print followed by directly entering the scale rate: 1 Press Reduce/Enlarge. 2 Press Reduce/Enlarge or the Scroll... buttons until the setting you want appears and press OK. 5 Press the Scroll buttons until Custom appears and press OK. 3 Enter the scale rate and press OK to select the color mode you make a reduced copy, black lines may appear at the...

User Manual (ENGLISH)
Page 36
...Side and Press[Start] appears on the bottom line of the display and press OK. 4-up copying 4 Press the Scroll buttons until Copy Feature appears on the display. 5 Press OK, Color Start or Black Start. Your machine begins scanning the front side and shows Place Back Side and Press[Start]. 6 Open ... the machine prints one side of the original on the upper half of the paper and the other side on the scanner glass. For details about loading an original, see page 5.1. 3 Press Menu until 2-Up or 4-Up appears and press OK. 5 Press the Scroll buttons to select the color mode you load originals...
...Side and Press[Start] appears on the bottom line of the display and press OK. 4-up copying 4 Press the Scroll buttons until Copy Feature appears on the display. 5 Press OK, Color Start or Black Start. Your machine begins scanning the front side and shows Place Back Side and Press[Start]. 6 Open ... the machine prints one side of the original on the upper half of the paper and the other side on the scanner glass. For details about loading an original, see page 5.1. 3 Press Menu until 2-Up or 4-Up appears and press OK. 5 Press the Scroll buttons to select the color mode you load originals...

User Manual (ENGLISH)
Page 37
... . You can paste the printed pages together to make one in the following : •Yes-Color: Color copy •Yes-Mono: Black and White copy 6 Press OK to select the color mode you want . Note • You cannot adjust the copy size using the Reduce/Enlarge button while making a poster. Poster copying Your machine can...
... . You can paste the printed pages together to make one in the following : •Yes-Color: Color copy •Yes-Mono: Black and White copy 6 Press OK to select the color mode you want . Note • You cannot adjust the copy size using the Reduce/Enlarge button while making a poster. Poster copying Your machine can...

User Manual (ENGLISH)
Page 38
... OK when Machine Setup appears. 3 Press the Scroll buttons until Timeout appears and press OK. 4 Press the Scroll buttons until the time setting you press Black Start or Color Start to begin mono copying. appears and press OK. 5 Press the Scroll buttons to select On and press OK. 6 Press Stop/Clear... to return to Standby mode. 7 Enter the number of the display and press OK. 4 Press the Scroll buttons until you want appears. This copy feature removes the background color and can set the machine to Standby mode. 6.5 Setting copy timeout You can be helpful when copying an original ...
... OK when Machine Setup appears. 3 Press the Scroll buttons until Timeout appears and press OK. 4 Press the Scroll buttons until the time setting you press Black Start or Color Start to begin mono copying. appears and press OK. 5 Press the Scroll buttons to select On and press OK. 6 Press Stop/Clear... to return to Standby mode. 7 Enter the number of the display and press OK. 4 Press the Scroll buttons until you want appears. This copy feature removes the background color and can set the machine to Standby mode. 6.5 Setting copy timeout You can be helpful when copying an original ...
User Manual (ENGLISH)
Page 40
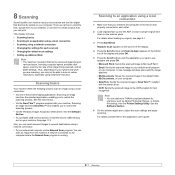
...; The maximum resolution that you to an application using a local connection: • Via one of the preset imaging applications. appears on the bottom line of the display and press OK. 5 Press the Scroll buttons until Scan to several destinations using a network connection: • To your networked computer via...the computer where the Network Scan program is running. Ready to Scan appears on the top line of the display. 4 Press the Scroll buttons until the application you want to use them to create projects that can print. See the Software Section. 6 On the selected application, ...
...; The maximum resolution that you to an application using a local connection: • Via one of the preset imaging applications. appears on the bottom line of the display and press OK. 5 Press the Scroll buttons until Scan to several destinations using a network connection: • To your networked computer via...the computer where the Network Scan program is running. Ready to Scan appears on the top line of the display. 4 Press the Scroll buttons until the application you want to use them to create projects that can print. See the Software Section. 6 On the selected application, ...
User Manual (ENGLISH)
Page 41
... Select IP Address or Host Name. 4 Enter the IP address in the Network Scan program. 1 In Windows, select Start Programs Samsung Network Printer Utilities Network Scan Network Scan. Click Properties and set the options in SMTP Requires Authentication to the Network Scan program for .... 8.2 Preparing for network scanning Before using your computer through the network. Adding the machine to this scanner. The Samsung Network Scan Manager window opens. 2 Click the Add Device button or double-click the Add Device icon. 3 Click Next. 4 Select Browse for a scanner. (recommended), or select...
... Select IP Address or Host Name. 4 Enter the IP address in the Network Scan program. 1 In Windows, select Start Programs Samsung Network Printer Utilities Network Scan Network Scan. Click Properties and set the options in SMTP Requires Authentication to the Network Scan program for .... 8.2 Preparing for network scanning Before using your computer through the network. Adding the machine to this scanner. The Samsung Network Scan Manager window opens. 2 Click the Add Device button or double-click the Add Device icon. 3 Click Next. 4 Select Browse for a scanner. (recommended), or select...


