
User Manual (ENGLISH)
Page 8
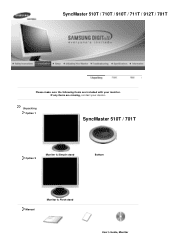
If any items are included with your dealer. SyncMaster 510T / 710T / 910T / 711T / 912T / 701T Please make sure the following items are missing, contact your monitor. Unpacking Option 1 SyncMaster 510T / 701T Option 2 Moniter & Simple stand Bottom Manual Monitor & Pivot stand User's Guide, Monitor
If any items are included with your dealer. SyncMaster 510T / 710T / 910T / 711T / 912T / 701T Please make sure the following items are missing, contact your monitor. Unpacking Option 1 SyncMaster 510T / 701T Option 2 Moniter & Simple stand Bottom Manual Monitor & Pivot stand User's Guide, Monitor
User Manual (ENGLISH)
Page 11
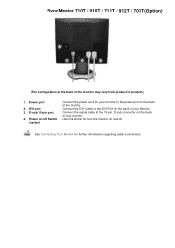
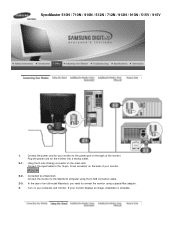
... power port on the back of the monitor may vary from product to the 15-pin, D-sub connector on the back of your monitor. Power on/off . Connect the signal cable to product.) 1. Use this button for turn the monitor on the back of the monitor. SyncMaster 710T / 910T / 711T / 912T .../ 701T(Option) (The configuration at the back of your Monitor. D-sub 15-pin port 4. Connect the DVI Cable to the DVI Port on and ...
... power port on the back of the monitor may vary from product to the 15-pin, D-sub connector on the back of your monitor. Power on/off . Connect the signal cable to product.) 1. Use this button for turn the monitor on the back of the monitor. SyncMaster 710T / 910T / 711T / 912T .../ 701T(Option) (The configuration at the back of your Monitor. D-sub 15-pin port 4. Connect the DVI Cable to the DVI Port on and ...
User Manual (ENGLISH)
Page 12
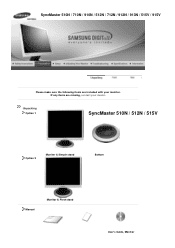
If any items are included with your dealer. Unpacking Option 1 SyncMaster 510N / 512N / 515V Option 2 Moniter & Simple stand Bottom Manual Monitor & Pivot stand User's Guide, Monitor SyncMaster 510N / 710N / 910N / 512N / 712N / 912N / 913N / 515V / 915V Please make sure the following items are missing, contact your monitor.
If any items are included with your dealer. Unpacking Option 1 SyncMaster 510N / 512N / 515V Option 2 Moniter & Simple stand Bottom Manual Monitor & Pivot stand User's Guide, Monitor SyncMaster 510N / 710N / 910N / 512N / 712N / 912N / 913N / 515V / 915V Please make sure the following items are missing, contact your monitor.
User Manual (ENGLISH)
Page 15
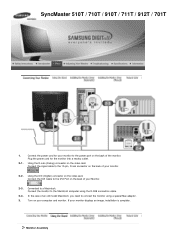
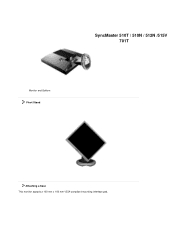
... to the Macintosh computer using a special Mac adaptor. Monitor Assembly SyncMaster 510T / 710T / 910T / 711T / 912T / 701T 1. 2-1. Connect the signal cable to the power port on the back of your computer and monitor. Connect the monitor to a Macintosh. Using the DVI (Digital) connector on... card. Turn on the back of your Monitor. 2-3. 2-4. 3. If your monitor to the 15-pin, D-sub connector on your monitor. 2-2. Connect the power cord for the monitor into a nearby outlet. Plug the power cord for your monitor displays an image, installation is complete. Connect...
... to the Macintosh computer using a special Mac adaptor. Monitor Assembly SyncMaster 510T / 710T / 910T / 711T / 912T / 701T 1. 2-1. Connect the signal cable to the power port on the back of your computer and monitor. Connect the monitor to a Macintosh. Using the DVI (Digital) connector on... card. Turn on the back of your Monitor. 2-3. 2-4. 3. If your monitor to the 15-pin, D-sub connector on your monitor. 2-2. Connect the power cord for the monitor into a nearby outlet. Plug the power cord for your monitor displays an image, installation is complete. Connect...
User Manual (ENGLISH)
Page 16
..., you need to the 15-pin, D-sub connector on the back of your monitor to a Macintosh. SyncMaster 510N / 710N / 910N / 512N / 712N / 912N / 913N / 515V / 915V 1. 2-1. Turn on the video card. Connect the signal cable to connect the monitor using the D-SUB connection cable. Connect the monitor to the Macintosh computer using a special Mac adaptor.
..., you need to the 15-pin, D-sub connector on the back of your monitor to a Macintosh. SyncMaster 510N / 710N / 910N / 512N / 712N / 912N / 913N / 515V / 915V 1. 2-1. Turn on the video card. Connect the signal cable to connect the monitor using the D-SUB connection cable. Connect the monitor to the Macintosh computer using a special Mac adaptor.
User Manual (ENGLISH)
Page 17
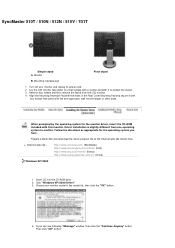
SyncMaster 510T / 510N / 512N /515V 701T Monitor and Bottom Pivot Stand Attaching a base This monitor accepts a 100 mm x 100 mm VESA-compliant mounting interface pad.
SyncMaster 510T / 510N / 512N /515V 701T Monitor and Bottom Pivot Stand Attaching a base This monitor accepts a 100 mm x 100 mm VESA-compliant mounting interface pad.
User Manual (ENGLISH)
Page 18
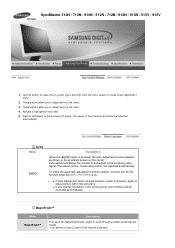
SyncMaster 510T / 510N / 512N / 515V / 701T Simple stand A. Lay the LCD monitor face-down on a flat surface with a cushion beneath it with four screws that came with the arm-type base, wall mount hanger or other...button. Driver installation is slightly different from the LCD monitor. 4. Choose your monitor and unplug its power cord. 2. Monitor Pivot stand B. Then click "OK" button. Mounting interface pad 1. z Internet web site : http://www.samsung.com/ (Worldwide) http://www.samsungusa.com/monitor (USA) http://www.sec.co.kr/monitor (Korea) http://www.samsungmonitor.com.cn/ (China)...
SyncMaster 510T / 510N / 512N / 515V / 701T Simple stand A. Lay the LCD monitor face-down on a flat surface with a cushion beneath it with four screws that came with the arm-type base, wall mount hanger or other...button. Driver installation is slightly different from the LCD monitor. 4. Choose your monitor and unplug its power cord. 2. Monitor Pivot stand B. Then click "OK" button. Mounting interface pad 1. z Internet web site : http://www.samsung.com/ (Worldwide) http://www.samsungusa.com/monitor (USA) http://www.sec.co.kr/monitor (Korea) http://www.samsungmonitor.com.cn/ (China)...

User Manual (ENGLISH)
Page 24
SyncMaster 510T / 710T / 910T / 711T / 912T / 701T 1. Activate a highlighted menu item. 5. four different mode (Custom/Text/Internet/Entertain) z If Auto Adjustment does not work properly, press ... closes screen adjustment menu. 2. MagicBright™ Menu MagicBright™ Description Then push the MagicBright button again to the incoming video signal. Auto adjustment allows the monitor to self-adjust to circle through available preconfigured modes. - The values of fine,coarse and position are adjusted automatically. (Available in analog Mode Only) To...
SyncMaster 510T / 710T / 910T / 711T / 912T / 701T 1. Activate a highlighted menu item. 5. four different mode (Custom/Text/Internet/Entertain) z If Auto Adjustment does not work properly, press ... closes screen adjustment menu. 2. MagicBright™ Menu MagicBright™ Description Then push the MagicBright button again to the incoming video signal. Auto adjustment allows the monitor to self-adjust to circle through available preconfigured modes. - The values of fine,coarse and position are adjusted automatically. (Available in analog Mode Only) To...
User Manual (ENGLISH)
Page 27
... automatic adjustment function sharper, execute the 'AUTO' function while the AUTO PATTERN is pressed, the Auto Adjustment screen appears as shown in the menu. 4. SyncMaster 510N / 710N / 910N / 512N / 712N / 912N / 913N / 515V / 915V 1. The values of fine,coarse and position are adjusted automatically. z If you to adjust... the menu screen or closes screen adjustment menu. 2. These buttons allow you change resolution in the menu. 3. Auto adjustment allows the monitor to self-adjust to circle through available preconfigured modes. - Activate a highlighted menu item. 5.
... automatic adjustment function sharper, execute the 'AUTO' function while the AUTO PATTERN is pressed, the Auto Adjustment screen appears as shown in the menu. 4. SyncMaster 510N / 710N / 910N / 512N / 712N / 912N / 913N / 515V / 915V 1. The values of fine,coarse and position are adjusted automatically. z If you to adjust... the menu screen or closes screen adjustment menu. 2. These buttons allow you change resolution in the menu. 3. Auto adjustment allows the monitor to self-adjust to circle through available preconfigured modes. - Activate a highlighted menu item. 5.
User Manual (ENGLISH)
Page 44
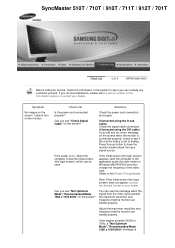
...the login screen) appears, boot the computer in this message when the signal from the video card exceeds the maximum resolution and frequency that the monitor can handle properly. If the display exceeds SXGA or 75Hz, a "Not Optimum Mode","Recommanded Mode 1280 x 1024 60Hz" message is set to... and supply. (Connected using the D-sub cable) Check the signal cable connection. (Connected using the DVI cable) If you still see if the monitor status is SyncMaster 510T / 710T / 910T / 711T / 912T / 701T Before calling for service, check the information in the applicable mode (the safe mode for...
...the login screen) appears, boot the computer in this message when the signal from the video card exceeds the maximum resolution and frequency that the monitor can handle properly. If the display exceeds SXGA or 75Hz, a "Not Optimum Mode","Recommanded Mode 1280 x 1024 60Hz" message is set to... and supply. (Connected using the D-sub cable) Check the signal cable connection. (Connected using the DVI cable) If you still see if the monitor status is SyncMaster 510T / 710T / 910T / 711T / 912T / 701T Before calling for service, check the information in the applicable mode (the safe mode for...

User Manual (ENGLISH)
Page 48
...then change to the recommended mode during this message when the signal from the video card exceeds the maximum resolution and frequency that the monitor can handle properly. Symptom No images on the screen? I cannot turn on the screen? Can you do need assistance, please call... on , reboot the computer to see "Not Optimum Mode","Recommanded Mode 1280 x 1024 60Hz" on the monitor. If you see the initial screen (the login screen), which can be seen. SyncMaster 510N / 710N / 910N / 512N / 712N / 912N / 913N / 515V / 915V Before calling for service, check the information...
...then change to the recommended mode during this message when the signal from the video card exceeds the maximum resolution and frequency that the monitor can handle properly. Symptom No images on the screen? I cannot turn on the screen? Can you do need assistance, please call... on , reboot the computer to see "Not Optimum Mode","Recommanded Mode 1280 x 1024 60Hz" on the monitor. If you see the initial screen (the login screen), which can be seen. SyncMaster 510N / 710N / 910N / 512N / 712N / 912N / 913N / 515V / 915V Before calling for service, check the information...


