User Manual (ENGLISH)
Page 40
... Windows 95/98/Me E.3 In Windows NT 4.0/2000/XP E.4 Setting Up a Network-Connected Printer E.6 Configuring Network Parameters on the Control Panel E.6 Appendix F : Installing Printer Options Installing Printer Memory F.2 Removing the Memory F.7 Installing a Network Interface Card F.8 Installing an Optional Tray F.13 Appendix G : Specifications Printer Specifications G.2 Paper Specifications G.4 Overview G.4 Supported Sizes of Paper G.5 Guidelines for Using Paper G.6 Paper...
... Windows 95/98/Me E.3 In Windows NT 4.0/2000/XP E.4 Setting Up a Network-Connected Printer E.6 Configuring Network Parameters on the Control Panel E.6 Appendix F : Installing Printer Options Installing Printer Memory F.2 Removing the Memory F.7 Installing a Network Interface Card F.8 Installing an Optional Tray F.13 Appendix G : Specifications Printer Specifications G.2 Paper Specifications G.4 Overview G.4 Supported Sizes of Paper G.5 Guidelines for Using Paper G.6 Paper...

User Manual (ENGLISH)
Page 51
... conserves electricity by substantially reducing power consumption when not printing. • This printer meets Energy Star guidelines for the CLP-550N) of memory which enables PS printing. • A Network interface enables network printing. Expand the printer capacity • This printer has 64 MB (128 MB for energy efficiency. You can also use preprinted forms and letterhead...
... conserves electricity by substantially reducing power consumption when not printing. • This printer meets Energy Star guidelines for the CLP-550N) of memory which enables PS printing. • A Network interface enables network printing. Expand the printer capacity • This printer has 64 MB (128 MB for energy efficiency. You can also use preprinted forms and letterhead...
User Manual (ENGLISH)
Page 104
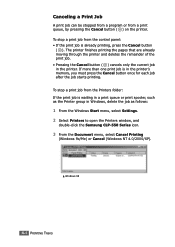
...is waiting in a print queue or print spooler, such as the Printer group in Windows, delete the job as follows: 1 From the Windows Start menu, select Settings. 2 Select Printers to open the Printers window, and double-click the Samsung CLP-550 Series icon. 3 From the Document menu, select Cancel Printing... printing the pages that are already moving through the printer and deletes the remainder of the print job. • Pressing the Cancel button ( ) cancels only the current job in the printer's memory, you must press the Cancel button once for each job after the job starts printing. Canceling a...
...is waiting in a print queue or print spooler, such as the Printer group in Windows, delete the job as follows: 1 From the Windows Start menu, select Settings. 2 Select Printers to open the Printers window, and double-click the Samsung CLP-550 Series icon. 3 From the Document menu, select Cancel Printing... printing the pages that are already moving through the printer and deletes the remainder of the print job. • Pressing the Cancel button ( ) cancels only the current job in the printer's memory, you must press the Cancel button once for each job after the job starts printing. Canceling a...
User Manual (ENGLISH)
Page 132
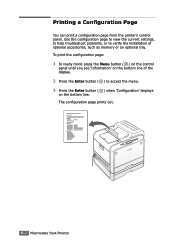
... Enter button ( ) when 'Configuration' displays on the bottom line of optional accessories, such as memory or an optional tray. Printing a Configuration Page You can print a configuration page from the printer's control panel. The configuration page prints out. 6.2 MAINTAINING YOUR PRINTER To print the configuration page: 1 In ready mode press the Menu button ( ) on...
... Enter button ( ) when 'Configuration' displays on the bottom line of optional accessories, such as memory or an optional tray. Printing a Configuration Page You can print a configuration page from the printer's control panel. The configuration page prints out. 6.2 MAINTAINING YOUR PRINTER To print the configuration page: 1 In ready mode press the Menu button ( ) on...
User Manual (ENGLISH)
Page 196
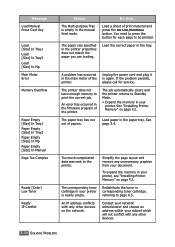
...] In Mp Main Motor Error Memory Overflow Paper Empty [Size] In Tray1 Paper Empty [Size] In Tray2 Paper Empty [Size] In Mp Paper Empty [Size] In Manual Page Too Complex Ready [Color] Low Toner Ready IP Conflict Status Do this... Load the correct paper in the printer properties does not match the paper...
...] In Mp Main Motor Error Memory Overflow Paper Empty [Size] In Tray1 Paper Empty [Size] In Tray2 Paper Empty [Size] In Mp Paper Empty [Size] In Manual Page Too Complex Ready [Color] Low Toner Ready IP Conflict Status Do this... Load the correct paper in the printer properties does not match the paper...

User Manual (ENGLISH)
Page 202
... to specify the IP address of CUPS (at least 1.1.14). My application seems to save on memory usage. This is printed), and I can be passed to print, the Printer Package will generate correct PostScript code that would result in Encapsulated PostScript (EPS) format, some earlier versions... of your choices won 't refresh). Unfortunately, CUPS currently doesn't allow you don't use SMB-shared printers (such as is running. Some documents come out all white (nothing is normal and the application should resume functioning correctly after the user...
... to specify the IP address of CUPS (at least 1.1.14). My application seems to save on memory usage. This is printed), and I can be passed to print, the Printer Package will generate correct PostScript code that would result in Encapsulated PostScript (EPS) format, some earlier versions... of your choices won 't refresh). Unfortunately, CUPS currently doesn't allow you don't use SMB-shared printers (such as is running. Some documents come out all white (nothing is normal and the application should resume functioning correctly after the user...
User Manual (ENGLISH)
Page 239
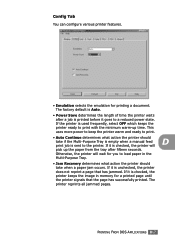
... If it is sent to print. • Auto Continue determines what action the printer should take when a paper jam occurs. This uses more power to keep the printer warm and ready to the printer. Otherwise, the printer will pick up time. D PRINTING FROM DOS APPLICATIONS D.7 Config Tab You can ...used frequently, select OFF which keeps the printer ready to a reduced power state. If it goes to print with the minimum warm-up the paper from the tray after fifteen seconds. If the printer is checked, the printer will wait for you to load paper in memory for printing a document.
... If it is sent to print. • Auto Continue determines what action the printer should take when a paper jam occurs. This uses more power to keep the printer warm and ready to the printer. Otherwise, the printer will pick up time. D PRINTING FROM DOS APPLICATIONS D.7 Config Tab You can ...used frequently, select OFF which keeps the printer ready to a reduced power state. If it goes to print with the minimum warm-up the paper from the tray after fifteen seconds. If the printer is checked, the printer will wait for you to load paper in memory for printing a document.
User Manual (ENGLISH)
Page 241
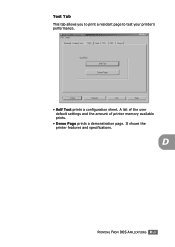
D PRINTING FROM DOS APPLICATIONS D.9 Test Tab This tab allows you to print a resident page to test your printer's performance. • Self Test prints a configuration sheet. A list of the user default settings and the amount of printer memory available prints. • Demo Page prints a demonstration page. It shows the printer features and specifications.
D PRINTING FROM DOS APPLICATIONS D.9 Test Tab This tab allows you to print a resident page to test your printer's performance. • Self Test prints a configuration sheet. A list of the user default settings and the amount of printer memory available prints. • Demo Page prints a demonstration page. It shows the printer features and specifications.
User Manual (ENGLISH)
Page 259
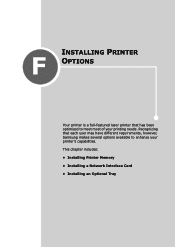
Recognizing that has been optimized to enhance your printing needs. F INSTALLING PRINTER OPTIONS Your printer is a full-featured laser printer that each user may have different requirements, however, Samsung makes several options available to meet most of your printer's capabilities. This chapter includes: • Installing Printer Memory • Installing a Network Interface Card • Installing an Optional Tray
Recognizing that has been optimized to enhance your printing needs. F INSTALLING PRINTER OPTIONS Your printer is a full-featured laser printer that each user may have different requirements, however, Samsung makes several options available to meet most of your printer's capabilities. This chapter includes: • Installing Printer Memory • Installing a Network Interface Card • Installing an Optional Tray

User Manual (ENGLISH)
Page 260
Installing Printer Memory Your printer has the dual in-line memory module (DIMM) slot. F.2 INSTALLING PRINTER OPTIONS Use only a Samsung-approved DIMM, part number ML-00MC (64 MB), ML-00MD (128 MB), or ML-00ME (256 MB). Contact your Samsung dealer. Note: Your printer has 64 MB (128 MB for the CLP-550N) of the DIMM antistatic package and then touch...
Installing Printer Memory Your printer has the dual in-line memory module (DIMM) slot. F.2 INSTALLING PRINTER OPTIONS Use only a Samsung-approved DIMM, part number ML-00MC (64 MB), ML-00MD (128 MB), or ML-00ME (256 MB). Contact your Samsung dealer. Note: Your printer has 64 MB (128 MB for the CLP-550N) of the DIMM antistatic package and then touch...

User Manual (ENGLISH)
Page 261
F INSTALLING PRINTER OPTIONS F.3 Memory DIMM 5 Open the lever on the control board. 3 Remove the two screws holding the metal plate in place, and then remove the metal cover, as shown below. 4 Locate the memory DIMM slot (the upper slot) on each side of the memory DIMM slot all the way.
F INSTALLING PRINTER OPTIONS F.3 Memory DIMM 5 Open the lever on the control board. 3 Remove the two screws holding the metal plate in place, and then remove the metal cover, as shown below. 4 Locate the memory DIMM slot (the upper slot) on each side of the memory DIMM slot all the way.

User Manual (ENGLISH)
Page 262
6 Remove the memory DIMM from the antistatic package. Locate the alignment notches on the bottom edge of the memory DIMM into the slots on the memory DIMM with the notches at the top of the memory DIMM slot. 8 Insert the ends of the DIMM. Notches Connection points NOTE: Avoid touching the connection points along the edge of the memory. 7 Holding the memory DIMM by the edges, align the notches on the levers. F.4 INSTALLING PRINTER OPTIONS
6 Remove the memory DIMM from the antistatic package. Locate the alignment notches on the bottom edge of the memory DIMM into the slots on the memory DIMM with the notches at the top of the memory DIMM slot. 8 Insert the ends of the DIMM. Notches Connection points NOTE: Avoid touching the connection points along the edge of the memory. 7 Holding the memory DIMM by the edges, align the notches on the levers. F.4 INSTALLING PRINTER OPTIONS

User Manual (ENGLISH)
Page 263
F INSTALLING PRINTER OPTIONS F.5 NOTE: If you have difficulty inserting the memory DIMM or closing the levers, make sure you removed in step 3. The levers on the bottom of the DIMM are automatically latched. 9 Push it firmly to make sure the notches on each side are aligned with the notches in the DIMM slot. 10 Replace the metal cover, as shown below, and tighten the two screws you fully insert the memory DIMM into the slot.
F INSTALLING PRINTER OPTIONS F.5 NOTE: If you have difficulty inserting the memory DIMM or closing the levers, make sure you removed in step 3. The levers on the bottom of the DIMM are automatically latched. 9 Push it firmly to make sure the notches on each side are aligned with the notches in the DIMM slot. 10 Replace the metal cover, as shown below, and tighten the two screws you fully insert the memory DIMM into the slot.

User Manual (ENGLISH)
Page 265
F INSTALLING PRINTER OPTIONS F.7 Removing the Memory 1 Follow steps 1 through 3 on page F.2 to access the control board. 2 Push the levers at both ends of the DIMM slot away from the DIMM. 3 Place the memory DIMM in its original packaging or wrap it with sheet of metal as thin as paper such as aluminium foil and store it in a box. 4 Follow from step 9 on page F.5.
F INSTALLING PRINTER OPTIONS F.7 Removing the Memory 1 Follow steps 1 through 3 on page F.2 to access the control board. 2 Push the levers at both ends of the DIMM slot away from the DIMM. 3 Place the memory DIMM in its original packaging or wrap it with sheet of metal as thin as paper such as aluminium foil and store it in a box. 4 Follow from step 9 on page F.5.
User Manual (ENGLISH)
Page 277
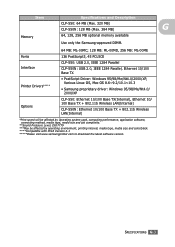
... optional memory available Use only the Samsung-approved DIMM. Fonts Interface Printer Drivers***** Options 64 MB: ML-00MC; 128 MB: ML-00MD, 256 MB: ML-00ME 136 PostScript3, 45 PCL5CE CLP-550: USB 2.0, IEEE 1284 Parallel CLP-550N: USB...CLP-550N: Ethernet 10/100 Base TX + 802.11b Wireless LAN(Internal) *Print speed will be affected by Operating system used, computing performance, application software, connecting method, media type, media size and job complexity. **Sound Pressure Level, ISO7779 ***May be affected by operating environment, printing interval, media type, media size and color...
... optional memory available Use only the Samsung-approved DIMM. Fonts Interface Printer Drivers***** Options 64 MB: ML-00MC; 128 MB: ML-00MD, 256 MB: ML-00ME 136 PostScript3, 45 PCL5CE CLP-550: USB 2.0, IEEE 1284 Parallel CLP-550N: USB...CLP-550N: Ethernet 10/100 Base TX + 802.11b Wireless LAN(Internal) *Print speed will be affected by Operating system used, computing performance, application software, connecting method, media type, media size and job complexity. **Sound Pressure Level, ISO7779 ***May be affected by operating environment, printing interval, media type, media size and color...

User Manual (ENGLISH)
Page 286
...printer 6.29 color mode 4.9, 4.10 components 1.5 configuration page, print 6.2 connect Ethernet F.12 control panel 2.2 buttons 2.3 display 2.2 menus 2.5 custom-sized materials, print 3.21 D double-sided printing 5.2 E envelopes, print 3.14 error messages 7.26 Ethernet cable, print F.12 F Favorite setting, use 4.13 features printer 1.2 G graphic properties, set 4.9 H help, use 4.14 I imaging unit, replace 6.14 install Memory... F.2 Network Interface Card F.8 optional Tray2 F.13 printer ...
...printer 6.29 color mode 4.9, 4.10 components 1.5 configuration page, print 6.2 connect Ethernet F.12 control panel 2.2 buttons 2.3 display 2.2 menus 2.5 custom-sized materials, print 3.21 D double-sided printing 5.2 E envelopes, print 3.14 error messages 7.26 Ethernet cable, print F.12 F Favorite setting, use 4.13 features printer 1.2 G graphic properties, set 4.9 H help, use 4.14 I imaging unit, replace 6.14 install Memory... F.2 Network Interface Card F.8 optional Tray2 F.13 printer ...

User Manual (ENGLISH)
Page 287
N network interface card, install F.8 network printing card, install F.8 locally shared printer, set E.3 network-connected printer, set E.6 parameters, configure E.6 n-up printing 5.6 O option, install memory DIMM F.2 network interface card F.8 paper tray 2 F.13 optional tray, install F.13 orientation, ..., print 3.20 print order, set 4.12 print quality problems 7.22 print quality problems, solve 7.22 print resolution, set 4.9 printer options F.1 printer software install in Linux C.2 in Macintosh A.2 uninstall in Linux C.7 printing booklets 5.9 configuration page 6.2 double-sided 5.2 fitting to...
N network interface card, install F.8 network printing card, install F.8 locally shared printer, set E.3 network-connected printer, set E.6 parameters, configure E.6 n-up printing 5.6 O option, install memory DIMM F.2 network interface card F.8 paper tray 2 F.13 optional tray, install F.13 orientation, ..., print 3.20 print order, set 4.12 print quality problems 7.22 print quality problems, solve 7.22 print resolution, set 4.9 printer options F.1 printer software install in Linux C.2 in Macintosh A.2 uninstall in Linux C.7 printing booklets 5.9 configuration page 6.2 double-sided 5.2 fitting to...
