
Quick Start Guide
Page 4
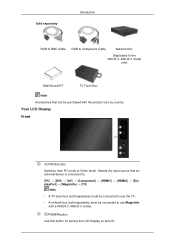
POWER button Use this button for turning the LCD Display on and off. Sold separately Introduction RGB to BNC Cable RGB to Component Cable Network Box (Applicable to use the TV. • A network box (sold separately) must be connected to the 400UX-3, 460UX-3 model only) Wall Mount KIT TV Tuner ...[AV] → [Component] → [HDMI1] → [HDMI2] → [DisplayPort] → [MagicInfo] → [TV] Note • A TV tuner box (sold separately) must be purchased with a 400UX-3, 460UX-3 model. Your LCD Display Front SOURCE button Switches from PC mode to Video mode.
POWER button Use this button for turning the LCD Display on and off. Sold separately Introduction RGB to BNC Cable RGB to Component Cable Network Box (Applicable to use the TV. • A network box (sold separately) must be connected to the 400UX-3, 460UX-3 model only) Wall Mount KIT TV Tuner ...[AV] → [Component] → [HDMI1] → [HDMI2] → [DisplayPort] → [MagicInfo] → [TV] Note • A TV tuner box (sold separately) must be purchased with a 400UX-3, 460UX-3 model. Your LCD Display Front SOURCE button Switches from PC mode to Video mode.

Quick Start Guide
Page 14
...HDMI2 (only with a 400UX-3, 460UX-3 model) or HDMI1 must be selected before PC is selected, be connected to the Audio port on the power switch. Connect the Audio cable for your LCD Display to establish the connection using step ( ). Note Contact a local SAMSUNG Electronics Service Center to ... via an HDMI cable. For detailed information on the back of the LCD Display. To obtain normal picture and audio from the PC, HDMI2 (only with a 400UX-3, 460UX-3 model) or HDMI1 as your LCD Display to the LCD Display. Turn on the back of the LCD Display. Connecting an External Monitor
...HDMI2 (only with a 400UX-3, 460UX-3 model) or HDMI1 must be selected before PC is selected, be connected to the Audio port on the power switch. Connect the Audio cable for your LCD Display to establish the connection using step ( ). Note Contact a local SAMSUNG Electronics Service Center to ... via an HDMI cable. For detailed information on the back of the LCD Display. To obtain normal picture and audio from the PC, HDMI2 (only with a 400UX-3, 460UX-3 model) or HDMI1 as your LCD Display to the LCD Display. Turn on the back of the LCD Display. Connecting an External Monitor

Quick Start Guide
Page 17
...-3 model) or [HDMI IN 1] and the DVI output port on the product or remote control and select "HDMI1 / HDMI2(only with a 400UX-3, 460UX-3 model) or [HDMI IN 1] on the product and the HDMI output port on a digital device. 2. Connect the red and white jacks of the digital ... 1. Connect an HDMI cable to the same colored audio output terminals of an RCA to stereo (for PC) cable to [HDMI IN 2 (MAGICINFO)] (only with a 400UX-3, 460UX-3 model)" Note In HDMI mode, only PCM format audio is supported.
...-3 model) or [HDMI IN 1] and the DVI output port on the product or remote control and select "HDMI1 / HDMI2(only with a 400UX-3, 460UX-3 model) or [HDMI IN 1] on the product and the HDMI output port on a digital device. 2. Connect the red and white jacks of the digital ... 1. Connect an HDMI cable to the same colored audio output terminals of an RCA to stereo (for PC) cable to [HDMI IN 2 (MAGICINFO)] (only with a 400UX-3, 460UX-3 model)" Note In HDMI mode, only PCM format audio is supported.
Quick Start Guide
Page 18
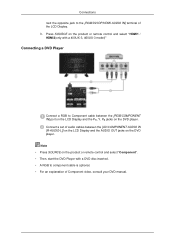
...a set of audio cables between the [AV/COMPONENT AUDIO IN [R-AUDIO-L]] on the LCD Display and the AUDIO OUT jacks on the product or remote control and select "Component". • Then, start the DVD Player with a 400UX-3, 460UX-3 model)" Connecting a DVD Player Connect a RGB to Component cable between the... [RGB/COMPONENT IN] port on the LCD Display and the PR, Y, PB jacks on the DVD player. Note • Press SOURCE on...
...a set of audio cables between the [AV/COMPONENT AUDIO IN [R-AUDIO-L]] on the LCD Display and the AUDIO OUT jacks on the product or remote control and select "Component". • Then, start the DVD Player with a 400UX-3, 460UX-3 model)" Connecting a DVD Player Connect a RGB to Component cable between the... [RGB/COMPONENT IN] port on the LCD Display and the PR, Y, PB jacks on the DVD player. Note • Press SOURCE on...

