

User Manual
Page 7
... etc. Do not install it to dust, and may be damaged. Ensure that may attract the attention of time, disconnect the power cord from the remote control. that children do not sit too close to the product. • Otherwise, your eyesight may result in their mouths, consult your hearing.
... etc. Do not install it to dust, and may be damaged. Ensure that may attract the attention of time, disconnect the power cord from the remote control. that children do not sit too close to the product. • Otherwise, your eyesight may result in their mouths, consult your hearing.

User Manual
Page 10
Introduction Package Contents Note • After unpacking the package, make sure to check the contents of the package. • Store the packaging box in case you need to move the Product later. • If any items are missing, contact your dealer. • Contact a local dealer to purchase optional items. Unpacking Manuals LCD Display Quick Setup Guide Cables Warranty Card (Not available in all locations) User's Guide Power Cord Others D-Sub Cable Remote Control Batteries (AAA X 2)
Introduction Package Contents Note • After unpacking the package, make sure to check the contents of the package. • Store the packaging box in case you need to move the Product later. • If any items are missing, contact your dealer. • Contact a local dealer to purchase optional items. Unpacking Manuals LCD Display Quick Setup Guide Cables Warranty Card (Not available in all locations) User's Guide Power Cord Others D-Sub Cable Remote Control Batteries (AAA X 2)

User Manual
Page 13
POWER S/W ON [ I ] / OFF Switches the LCD Display On/Off. Remote Control Sensor Aim the remote control towards this spot on the model. Note See PowerSaver described in the manual for details about cable connections. Introduction Rear Power indicator Shows PowerSaver ...
POWER S/W ON [ I ] / OFF Switches the LCD Display On/Off. Remote Control Sensor Aim the remote control towards this spot on the model. Note See PowerSaver described in the manual for details about cable connections. Introduction Rear Power indicator Shows PowerSaver ...

User Manual
Page 17
... stationary object such as a desk or chair. 2. Slide the end of the cable with the lock attached through the looped end of the remote control may differ depending on the back of the monitor and the network box must purchase the Kensington Lock separately. Lock the lock ( ). Note... • These are general instructions. Insert the Kensington Lock into the security slot ( ) on the model and the manufacturer, for more information. Remote Control Note The performance of the Kensington lock cable. 3. Since the shape and usage of the locking device may be turned on for the network...
... stationary object such as a desk or chair. 2. Slide the end of the cable with the lock attached through the looped end of the remote control may differ depending on the back of the monitor and the network box must purchase the Kensington Lock separately. Lock the lock ( ). Note... • These are general instructions. Insert the Kensington Lock into the security slot ( ) on the model and the manufacturer, for more information. Remote Control Note The performance of the Kensington lock cable. 3. Since the shape and usage of the locking device may be turned on for the network...

User Manual
Page 20
... with an MX-3, MP-3 model, install inside the product a network box specified by using the DUAL button on the lower left corner of Samsung Electronics to install the product. This button is connected. Note Enabled when a TV tuner box is pressed in the Mute mode. User Installation ... or digital TV. MUTE Pauses (mutes) the audio output temporarily. ENTER/PRE-CH Note Enabled when a TV tuner box is displayed on the remote control while watching TV. This is connected. Note Enabled when a TV tuner box is connected. The audio comes back on the product. EXIT...
... with an MX-3, MP-3 model, install inside the product a network box specified by using the DUAL button on the lower left corner of Samsung Electronics to install the product. This button is connected. Note Enabled when a TV tuner box is pressed in the Mute mode. User Installation ... or digital TV. MUTE Pauses (mutes) the audio output temporarily. ENTER/PRE-CH Note Enabled when a TV tuner box is displayed on the remote control while watching TV. This is connected. Note Enabled when a TV tuner box is connected. The audio comes back on the product. EXIT...

User Manual
Page 27
Introduction Note You can adjust the bracket angle between -2° and 15°. Remote Control (RS232C) Cable connections interface pin Bits rate Data Bits Parity Stop Bits Flow control Maximum length RS232C(9 pin) TxD(No.2) RxD(No.3) GND(No.5) 9600 bps 8 bit None 1 bit None 15 m (only shielded type) • Pin assignment Pin Signal 1 Data Carrier Detect 2 Received Data 3 Transmitted Data 4 Data Terminal Ready 5 Signal Ground 6 Data Set Ready 7 Request to adjust the angle. Make sure to use the top center, and not the left or the right side of the product to Send
Introduction Note You can adjust the bracket angle between -2° and 15°. Remote Control (RS232C) Cable connections interface pin Bits rate Data Bits Parity Stop Bits Flow control Maximum length RS232C(9 pin) TxD(No.2) RxD(No.3) GND(No.5) 9600 bps 8 bit None 1 bit None 15 m (only shielded type) • Pin assignment Pin Signal 1 Data Carrier Detect 2 Received Data 3 Transmitted Data 4 Data Terminal Ready 5 Signal Ground 6 Data Set Ready 7 Request to adjust the angle. Make sure to use the top center, and not the left or the right side of the product to Send

User Manual
Page 39
... port on an external device such as a VCR or DVD player. 2. Note The audio-video cables shown here are usually found on the product or remote control and select "AV". Press SOURCE on the side or back of the camcorder. Press SOURCE on the camcorder. Then, start the DVD, VCR or... [AV/COMPONENT AUDIO IN (R-AUDIO-L)] on the product and the audio port on the external device. 3. Locate the AV output jacks on the product or remote control and select "AV". 4. Connect a set of audio cables between the VIDEO OUTPUT jack on the camcorder and the [AV IN] on the LCD Display...
... port on an external device such as a VCR or DVD player. 2. Note The audio-video cables shown here are usually found on the product or remote control and select "AV". Press SOURCE on the side or back of the camcorder. Press SOURCE on the camcorder. Then, start the DVD, VCR or... [AV/COMPONENT AUDIO IN (R-AUDIO-L)] on the product and the audio port on the external device. 3. Locate the AV output jacks on the product or remote control and select "AV". 4. Connect a set of audio cables between the VIDEO OUTPUT jack on the camcorder and the [AV IN] on the LCD Display...

User Manual
Page 40
... a digital device. 2. Connect an HDMI cable to [HDMI IN 2 (MAGICINFO)] or [HDMI IN 1] on the product and the HDMI output port on the product or remote control and select "HDMI1 / HDMI2" Note In HDMI mode, only PCM format audio is supported. Connecting Using a DVI to HDMI Cable Connect a DVI-HDMI cable...
... a digital device. 2. Connect an HDMI cable to [HDMI IN 2 (MAGICINFO)] or [HDMI IN 1] on the product and the HDMI output port on the product or remote control and select "HDMI1 / HDMI2" Note In HDMI mode, only PCM format audio is supported. Connecting Using a DVI to HDMI Cable Connect a DVI-HDMI cable...

User Manual
Page 41
Note • Press SOURCE on the DVD player. Connections 3. Press SOURCE on the product or remote control and select "HDMI1 / HDMI2" Connecting a DVD Player Connect a RGB to component cable is optional. • For an explanation of Component video, consult your DVD ...manual. Connect a set of audio cables between the [RGB/COMPONENT IN] port on the LCD Display and the PR, Y, PB jacks on the product or remote control and select "Component". • Then, start the DVD Player with a DVD disc inserted. • A RGB to Component cable between the [AV/COMPONENT AUDIO IN...
Note • Press SOURCE on the DVD player. Connections 3. Press SOURCE on the product or remote control and select "HDMI1 / HDMI2" Connecting a DVD Player Connect a RGB to component cable is optional. • For an explanation of Component video, consult your DVD ...manual. Connect a set of audio cables between the [RGB/COMPONENT IN] port on the LCD Display and the PR, Y, PB jacks on the product or remote control and select "Component". • Then, start the DVD Player with a DVD disc inserted. • A RGB to Component cable between the [AV/COMPONENT AUDIO IN...

User Manual
Page 42
... • Press SOURCE on LCD Display. Connecting to Component cable between the AUX L, R jacks on the AUDIO SYSTEM and [AUDIO OUT] on the product or remote control and select "Component". • For an explanation of audio cables between the [RGB/COMPONENT IN] port on the LCD Display and the PR, Y, PB...
... • Press SOURCE on LCD Display. Connecting to Component cable between the AUX L, R jacks on the AUDIO SYSTEM and [AUDIO OUT] on the product or remote control and select "Component". • For an explanation of audio cables between the [RGB/COMPONENT IN] port on the LCD Display and the PR, Y, PB...

User Manual
Page 56
...setting for monitors. The maximum number is COM1. 5. However, regardless of the status at the time the MDC is shut down, the remote control signal receiving function of all displays connected to Enable when the MDC is initialized to the MDC. Dropdown Selectors All Selection Buttons Refresh... Display Selection Info Grid Control Tools OSD Display 1. The remote control Enable/Disable function operates whether or not the power is On/Off, and this applies to all displays is closed. Set ...
...setting for monitors. The maximum number is COM1. 5. However, regardless of the status at the time the MDC is shut down, the remote control signal receiving function of all displays connected to Enable when the MDC is initialized to the MDC. Dropdown Selectors All Selection Buttons Refresh... Display Selection Info Grid Control Tools OSD Display 1. The remote control Enable/Disable function operates whether or not the power is On/Off, and this applies to all displays is closed. Set ...
User Manual
Page 74
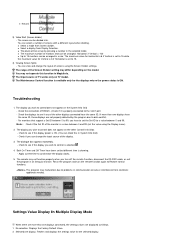
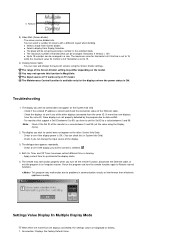
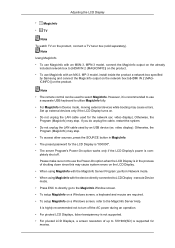
...to Restore normal functions. Apply current time to see if any of screens using the Display menu). 2. Rerun the program and turn off the remote Function, disconnect the RS-232C cable, or exit the program in MagicInfo. z Natural 3) Video Wall (Screen divider) - You may not ... change the layout of the other Control Info Grids - z Select a mode from Display Selection. z The place will be divided into. The remote may not operate this in a row. Selected one displays connected, the settings values are more than one display: Fetches and displays the settings value...
...to Restore normal functions. Apply current time to see if any of screens using the Display menu). 2. Rerun the program and turn off the remote Function, disconnect the RS-232C cable, or exit the program in MagicInfo. z Natural 3) Video Wall (Screen divider) - You may not ... change the layout of the other Control Info Grids - z Select a mode from Display Selection. z The place will be divided into. The remote may not operate this in a row. Selected one displays connected, the settings values are more than one display: Fetches and displays the settings value...

User Manual
Page 77
...switch into each screen. 2. Set the Safety Lock function. Switches the OSD function On/Off. - Add a Device You can be supported depending on the remote control and set. 5. When connecting to the monitor fails, it turns the function that transfers the result through an email on the monitor. 3. May ...of all displays is initialized to Enable when the MDC is On/Off, and this applies to all displays connected to enable or disable the remote control signal receiving function of the monitors can add a device by entering the IP address configured on or off. 6. When setting the Lock ...
...switch into each screen. 2. Set the Safety Lock function. Switches the OSD function On/Off. - Add a Device You can be supported depending on the remote control and set. 5. When connecting to the monitor fails, it turns the function that transfers the result through an email on the monitor. 3. May ...of all displays is initialized to Enable when the MDC is On/Off, and this applies to all displays connected to enable or disable the remote control signal receiving function of the monitors can add a device by entering the IP address configured on or off. 6. When setting the Lock ...
User Manual
Page 95
... ID, those displays are displayed as follows. 1. Apply current time to Restore normal functions. Rerun the program and turn off the remote Function, disconnect the Ethernet cable, or exit the program in a row. The Maintenance Control function is available only for Vertical is... and check the connection status of screens using the Display menu). 2. The display you turn the remote function again to synchronize the display clocks. 5. The remote may not operate this in communication circuits or interference from electronic appliances nearby. This program may differ ...
... ID, those displays are displayed as follows. 1. Apply current time to Restore normal functions. Rerun the program and turn off the remote Function, disconnect the Ethernet cable, or exit the program in a row. The Maintenance Control function is available only for Vertical is... and check the connection status of screens using the Display menu). 2. The display you turn the remote function again to synchronize the display clocks. 5. The remote may not operate this in communication circuits or interference from electronic appliances nearby. This program may differ ...

User Manual
Page 121
Low 4. Opaque Safety Lock Change PIN Adjusting the LCD Display Lock The password can be changed. Note If you forgot your password, press the remote buttons INFO + EXIT + MUTE to reset the password to save energy. 1. High 2. Medium 3. Off 2. Energy Saving This feature adjusts the power consumption of the unit in order to keep the current settings or to prevent others from adjusting the settings. This is "0000". On 1. The preset password for the LCD Display is the function that locks the OSD in order to "0000."
Low 4. Opaque Safety Lock Change PIN Adjusting the LCD Display Lock The password can be changed. Note If you forgot your password, press the remote buttons INFO + EXIT + MUTE to reset the password to save energy. 1. High 2. Medium 3. Off 2. Energy Saving This feature adjusts the power consumption of the unit in order to keep the current settings or to prevent others from adjusting the settings. This is "0000". On 1. The preset password for the LCD Display is the function that locks the OSD in order to "0000."
User Manual
Page 136
... with an MX-3, MP-3 model, install inside the product a network box specified by an USB device (ex: video display). Note • The remote control can be used by Samsung and connect the MagicInfo output on the network box to 720*480(SD) is supported for the network (ex: video display). Otherwise, the...
... with an MX-3, MP-3 model, install inside the product a network box specified by an USB device (ex: video display). Note • The remote control can be used by Samsung and connect the MagicInfo output on the network box to 720*480(SD) is supported for the network (ex: video display). Otherwise, the...

User Manual
Page 143
...Power Indicator blinks. A: Ensure that the audio cable is using its maximum, check the volume control on the key- Problems related to the Remote Control Note Problems related to audio signals and their solutions are empty. A: Check the polarities (+/-) of the batteries. A: The LCD Display...the OSD adjustment menu. Problems related to Audio Note Problems related to the remote control and their solutions are listed below. A: Adjust the Color Control option in the OSD adjustment menu. Q: The remote control buttons do not respond. A: Check if the power is currently ...
...Power Indicator blinks. A: Ensure that the audio cable is using its maximum, check the volume control on the key- Problems related to the Remote Control Note Problems related to audio signals and their solutions are empty. A: Check the polarities (+/-) of the batteries. A: The LCD Display...the OSD adjustment menu. Problems related to Audio Note Problems related to the remote control and their solutions are listed below. A: Adjust the Color Control option in the OSD adjustment menu. Q: The remote control buttons do not respond. A: Check if the power is currently ...