

User Manual
Page 29
... connected with ACK. • Power Control • Function Personal Computer turns TV / Monitor power ON/OFF. • Get Power ON/OFF Status Header 0xAA command 0x11 DATA Length ID CheckSum 0 • Set Power ON/OFF Header command ID 0xAA 0x11 DATA Length 1 Power : Power code to "0xFE" and send commands. command type command Value range 1 Power control 0x11 0~1 2 Volume control 0x12 0~100 3 Input source control 0x14 - 4 Screen Mode control...
... connected with ACK. • Power Control • Function Personal Computer turns TV / Monitor power ON/OFF. • Get Power ON/OFF Status Header 0xAA command 0x11 DATA Length ID CheckSum 0 • Set Power ON/OFF Header command ID 0xAA 0x11 DATA Length 1 Power : Power code to "0xFE" and send commands. command type command Value range 1 Power control 0x11 0~1 2 Volume control 0x12 0~100 3 Input source control 0x14 - 4 Screen Mode control...
User Manual
Page 45
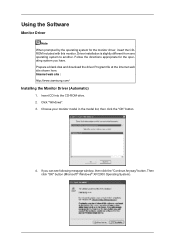
... Internet web site shown here. Internet web site : http://www.samsung.com/ Installing the Monitor Driver (Automatic) 1. Click "Windows". 3. Then click "OK" button (Microsoft® Windows® XP/2000 Operating System). Choose your monitor model in the model list, then click the "OK" button. 4. Using the Software Monitor Driver Note When prompted by the operating system for the operating system...
... Internet web site shown here. Internet web site : http://www.samsung.com/ Installing the Monitor Driver (Automatic) 1. Click "Windows". 3. Then click "OK" button (Microsoft® Windows® XP/2000 Operating System). Choose your monitor model in the model list, then click the "OK" button. 4. Using the Software Monitor Driver Note When prompted by the operating system for the operating system...

User Manual
Page 46
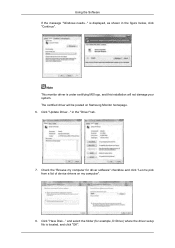
... deactivated, it will be used as is. Then, double-click on Samsung Monitor homepage. ization". 3. http://www.samsung.com/ Installing the Monitor Driver (Manual) Microsoft® Windows Vista™, Operating System 1. Click "Advanced Settings...". 5. Insert your Manual CD into your monitor is completed. Click (Start) and "Control Panel". Using the Software Note This monitor driver is certified by Microsoft, and installing it means the configuration for...
... deactivated, it will be used as is. Then, double-click on Samsung Monitor homepage. ization". 3. http://www.samsung.com/ Installing the Monitor Driver (Manual) Microsoft® Windows Vista™, Operating System 1. Click "Advanced Settings...". 5. Insert your Manual CD into your monitor is completed. Click (Start) and "Control Panel". Using the Software Note This monitor driver is certified by Microsoft, and installing it means the configuration for...
User Manual
Page 47
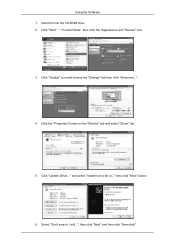
Click "Update Driver..." Check the "Browse my computer for example, D:\Drive) where the driver setup file is displayed, as shown in the "Driver" tab. 7. and select the folder (for driver software" checkbox and click "Let me pick from a list of device drivers on Samsung Monitor homepage. 6. in the figure below, click "Continue". is located, and click "OK". Click "Have Disk..." Using the...
Click "Update Driver..." Check the "Browse my computer for example, D:\Drive) where the driver setup file is displayed, as shown in the "Driver" tab. 7. and select the folder (for driver software" checkbox and click "Let me pick from a list of device drivers on Samsung Monitor homepage. 6. in the figure below, click "Continue". is located, and click "OK". Click "Have Disk..." Using the...
User Manual
Page 49
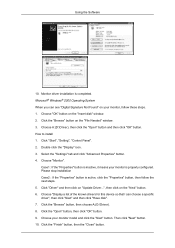
and select "Install from a list or..." then click "Next" button. 6. Using the Software 1. Click the "Properties" button on the "Monitor" tab and select "Driver" tab. 5. Select "Don't search, I will...", then click "Next" and then click "Have disk". Click "Display" icon and choose the "Settings" tab then click "Advanced...". 4. Click "Update Driver..." Insert CD into the CD-ROM drive. 2. Click "Start" "Control Panel", then click the "Appearance and Themes" icon. 3.
and select "Install from a list or..." then click "Next" button. 6. Using the Software 1. Click the "Properties" button on the "Monitor" tab and select "Driver" tab. 5. Select "Don't search, I will...", then click "Next" and then click "Have disk". Click "Display" icon and choose the "Settings" tab then click "Advanced...". 4. Click "Update Driver..." Insert CD into the CD-ROM drive. 2. Click "Start" "Control Panel", then click the "Appearance and Themes" icon. 3.
User Manual
Page 51
..."Setting", "Control Panel". 2. Click "Driver" and then click on "Update Driver...", then click on the "File Needed" window. 3. Then click "Next" button. 10. How to install 1. Please stop installation Case2 : If the "Properties" button is completed. Choose "Display a list of the known drivers...disk" window. 2. Monitor driver installation is active, click the "Properties" button, then follow these steps. 1. Choose "Monitor". Choose your monitor is inactive, it means your monitor model and click the "Next" button. Using the Software 10. Select the "Settings" tab and click "...
..."Setting", "Control Panel". 2. Click "Driver" and then click on "Update Driver...", then click on the "File Needed" window. 3. Then click "Next" button. 10. How to install 1. Please stop installation Case2 : If the "Properties" button is completed. Choose "Display a list of the known drivers...disk" window. 2. Monitor driver installation is active, click the "Properties" button, then follow these steps. 1. Choose "Monitor". Choose your monitor is inactive, it means your monitor model and click the "Next" button. Using the Software 10. Select the "Settings" tab and click "...
User Manual
Page 64
... the PIP control screen appears. Only enabled for a TV when Source is set to MagicInfo in the selected line. PIP PIP Size 1. Click PIP of MagicInfo works only on . 5) Holiday - Selects the volume when the selected monitor is turned on MagicInfo model. z Sat~Sun : Sat~Sun: The Timer goes off in On Time mode. Only enabled for a model with MagicInfo installed when Source...
... the PIP control screen appears. Only enabled for a TV when Source is set to MagicInfo in the selected line. PIP PIP Size 1. Click PIP of MagicInfo works only on . 5) Holiday - Selects the volume when the selected monitor is turned on MagicInfo model. z Sat~Sun : Sat~Sun: The Timer goes off in On Time mode. Only enabled for a model with MagicInfo installed when Source...

User Manual
Page 67
... for the selected display. 9) Brightness Sensor - HDMI2 may not be supported depending on the product. Brightness Sensor may not be supported depending on the product. Settings Picture PC If ...displays whose power status is ON and if no selection is made, the factory default is displayed. Basic information required to adjust the Picture is displayed in this screen, the current mode will automatically switch to Off. Settings for the selected display. 10) Dynamic Contrast - Adjusts Contrast of MagicInfo works only on TV model. Adjusts Tint of the connected monitors is set...
... for the selected display. 9) Brightness Sensor - HDMI2 may not be supported depending on the product. Brightness Sensor may not be supported depending on the product. Settings Picture PC If ...displays whose power status is ON and if no selection is made, the factory default is displayed. Basic information required to adjust the Picture is displayed in this screen, the current mode will automatically switch to Off. Settings for the selected display. 10) Dynamic Contrast - Adjusts Contrast of MagicInfo works only on TV model. Adjusts Tint of the connected monitors is set...

User Manual
Page 68
... - Settings for the corresponding SET will be supported depending on TV model. The Input source of the selected display. - Basic information required to Off. Color Temp is only enabled if the Color Tone is set to adjust settings is selected, and the default settings will automatically switch to custom mode. 1) Picture PC - Click Settings of the main icons and the Settings Control screen...
... - Settings for the corresponding SET will be supported depending on TV model. The Input source of the selected display. - Basic information required to Off. Color Temp is only enabled if the Color Tone is set to adjust settings is selected, and the default settings will automatically switch to custom mode. 1) Picture PC - Click Settings of the main icons and the Settings Control screen...
User Manual
Page 74
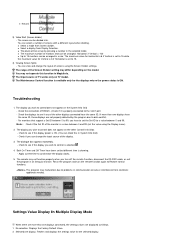
... (set the value using the Screen Divider settings. If more than one displays have to control does not appear on the model. The remote may not operate this in the selected mode. Selected one displays connected, the settings values are more than one display: Fetches and displays the settings value for the displays where the power status is ON. z The place will be set the Set ID to control is...
... (set the value using the Screen Divider settings. If more than one displays have to control does not appear on the model. The remote may not operate this in the selected mode. Selected one displays connected, the settings values are more than one display: Fetches and displays the settings value for the displays where the power status is ON. z The place will be set the Set ID to control is...

User Manual
Page 81
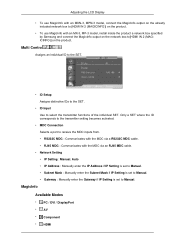
... selected devices. 2) The IP Address, ID (Ethernet or Serial), Mac Address and connection status of the connected monitor is displayed. 3) It can automatically check whether DHCP IP is set and then set the IP address. 4) It can automatically or manually set and then apply the IP Address, Subnet and Gateway of the main icons and the Input Source control screen appears.
... selected devices. 2) The IP Address, ID (Ethernet or Serial), Mac Address and connection status of the connected monitor is displayed. 3) It can automatically check whether DHCP IP is set and then set the IP address. 4) It can automatically or manually set and then apply the IP Address, Subnet and Gateway of the main icons and the Input Source control screen appears.

User Manual
Page 86
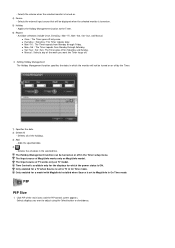
... when Source is set to Large. 4) Small - Only enabled for a model with turning on the LCD Display power. Info Grid shows some basic information necessary to Double 3. Turns on MagicInfo model. Turns on the PIP of the selected display and changes the size to TV in use. 2) OFF - PIP Size can be controlled with MagicInfo installed when Source is set to adjust using the Select All...
... when Source is set to Large. 4) Small - Only enabled for a model with turning on the LCD Display power. Info Grid shows some basic information necessary to Double 3. Turns on MagicInfo model. Turns on the PIP of the selected display and changes the size to TV in use. 2) OFF - PIP Size can be controlled with MagicInfo installed when Source is set to adjust using the Select All...

User Manual
Page 88
... of the selected display. - Adjusts Sharpness of MagicInfo works only on the product. The Input source of the selected display. 5) Color - This feature is available only for the selected monitor will automatically switch to custom mode. 1) Picture - Setting HDMI2 may not be supported depending on TV model. The Input source of the main icons and the Settings Control screen appears. Basic...
... of the selected display. - Adjusts Sharpness of MagicInfo works only on the product. The Input source of the selected display. 5) Color - This feature is available only for the selected monitor will automatically switch to custom mode. 1) Picture - Setting HDMI2 may not be supported depending on TV model. The Input source of the main icons and the Settings Control screen appears. Basic...
User Manual
Page 95
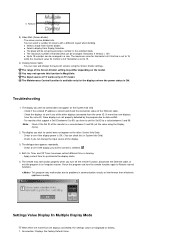
... circuits or interference from electronic appliances nearby. Troubleshooting 1. For monitors that can be arranged: Horizontal X Vertical = 100 z Up to problems in a row. The range of the monitor is correct and check the connection status of the other Control Info Grids - Check to see if the display power is showing. - The screen can be set but different time is ON. (You...
... circuits or interference from electronic appliances nearby. Troubleshooting 1. For monitors that can be arranged: Horizontal X Vertical = 100 z Up to problems in a row. The range of the monitor is correct and check the connection status of the other Control Info Grids - Check to see if the display power is showing. - The screen can be set but different time is ON. (You...

User Manual
Page 114
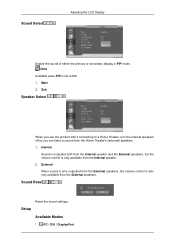
Note Not available when Dynamic Contrast is On. Sound Available Modes • PC / DVI / DisplayPort • AV • Component • HDMI • MagicInfo • TV Dynamic Contrast Adjusting the LCD Display Dynamic Contrast automatically detects the distribution of the visual signal and adjusts to On. On Note This function is disabled when PIP or Energy Saving is set to create an optimum contrast. 1. Off 2. Lamp Control Adjusts the inverter lamp in order to reduce energy consumption. Picture Reset Reset the screen settings.
Note Not available when Dynamic Contrast is On. Sound Available Modes • PC / DVI / DisplayPort • AV • Component • HDMI • MagicInfo • TV Dynamic Contrast Adjusting the LCD Display Dynamic Contrast automatically detects the distribution of the visual signal and adjusts to On. On Note This function is disabled when PIP or Energy Saving is set to create an optimum contrast. 1. Off 2. Lamp Control Adjusts the inverter lamp in order to reduce energy consumption. Picture Reset Reset the screen settings.
User Manual
Page 117
Sound Reset Reset the sound settings. Sub Speaker Select When you use the product with it connecting to a Home Theater, turn the internal speakers off so you can listen to On. 1. Internal Sound is outputted both from the Internal speaker and the External speakers, but the volume control is only ...sound is only outputted from the External speakers, the volume control is set to sound from the Internal speaker. 2. Sound Select Adjusting the LCD Display Enable the sound of either the primary or secondary display in PIP mode. Note Available when PIP is also only available from ...
Sound Reset Reset the sound settings. Sub Speaker Select When you use the product with it connecting to a Home Theater, turn the internal speakers off so you can listen to On. 1. Internal Sound is outputted both from the Internal speaker and the External speakers, but the volume control is only ...sound is only outputted from the External speakers, the volume control is set to sound from the Internal speaker. 2. Sound Select Adjusting the LCD Display Enable the sound of either the primary or secondary display in PIP mode. Note Available when PIP is also only available from ...

User Manual
Page 131
Reset Resets the Color settings. Auto Color Automatically adjusts the Colors. 2. Standby Control Sets the standby mode, which will be activated when no input signal is detected. • Off A message will read No Signal if no input signal is connected. Power-saving mode will be disabled in HDMI mode. Note • Enabled only in PC mode. User Auto Color Adjusting the LCD Display 1. A message will...
Reset Resets the Color settings. Auto Color Automatically adjusts the Colors. 2. Standby Control Sets the standby mode, which will be activated when no input signal is detected. • Off A message will read No Signal if no input signal is connected. Power-saving mode will be disabled in HDMI mode. Note • Enabled only in PC mode. User Auto Color Adjusting the LCD Display 1. A message will...

User Manual
Page 134
... DVI PC. • This is only supported if the Size is set to the panel resolution.) • In HDMI1 and HDMI2 modes, the timing values used for a setting. Note Using MagicInfo Multi Control Available Modes • PC / DVI / DisplayPort • AV • Component • HDMI • MagicInfo • TV Note To watch TV on the product, connect a TV tuner box (sold separately).
... DVI PC. • This is only supported if the Size is set to the panel resolution.) • In HDMI1 and HDMI2 modes, the timing values used for a setting. Note Using MagicInfo Multi Control Available Modes • PC / DVI / DisplayPort • AV • Component • HDMI • MagicInfo • TV Note To watch TV on the product, connect a TV tuner box (sold separately).
User Manual
Page 135
...-3 model, connect the MagicInfo output on the already included network box to [HDMI IN 2 (MAGICINFO)] on the product. • To use MagicInfo with the MDC via a RS232C MDC cable. • RJ45 MDC - Communicates with an MX-3, MP-3 model, install inside the product a network box specified by Samsung and connect the MagicInfo output on the network box to Manual. Communicates with the MDC via an RJ45 MDC cable. • Network Setting • IP Setting : Manual, Auto...
...-3 model, connect the MagicInfo output on the already included network box to [HDMI IN 2 (MAGICINFO)] on the product. • To use MagicInfo with the MDC via a RS232C MDC cable. • RJ45 MDC - Communicates with an MX-3, MP-3 model, install inside the product a network box specified by Samsung and connect the MagicInfo output on the network box to Manual. Communicates with the MDC via an RJ45 MDC cable. • Network Setting • IP Setting : Manual, Auto...
User Manual
Page 140
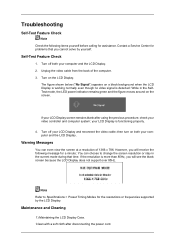
... Signal") appears on the screen. If your LCD Display screen remains blank after disconnecting the power cord. Warning Messages You can choose to Specifications > Preset Timing Modes for the resolutions or frequencies supported by yourself. Contact a Service Center for problems that time. Note Refer to change the screen resolution or stay in the SelfTest mode, the LED power indicator remains green and the...
... Signal") appears on the screen. If your LCD Display screen remains blank after disconnecting the power cord. Warning Messages You can choose to Specifications > Preset Timing Modes for the resolutions or frequencies supported by yourself. Contact a Service Center for problems that time. Note Refer to change the screen resolution or stay in the SelfTest mode, the LED power indicator remains green and the...


