

User Manual
Page 1
SyncMaster 320MX-3, 320MXN-3 320MP-3, 320MPN-3 LCD Display User Manual The color and the appearance may differ depending on the product, and the specifications are subject to change without prior notice to improve the performance.
SyncMaster 320MX-3, 320MXN-3 320MP-3, 320MPN-3 LCD Display User Manual The color and the appearance may differ depending on the product, and the specifications are subject to change without prior notice to improve the performance.

User Manual
Page 10
Introduction Package Contents Note • After unpacking the package, make sure to check the contents of the package. • Store the packaging box in case you need to move the Product later. • If any items are missing, contact your dealer. • Contact a local dealer to purchase optional items. Unpacking Manuals LCD Display Quick Setup Guide Cables Warranty Card (Not available in all locations) User's Guide Power Cord Others D-Sub Cable Remote Control Batteries (AAA X 2)
Introduction Package Contents Note • After unpacking the package, make sure to check the contents of the package. • Store the packaging box in case you need to move the Product later. • If any items are missing, contact your dealer. • Contact a local dealer to purchase optional items. Unpacking Manuals LCD Display Quick Setup Guide Cables Warranty Card (Not available in all locations) User's Guide Power Cord Others D-Sub Cable Remote Control Batteries (AAA X 2)

User Manual
Page 13
... back may vary slightly depending on the LCD Display. Introduction Rear Power indicator Shows PowerSaver mode by blinking green. Note See PowerSaver described in the manual for long periods. For energy conservation, turn your LCD Display OFF when it is not needed or when leaving it unattended for further information regarding...
... back may vary slightly depending on the LCD Display. Introduction Rear Power indicator Shows PowerSaver mode by blinking green. Note See PowerSaver described in the manual for long periods. For energy conservation, turn your LCD Display OFF when it is not needed or when leaving it unattended for further information regarding...

User Manual
Page 17
Slide the end of the Kensington lock cable. 3. For exact instructions, see the User Manual supplied with the lock attached through the looped end of the cable with the locking device. • You can safely use it in public locations. ... a large, stationary object such as a desk or chair. 2. Introduction Kensington Lock slot A Kensington Lock is an anti-theft device that enables users to the User Manual supplied with the frequency. Since the shape and usage of the remote control may differ depending on the back of the monitor and the network...
Slide the end of the Kensington lock cable. 3. For exact instructions, see the User Manual supplied with the lock attached through the looped end of the cable with the locking device. • You can safely use it in public locations. ... a large, stationary object such as a desk or chair. 2. Introduction Kensington Lock slot A Kensington Lock is an anti-theft device that enables users to the User Manual supplied with the frequency. Since the shape and usage of the remote control may differ depending on the back of the monitor and the network...

User Manual
Page 19
.... Note This function does not work for this LCD Display. FM Stereo Audio Type Mono Stereo SAP MTS/S_Mode Mono Mono Stereo Mono SAP Default Manual Change Mono DUAL- Moves from one menu item to another horizontally, vertically or adjusts selected menu values. MTSYou can only be operated depending on the...
.... Note This function does not work for this LCD Display. FM Stereo Audio Type Mono Stereo SAP MTS/S_Mode Mono Mono Stereo Mono SAP Default Manual Change Mono DUAL- Moves from one menu item to another horizontally, vertically or adjusts selected menu values. MTSYou can only be operated depending on the...

User Manual
Page 41
Connect a set of Component video, consult your DVD manual. Note • Press SOURCE on the DVD player. Press SOURCE on the product or remote control and select "HDMI1 / HDMI2" Connecting a DVD Player Connect a RGB ...
Connect a set of Component video, consult your DVD manual. Note • Press SOURCE on the DVD player. Press SOURCE on the product or remote control and select "HDMI1 / HDMI2" Connecting a DVD Player Connect a RGB ...

User Manual
Page 42
...-L)] on the LCD Display and the AUDIO OUT jacks on the Set Top Box. Connect a set of Component video, see your Set Top Box owner's manual. Note • Press SOURCE on the product or remote control and select "Component". • For an explanation of audio cables between the [RGB/COMPONENT IN...
...-L)] on the LCD Display and the AUDIO OUT jacks on the Set Top Box. Connect a set of Component video, see your Set Top Box owner's manual. Note • Press SOURCE on the product or remote control and select "Component". • For an explanation of audio cables between the [RGB/COMPONENT IN...

User Manual
Page 46
http://www.samsung.com/ Installing the Monitor Driver (Manual) Microsoft® Windows Vista™, Operating System 1. Insert your Manual CD into your monitor is completed. Click "Personalization" and then "Display Settings". 4. Click (Start) and "Control Panel". Click "Properties" in the "Monitor" tab. If the "...
http://www.samsung.com/ Installing the Monitor Driver (Manual) Microsoft® Windows Vista™, Operating System 1. Insert your Manual CD into your monitor is completed. Click "Personalization" and then "Display Settings". 4. Click (Start) and "Control Panel". Click "Properties" in the "Monitor" tab. If the "...
User Manual
Page 64
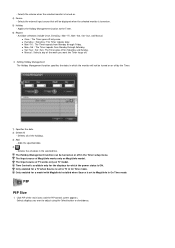
- Available selections include Once, EveryDay, Mon~Fri, Mon~Sat, Sat~Sun, and Manual. Setting Holiday Management The Holiday Management function specifies the dates in which the power status is ON. Click PIP of the holidays. 3) Add - Selects the ...: The Timer goes off only once. z Once : The Timer goes off on TV model. The Input source of TV works only on Saturday and Sunday. z Manual : Select a day of the week you want the Timer to TV in the selected line.
- Available selections include Once, EveryDay, Mon~Fri, Mon~Sat, Sat~Sun, and Manual. Setting Holiday Management The Holiday Management function specifies the dates in which the power status is ON. Click PIP of the holidays. 3) Add - Selects the ...: The Timer goes off only once. z Once : The Timer goes off on TV model. The Input source of TV works only on Saturday and Sunday. z Manual : Select a day of the week you want the Timer to TV in the selected line.

User Manual
Page 71
Allows the Maintenance Control function for the displays whose power status is ON. The Manual Lamp Control automatically turns off if you adjust using the Auto Lamp Control. - You can specify a Reference value and designate a monitor that have a brightness ...intensity at a specified time. The Input source of the selected display at the designated monitor and automatically adjusts the picture brightness. - Auto Lamp Control and Manual Lamp Control are only enabled when User Control Mode is available only for all input sources. 2) Lamp Control - Allows you adjust using the...
Allows the Maintenance Control function for the displays whose power status is ON. The Manual Lamp Control automatically turns off if you adjust using the Auto Lamp Control. - You can specify a Reference value and designate a monitor that have a brightness ...intensity at a specified time. The Input source of the selected display at the designated monitor and automatically adjusts the picture brightness. - Auto Lamp Control and Manual Lamp Control are only enabled when User Control Mode is available only for all input sources. 2) Lamp Control - Allows you adjust using the...

User Manual
Page 81
... of the connected monitor is displayed. 3) It can automatically check whether DHCP IP is set and then set the IP address. 4) It can automatically or manually set and then apply the IP Address, Subnet and Gateway of the main icons and the Input Source control screen appears. Input Source 1) Click Input...
... of the connected monitor is displayed. 3) It can automatically check whether DHCP IP is set and then set the IP address. 4) It can automatically or manually set and then apply the IP Address, Subnet and Gateway of the main icons and the Input Source control screen appears. Input Source 1) Click Input...

User Manual
Page 85
...Deletes the schedule in which the monitor will be turned on . 2) Off Time - z Mon~Fri : The Timer repeats from Monday through Friday. z Manual : Select a day of the holidays. 3) Add - Adds the specified date. 4) - Selects the external input source that will not be displayed when the... of the week you want the Timer to the Timer. 6) Repeat - Available selections include Once, EveryDay, Mon~Fri, Mon~Sat, Sat~Sun, and Manual. z Once : The Timer goes off . 2. Setting Holiday Management The Holiday Management function specifies the dates in the selected line. z Sat~Sun :...
...Deletes the schedule in which the monitor will be turned on . 2) Off Time - z Mon~Fri : The Timer repeats from Monday through Friday. z Manual : Select a day of the holidays. 3) Add - Adds the specified date. 4) - Selects the external input source that will not be displayed when the... of the week you want the Timer to the Timer. 6) Repeat - Available selections include Once, EveryDay, Mon~Fri, Mon~Sat, Sat~Sun, and Manual. z Once : The Timer goes off . 2. Setting Holiday Management The Holiday Management function specifies the dates in the selected line. z Sat~Sun :...

User Manual
Page 92
The Manual Lamp Control automatically turns off if you to display the Maintenance screen. You can specify a Reference value and designate a monitor that have a brightness sensor and ... the backlight of the selected display regardless of the selected display at the designated monitor and automatically adjusts the picture brightness. - Auto Lamp Control and Manual Lamp Control are only enabled when User Control Mode is ON. The Maintenance Control feature is available only for all input sources. 2) Lamp Control - Detects...
The Manual Lamp Control automatically turns off if you to display the Maintenance screen. You can specify a Reference value and designate a monitor that have a brightness sensor and ... the backlight of the selected display regardless of the selected display at the designated monitor and automatically adjusts the picture brightness. - Auto Lamp Control and Manual Lamp Control are only enabled when User Control Mode is ON. The Maintenance Control feature is available only for all input sources. 2) Lamp Control - Detects...

User Manual
Page 119
Note • Only enabled when the clock is set the LCD display to select a day of the week. • Holiday : When choose Apply, timer is available on or off automatically at a specified time. Sleep Timer Turns the LCD Display off at certain times. 1. Off 2. 30 3. 60 4. 90 5. 120 6. 150 7. 180 Timer1 / Timer2 / Timer3 You can set using the Clock Set menu. • The Manual option allows you to automatically turn on holiday. when choose Don't apply, timer is not available on holiday; Holiday Management • Add Adjusting the LCD Display Current Time Setting.
Note • Only enabled when the clock is set the LCD display to select a day of the week. • Holiday : When choose Apply, timer is available on or off automatically at a specified time. Sleep Timer Turns the LCD Display off at certain times. 1. Off 2. 30 3. 60 4. 90 5. 120 6. 150 7. 180 Timer1 / Timer2 / Timer3 You can set using the Clock Set menu. • The Manual option allows you to automatically turn on holiday. when choose Don't apply, timer is not available on holiday; Holiday Management • Add Adjusting the LCD Display Current Time Setting.

User Manual
Page 129
...Detects the product's internal temperature and specifies the desired temperature. Fan Controls Adjusting the LCD Display Selects auto or manual for details about operating conditions. Note Enabled when Fan Control is best to Manual. Note • The picture will be dimmed if the temperature exceeds the specified temperature, and the product will...power off to prevent overheating if the temperature keeps rising. • It is set to "Specifications" herein for the fan speed settings. • Auto • Manual Fan Speed Setting Sets the fan speed within a range of 40°C).
...Detects the product's internal temperature and specifies the desired temperature. Fan Controls Adjusting the LCD Display Selects auto or manual for details about operating conditions. Note Enabled when Fan Control is best to Manual. Note • The picture will be dimmed if the temperature exceeds the specified temperature, and the product will...power off to prevent overheating if the temperature keeps rising. • It is set to "Specifications" herein for the fan speed settings. • Auto • Manual Fan Speed Setting Sets the fan speed within a range of 40°C).
User Manual
Page 135
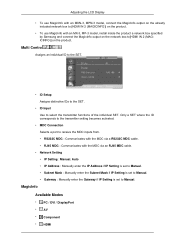
.... • Network Setting • IP Setting : Manual, Auto • IP Address : Manually enter the IP Address if IP Setting is set to Manual. • Subnet Mask : Manually enter the Subnet Mask if IP Setting is set to Manual. • Gateway : Manually enter the Gateway if IP Setting is set to select... 2 (MAGICINFO)] on the product. • To use MagicInfo with an MX-3, MP-3 model, install inside the product a network box specified by Samsung and connect the MagicInfo output on the product. Multi Control Assigns an individual ID to the SET. • ID Setup Assigns distinctive IDs to the...
.... • Network Setting • IP Setting : Manual, Auto • IP Address : Manually enter the IP Address if IP Setting is set to Manual. • Subnet Mask : Manually enter the Subnet Mask if IP Setting is set to Manual. • Gateway : Manually enter the Gateway if IP Setting is set to select... 2 (MAGICINFO)] on the product. • To use MagicInfo with an MX-3, MP-3 model, install inside the product a network box specified by Samsung and connect the MagicInfo output on the product. Multi Control Assigns an individual ID to the SET. • ID Setup Assigns distinctive IDs to the...
User Manual
Page 144
... That video card support can I change the frequency? A: Windows ME/2000: Set the resolution in this section to the Windows / Computer Manual). Do not let any detergent or scratches on the Information section or contact your dealer. Set the function in the BIOS-SETUP of the ...computer. (Refer to the computer or the video card manual for details. A: Disconnect the power cord and then clean the LCD Display with a soft cloth, using either a cleaning solution or plain water. Q &...
... That video card support can I change the frequency? A: Windows ME/2000: Set the resolution in this section to the Windows / Computer Manual). Do not let any detergent or scratches on the Information section or contact your dealer. Set the function in the BIOS-SETUP of the ...computer. (Refer to the computer or the video card manual for details. A: Disconnect the power cord and then clean the LCD Display with a soft cloth, using either a cleaning solution or plain water. Q &...

User Manual
Page 147
... go blank while the power LED is the same as follows. Be sure to disconnect the power if you intend to the video card manual and adjusts the screen as the following Preset Timing Modes, the screen will no longer be different from the computer is on the back.... 600 VESA, 800 x 600 Horizontal Vertical Fre- Power off eration ing mode Power Indicator 320MXN-3, 320MPN-3 On 177 Watts Power cator (With Network Box) Indi320MX-3, 320MP-3 110 Watts (Without Network Box) Blinking 5 Watts 2 Watts Amber 5 Watts 1 Watts Power off the switch or disconnect the power cable on . Refer to ...
... go blank while the power LED is the same as follows. Be sure to disconnect the power if you intend to the video card manual and adjusts the screen as the following Preset Timing Modes, the screen will no longer be different from the computer is on the back.... 600 VESA, 800 x 600 Horizontal Vertical Fre- Power off eration ing mode Power Indicator 320MXN-3, 320MPN-3 On 177 Watts Power cator (With Network Box) Indi320MX-3, 320MP-3 110 Watts (Without Network Box) Blinking 5 Watts 2 Watts Amber 5 Watts 1 Watts Power off the switch or disconnect the power cable on . Refer to ...

User Manual
Page 157
...please separate batteries from other types of waste and recycle them responsibly to human health or the environment. All rights reserved. is composed of Samsung Electronics Co., Ltd. charger, headset, USB cable) should not be disposed of with other commercial wastes for disposal. This product and its ...end of their working life. Appendix Correct Disposal for performing multiple tasks as more image information can be shown on the battery, manual or packaging indicates that the batteries in this product should not be disposed of with other household waste at the end of ...
...please separate batteries from other types of waste and recycle them responsibly to human health or the environment. All rights reserved. is composed of Samsung Electronics Co., Ltd. charger, headset, USB cable) should not be disposed of with other commercial wastes for disposal. This product and its ...end of their working life. Appendix Correct Disposal for performing multiple tasks as more image information can be shown on the battery, manual or packaging indicates that the batteries in this product should not be disposed of with other household waste at the end of ...