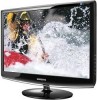

Quick Guide (ENGLISH)
Page 3
...this product. Your Monitor Initial Settings Select the language using the up to adjust brightness. It can be displayed again. Adjust your PC before reaching the maximum count. Customized Key[ ] 9 Also use to exit the OSD menu or return to adjust the resolution of your PC resolution so that it... the previous menu. It will disappear after 40 seconds. Brightness button [ ] When OSD is not on the screen is the same as the optimal resolution for highly polished black products as a product feature. Front MENU button [MENU/ ] Opens the on . Turn the Power button off and on -...
...this product. Your Monitor Initial Settings Select the language using the up to adjust brightness. It can be displayed again. Adjust your PC before reaching the maximum count. Customized Key[ ] 9 Also use to exit the OSD menu or return to adjust the resolution of your PC resolution so that it... the previous menu. It will disappear after 40 seconds. Brightness button [ ] When OSD is not on the screen is the same as the optimal resolution for highly polished black products as a product feature. Front MENU button [MENU/ ] Opens the on . Turn the Power button off and on -...

Quick Guide (ENGLISH)
Page 12
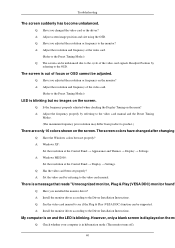
...mode during this message when the signal from the video card exceeds the maximum resolution and frequency that the monitor can handle properly. Is the power indicator on the monitor blinking at least 5 seconds. A: The monitor is still no image on the screen. Q: Connected using the DVI cable?... cellophane paper? plications? Q: Has the video card been set properly? A: If there is in its slot. A: Adjust the maximum resolution and frequency that the monitor can handle properly. A: You may get a blank screen if you boot the system before you connect the DVI cable, or disconnect ...
...mode during this message when the signal from the video card exceeds the maximum resolution and frequency that the monitor can handle properly. Is the power indicator on the monitor blinking at least 5 seconds. A: The monitor is still no image on the screen. Q: Connected using the DVI cable?... cellophane paper? plications? Q: Has the video card been set properly? A: If there is in its slot. A: Adjust the maximum resolution and frequency that the monitor can handle properly. A: You may get a blank screen if you boot the system before you connect the DVI cable, or disconnect ...

Quick Guide (ENGLISH)
Page 13
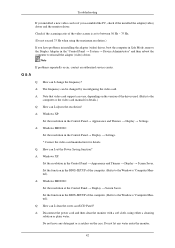
...screen colors have changed the video card or the driver? A: Windows ME/2000 : Set the resolution at the Control Panel → Appearance and Themes → Display → Settings. A: Install the monitor driver according to see if the Plug & Play (VESA DDC) function can be adjusted. ...of the video card. (Refer to the Preset Timing Modes) Q: The screen can be supported. Q: Have you installed the monitor driver? A: Windows XP : Set the resolution at the Control Panel → Display → Settings. Q: Has the video card been set properly? Q: See the video...
...screen colors have changed the video card or the driver? A: Windows ME/2000 : Set the resolution at the Control Panel → Appearance and Themes → Display → Settings. A: Install the monitor driver according to see if the Plug & Play (VESA DDC) function can be adjusted. ...of the video card. (Refer to the Preset Timing Modes) Q: The screen can be supported. Q: Have you installed the monitor driver? A: Windows XP : Set the resolution at the Control Panel → Display → Settings. Q: Has the video card been set properly? Q: See the video...

Quick Guide (ENGLISH)
Page 15
...Computer Manual). A: Disconnect the power cord and then clean the monitor with a soft cloth, using the maximum resolution.) If you assembled the PC, check if the installed the adapter(video) driver and the monitor driver. A: Windows ME/2000: Set the resolution in the BIOS-SETUP of the video screen is set the ...(Do not exceed 75 Hz when using either a cleaning solution or plain water. Do not leave any water enter the monitor. 42 Q: How can I clean the outer case/LCD Panel? Do not let any detergent or scratches on the version of the computer. (Refer to the computer or the ...
...Computer Manual). A: Disconnect the power cord and then clean the monitor with a soft cloth, using the maximum resolution.) If you assembled the PC, check if the installed the adapter(video) driver and the monitor driver. A: Windows ME/2000: Set the resolution in the BIOS-SETUP of the video screen is set the ...(Do not exceed 75 Hz when using either a cleaning solution or plain water. Do not leave any water enter the monitor. 42 Q: How can I clean the outer case/LCD Panel? Do not let any detergent or scratches on the version of the computer. (Refer to the computer or the ...
User Manual (ENGLISH)
Page 6
... a product malfunction, electric shock, or fire. Keep the volume at a comfortable level when using your eyesight may result in fire due to the cable. Set a resolution and frequency appropriate to the product. • Otherwise, your product for a long period of time, put it may fall and result in electric shock, damage... or right and left while only holding the power cord or signal cables. • Otherwise, it may damage hearing. 5 Do not lift or move the monitor by a table or curtain. • Otherwise, it may be damaged.
... a product malfunction, electric shock, or fire. Keep the volume at a comfortable level when using your eyesight may result in fire due to the cable. Set a resolution and frequency appropriate to the product. • Otherwise, your product for a long period of time, put it may fall and result in electric shock, damage... or right and left while only holding the power cord or signal cables. • Otherwise, it may damage hearing. 5 Do not lift or move the monitor by a table or curtain. • Otherwise, it may be damaged.

User Manual (ENGLISH)
Page 10
... that it is the same as a product feature. Introduction Note Cleaning Cloth is only provided for highly polished black products as the optimal resolution for this product. The displayed content will be displayed up or down key. It can be displayed again. Customized Key[ ] 9 Turn the Power button off ...and on -screen menu and exits from the menu. Front MENU button [MENU/ ] Opens the on . Your Monitor Initial Settings Select the language using the up to adjust brightness.
... that it is the same as a product feature. Introduction Note Cleaning Cloth is only provided for highly polished black products as the optimal resolution for this product. The displayed content will be displayed up or down key. It can be displayed again. Customized Key[ ] 9 Turn the Power button off ...and on -screen menu and exits from the menu. Front MENU button [MENU/ ] Opens the on . Your Monitor Initial Settings Select the language using the up to adjust brightness.
User Manual (ENGLISH)
Page 24
... change to the one you see the screen working normally after setting other requested hardware. 23 Set a Keyboard for your monitor. (You can enter the frequency directly.) 8. Enter the model name of resolution and vertical frequency by referring to make the X86Config file, which is for setting your... monitor. 7. Choose "Display a list of resolution, colors or frequency). If the screen is for setting your mouse. 3. Specify A:\(D:\driver) then click "OK" button. 10. The next ...
... change to the one you see the screen working normally after setting other requested hardware. 23 Set a Keyboard for your monitor. (You can enter the frequency directly.) 8. Enter the model name of resolution and vertical frequency by referring to make the X86Config file, which is for setting your... monitor. 7. Choose "Display a list of resolution, colors or frequency). If the screen is for setting your mouse. 3. Specify A:\(D:\driver) then click "OK" button. 10. The next ...

User Manual (ENGLISH)
Page 29
... in Analog mode only, so "AUTO" icon of settings or prevent others from adjusting the current settings. Adjusting the Monitor Direct Functions AUTO When the 'AUTO' button is activated, you change resolution in the control panel, auto function will be executed automatically. Lock : Hold down the MENU button for more accuracy. Auto...
... in Analog mode only, so "AUTO" icon of settings or prevent others from adjusting the current settings. Adjusting the Monitor Direct Functions AUTO When the 'AUTO' button is activated, you change resolution in the control panel, auto function will be executed automatically. Lock : Hold down the MENU button for more accuracy. Auto...

User Manual (ENGLISH)
Page 35
...576p/720p/1080i/1080p) signals are input. Use the function to see the full image without any cutoff when DVI (480p/576p/720p/1080i/1080p) signals are not supported. • If the wide screen which is the optimal resolution for the wide models only such as 16:9 or 16:10. PC signals..."Screen Fit "to 16:9 wide mode. • Screen Fit- The screen is displayed regardless of the screen aspect ratio of the screen displayed on your monitor. A full screen is displayed in 0-6 levels. Note • It can only be selected if an external input is connected to the DVI terminal and the 'PC...
...576p/720p/1080i/1080p) signals are input. Use the function to see the full image without any cutoff when DVI (480p/576p/720p/1080i/1080p) signals are not supported. • If the wide screen which is the optimal resolution for the wide models only such as 16:9 or 16:10. PC signals..."Screen Fit "to 16:9 wide mode. • Screen Fit- The screen is displayed regardless of the screen aspect ratio of the screen displayed on your monitor. A full screen is displayed in 0-6 levels. Note • It can only be selected if an external input is connected to the DVI terminal and the 'PC...
User Manual (ENGLISH)
Page 40
... any key on the keyboard again to the recommended mode during this message when the signal from the video card exceeds the maximum resolution and frequency that the monitor can handle properly. Q: Connected using the DVI cable? plications? Q: Has the video card been set properly? A: Check the ...and white. Is the power indicator on the screen? Troubleshooting (Refer to the video card manual. 39 A: Adjust the maximum resolution and frequency that the monitor can see this one-minute period. (The message is displayed again if the system is rebooted.) Q: There is still no ...
... any key on the keyboard again to the recommended mode during this message when the signal from the video card exceeds the maximum resolution and frequency that the monitor can handle properly. Q: Connected using the DVI cable? plications? Q: Has the video card been set properly? A: Check the ...and white. Is the power indicator on the screen? Troubleshooting (Refer to the video card manual. 39 A: Adjust the maximum resolution and frequency that the monitor can see this one-minute period. (The message is displayed again if the system is rebooted.) Q: There is still no ...
User Manual (ENGLISH)
Page 41
...Modes) Q: The screen can be supported. A: Adjust the frequency properly by referring to the monitor? A: Install the monitor driver according to the video card manual. Q: Have you adjusted the resolution or frequency to the OSD. Readjust Position by referring to the video card manual and the ...been set properly? A: Adjust screen image position and size using the OSD. The screen is in hibernation mode (The monitor turns off). 40 A: Windows ME/2000 : Set the resolution at the Control Panel → Appearance and Themes → Display → Settings. A: Set the video card ...
...Modes) Q: The screen can be supported. A: Adjust the frequency properly by referring to the monitor? A: Install the monitor driver according to the video card manual. Q: Have you adjusted the resolution or frequency to the OSD. Readjust Position by referring to the video card manual and the ...been set properly? A: Adjust screen image position and size using the OSD. The screen is in hibernation mode (The monitor turns off). 40 A: Windows ME/2000 : Set the resolution at the Control Panel → Appearance and Themes → Display → Settings. A: Set the video card ...
User Manual (ENGLISH)
Page 43
...using the maximum resolution.) If you assembled the PC, check if the installed the adapter(video) driver and the monitor driver. A: The frequency can vary, depending on the case. Q: How can I set to the computer or the video card manual for details. Q: How can I clean the outer case/LCD Panel? A:... Windows ME/2000: Set the resolution in the BIOS-SETUP of the ...
...using the maximum resolution.) If you assembled the PC, check if the installed the adapter(video) driver and the monitor driver. A: The frequency can vary, depending on the case. Q: How can I set to the computer or the video card manual for details. Q: How can I clean the outer case/LCD Panel? A:... Windows ME/2000: Set the resolution in the BIOS-SETUP of the ...

User Manual (ENGLISH)
Page 45
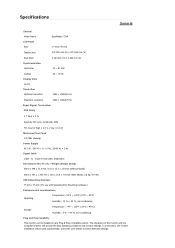
... ~ 60°C) Humidity : 10 % ~ 80 %, non-condensing Plug and Play Capability This monitor can be installed on any Plug & Play compatible system. Specifications General General Model Name LCD Panel Size SyncMaster 633NW 15.6 inch (39 cm) Display area 344.232 mm(H) x 193.536... mm(V) Pixel Pitch Synchronization Horizontal 0.252 mm(H) x 0.252 mm(V) 30 ~ 61 kHz Vertical Display Color 16.7 M Resolution Optimum resolution 56 ~ 75 Hz 1360 x 768@60 Hz Maximum resolution 1360 x 768@60 Hz Input Signal, Terminated RGB Analog, 0.7 Vp-p ± 5 % Separate H/V sync, Composite, SOG ...
... ~ 60°C) Humidity : 10 % ~ 80 %, non-condensing Plug and Play Capability This monitor can be installed on any Plug & Play compatible system. Specifications General General Model Name LCD Panel Size SyncMaster 633NW 15.6 inch (39 cm) Display area 344.232 mm(H) x 193.536... mm(V) Pixel Pitch Synchronization Horizontal 0.252 mm(H) x 0.252 mm(V) 30 ~ 61 kHz Vertical Display Color 16.7 M Resolution Optimum resolution 56 ~ 75 Hz 1360 x 768@60 Hz Maximum resolution 1360 x 768@60 Hz Input Signal, Terminated RGB Analog, 0.7 Vp-p ± 5 % Separate H/V sync, Composite, SOG ...
User Manual (ENGLISH)
Page 49
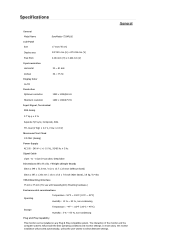
...;C ~ 45°C) Humidity : 5 % ~ 95 %, non-condensing Plug and Play Capability This monitor can be installed on any Plug & Play compatible system. Specifications General General Model Name LCD Panel Size SyncMaster 733A 17 inch (43 cm) Display area 337.920 mm (H) x 270.336 ...mm (V) Pixel Pitch Synchronization Horizontal 0.264 mm (H) x 0.264 mm (V) 30 ~ 81 kHz Vertical Display Color 16.7M Resolution Optimum resolution 56 ~ 75 Hz 1280 x 1024@60 Hz Maximum resolution 1280 x 1024@75 Hz Input Signal, Terminated RGB Analog 0.7 Vp-p ± 5 % Separate H/V sync, Composite, SOG TTL...
...;C ~ 45°C) Humidity : 5 % ~ 95 %, non-condensing Plug and Play Capability This monitor can be installed on any Plug & Play compatible system. Specifications General General Model Name LCD Panel Size SyncMaster 733A 17 inch (43 cm) Display area 337.920 mm (H) x 270.336 ...mm (V) Pixel Pitch Synchronization Horizontal 0.264 mm (H) x 0.264 mm (V) 30 ~ 81 kHz Vertical Display Color 16.7M Resolution Optimum resolution 56 ~ 75 Hz 1280 x 1024@60 Hz Maximum resolution 1280 x 1024@75 Hz Input Signal, Terminated RGB Analog 0.7 Vp-p ± 5 % Separate H/V sync, Composite, SOG TTL...
User Manual (ENGLISH)
Page 53
...General General Model Name LCD Panel Size SyncMaster 733APLUS 17 inch (43 cm) Display area 337.920 mm (H) x 270.336 mm (V) Pixel Pitch Synchronization Horizontal 0.264 mm (H) x 0.264 mm (V) 30 ~ 81 kHz Vertical Display Color 16.7M Resolution Optimum resolution 56 ~ 75 Hz 1280 x 1024@60 Hz Maximum resolution 1280 x 1024@75...;C) Humidity : 10 % ~ 80 %, non-condensing Storage Temperature : -4°F ~ 113°F (-20°C ~ 45°C) Humidity : 5 % ~ 95 %, non-condensing Plug and Play Capability This monitor can be installed on any Plug & Play compatible system. In most cases, the...
...General General Model Name LCD Panel Size SyncMaster 733APLUS 17 inch (43 cm) Display area 337.920 mm (H) x 270.336 mm (V) Pixel Pitch Synchronization Horizontal 0.264 mm (H) x 0.264 mm (V) 30 ~ 81 kHz Vertical Display Color 16.7M Resolution Optimum resolution 56 ~ 75 Hz 1280 x 1024@60 Hz Maximum resolution 1280 x 1024@75...;C) Humidity : 10 % ~ 80 %, non-condensing Storage Temperature : -4°F ~ 113°F (-20°C ~ 45°C) Humidity : 5 % ~ 95 %, non-condensing Plug and Play Capability This monitor can be installed on any Plug & Play compatible system. In most cases, the...

User Manual (ENGLISH)
Page 57
... provide the best operating conditions and monitor settings. Specifications General General Model Name LCD Panel Size SyncMaster 733N 17 inch (43 cm) Display area 337.920 mm (H) x 270.336 mm (V) Pixel Pitch Synchronization Horizontal 0.264 mm (H) x 0.264 mm (V) 30 ~ 81 kHz Vertical Display Color 16.7M Resolution Optimum resolution 56 ~ 75 Hz 1280 x 1024...
... provide the best operating conditions and monitor settings. Specifications General General Model Name LCD Panel Size SyncMaster 733N 17 inch (43 cm) Display area 337.920 mm (H) x 270.336 mm (V) Pixel Pitch Synchronization Horizontal 0.264 mm (H) x 0.264 mm (V) 30 ~ 81 kHz Vertical Display Color 16.7M Resolution Optimum resolution 56 ~ 75 Hz 1280 x 1024...

User Manual (ENGLISH)
Page 61
... ~ 45°C) Humidity : 5 % ~ 95 %, non-condensing Plug and Play Capability This monitor can be installed on any Plug & Play compatible system. Specifications General General Model Name LCD Panel Size SyncMaster 733NPLUS 17 inch (43 cm) Display area 337.920 mm (H) x 270.336... mm (V) Pixel Pitch Synchronization Horizontal 0.264 mm (H) x 0.264 mm (V) 30 ~ 81 kHz Vertical Display Color 16.7M Resolution Optimum resolution 56 ~ 75 Hz 1280 x 1024@60 Hz Maximum resolution 1280 x 1024@75 Hz Input Signal, Terminated RGB Analog 0.7 Vp-p ± 5 % Separate H/V sync, Composite, SOG ...
... ~ 45°C) Humidity : 5 % ~ 95 %, non-condensing Plug and Play Capability This monitor can be installed on any Plug & Play compatible system. Specifications General General Model Name LCD Panel Size SyncMaster 733NPLUS 17 inch (43 cm) Display area 337.920 mm (H) x 270.336... mm (V) Pixel Pitch Synchronization Horizontal 0.264 mm (H) x 0.264 mm (V) 30 ~ 81 kHz Vertical Display Color 16.7M Resolution Optimum resolution 56 ~ 75 Hz 1280 x 1024@60 Hz Maximum resolution 1280 x 1024@75 Hz Input Signal, Terminated RGB Analog 0.7 Vp-p ± 5 % Separate H/V sync, Composite, SOG ...

User Manual (ENGLISH)
Page 65
...Humidity : 20 % ~ 80 %, non-condensing Temperature : -4°F ~ 140°F (-20°C ~ 60°C) General Specifications General Model Name LCD Panel Size SyncMaster 733NW 17 inch (43 cm) Display area 367.2 mm(H) x 229.5 mm(V) Pixel Pitch Synchronization Horizontal 0.255 mm(H) x 0.255... mm(V) 30 ~ 81 kHz Vertical Display Color 16.2 M Resolution Optimum resolution 56 ~ 75 Hz 1440 x 900@60 Hz Maximum resolution 1440 x 900@75 Hz Input Signal, Terminated RGB Analog, 0.7 Vp-p ± 5 % Separate H/V sync, Composite,...
...Humidity : 20 % ~ 80 %, non-condensing Temperature : -4°F ~ 140°F (-20°C ~ 60°C) General Specifications General Model Name LCD Panel Size SyncMaster 733NW 17 inch (43 cm) Display area 367.2 mm(H) x 229.5 mm(V) Pixel Pitch Synchronization Horizontal 0.255 mm(H) x 0.255... mm(V) 30 ~ 81 kHz Vertical Display Color 16.2 M Resolution Optimum resolution 56 ~ 75 Hz 1440 x 900@60 Hz Maximum resolution 1440 x 900@75 Hz Input Signal, Terminated RGB Analog, 0.7 Vp-p ± 5 % Separate H/V sync, Composite,...
User Manual (ENGLISH)
Page 69
...: 50°F ~ 104°F (10°C ~ 40°C) Humidity : 10 % ~ 80 %, non-condensing General Specifications General Model Name LCD Panel Size SyncMaster 933BW 19 inch (48 cm) Display area 408.24 mm (H) x 255.15 mm (V) Pixel Pitch Synchronization Horizontal 0.2835 mm (H) ...x 0.2835 mm (V) 30 ~ 81 kHz Vertical Display Color 16.7M Resolution Optimum resolution 56 ~ 75 Hz 1440 x 900@60 Hz Maximum resolution 1440 x 900@75 Hz Input Signal, Terminated RGB Analog, DVI(Digital Visual Interface) Compliant Digital RGB 0.7 Vp-p &#...
...: 50°F ~ 104°F (10°C ~ 40°C) Humidity : 10 % ~ 80 %, non-condensing General Specifications General Model Name LCD Panel Size SyncMaster 933BW 19 inch (48 cm) Display area 408.24 mm (H) x 255.15 mm (V) Pixel Pitch Synchronization Horizontal 0.2835 mm (H) ...x 0.2835 mm (V) 30 ~ 81 kHz Vertical Display Color 16.7M Resolution Optimum resolution 56 ~ 75 Hz 1440 x 900@60 Hz Maximum resolution 1440 x 900@75 Hz Input Signal, Terminated RGB Analog, DVI(Digital Visual Interface) Compliant Digital RGB 0.7 Vp-p &#...

User Manual (ENGLISH)
Page 73
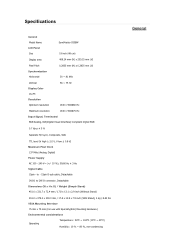
Specifications General Model Name LCD Panel Size SyncMaster 933BWPLUS 19 inch (48 cm) Display area 408.24 mm (H) x 255.15 mm (V) Pixel Pitch Synchronization Horizontal 0.2835 mm (H) x 0.2835 mm (V) 30 ~ 81 kHz Vertical Display Color 16.7M Resolution Optimum resolution 56 ~ 75 Hz 1440 x 900@60 Hz Maximum resolution 1440 x 900@75 Hz Input Signal...
Specifications General Model Name LCD Panel Size SyncMaster 933BWPLUS 19 inch (48 cm) Display area 408.24 mm (H) x 255.15 mm (V) Pixel Pitch Synchronization Horizontal 0.2835 mm (H) x 0.2835 mm (V) 30 ~ 81 kHz Vertical Display Color 16.7M Resolution Optimum resolution 56 ~ 75 Hz 1440 x 900@60 Hz Maximum resolution 1440 x 900@75 Hz Input Signal...


