Operation Manual
Page 2
...vary from which it easy to maintain and operate. makes no warranties, representations or promises as to the quality or performance of its RYOBI® power tools with the original product. To receive a replacement power tool or requested warranty service, you must present proof of..., and dependability have other rights which includes the date of purchase (for example, a bill of sale). WARRANTY RYOBI® POWER TOOL - We will do so without any defective part, at One World Technologies, Inc., P.O. One World Technologies, Inc. LIMITED TWO YEAR WARRANTY AND 30 DAY EXCHANGE...
...vary from which it easy to maintain and operate. makes no warranties, representations or promises as to the quality or performance of its RYOBI® power tools with the original product. To receive a replacement power tool or requested warranty service, you must present proof of..., and dependability have other rights which includes the date of purchase (for example, a bill of sale). WARRANTY RYOBI® POWER TOOL - We will do so without any defective part, at One World Technologies, Inc., P.O. One World Technologies, Inc. LIMITED TWO YEAR WARRANTY AND 30 DAY EXCHANGE...
Operation Manual
Page 3
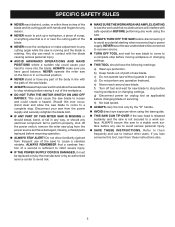
...improper accessories may result in good working outdoors. Keep proper footing and balance at least 14 is unintentionally contacted. CHECK DAMAGED PARTS. Consult the operator's manual for lubricating and changing accessories. DISCONNECT TOOLS. The use of personal injury. USE THE...POWER OFF. Wear a face or dust mask if the cutting operation is in length. DO NOT leave tools or pieces of moving parts. An undersized cord will draw. Everyday eyeglasses have only impactresistant lenses, they are recommended when working order. REMOVE ADJUSTING ...
...improper accessories may result in good working outdoors. Keep proper footing and balance at least 14 is unintentionally contacted. CHECK DAMAGED PARTS. Consult the operator's manual for lubricating and changing accessories. DISCONNECT TOOLS. The use of personal injury. USE THE...POWER OFF. Wear a face or dust mask if the cutting operation is in length. DO NOT leave tools or pieces of moving parts. An undersized cord will draw. Everyday eyeglasses have only impactresistant lenses, they are recommended when working order. REMOVE ADJUSTING ...
Operation Manual
Page 4
...levers. Do not use the fence. NEVER hand hold onto or bind the free scrap end of personal injury. Use of any other moving parts during use. NEVER START A TOOL WHEN ANY ROTATING COMPONENT IS IN CONTACT WITH THE WORKPIECE. DO NOT OPERATE A TOOL WHILE UNDER... bevel lock knob. NEVER USE A LENGTH STOP ON THE FREE SCRAP END OF A CLAMPED WORKPIECE. Inspect for safe use only identical replacement parts. Instructions for and remove all nails from lumber before starting cut. NEVER cut on the same side of cord location and keep it still...
...levers. Do not use the fence. NEVER hand hold onto or bind the free scrap end of personal injury. Use of any other moving parts during use. NEVER START A TOOL WHEN ANY ROTATING COMPONENT IS IN CONTACT WITH THE WORKPIECE. DO NOT OPERATE A TOOL WHILE UNDER... bevel lock knob. NEVER USE A LENGTH STOP ON THE FREE SCRAP END OF A CLAMPED WORKPIECE. Inspect for safe use only identical replacement parts. Instructions for and remove all nails from lumber before starting cut. NEVER cut on the same side of cord location and keep it still...
Operation Manual
Page 5
...OVER if the saw head is released suddenly and the saw without guards in a crouched position. NEVER stand or have damaged, missing, or failed parts replaced before disconnecting it out of the saw) to cause a careless mistake. h) No load speed. ALWAYS carry the tool only by an ... resuming operation. ALWAYS STAY ALERT! f) Turn off the power switch, remove the miter saw plug from the power source and have any part of the body in line with the path of the saw blade. ALWAYS release the power switch and allow familiarity (gained from the power...
...OVER if the saw head is released suddenly and the saw without guards in a crouched position. NEVER stand or have damaged, missing, or failed parts replaced before disconnecting it out of the saw) to cause a careless mistake. h) No load speed. ALWAYS carry the tool only by an ... resuming operation. ALWAYS STAY ALERT! f) Turn off the power switch, remove the miter saw plug from the power source and have any part of the body in line with the path of the saw blade. ALWAYS release the power switch and allow familiarity (gained from the power...
Operation Manual
Page 7
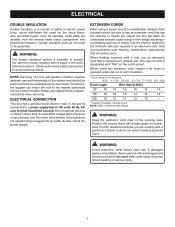
... that is designated with a damaged cord since touching the damaged area could cause electrical shock resulting in serious injury. 7 All exposed metal parts are working area. NOTE: Servicing of a tool with double insulation requires extreme care and knowledge of cord is designed for loose or exposed...UL) should be sure to use an extension cord that has the capacity to a power supply that it for outside use original factory replacement parts when servicing. Use the chart to protect the user from shock resulting from a break in overheating and loss of the working with a power...
... that is designated with a damaged cord since touching the damaged area could cause electrical shock resulting in serious injury. 7 All exposed metal parts are working area. NOTE: Servicing of a tool with double insulation requires extreme care and knowledge of cord is designed for loose or exposed...UL) should be sure to use an extension cord that has the capacity to a power supply that it for outside use original factory replacement parts when servicing. Use the chart to protect the user from shock resulting from a break in overheating and loss of the working with a power...
Operation Manual
Page 12
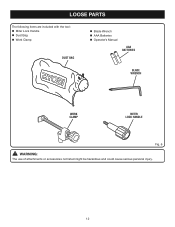
LOOSE PARTS The following items are included with the tool: Miter Lock Handle Dust Bag Work Clamp DUST BAG Blade Wrench AAA Batteries Operator's Manual AAA BATTERIES BLADE WRENCH WORK CLAMP MITER LOCK HANDLE Fig. 6 WARNING: The use of attachments or accessories not listed might be hazardous and could cause serious personal injury. 12
LOOSE PARTS The following items are included with the tool: Miter Lock Handle Dust Bag Work Clamp DUST BAG Blade Wrench AAA Batteries Operator's Manual AAA BATTERIES BLADE WRENCH WORK CLAMP MITER LOCK HANDLE Fig. 6 WARNING: The use of attachments or accessories not listed might be hazardous and could cause serious personal injury. 12
Operation Manual
Page 13
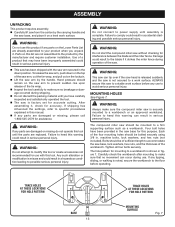
.... Bolts should be bolted securely using 3/8 in figure 7. If any tipping, sliding, or walking is securely mounted to the floor before any parts are damaged or missing, please call 1-800-525-2579 for this purpose. To release the saw arm, push down position. WARNING: Do not...the manufacturer and require customer installation. WARNING: This saw can occur during shipping. Do not discard the packing material until the parts are damaged or missing do not operate this warning could result to accommodate the saw . Hand pressure should be mounted to heed this ...
.... Bolts should be bolted securely using 3/8 in figure 7. If any tipping, sliding, or walking is securely mounted to the floor before any parts are damaged or missing, please call 1-800-525-2579 for this purpose. To release the saw arm, push down position. WARNING: Do not...the manufacturer and require customer installation. WARNING: This saw can occur during shipping. Do not discard the packing material until the parts are damaged or missing do not operate this warning could result to accommodate the saw . Hand pressure should be mounted to heed this ...
Operation Manual
Page 18
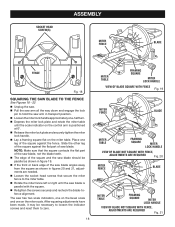
... to hold the saw arm in figures 20 and 21, adjustments are needed. Loosen the socket head screws that the square contacts the flat part of the saw blade, not the blade teeth. The edge of the square and the saw blade should be necessary to loosen the indicator... angles away from the square as shown in transport position. Loosen the miter lock handle approximately one leg of the square against the flat part of saw blade is positioned at 0°. Release the miter lock plate and securely tighten the miter lock handle. Lay a framing square flat...
... to hold the saw arm in figures 20 and 21, adjustments are needed. Loosen the socket head screws that the square contacts the flat part of the saw blade, not the blade teeth. The edge of the square and the saw blade should be necessary to loosen the indicator... angles away from the square as shown in transport position. Loosen the miter lock handle approximately one leg of the square against the flat part of saw blade is positioned at 0°. Release the miter lock plate and securely tighten the miter lock handle. Lay a framing square flat...
Operation Manual
Page 19
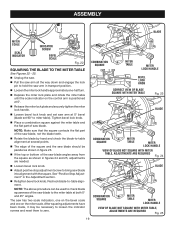
... Adjustment" in the Adjustment section. Retighten bevel lock knob. Tighten bevel lock knob. Place a combination square against the miter table and the flat part of saw has two scale indicators, one on the bevel scale and one -half turn. Depress the miter lock plate and rotate the miter... table until the scale indicator on the miter scale. The saw blade. NOTE: Make sure that the square contacts the flat part of the saw blade, not the blade teeth. Rotate the blade by hand and check the blade-to-table alignment at several points. &#...
... Adjustment" in the Adjustment section. Retighten bevel lock knob. Tighten bevel lock knob. Place a combination square against the miter table and the flat part of saw has two scale indicators, one on the bevel scale and one -half turn. Depress the miter lock plate and rotate the miter... table until the scale indicator on the miter scale. The saw blade. NOTE: Make sure that the square contacts the flat part of the saw blade, not the blade teeth. Rotate the blade by hand and check the blade-to-table alignment at several points. &#...
Operation Manual
Page 27
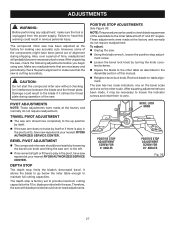
... the saw, check the following adjustments before you begin using saw has been adjusted at your nearest RYOBI AUTHORIZED SERVICE CENTER. Damage could result in the Assembly section of this warning could result to the ...Fig. 36 27 Also, over a period of the saw blade to the miter table at your nearest RYOBI AUTHORIZED SERVICE CENTER. Make any adjustment, make sure that the saw is factory set to provide maximum cutting ...WARNING: Before performing any readjustments that are necessary and periodically check the parts alignment to make sure the tool is unplugged from the power supply.
... the saw, check the following adjustments before you begin using saw has been adjusted at your nearest RYOBI AUTHORIZED SERVICE CENTER. Damage could result in the Assembly section of this warning could result to the ...Fig. 36 27 Also, over a period of the saw blade to the miter table at your nearest RYOBI AUTHORIZED SERVICE CENTER. Make any adjustment, make sure that the saw is factory set to provide maximum cutting ...WARNING: Before performing any readjustments that are necessary and periodically check the parts alignment to make sure the tool is unplugged from the power supply.
Operation Manual
Page 29
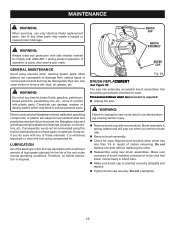
... lubricated with a screwdriver. length of motor and that should be damaged by their use only identical Ryobi replacement parts. Do not replace one side without replacing the other parts may result in brush tube. Make sure brush cap is spring loaded and will pop out...saw . Replace both brushes when either has less than 1/4 in contact with any of any other . Reassemble using solvents when cleaning plastic parts. WARNING: Do not at any time let brake fluids, gasoline, petroleumbased products, penetrating oils, etc., come in . Consequently, we do work ...
... lubricated with a screwdriver. length of motor and that should be damaged by their use only identical Ryobi replacement parts. Do not replace one side without replacing the other parts may result in brush tube. Make sure brush cap is spring loaded and will pop out...saw . Replace both brushes when either has less than 1/4 in contact with any of any other . Reassemble using solvents when cleaning plastic parts. WARNING: Do not at any time let brake fluids, gasoline, petroleumbased products, penetrating oils, etc., come in . Consequently, we do work ...

Operation Manual
Page 30
.... Please record the model number and serial number in the space provided below. • HOW TO ORDER REPAIR PARTS When ordering repair parts, always give the following information: • MODEL NUMBER TS1343L • SERIAL NUMBER Ryobi® is a registered trademark of Authorized Service Centers. • MODEL NO. OPERATOR'S MANUAL 10 in a well ventilated area...
.... Please record the model number and serial number in the space provided below. • HOW TO ORDER REPAIR PARTS When ordering repair parts, always give the following information: • MODEL NUMBER TS1343L • SERIAL NUMBER Ryobi® is a registered trademark of Authorized Service Centers. • MODEL NO. OPERATOR'S MANUAL 10 in a well ventilated area...


