
Operation Manual
Page 1
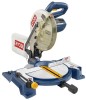
OPERATOR'S MANUAL 10 in. Double Insulated Your miter saw has been engineered and manufactured to our high standard for dependability, ease of rugged, trouble-free performance. SAVE THIS MANUAL FOR FUTURE REFERENCE When properly cared for your purchase. Thank you for , it will give you years of operation, and operator safety. WARNING: To reduce the risk of injury, the user must read and understand the operator's manual before using this product. Compound Miter Saw TS1343L -
OPERATOR'S MANUAL 10 in. Double Insulated Your miter saw has been engineered and manufactured to our high standard for dependability, ease of rugged, trouble-free performance. SAVE THIS MANUAL FOR FUTURE REFERENCE When properly cared for your purchase. Thank you for , it will give you years of operation, and operator safety. WARNING: To reduce the risk of injury, the user must read and understand the operator's manual before using this product. Compound Miter Saw TS1343L -
Operation Manual
Page 3
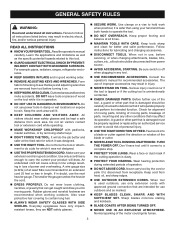
Failure to follow all tools should be disconnected from receptacle. Read the operator's manual carefully. Cluttered areas and benches invite accidents. All visitors should wear safety glasses and be properly repaired or replaced by an authorized service center to ... balance at the feed rate for an extension cord 25 feet or less in electric shock, fire, and/or serious personal injury. Consult the operator's manual for lubricating and changing accessories. DISCONNECT TOOLS. Don't leave tool until it was designed. USE THE RIGHT TOOL. Wear a face or dust mask...
Failure to follow all tools should be disconnected from receptacle. Read the operator's manual carefully. Cluttered areas and benches invite accidents. All visitors should wear safety glasses and be properly repaired or replaced by an authorized service center to ... balance at the feed rate for an extension cord 25 feet or less in electric shock, fire, and/or serious personal injury. Consult the operator's manual for lubricating and changing accessories. DISCONNECT TOOLS. Don't leave tool until it was designed. USE THE RIGHT TOOL. Wear a face or dust mask...
Operation Manual
Page 4
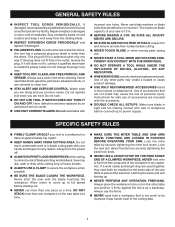
... hold onto or bind the free scrap end of the workpiece in the outlet, reverse the plug. To reduce the risk of electric shock, this manual or addendums. Use of personal injury. Do not operate tool when you are included with incorrect size holes. Have defective switches replaced by securely tightening...
... hold onto or bind the free scrap end of the workpiece in the outlet, reverse the plug. To reduce the risk of electric shock, this manual or addendums. Use of personal injury. Do not operate tool when you are included with incorrect size holes. Have defective switches replaced by securely tightening...
Operation Manual
Page 6
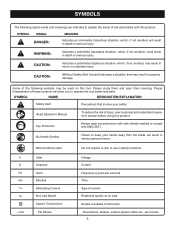
... Construction Per Minute Voltage Current Frequency (cycles per minute 6 Some of injury, user must read and understand operator's manual before using this product. Please study them and learn their meaning. Read Operator's Manual Eye Protection To reduce the risk of the following signal words and meanings are intended to comply with this...
... Construction Per Minute Voltage Current Frequency (cycles per minute 6 Some of injury, user must read and understand operator's manual before using this product. Please study them and learn their meaning. Read Operator's Manual Eye Protection To reduce the risk of the following signal words and meanings are intended to comply with this...
Operation Manual
Page 10
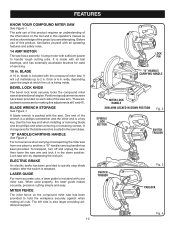
... electric brake has been provided to another, a "D" handle/carrying handle has been provided. Positive stop blade rotation after the switch is located in this operator's manual as well as a knowledge of this product requires an understanding of servicing. 10 in . BLADE WRENCH STORAGE See Figure 1. Use the hex key end when...
... electric brake has been provided to another, a "D" handle/carrying handle has been provided. Positive stop blade rotation after the switch is located in this operator's manual as well as a knowledge of this product requires an understanding of servicing. 10 in . BLADE WRENCH STORAGE See Figure 1. Use the hex key end when...
Operation Manual
Page 12
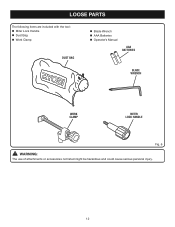
LOOSE PARTS The following items are included with the tool: Miter Lock Handle Dust Bag Work Clamp DUST BAG Blade Wrench AAA Batteries Operator's Manual AAA BATTERIES BLADE WRENCH WORK CLAMP MITER LOCK HANDLE Fig. 6 WARNING: The use of attachments or accessories not listed might be hazardous and could cause serious personal injury. 12
LOOSE PARTS The following items are included with the tool: Miter Lock Handle Dust Bag Work Clamp DUST BAG Blade Wrench AAA Batteries Operator's Manual AAA BATTERIES BLADE WRENCH WORK CLAMP MITER LOCK HANDLE Fig. 6 WARNING: The use of attachments or accessories not listed might be hazardous and could cause serious personal injury. 12
Operation Manual
Page 13
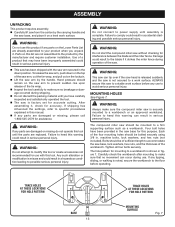
... tie wrap. Inspect the tool carefully to avoid serious personal injury. If shipping has influenced the settings, refer to comply could result in this manual. If any parts are replaced. Failure to specific procedures explained in serious personal injury. If any tipping, sliding, or walking is complete. Failure to...
... tie wrap. Inspect the tool carefully to avoid serious personal injury. If shipping has influenced the settings, refer to comply could result in this manual. If any parts are replaced. Failure to specific procedures explained in serious personal injury. If any tipping, sliding, or walking is complete. Failure to...
Operation Manual
Page 17
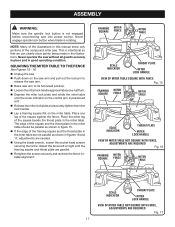
... and the throat plate in the miter table should be parallel as shown in figure 15. If the edge of the illustrations in this manual show points being made in figures 16 and 17, adjustments are parallel. Retighten the screws securely and recheck the fence-totable alignment. ASSEMBLY WARNING...
... and the throat plate in the miter table should be parallel as shown in figure 15. If the edge of the illustrations in this manual show points being made in figures 16 and 17, adjustments are parallel. Retighten the screws securely and recheck the fence-totable alignment. ASSEMBLY WARNING...
Operation Manual
Page 27
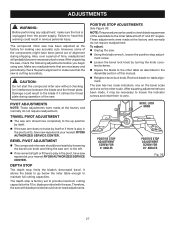
... unpacking the saw, check the following adjustments before you begin using saw . PIVOT ADJUSTMENTS NOTE: These adjustments were made at your nearest RYOBI AUTHORIZED SERVICE CENTER. It allows the blade to go below the miter table enough to -table alignment. blade provided with blade provided should...at the factory and normally do not require readjustment. DEPTH STOP The depth stop is play in serious personal injury. Failure to heed this manual. Retighten bevel lock knob. CAUTION: Do not start the compound miter saw repaired at the factory and normally do not require...
... unpacking the saw, check the following adjustments before you begin using saw . PIVOT ADJUSTMENTS NOTE: These adjustments were made at your nearest RYOBI AUTHORIZED SERVICE CENTER. It allows the blade to go below the miter table enough to -table alignment. blade provided with blade provided should...at the factory and normally do not require readjustment. DEPTH STOP The depth stop is play in serious personal injury. Failure to heed this manual. Retighten bevel lock knob. CAUTION: Do not start the compound miter saw repaired at the factory and normally do not require...

Operation Manual
Page 30
...provided below. • HOW TO ORDER REPAIR PARTS When ordering repair parts, always give the following information: • MODEL NUMBER TS1343L • SERIAL NUMBER Ryobi® is a registered trademark of Authorized Service Centers. • MODEL NO. Some examples of these chemicals: work in . To... WARNING: Some dust created by power sanding, sawing, grinding, drilling, and other reproductive harm. The model number of work. OPERATOR'S MANUAL 10 in a well ventilated area, and work with approved safety equipment, such as those dust masks that you have purchased your tool,...
...provided below. • HOW TO ORDER REPAIR PARTS When ordering repair parts, always give the following information: • MODEL NUMBER TS1343L • SERIAL NUMBER Ryobi® is a registered trademark of Authorized Service Centers. • MODEL NO. Some examples of these chemicals: work in . To... WARNING: Some dust created by power sanding, sawing, grinding, drilling, and other reproductive harm. The model number of work. OPERATOR'S MANUAL 10 in a well ventilated area, and work with approved safety equipment, such as those dust masks that you have purchased your tool,...


