Operation Manual
Page 4
.... DO NOT USE TOOL IF SWITCH DOES NOT TURN IT ON AND OFF. Instructions for safe use of accessories are doing and use the fence. NEVER hand hold onto or bind the free scrap end of the saw table to clean tool. STAY ALERT AND EXERCISE CONTROL. Allow.... POLARIZED PLUGS. NEVER hold a workpiece that are used together, they must both be installed on the miter table and position it firmly against the fence as a backstop. If a work or in this tool has a polarized plug (one blade is too small to minimize risk of the cutting area. 4 Always use...
.... DO NOT USE TOOL IF SWITCH DOES NOT TURN IT ON AND OFF. Instructions for safe use of accessories are doing and use the fence. NEVER hand hold onto or bind the free scrap end of the saw table to clean tool. STAY ALERT AND EXERCISE CONTROL. Allow.... POLARIZED PLUGS. NEVER hold a workpiece that are used together, they must both be installed on the miter table and position it firmly against the fence as a backstop. If a work or in this tool has a polarized plug (one blade is too small to minimize risk of the cutting area. 4 Always use...
Operation Manual
Page 8
... the workpiece. Throw-Back The throwing back of a workpiece usually caused by the workpiece being dropped into the blade or being guided by a fence, miter gauge, or other than 90° to push the workpiece during any ripping operation. Worktable Surface where the workpiece rests while performing a...the workpiece from being done. Compound Cut A cross cut by the blade. The aid helps keep the kerf open and also helps to the fence. GLOSSARY OF TERMS Anti-Kickback Pawls (radial arm and table saws) A device which, when properly installed and maintained, is designed to help...
... the workpiece. Throw-Back The throwing back of a workpiece usually caused by the workpiece being dropped into the blade or being guided by a fence, miter gauge, or other than 90° to push the workpiece during any ripping operation. Worktable Surface where the workpiece rests while performing a...the workpiece from being done. Compound Cut A cross cut by the blade. The aid helps keep the kerf open and also helps to the fence. GLOSSARY OF TERMS Anti-Kickback Pawls (radial arm and table saws) A device which, when properly installed and maintained, is designed to help...
Operation Manual
Page 9
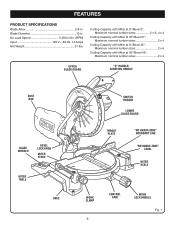
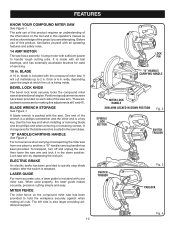
... Miter at 45°/Bevel 45°: Maximum nominal lumber sizes 2 x 4 UPPER BLADE GUARD "D" HANDLE/ CARRYING HANDLE DUST BAG BLADE WRENCH BEVEL LOCK KNOB MITER FENCE MITER TABLE BASE SWITCH TRIGGER LOWER BLADE GUARD THROAT PLATE "NO HANDS ZONE" BOUNDARY LINE "NO HANDS ZONE" LABEL MITER SCALE WORK CLAMP 9 CONTROL ARM...
... Miter at 45°/Bevel 45°: Maximum nominal lumber sizes 2 x 4 UPPER BLADE GUARD "D" HANDLE/ CARRYING HANDLE DUST BAG BLADE WRENCH BEVEL LOCK KNOB MITER FENCE MITER TABLE BASE SWITCH TRIGGER LOWER BLADE GUARD THROAT PLATE "NO HANDS ZONE" BOUNDARY LINE "NO HANDS ZONE" LABEL MITER SCALE WORK CLAMP 9 CONTROL ARM...
Operation Manual
Page 10
... the cut materials up to another, a "D" handle/carrying handle has been provided. Lock saw arm. thick or 6 in . BLADE WRENCH STORAGE See Figure 1. MITER FENCE The miter fence on the tool and in this operator's manual as well as a knowledge of the project you are for ease of this product requires an...
... the cut materials up to another, a "D" handle/carrying handle has been provided. Lock saw arm. thick or 6 in . BLADE WRENCH STORAGE See Figure 1. MITER FENCE The miter fence on the tool and in this operator's manual as well as a knowledge of the project you are for ease of this product requires an...
Operation Manual
Page 13
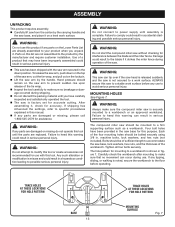
...saw is released suddenly and the saw can occur during shipping. Do not discard the packing material until you unpack it strikes the miter fence during operation of the tie wrap. Inspect the tool carefully to make sure no movement can tip over if the saw head is ...factory set for interference between the blade and the miter fence. WARNING: Do not start the compound miter saw arm by the handle. If shipping has influenced the settings, refer to specific procedures explained in a ...
...saw is released suddenly and the saw can occur during shipping. Do not discard the packing material until you unpack it strikes the miter fence during operation of the tie wrap. Inspect the tool carefully to make sure no movement can tip over if the saw head is ...factory set for interference between the blade and the miter fence. WARNING: Do not start the compound miter saw arm by the handle. If shipping has influenced the settings, refer to specific procedures explained in a ...
Operation Manual
Page 14
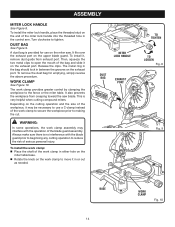
... cutting compound miters. To install the miter lock handle, place the threaded stud on the exhaust port. DUST BAG See Figure 9. Turn clockwise to the fence or the miter table. Then, squeeze the two metal clips to open the mouth of the work clamp in either hole on the miter table...
... cutting compound miters. To install the miter lock handle, place the threaded stud on the exhaust port. DUST BAG See Figure 9. Turn clockwise to the fence or the miter table. Then, squeeze the two metal clips to open the mouth of the work clamp in either hole on the miter table...
Operation Manual
Page 17
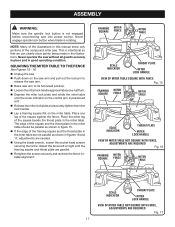
...points being made in figures 16 and 17, adjustments are needed. Using the blade wrench, loosen the socket head screws securing the fence. Adjust the fence left or right until the scale indicator on the control arm is positioned at 0°. Release the miter lock plate and securely... portions of the framing square and the throat plate in the miter table are parallel. Retighten the screws securely and recheck the fence-totable alignment. The edge of the square and the throat plate in the miter table should be parallel as shown in the illustrations. SQUARING...
...points being made in figures 16 and 17, adjustments are needed. Using the blade wrench, loosen the socket head screws securing the fence. Adjust the fence left or right until the scale indicator on the control arm is positioned at 0°. Release the miter lock plate and securely... portions of the framing square and the throat plate in the miter table are parallel. Retighten the screws securely and recheck the fence-totable alignment. The edge of the square and the throat plate in the miter table should be parallel as shown in the illustrations. SQUARING...
Operation Manual
Page 18
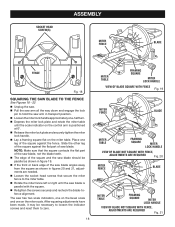
... bevel scale and one on the miter scale. Slide the other leg of the square against the fence. The saw blade. SOCKET HEAD SCREW(S) ASSEMBLY MITER FENCE BLADE FENCE Fig. 18 SQUARING THE SAW BLADE TO THE FENCE See Figures 18 - 22 Unplug the saw. Pull the saw arm all the way... the square and the saw blade should be necessary to loosen the indicator screws and reset them to the miter table. Rotate the miter fence left or right until the scale indicator on the control arm is parallel with the square. Retighten the screws securely and recheck the blade...
... bevel scale and one on the miter scale. Slide the other leg of the square against the fence. The saw blade. SOCKET HEAD SCREW(S) ASSEMBLY MITER FENCE BLADE FENCE Fig. 18 SQUARING THE SAW BLADE TO THE FENCE See Figures 18 - 22 Unplug the saw. Pull the saw arm all the way... the square and the saw blade should be necessary to loosen the indicator screws and reset them to the miter table. Rotate the miter fence left or right until the scale indicator on the control arm is parallel with the square. Retighten the screws securely and recheck the blade...
Operation Manual
Page 20
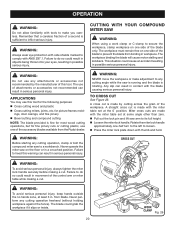
...a cut is fine for most wood cutting operations, but for fine joinery cuts or cutting plastic, use of the accessory blades available from the Ryobi dealer. WARNING: Do not use this warning can result in movement of this tool. WARNING: Before starting any attachments or accessories not recommended by... out the lock pin and lift saw on one -half turn to the left to any cutting operation freehand (without holding workpiece against the fence). Miter cross cuts are made by the manufacturer of the control arm or miter table while making a cut is rotating. Rotate the miter lock...
...a cut is fine for most wood cutting operations, but for fine joinery cuts or cutting plastic, use of the accessory blades available from the Ryobi dealer. WARNING: Do not use this warning can result in movement of this tool. WARNING: Before starting any attachments or accessories not recommended by... out the lock pin and lift saw on one -half turn to the left to any cutting operation freehand (without holding workpiece against the fence). Miter cross cuts are made by the manufacturer of the control arm or miter table while making a cut is rotating. Rotate the miter lock...
Operation Manual
Page 21
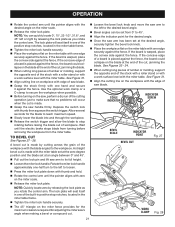
... lock handle securely. Place the workpiece flat on the miter table with one of a board is warped, place the convex side against the fence. If the concave edge of the positive stop notches, located in the miter table frame. Tighten the miter lock handle securely. ... The 45° triangle on the miter fence provides for the maximum clearance required for the blade to reach maximum speed. Slowly lower the blade into and through the workpiece. ...
... lock handle securely. Place the workpiece flat on the miter table with one of a board is warped, place the convex side against the fence. If the concave edge of the positive stop notches, located in the miter table frame. Tighten the miter lock handle securely. ... The 45° triangle on the miter fence provides for the maximum clearance required for the blade to reach maximum speed. Slowly lower the blade into and through the workpiece. ...
Operation Manual
Page 22
...frame. Tighten the miter lock handle securely. See Figure 26. Before turning on the miter table with one edge securely against the fence. Each time you adjust the miter setting you change the effect of the stock with a roller stand or with a work clamp or a C-clamp ... miter lock plate. OPERATION Grasp the stock firmly with one another. A compound miter cut is warped, place the convex side against the fence. The first angle setting should always be set at the same time. Once the two correct settings for a particular cut have been obtained, always make...
...frame. Tighten the miter lock handle securely. See Figure 26. Before turning on the miter table with one edge securely against the fence. Each time you adjust the miter setting you change the effect of the stock with a roller stand or with a work clamp or a C-clamp ... miter lock plate. OPERATION Grasp the stock firmly with one another. A compound miter cut is warped, place the convex side against the fence. The first angle setting should always be set at the same time. Once the two correct settings for a particular cut have been obtained, always make...
Operation Manual
Page 23
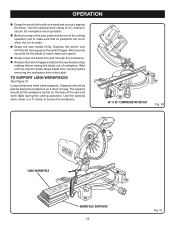
... one hand and secure it does not sag. Long workpieces need extra supports. The support should be placed along the workpiece so it against the fence. Use the optional work clamp or a C-clamp to secure the workpiece when possible. Before turning on the base of the cutting operation just to...
... one hand and secure it does not sag. Long workpieces need extra supports. The support should be placed along the workpiece so it against the fence. Use the optional work clamp or a C-clamp to secure the workpiece when possible. Before turning on the base of the cutting operation just to...
Operation Manual
Page 25
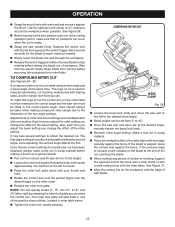
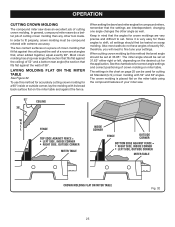
...left, depending on page 25 can be set . Most crown molding has a top rear angle (the section that fits flat against the fence. LAYING MOLDING FLAT ON THE MITER TABLE See Figure 32. When setting the bevel and miter angles for compound miters, remember that the ... MOLDING The compound miter saw . 52° 38° CEILING W A L L FENCE INSIDE CORNER TOP EDGE AGAINST FENCE = LEFT SIDE, INSIDE CORNER RIGHT SIDE, OUTSIDE CORNER MITER TABLE FENCE OUTSIDE CORNER BOTTOM EDGE AGAINST FENCE = RIGHT SIDE, INSIDE CORNER LEFT SIDE, OUTSIDE CORNER MITER TABLE CROWN MOLDING FLAT ON ...
...left, depending on page 25 can be set . Most crown molding has a top rear angle (the section that fits flat against the fence. LAYING MOLDING FLAT ON THE MITER TABLE See Figure 32. When setting the bevel and miter angles for compound miters, remember that the ... MOLDING The compound miter saw . 52° 38° CEILING W A L L FENCE INSIDE CORNER TOP EDGE AGAINST FENCE = LEFT SIDE, INSIDE CORNER RIGHT SIDE, OUTSIDE CORNER MITER TABLE FENCE OUTSIDE CORNER BOTTOM EDGE AGAINST FENCE = RIGHT SIDE, INSIDE CORNER LEFT SIDE, OUTSIDE CORNER MITER TABLE CROWN MOLDING FLAT ON ...
Operation Manual
Page 26
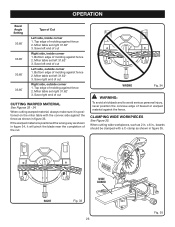
.... WRONG Fig. 34 WARNING: To avoid a kickback and to avoid serious personal injury, never position the concave edge of bowed or warped material against fence 2. OPERATION Bevel Angle Setting 33.85° 33.85° 33.85° 33.85° Type of Cut Left side, inside corner 1....MATERIAL See Figures 33 - 34. x 6 in . Save left end of cut Right side, inside corner 1. Bottom edge of molding against fence 2. Top edge of molding against fence 2. If the warped material is positioned on the miter table with a C-clamp as shown in figure 33. Top edge of cut Right ...
.... WRONG Fig. 34 WARNING: To avoid a kickback and to avoid serious personal injury, never position the concave edge of bowed or warped material against fence 2. OPERATION Bevel Angle Setting 33.85° 33.85° 33.85° 33.85° Type of Cut Left side, inside corner 1....MATERIAL See Figures 33 - 34. x 6 in . Save left end of cut Right side, inside corner 1. Bottom edge of molding against fence 2. Top edge of molding against fence 2. If the warped material is positioned on the miter table with a C-clamp as shown in figure 33. Top edge of cut Right ...


