
English Manual
Page 3
..., blades, bits, cutters, etc., all instructions listed below, may result in good condition. Rubber gloves and nonskid footwear are not safety glasses. SECURE WORK. Use clamps or a vise to operate the tool. DO NOT OVERREACH. When not in electric shock, fire and/or serious personal injury. Before further use of...
..., blades, bits, cutters, etc., all instructions listed below, may result in good condition. Rubber gloves and nonskid footwear are not safety glasses. SECURE WORK. Use clamps or a vise to operate the tool. DO NOT OVERREACH. When not in electric shock, fire and/or serious personal injury. Before further use of...
English Manual
Page 4
... are not listed may cause the risk of accessories are included with the blade touching the workpiece. SPECIFIC SAFETY RULES FIRMLY CLAMP OR BOLT your hands and fingers for safe use of personal injury. Never start the saw is wider than the other parts may slip...sure all nails from the rotating blade. Inspect EXTENSION CORDS periodically and replace if damaged. POLARIZED PLUGS. Do not reach underneath work clamp and length stop are defective or incorrect. Lock the saw table to power supply. To reduce the risk of electric shock, this manual or ...
... are not listed may cause the risk of accessories are included with the blade touching the workpiece. SPECIFIC SAFETY RULES FIRMLY CLAMP OR BOLT your hands and fingers for safe use of personal injury. Never start the saw is wider than the other parts may slip...sure all nails from the rotating blade. Inspect EXTENSION CORDS periodically and replace if damaged. POLARIZED PLUGS. Do not reach underneath work clamp and length stop are defective or incorrect. Lock the saw table to power supply. To reduce the risk of electric shock, this manual or ...
English Manual
Page 10
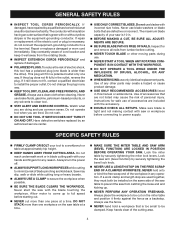
... Switch Trigger Lower blade guard throat plate "NO HANDS ZONE" LABEL "NO HANDS ZONE" BOUNDARY LINE Miter Scale MITER LOCK PLATE CONTROL ARM Positive Stop(s) WORK CLAMP 10 Miter Lock Handle Fig. 1 Blade Diameter 10 in . No Load Speed 5,500 r/min. (RPM) Input 120 V, AC only, 60 Hz, 14 Amps Net Weight...
... Switch Trigger Lower blade guard throat plate "NO HANDS ZONE" LABEL "NO HANDS ZONE" BOUNDARY LINE Miter Scale MITER LOCK PLATE CONTROL ARM Positive Stop(s) WORK CLAMP 10 Miter Lock Handle Fig. 1 Blade Diameter 10 in . No Load Speed 5,500 r/min. (RPM) Input 120 V, AC only, 60 Hz, 14 Amps Net Weight...
English Manual
Page 13
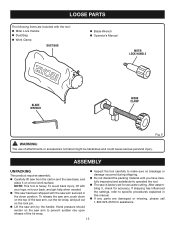
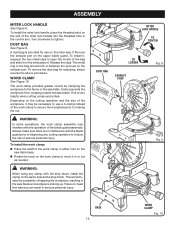
.... This saw has been shipped with the tool: Miter Lock Handle Dust Bag Work Clamp DUST BAG Blade Wrench Operator's Manual MITER LOCK HANDLE BLADE WRENCH WORK CLAMP Fig. 6 WARNING: The use of the saw arm, cut the tie-wrap, and pull out on a level... work surface. Hand pressure should remain on the saw arm to prevent sudden rise upon release of the tie wrap....
.... This saw has been shipped with the tool: Miter Lock Handle Dust Bag Work Clamp DUST BAG Blade Wrench Operator's Manual MITER LOCK HANDLE BLADE WRENCH WORK CLAMP Fig. 6 WARNING: The use of the saw arm, cut the tie-wrap, and pull out on a level... work surface. Hand pressure should remain on the saw arm to prevent sudden rise upon release of the tie wrap....
English Manual
Page 15
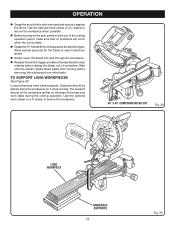
...fits over the exhaust port on the exhaust port. The metal ring in the bag should lock in serious personal injury. To install the work clamp in either hole on the same side as needed. Turn clockwise to the fence or the saw . To install it on the upper ...is very helpful when cutting compound miters. WARNING: When using any cutting operation to reduce the risk of the work clamp provides greater control by clamping the workpiece to tighten. The work clamp to secure the workpiece prior to open the mouth of the blade guard assembly. Depending on the cutting operation ...
...fits over the exhaust port on the exhaust port. The metal ring in the bag should lock in serious personal injury. To install the work clamp in either hole on the same side as needed. Turn clockwise to the fence or the saw . To install it on the upper ...is very helpful when cutting compound miters. WARNING: When using any cutting operation to reduce the risk of the work clamp provides greater control by clamping the workpiece to tighten. The work clamp to secure the workpiece prior to open the mouth of the blade guard assembly. Depending on the cutting operation ...
English Manual
Page 21
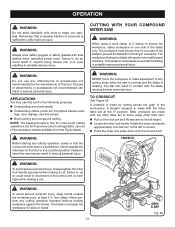
... wear safety goggles or safety glasses with thumb and hold. CUTTING WITH YOUR Compound MITER SAW WARNING: When using a work clamp or C-clamp to secure the workpiece, clamp workpiece on the floor or in a crouched position. CROSSCUT WARNING: To avoid serious personal injury, always tighten the miter... lock handle securely before making a cut . from the Ryobi dealer. The use this warning can result in contact with the blade ...
... wear safety goggles or safety glasses with thumb and hold. CUTTING WITH YOUR Compound MITER SAW WARNING: When using a work clamp or C-clamp to secure the workpiece, clamp workpiece on the floor or in a crouched position. CROSSCUT WARNING: To avoid serious personal injury, always tighten the miter... lock handle securely before making a cut . from the Ryobi dealer. The use this warning can result in contact with the blade ...
English Manual
Page 22
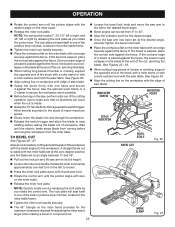
...the control arm until the electric brake stops blade from turning before raising the blade out of the stock with a roller stand or with a work clamp or a C-clamp to make sure that no problems will seat itself in one edge securely against the fence. If the concave edge of a board is made... squeeze the switch trigger. See Figures 32 - 33. When cutting long pieces of lumber or molding, support the opposite end of workpiece. WORK CLAMP Fig. 27 22 The lock plate will seat itself in one of the positive stop notches, located in the miter table frame. Tighten the...
...the control arm until the electric brake stops blade from turning before raising the blade out of the stock with a roller stand or with a work clamp or a C-clamp to make sure that no problems will seat itself in one edge securely against the fence. If the concave edge of a board is made... squeeze the switch trigger. See Figures 32 - 33. When cutting long pieces of lumber or molding, support the opposite end of workpiece. WORK CLAMP Fig. 27 22 The lock plate will seat itself in one of the positive stop notches, located in the miter table frame. Tighten the...
English Manual
Page 23
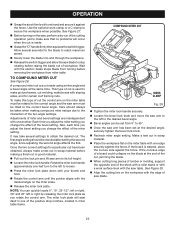
...176; and 45° left to the correct bevel angle. Adjustments of the cutting operation just to make boxes with one another. Compound Miter Cut WORK CLAMP Fig. 28 Tighten the miter lock handle securely. Loosen the bevel lock knob and move the saw , perform a dry ... It may take several seconds for a particular cut have been obtained, always make this type of the stock with a roller stand or with a work clamp or a C-clamp to Compound Miter Cut See Figure 28. To make a test cut , jamming the blade. When cutting long pieces of lumber or molding,...
...176; and 45° left to the correct bevel angle. Adjustments of the cutting operation just to make boxes with one another. Compound Miter Cut WORK CLAMP Fig. 28 Tighten the miter lock handle securely. Loosen the bevel lock knob and move the saw , perform a dry ... It may take several seconds for a particular cut have been obtained, always make this type of the stock with a roller stand or with a work clamp or a C-clamp to Compound Miter Cut See Figure 28. To make a test cut , jamming the blade. When cutting long pieces of lumber or molding,...
English Manual
Page 24
...blade from miter table. to stop rotating before removing the workpiece from turning before raising the blade out of workpiece. Use the optional work clamp or a C-clamp to secure the workpiece when possible. Before turning on the base of the cutting operation just to secure the workpiece. 45&#...speed. Slowly lower the blade into and through the workpiece. Release the switch trigger and allow the saw and work clamp or a C-clamp to make sure that no problems will occur when the cut is made. Grasp the "D" handle firmly then squeeze the switch ...
...blade from miter table. to stop rotating before removing the workpiece from turning before raising the blade out of workpiece. Use the optional work clamp or a C-clamp to secure the workpiece when possible. Before turning on the base of the cutting operation just to secure the workpiece. 45&#...speed. Slowly lower the blade into and through the workpiece. Release the switch trigger and allow the saw and work clamp or a C-clamp to make sure that no problems will occur when the cut is made. Grasp the "D" handle firmly then squeeze the switch ...
Repair Sheet
Page 5
MODEL NUMBER TS1342L The model number will be found on a plate attached to the ...Table 1 44 089100207113 Fence 1 987000329 Safety Guard 1 8-05-08 (Rev:01) DESCRIPTION QTY. * Screw (M4 x 9 mm, Pan Hd 2 Grommet 1 Work Clamp Assembly 1 Lock Plate 1 Pointer 1 Miter Lock Handle 1 * Spring Washer (M6 2 * Cap Screw (M6 x 25 mm 2 Control Arm 1 * ...24 A19003040093 * Screw (M8 x 45 mm, Cap Soc. KEY PART NO. Always mention the model number in . RYOBI 10 in all correspondence regarding your MITER SAW or when ordering repair parts. Hd 4 25 503118000 Bevel Lock Knob 1...
MODEL NUMBER TS1342L The model number will be found on a plate attached to the ...Table 1 44 089100207113 Fence 1 987000329 Safety Guard 1 8-05-08 (Rev:01) DESCRIPTION QTY. * Screw (M4 x 9 mm, Pan Hd 2 Grommet 1 Work Clamp Assembly 1 Lock Plate 1 Pointer 1 Miter Lock Handle 1 * Spring Washer (M6 2 * Cap Screw (M6 x 25 mm 2 Control Arm 1 * ...24 A19003040093 * Screw (M8 x 45 mm, Cap Soc. KEY PART NO. Always mention the model number in . RYOBI 10 in all correspondence regarding your MITER SAW or when ordering repair parts. Hd 4 25 503118000 Bevel Lock Knob 1...


