English Manual
Page 22
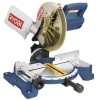
... miter lock handle securely. Place the workpiece flat on the saw, perform a dry run of the cutting operation just to make sure that no problems will seat itself in the miter table frame. Tighten the miter lock handle securely. The 45° triangle on workpiece with edge of...
... miter lock handle securely. Place the workpiece flat on the saw, perform a dry run of the cutting operation just to make sure that no problems will seat itself in the miter table frame. Tighten the miter lock handle securely. The 45° triangle on workpiece with edge of...
English Manual
Page 23
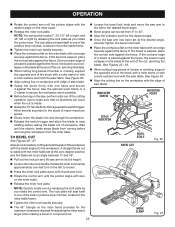
... the workpiece when possible. See Figure 30. Align the cutting line on the saw blade. 23 Make a test cut molding, make sure that no problems will seat itself in one of the positive stop rotating before making compound miter setups due to the interaction of the cutting operation just to...
... the workpiece when possible. See Figure 30. Align the cutting line on the saw blade. 23 Make a test cut molding, make sure that no problems will seat itself in one of the positive stop rotating before making compound miter setups due to the interaction of the cutting operation just to...
English Manual
Page 24
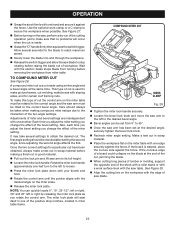
.... Slowly lower the blade into and through the workpiece. Release the switch trigger and allow the saw blade to make sure that no problems will occur when the cut is made. Grasp the "D" handle firmly then squeeze the switch trigger. Use the optional work clamp or a C-clamp to...
.... Slowly lower the blade into and through the workpiece. Release the switch trigger and allow the saw blade to make sure that no problems will occur when the cut is made. Grasp the "D" handle firmly then squeeze the switch trigger. Use the optional work clamp or a C-clamp to...


