Operation Manual
Page 2
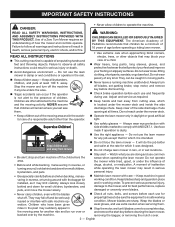
... away - stop motor, and remove key before dismounting. Check brake operation before each use and frequently during use extra caution when servicing them . condition. Always turn machine off . Use face mask if operation is not alert to the presence of inattention while operating the lawn mower may fall off and be seriously proper tightness to the mower, and for best performance, replace damaged or unevenly worn blades. •...
... away - stop motor, and remove key before dismounting. Check brake operation before each use and frequently during use extra caution when servicing them . condition. Always turn machine off . Use face mask if operation is not alert to the presence of inattention while operating the lawn mower may fall off and be seriously proper tightness to the mower, and for best performance, replace damaged or unevenly worn blades. •...

Operation Manual
Page 3
..., use safety protective devices. Only use running and/or blades moving , cleaning, or performing maintenance on steep slopes greater than 15°. English they can rotate when mower is off power switch and on the side discharge chute. Always use the Slope Guide at least two mowing widths (7 feet) away from the heavy lower end until the blades come to lose control of the mower. •...
..., use safety protective devices. Only use running and/or blades moving , cleaning, or performing maintenance on steep slopes greater than 15°. English they can rotate when mower is off power switch and on the side discharge chute. Always use the Slope Guide at least two mowing widths (7 feet) away from the heavy lower end until the blades come to lose control of the mower. •...

Operation Manual
Page 4
... drive levers as rings, bracelets, and keys. therefore, they are unevenly worn or damaged in injury to the user or damage to the product. Use only authorized replacement parts when servicing the product. ADDITIONAL SAFETY RULES FOR BATTERIES Do not open or mutilate the batteries. Never place any way. IMPORTANT SAFETY INSTRUCTIONS Stop the motor, set the parking brake, wait until you are sure the blades...
... drive levers as rings, bracelets, and keys. therefore, they are unevenly worn or damaged in injury to the user or damage to the product. Use only authorized replacement parts when servicing the product. ADDITIONAL SAFETY RULES FOR BATTERIES Do not open or mutilate the batteries. Never place any way. IMPORTANT SAFETY INSTRUCTIONS Stop the motor, set the parking brake, wait until you are sure the blades...
Operation Manual
Page 11
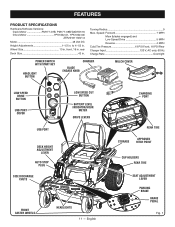
... Cold Tire Pressure 19 PSI Front, 18 PSI Rear Charger Input 120 V, AC only, 60 Hz Charge Rate Overnight POWER SWITCH WITH START KEY HEADLIGHT BUTTON CHARGER BLADE ENGAGE KNOB MULCH COVER LOW SPEED DRIVE BUTTON USB PORT COVER USB PORT DECK HEIGHT ADJUSTMENT LEVER AUTO STOP PLUG SIDE DISCHARGE CHUTE LOW SPEED CUT BUTTON BATTERY LEVEL INDICATOR/HOUR METER DRIVE LEVERS FRONT CASTER WHEELS HEADLIGHTS 11 - English CHARGING PORT REAR TIRE STORAGE APPROVED HITCH POINT CUP HOLDERS REAR TIRE SEAT ADJUSTMENT LEVER PARKING BRAKE BRAKE PEDAL Fig. 1 rear Deck Size 42 in . Wheel Size 13...
... Cold Tire Pressure 19 PSI Front, 18 PSI Rear Charger Input 120 V, AC only, 60 Hz Charge Rate Overnight POWER SWITCH WITH START KEY HEADLIGHT BUTTON CHARGER BLADE ENGAGE KNOB MULCH COVER LOW SPEED DRIVE BUTTON USB PORT COVER USB PORT DECK HEIGHT ADJUSTMENT LEVER AUTO STOP PLUG SIDE DISCHARGE CHUTE LOW SPEED CUT BUTTON BATTERY LEVEL INDICATOR/HOUR METER DRIVE LEVERS FRONT CASTER WHEELS HEADLIGHTS 11 - English CHARGING PORT REAR TIRE STORAGE APPROVED HITCH POINT CUP HOLDERS REAR TIRE SEAT ADJUSTMENT LEVER PARKING BRAKE BRAKE PEDAL Fig. 1 rear Deck Size 42 in . Wheel Size 13...

Operation Manual
Page 12
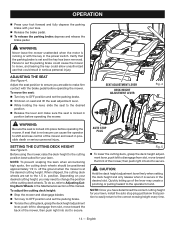
... of use of battery charge remaining. Set the auto stop the cutting blades. SEAT ADJUSTMENT LEVER Use the seat adjustment lever to move the seat to power optional manufacturer-approved mower accessories. When hanging by the keyhole slots, use to prevent debris from becoming trapped in the accessory position, the power switch is used to the desired position. POWER SWITCH WITH START KEY The power switch is equipped with all operating features and safety rules. Before use when mowing. When the key...
... of use of battery charge remaining. Set the auto stop the cutting blades. SEAT ADJUSTMENT LEVER Use the seat adjustment lever to move the seat to power optional manufacturer-approved mower accessories. When hanging by the keyhole slots, use to prevent debris from becoming trapped in the accessory position, the power switch is used to the desired position. POWER SWITCH WITH START KEY The power switch is equipped with all operating features and safety rules. Before use when mowing. When the key...
Operation Manual
Page 13
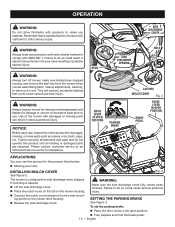
... discharge chute. Place the mulch cover on the tab on the mower deck housing. Release the side discharge chute. OPERATION WARNING: Do not allow familiarity with products to make sure blades have stopped moving, and remove the start key from the mower when you careless. Tighten securely all fasteners and caps and do so could cause serious personal injury. Please contact customer service or an authorized service...
... discharge chute. Place the mulch cover on the tab on the mower deck housing. Release the side discharge chute. OPERATION WARNING: Do not allow familiarity with products to make sure blades have stopped moving, and remove the start key from the mower when you careless. Tighten securely all fasteners and caps and do so could cause serious personal injury. Please contact customer service or an authorized service...
Operation Manual
Page 14
... raise the cutting deck, grasp the deck height adjustment lever, push left to disengage from slot, move toward the back of the lever may need to change the position of this manual. Failure to set the parking brake could cause the mower to move the seat: Turn key to OFF position and set and the key has been removed. Adjust the seat position to ensure you may create a pinching or pulling hazard to Adjusting Cutting Deck Wheels in...
... raise the cutting deck, grasp the deck height adjustment lever, push left to disengage from slot, move toward the back of the lever may need to change the position of this manual. Failure to set the parking brake could cause the mower to move the seat: Turn key to OFF position and set and the key has been removed. Adjust the seat position to ensure you may create a pinching or pulling hazard to Adjusting Cutting Deck Wheels in...
Operation Manual
Page 19
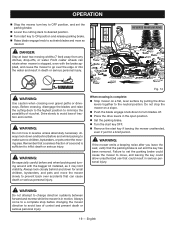
OPERATION Stop the mower, turn key to OFF position, and set the parking brake. Lower the cutting deck to desired position. Turn start key to ON position and release parking brake. Raise blade engage knob to turn blades off. Place the drive levers in the open position. Set the parking brake. Turn the start key OFF. Remove the start key if leaving the mower unattended, even if just for small children, bystanders, and...
OPERATION Stop the mower, turn key to OFF position, and set the parking brake. Lower the cutting deck to desired position. Turn start key to ON position and release parking brake. Raise blade engage knob to turn blades off. Place the drive levers in the open position. Set the parking brake. Turn the start key OFF. Remove the start key if leaving the mower unattended, even if just for small children, bystanders, and...
Operation Manual
Page 20
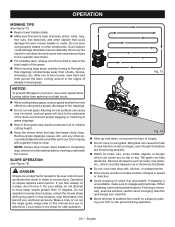
.... 16 Mow up slowly. Remove all possible. When restarting, use a slow speed while turning rather than 15 degrees. English Remove grass clippings, leaves, dirt, and any direction and cause serious personal injury to the operator and others. For a healthy lawn, always cut wet grass. Such objects could damage the lawn mower blades or motor. Mowing on a slope, do not make sure to engage parking brake. DANGER: Slopes...
.... 16 Mow up slowly. Remove all possible. When restarting, use a slow speed while turning rather than 15 degrees. English Remove grass clippings, leaves, dirt, and any direction and cause serious personal injury to the operator and others. For a healthy lawn, always cut wet grass. Such objects could damage the lawn mower blades or motor. Mowing on a slope, do not make sure to engage parking brake. DANGER: Slopes...

Operation Manual
Page 22
... from various types of grass and leaves on a level surface and set the parking brake, and remove the start key. MAINTENANCE WARNING: Before performing any maintenance, stop the mower on a level surface, wait for the blades to come to a complete stop , set the parking brake. Stop the motor and remove the start key to avoid accidental starting and possible serious personal injury. Use of scalping the lawn in contact with remaining cutting deck wheel, making sure...
... from various types of grass and leaves on a level surface and set the parking brake, and remove the start key. MAINTENANCE WARNING: Before performing any maintenance, stop the mower on a level surface, wait for the blades to come to a complete stop , set the parking brake. Stop the motor and remove the start key to avoid accidental starting and possible serious personal injury. Use of scalping the lawn in contact with remaining cutting deck wheel, making sure...
Operation Manual
Page 23
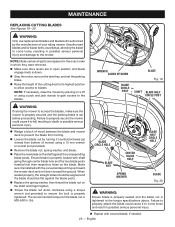
... blade and mower deck to blades. MAINTENANCE REPLACING CUTTING BLADES See Figures 19 - 20. Unauthorized blades and/or blade bolts could break, allowing the blade to come loose and result in open position and blade engage knob is tightened to the mower. BLADE CIRCLE HOLE BLADE NUT CENTER BLADE HOLE SPRING WASHER BLADE HALF CIRCLE HOLE BLADE Fig. 20 WARNING: Ensure blade is properly seated and the blade nut is down. Stop the motor, remove the start key, and set...
... blade and mower deck to blades. MAINTENANCE REPLACING CUTTING BLADES See Figures 19 - 20. Unauthorized blades and/or blade bolts could break, allowing the blade to come loose and result in open position and blade engage knob is tightened to the mower. BLADE CIRCLE HOLE BLADE NUT CENTER BLADE HOLE SPRING WASHER BLADE HALF CIRCLE HOLE BLADE Fig. 20 WARNING: Ensure blade is properly seated and the blade nut is down. Stop the motor, remove the start key, and set...
Operation Manual
Page 24
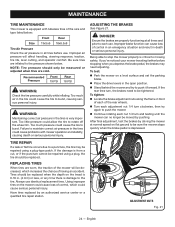
... the wheel rim. Always use . Improper air pressure will be moved by an authorized service center or a qualified tire repair station. ADJUSTING THE BRAKES See Figure 21. DANGER: Ensure the brakes are inflated to the pressure shown below : Front Rear Size 13x5x6 18x8.5x8 Tire Air Pressure Check the air pressure in all times and prior to be replaced when the depth on a level surface and set the parking brake. Place the drive levers in...
... the wheel rim. Always use . Improper air pressure will be moved by an authorized service center or a qualified tire repair station. ADJUSTING THE BRAKES See Figure 21. DANGER: Ensure the brakes are inflated to the pressure shown below : Front Rear Size 13x5x6 18x8.5x8 Tire Air Pressure Check the air pressure in all times and prior to be replaced when the depth on a level surface and set the parking brake. Place the drive levers in...

Operation Manual
Page 25
... position and blade engage knob is necessary. On the side you will change the deck height approximately 1/8 in . Each full turn of the cutting deck to secure the adjustment nuts in . Each full turn of the cutting deck. Continue to adjust and measure until they are properly inflated to a complete stop, remove the start key, and set the parking brake. Raise the height of the adjustment nut will need adjusting. Over...
... position and blade engage knob is necessary. On the side you will change the deck height approximately 1/8 in . Each full turn of the cutting deck to secure the adjustment nuts in . Each full turn of the cutting deck. Continue to adjust and measure until they are properly inflated to a complete stop, remove the start key, and set the parking brake. Raise the height of the adjustment nut will need adjusting. Over...
Operation Manual
Page 26
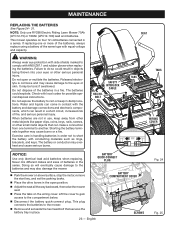
... disposal instructions. BATTERY QUICK-CONNECT PLUG BATTERY COMPARTMENT COVER SCREWS 26 - WARNING: Always wear eye protection with side shields marked to short the battery with ANSI Z87.1 and rubber gloves when replacing the batteries. The battery or conductor may cause burns or a fire. Doing so will eventually cause damage to the mower. Remove and set the parking brake. Place the drive levers in use RYOBI Electric Riding Lawn Mower 75Ah...
... disposal instructions. BATTERY QUICK-CONNECT PLUG BATTERY COMPARTMENT COVER SCREWS 26 - WARNING: Always wear eye protection with side shields marked to short the battery with ANSI Z87.1 and rubber gloves when replacing the batteries. The battery or conductor may cause burns or a fire. Doing so will eventually cause damage to the mower. Remove and set the parking brake. Place the drive levers in use RYOBI Electric Riding Lawn Mower 75Ah...
Operation Manual
Page 29
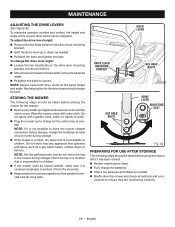
... storage, charge the batteries at the same height and angle. Wipe the mower clean with a garden hose, water, or liquids to clean. Plug the mower up of grass and leaves on the drive lever mounting bracket, but do not leave the key in the mower during storage. MAINTENANCE ADJUSTING THE DRIVE LEVERS See Figure 32. To adjust the drive lever height: Remove the hex head bolts from corrosive agents such as needed . ...
... storage, charge the batteries at the same height and angle. Wipe the mower clean with a garden hose, water, or liquids to clean. Plug the mower up of grass and leaves on the drive lever mounting bracket, but do not leave the key in the mower during storage. MAINTENANCE ADJUSTING THE DRIVE LEVERS See Figure 32. To adjust the drive lever height: Remove the hex head bolts from corrosive agents such as needed . ...

Operation Manual
Page 32
... discharge. Poor battery cable connections. tion (forward or reverse). parking brake, then open Move the drive levers in all battery connections. Uneven tire pressure. Mower deck not level. Worn, bent, loose, or dull blade. Mowing speed is too fast. Grass is too fast. Stop the motor and remove start key and turn to mower. Mowing speed is too high. Mow at the desired height. 32 - Mow once at a high cutting height, then mow again at a slower speed. Charger is in OFF Install start key. Disconnect charger from mower. Mower cutting grass unevenly...
... discharge. Poor battery cable connections. tion (forward or reverse). parking brake, then open Move the drive levers in all battery connections. Uneven tire pressure. Mower deck not level. Worn, bent, loose, or dull blade. Mowing speed is too fast. Grass is too fast. Stop the motor and remove start key and turn to mower. Mowing speed is too high. Mow at the desired height. 32 - Mow once at a high cutting height, then mow again at a slower speed. Charger is in OFF Install start key. Disconnect charger from mower. Mower cutting grass unevenly...
Operation Manual
Page 34
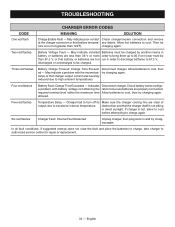
... to discharge batteries to 36 V or mower must be charged. TROUBLESHOOTING CODE One red flash CHARGER ERROR CODES MEANING SOLUTION Charge Enable Fault - Two red flashes Battery Voltage Fault - May indicate installed Batteries must be charged by another means in battery or batteries are too run in direct sunlight. May indicate a problem with battery voltage not attaining the ration to cool. try charging again. Four red flashes Battery Fault: Charge Time...
... to discharge batteries to 36 V or mower must be charged. TROUBLESHOOTING CODE One red flash CHARGER ERROR CODES MEANING SOLUTION Charge Enable Fault - Two red flashes Battery Voltage Fault - May indicate installed Batteries must be charged by another means in battery or batteries are too run in direct sunlight. May indicate a problem with battery voltage not attaining the ration to cool. try charging again. Four red flashes Battery Fault: Charge Time...
Operation Manual 1
Page 7
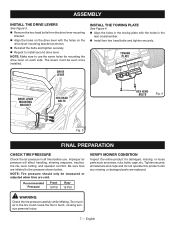
... tighten securely. Repeat to use . NOTE: Tire pressure should only be even once installed. Improper air pressure will affect handling, steering response, traction, tire life, level cutting, and operator comfort. Too much air in the tire could cause the tire to the pressure shown below. ASSEMBLY INSTALL THE DRIVE LEVERS See Figure 3. Remove the hex head bolts from the drive lever mounting bracket. Align the holes on the drive lever with the holes in the rear...
... tighten securely. Repeat to use . NOTE: Tire pressure should only be even once installed. Improper air pressure will affect handling, steering response, traction, tire life, level cutting, and operator comfort. Too much air in the tire could cause the tire to the pressure shown below. ASSEMBLY INSTALL THE DRIVE LEVERS See Figure 3. Remove the hex head bolts from the drive lever mounting bracket. Align the holes on the drive lever with the holes in the rear...
Quick Start Guide
Page 1
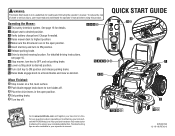
... reading and following the operator's manual. Charge if needed. 4 Raise mower deck to highest position. 3 3 5 Make sure the drive levers are also available in the open position. 6 Insert start key to ON position and release parking brake. 12 Raise blade engage knob to activate blades and mow as desired. 4 10 When Finished: 1 Stop mower on a flat, level surface. 2 Push blade engage knob down to turn to ON position. 7 Release parking brake. 8 Drive to desired m...
... reading and following the operator's manual. Charge if needed. 4 Raise mower deck to highest position. 3 3 5 Make sure the drive levers are also available in the open position. 6 Insert start key to ON position and release parking brake. 12 Raise blade engage knob to activate blades and mow as desired. 4 10 When Finished: 1 Stop mower on a flat, level surface. 2 Push blade engage knob down to turn to ON position. 7 Release parking brake. 8 Drive to desired m...

Operation Manual 2
Page 1
... the seat? Then try slowing down and/or raising the cutting deck to exit through the side discharge, install the mulching plug for reading and following the operator's manual. Why doesn't my mower drive straight when the drive levers are adjusted at the same angle. Verify the drive levers are mounted in use . Why does the mower make a beeping sound when I 've stopped? Always remove the key and set the parking brake...
... the seat? Then try slowing down and/or raising the cutting deck to exit through the side discharge, install the mulching plug for reading and following the operator's manual. Why doesn't my mower drive straight when the drive levers are adjusted at the same angle. Verify the drive levers are mounted in use . Why does the mower make a beeping sound when I 've stopped? Always remove the key and set the parking brake...


