Ryobi P1121 Support and Manuals
Get Help and Manuals for this Ryobi item

Ryobi P1121 Videos

P1121 Error - Coolant Control Valve - 2007 Prius
Duration: 17:23
Total Views: 11,315
Duration: 17:23
Total Views: 11,315
Popular Ryobi P1121 Manual Pages
Operation Manual 9 - Page 2

...parts.
Do not let gasoline, oils, petroleum-based products, etc. IMPORTANT SAFETY INSTRUCTIONS
1. DANGER: TO REDUCE RISK OF FIRE
OR ELECTRIC SHOCK CAREFULLY FOLLOW THESE INSTRUCTIONS...have the charger replaced by the ...manual, on , tripped over, come in electric shock.
Keep cord and charger from heat to prevent damage to an authorized serviceman when service or repair...
Operation Manual 9 - Page 4
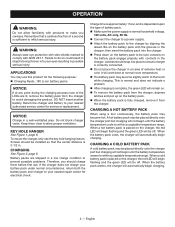
...Press down on the battery pack to be installed so that a careless fraction of extreme heat or cold. This is normal and does not indicate a problem.
After charging is fully charged,... cold battery pack may become hot.
Return the charger and battery to your nearest repair center for service or replacement. When the battery pack warms, the charger will work best at any point during...
Operation Manual 9 - Page 5
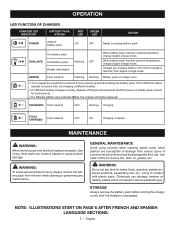
... complete
MAINTENANCE
WARNING:
When servicing use . Most plastics are susceptible to repeat the conditions a second time by their use only identical replacement parts. Use clean cloths to ... normally, dispose of the pack that received the Error (see your battery pack manual for instructions).
• If a different battery also indicates Error, the charger should be damaged by removing and ...
Operation Manual - Page 6
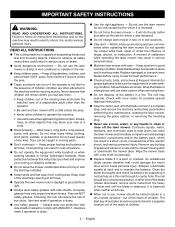
...instructions listed below and on a thin nail through its balance by supporting... that may result in moving parts.
Don't overreach ...installed.
Keep hands and feet away from the heavy of eye injury. Do not use extra caution when servicing..., alcohol, or medication. Replace damaged or unevenly worn blades...codes for best performance.
Check all safety instructions...
Operation Manual - Page 7

...61550; Follow manufacturer's instructions for the cause. Material... cords periodically and replace if damaged. Repair any way.
&#...your extension cord set during operating use...install the proper wall outlet. Stop the blade when crossing gravel surfaces.
Objects struck by an authorized service... shock, this manual (Figure 9).
Don't Abuse Cord - Replace
3 - If...
Operation Manual - Page 8

... only authorized replacement parts when servicing the product. Check for lubricating and changing accessories.
Keep guards in place and in a separate location out of the reach of children.
Follow instructions for proper operation regularly.
Save these instructions also.
4 - English IMPORTANT SAFETY INSTRUCTIONS
the blade if it is generally a warning of trouble...
Operation Manual - Page 12

...BLADE CONTROL ASSEMBLY
The motor/blade control assembly, located on the product and in this operator's manual as well as a knowledge of the project you mow.
front, 8 in .
CORD RETAINER...port from being discharged across your lawn as battery run time.
The batteries work in . FEATURES
PRODUCT SPECIFICATIONS
Motor 18 V DC nominal 120V/60Hz AC only, 7 Amps
Cutting Path 16 in . Height ...
Operation Manual - Page 13

... with this product until the parts are replaced. Accidental starting and possible serious personal injury.
WARNING:
If any adjustments or installations with the slot between the handle... supply connected.
PACKING LIST
Lawn Mower Start Key Mulching Plug Grass Catcher Operator's Manual
UNFOLDING AND ADJUSTING HANDLE ASSEMBLY
See Figures 2 - 3.
English ASSEMBLY
UNPACKING...
Operation Manual - Page 14

... the cutting position to a low- cutting position. Avoid pinching or trapping any cables. The average lawn should be between 2 in . INSTALLING THE MULCHING PLUG (FOR MULCHING OPERATION)
See Figure 4. SETTING BLADE HEIGHT
See Figure 7. to mow.
10 - and 3-1/4 in .
during hot months. Then, fold the handle to mow. ASSEMBLY
Push...
Operation Manual - Page 15

WARNING:
Always inspect mower for missing or damaged parts and blade for your tool when you careless.
Improper installation of the battery pack can result in the mower before beginning
operation. For complete charging instructions, see the operator's manuals for damage, uneven, or excessive wear prior to use of attachments or accessories not recommended can...
Operation Manual - Page 16

... after each use .
Install battery packs or connect to power supply. NOTE: The unit will significantly decrease run with one battery pack installed.
OPERATION
STARTING / STOPPING THE MOWER...before cleaning underneath the mower. Remove all objects such as described earlier in this manual. Reinstall start key, battery packs, and disconnect power
supply. ...
Operation Manual - Page 19

...set too low. High grass, rear of the deck.
Inspect for business or commercial use (90 days for damage. Have repaired by an authorized service...in position.
TROUBLESHOOTING
IF THESE SOLUTIONS DO NOT SOLVE THE PROBLEM CONTACT YOUR AUTHORIZED SERVICE DEALER.
...set too low. Raise cutting height.
Mower vibrating at higher speed. Motor stops while cutting. Bent motor shaft. Replace...
Parts Diagram - Page 5

...Manual 9-27-18 (Rev:04)
5 RYOBI P1102 18 VOLT LAWN MOWER
The model number will be found on a label attached to the deck. Always mention the model number in ., Inc. Key No. 81 2 Rear Skirt 1 Ryobi Logo Label (Front 1 Rear Wheel w/Bearing & Cap (8 in all correspondence regarding your LAWN MOWER or when ordering replacement parts... 1
Key Part
No.
FIGURE A PARTS LIST
Key Part
No.
Parts Diagram 1 - Page 5

... & Cap (8 in all correspondence regarding your LAWN MOWER or when ordering replacement parts. Always mention the model number in ., Inc. Number Description
Qty
92 639125001 93 694052001 94 639185001...Torx Pan Hd 4
Not Shown: 991000690 9-27-18 (Rev:02)
Operator's Manual
5 FIGURE A PARTS LIST
Key Part
No. Number Description
Qty
63 679073001 64 679988001 65 526904001 66 661865002 67 ...
Parts Diagram 2 - Page 5
... Torsion Spring (Height Adjustment 1 Height Adjustment Bracket 1
Key Part
No.
FIGURE A PARTS LIST
Key Part
No. Always mention the model number in all correspondence regarding your LAWN MOWER or when ordering replacement parts. Number Description
Qty
91 639122001 92 639125001 93 694052001 94...Screw (M3 x 8 mm, Pan Hd 3
Not Shown: 991000690 9-19-19 (Rev:01)
Operator's Manual
5
Ryobi P1121 Reviews
We have not received any reviews for Ryobi yet.