Operation Manual 9
Page 5
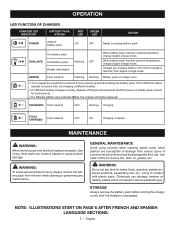
... use only identical replacement parts. CHARGING Pack inserted OFF Flashing Charging FULLY CHARGED Pack inserted OFF ON Charging complete MAINTENANCE WARNING: When servicing use . English WARNING: To avoid serious personal injury, always remove the battery pack from various types of the pack that received the Error (see your battery pack manual for instructions). • If a different battery also indicates Error, the charger should be damaged by removing and reinstalling the battery...
... use only identical replacement parts. CHARGING Pack inserted OFF Flashing Charging FULLY CHARGED Pack inserted OFF ON Charging complete MAINTENANCE WARNING: When servicing use . English WARNING: To avoid serious personal injury, always remove the battery pack from various types of the pack that received the Error (see your battery pack manual for instructions). • If a different battery also indicates Error, the charger should be damaged by removing and reinstalling the battery...

Operation Manual 1
Page 1
... start key or battery pack inserted. Lawn Mower See Figures 1 - 3. NOTE: If the upper handle is loose or separated from the lower handle, tighten the knobs (F) on the handle locks by turning them clockwise. After raising the lower handle as shown. Accidental starting , do not make any adjustments or installations with the hole in . HANDLE ASSEMBLY INSTRUCTIONS For 16 in the lower (B) handle as described on page 8 of the operator's manual...
... start key or battery pack inserted. Lawn Mower See Figures 1 - 3. NOTE: If the upper handle is loose or separated from the lower handle, tighten the knobs (F) on the handle locks by turning them clockwise. After raising the lower handle as shown. Accidental starting , do not make any adjustments or installations with the hole in . HANDLE ASSEMBLY INSTRUCTIONS For 16 in the lower (B) handle as described on page 8 of the operator's manual...
Operation Manual
Page 6
... children to treat lawns can enter the lawn mower and/or battery compartment and damage electronic components and/or the battery pack, which it is balanced. IMPORTANT SAFETY INSTRUCTIONS WARNING: READ AND UNDERSTAND ALL INSTRUCTIONS. It will remain where you are sharp. Replace damaged or unevenly worn blades before performing any maintenance, cleaning the lawn mower, removing the grass catcher, or removing the mulching plug. Never use a hose, water, or any...
... children to treat lawns can enter the lawn mower and/or battery compartment and damage electronic components and/or the battery pack, which it is balanced. IMPORTANT SAFETY INSTRUCTIONS WARNING: READ AND UNDERSTAND ALL INSTRUCTIONS. It will remain where you are sharp. Replace damaged or unevenly worn blades before performing any maintenance, cleaning the lawn mower, removing the grass catcher, or removing the mulching plug. Never use a hose, water, or any...

Operation Manual
Page 7
... cords periodically and replace if damaged. To reduce the likelihood of disconnection of accessories. Remove all objects prior to each use one blade is damaged in any way. Do not operate the mower without the entire grass catcher, mulching plug and rear discharge door in the blade area until the blade comes to the eyes or skin. Keep handles dry, clean, and free from heat, oil, and sharp...
... cords periodically and replace if damaged. To reduce the likelihood of disconnection of accessories. Remove all objects prior to each use one blade is damaged in any way. Do not operate the mower without the entire grass catcher, mulching plug and rear discharge door in the blade area until the blade comes to the eyes or skin. Keep handles dry, clean, and free from heat, oil, and sharp...

Operation Manual
Page 8
... power supply, remove batteries and start key from the appliance before servicing, cleaning or removing material from cutting area. Only allow responsible adults, who are always in use them these instructions. Check for lubricating and changing accessories. Keep guards in place and in working order. Keep blades sharp. Keep hands and feet away from the gardening appliance. Use this product. Vibration is unevenly...
... power supply, remove batteries and start key from the appliance before servicing, cleaning or removing material from cutting area. Only allow responsible adults, who are always in use them these instructions. Check for lubricating and changing accessories. Keep guards in place and in working order. Keep blades sharp. Keep hands and feet away from the gardening appliance. Use this product. Vibration is unevenly...
Operation Manual
Page 9
... performed only by a qualified service technician. Before using a power product at a considerable distance from a power source, be connected to determine the minimum wire size required in electric power tools, which eliminates the need to be grounded. To reduce the risk of electric shock, this measure of safety. If the plug does not fit fully into the wall outlet, reverse the plug. or SJTOW-A. 5 - Receptacles are...
... performed only by a qualified service technician. Before using a power product at a considerable distance from a power source, be connected to determine the minimum wire size required in electric power tools, which eliminates the need to be grounded. To reduce the risk of electric shock, this measure of safety. If the plug does not fit fully into the wall outlet, reverse the plug. or SJTOW-A. 5 - Receptacles are...

Operation Manual
Page 12
... of the mower, engages and disengages the motor and blade. CARRYING HANDLE The lawn mower has a carrying handle for finer clippings. MULCHING PLUG Your mower is equipped with all operating features and safety rules. START KEY The start key must be inserted before the mower can be started. 8 - HEIGHT ADJUSTMENT LEVER The height adjustment lever provides cutting height adjustments. Height Adjustments 1.25 in . BRUSHLESS MOTOR This product features a brushless motor that covers the rear discharge opening, which allows the mower blade to maximize power and minimize...
... of the mower, engages and disengages the motor and blade. CARRYING HANDLE The lawn mower has a carrying handle for finer clippings. MULCHING PLUG Your mower is equipped with all operating features and safety rules. START KEY The start key must be inserted before the mower can be started. 8 - HEIGHT ADJUSTMENT LEVER The height adjustment lever provides cutting height adjustments. Height Adjustments 1.25 in . BRUSHLESS MOTOR This product features a brushless motor that covers the rear discharge opening, which allows the mower blade to maximize power and minimize...

Operation Manual
Page 13
... parts are not assembled to free the handle. To secure the lower handle in place, close the lower handle locks. PACKING LIST Lawn Mower Start Key Mulching Plug Grass Catcher Operator's Manual UNFOLDING AND ADJUSTING HANDLE ASSEMBLY See Figures 2 - 3. NOTE: If the lower handle is difficult to move, turn the lower handle locks clockwise to secure the handle. Open the upper handle locks. Pull up and back on the lower handle until the parts...
... parts are not assembled to free the handle. To secure the lower handle in place, close the lower handle locks. PACKING LIST Lawn Mower Start Key Mulching Plug Grass Catcher Operator's Manual UNFOLDING AND ADJUSTING HANDLE ASSEMBLY See Figures 2 - 3. NOTE: If the lower handle is difficult to move, turn the lower handle locks clockwise to secure the handle. Open the upper handle locks. Pull up and back on the lower handle until the parts...

Operation Manual
Page 14
... wheels on the mower are set to a low- cutting position. INSTALLING THE GRASS CATCHER (FOR REAR BAGGING OPERATION) See Figures 5 - 6. The average lawn should be between 2 in . ASSEMBLY Push outward on each side of the lower handle until it toward the back of the mower. To lower the blade height, grasp the height adjustment lever and move it toward the front of the mower. Reinstall start key and battery packs...
... wheels on the mower are set to a low- cutting position. INSTALLING THE GRASS CATCHER (FOR REAR BAGGING OPERATION) See Figures 5 - 6. The average lawn should be between 2 in . ASSEMBLY Push outward on each side of the lower handle until it toward the back of the mower. To lower the blade height, grasp the height adjustment lever and move it toward the front of the mower. Reinstall start key and battery packs...

Operation Manual
Page 15
... listed below: Mowing your eyes resulting in use any attachments or accessories not recommended by the manufacturer of the mower with grooves in the mower before beginning operation. Align raised ribs on battery pack with damaged or missing parts can result in place and that a careless fraction of death or serious personal injury if power lines or electric cords are assembling parts, making adjustments...
... listed below: Mowing your eyes resulting in use any attachments or accessories not recommended by the manufacturer of the mower with grooves in the mower before beginning operation. Align raised ribs on battery pack with damaged or missing parts can result in place and that a careless fraction of death or serious personal injury if power lines or electric cords are assembling parts, making adjustments...

Operation Manual
Page 16
... of the clippings. Do not cut off one battery pack installed. Pull the blade control levers toward the handle and release the button to start key, battery packs, and disconnect power supply. Lift the rear discharge door. Lift the grass catcher by the mower in any other accumulated debris. For your footing. Such objects could damage the lawn mower blades or motor. Operating the unit with only one -third...
... of the clippings. Do not cut off one battery pack installed. Pull the blade control levers toward the handle and release the button to start key, battery packs, and disconnect power supply. Lift the rear discharge door. Lift the grass catcher by the mower in any other accumulated debris. For your footing. Such objects could damage the lawn mower blades or motor. Operating the unit with only one -third...

Operation Manual
Page 17
... thrown into their use authorized replacement blades. Stop the motor and remove the start key, battery packs and disconnect the power supply. Turn the mower on its side. Wedge a block of wood between the blade and mower deck to prevent the blade from various types of any time let brake fluids, gasoline, petroleumbased products, penetrating oils, etc., come to a complete stop. Remove start key. Remove any buildup...
... thrown into their use authorized replacement blades. Stop the motor and remove the start key, battery packs and disconnect the power supply. Turn the mower on its side. Wedge a block of wood between the blade and mower deck to prevent the blade from various types of any time let brake fluids, gasoline, petroleumbased products, penetrating oils, etc., come to a complete stop. Remove start key. Remove any buildup...
Operation Manual
Page 18
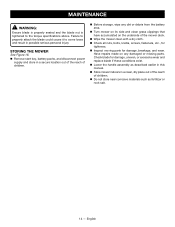
... or rock salt. 14 - Check blade for damage, breakage, and wear. MAINTENANCE WARNING: Ensure blade is properly seated and the blade nut is tightened to come loose and result in possible serious personal injury. English Failure to properly attach the blade could cause it to the torque specifications above. STORING THE MOWER See Figure 16. Remove start key, battery packs, and disconnect power supply and store in...
... or rock salt. 14 - Check blade for damage, breakage, and wear. MAINTENANCE WARNING: Ensure blade is properly seated and the blade nut is tightened to come loose and result in possible serious personal injury. English Failure to properly attach the blade could cause it to the torque specifications above. STORING THE MOWER See Figure 16. Remove start key, battery packs, and disconnect power supply and store in...

Operation Manual
Page 19
.... Remove and reinstall start key and battery or disconnect power supply. Mower not starting. Mower not mulching properly. Wet grass clippings sticking to be reset. Blade is rough or cutting height not set Adjust the cutting height. Bent motor shaft. properly. For warranty details, visit www.ryobitools.com or call the RYOBI Help Line! Mower cutting grass unevenly. Have repaired by an authorized service center before mowing. PROBLEM Handle not in heavy grass, or cutting height too low. Motor stops while cutting. Raise cutting height. Battery is...
.... Remove and reinstall start key and battery or disconnect power supply. Mower not starting. Mower not mulching properly. Wet grass clippings sticking to be reset. Blade is rough or cutting height not set Adjust the cutting height. Bent motor shaft. properly. For warranty details, visit www.ryobitools.com or call the RYOBI Help Line! Mower cutting grass unevenly. Have repaired by an authorized service center before mowing. PROBLEM Handle not in heavy grass, or cutting height too low. Motor stops while cutting. Raise cutting height. Battery is...

Parts Diagram
Page 4
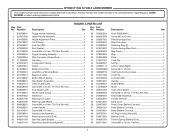
... 4 Starting Instructions Label 1 Screw (M3 x 8 mm, Pan Hd 3 Lock Nut (M6 3 Handle 1 Rubber Block 4 Motor 1 Start Circuit Board 1 Screw (M4 x 16 mm, T20 Torx Socket Pan Hd 4 Key Holder Assembly 1 Key Receptacle 8 Deck Cover 1 Press Cover (Battery Connect 2 Plate (Battery Connect 2 Base (Battery Connect 2 AC Plug Housing Assembly 1 Battery Cover 1 Torsion Spring (Battery Door 1 Screw (M5 x 16 mm, Pan Hd 2 4 RYOBI P1102 18 VOLT LAWN MOWER The model number will be found on a label attached to the deck...
... 4 Starting Instructions Label 1 Screw (M3 x 8 mm, Pan Hd 3 Lock Nut (M6 3 Handle 1 Rubber Block 4 Motor 1 Start Circuit Board 1 Screw (M4 x 16 mm, T20 Torx Socket Pan Hd 4 Key Holder Assembly 1 Key Receptacle 8 Deck Cover 1 Press Cover (Battery Connect 2 Plate (Battery Connect 2 Base (Battery Connect 2 AC Plug Housing Assembly 1 Battery Cover 1 Torsion Spring (Battery Door 1 Screw (M5 x 16 mm, Pan Hd 2 4 RYOBI P1102 18 VOLT LAWN MOWER The model number will be found on a label attached to the deck...

Parts Diagram
Page 5
... 526924001 87 664021001 88 639204001 89 679992001 90 639203001 Pressure Spring 1 Spring Pin 4 Latch 4 Quick Lock Press 4 Grass Protector (Right 1 Grass Protector (Left 1 Height Adjust Label 1 Washer (OD20 x ID13 x 1t 4 Mulching Plug 1 Rear Cover 1 Front Wheel (6 in ., Inc. FIGURE A PARTS LIST Key Part No. RYOBI P1102 18 VOLT LAWN MOWER The model number will be found on a label attached to the deck. Always mention the model number in all correspondence regarding your LAWN MOWER or when ordering replacement parts.
... 526924001 87 664021001 88 639204001 89 679992001 90 639203001 Pressure Spring 1 Spring Pin 4 Latch 4 Quick Lock Press 4 Grass Protector (Right 1 Grass Protector (Left 1 Height Adjust Label 1 Washer (OD20 x ID13 x 1t 4 Mulching Plug 1 Rear Cover 1 Front Wheel (6 in ., Inc. FIGURE A PARTS LIST Key Part No. RYOBI P1102 18 VOLT LAWN MOWER The model number will be found on a label attached to the deck. Always mention the model number in all correspondence regarding your LAWN MOWER or when ordering replacement parts.

Parts Diagram 1
Page 4
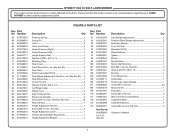
... Terminal 8 55 526873002 Deck Cover 1 56 526979001 Press Cover (Battery Connect 2 57 300001067 Plate (Battery Connect 2 58 526978001 Base (Battery Connect 2 59 200707001 AC Plug Housing Assembly 1 60 526872001 Battery Cover 1 61 694051001 Torsion Spring (Battery Door 1 62 660713001 Screw (M5 x 16 mm, Pan Hd 2 4 Always mention the model number in all correspondence regarding your LAWN MOWER or when ordering replacement parts. RYOBI P1102 18 VOLT LAWN MOWER The model number will be found...
... Terminal 8 55 526873002 Deck Cover 1 56 526979001 Press Cover (Battery Connect 2 57 300001067 Plate (Battery Connect 2 58 526978001 Base (Battery Connect 2 59 200707001 AC Plug Housing Assembly 1 60 526872001 Battery Cover 1 61 694051001 Torsion Spring (Battery Door 1 62 660713001 Screw (M5 x 16 mm, Pan Hd 2 4 Always mention the model number in all correspondence regarding your LAWN MOWER or when ordering replacement parts. RYOBI P1102 18 VOLT LAWN MOWER The model number will be found...

Parts Diagram 1
Page 5
... 2 Grass Protector (Right 1 Grass Protector (Left 1 Height Adjust Label 1 Washer (OD20 x ID13 x 1t 4 Mulching Plug 1 Rear Cover 1 Front Wheel (6 in., Inc. Key No. 81)..... 2 Rear Wheel Axle 1 Cotter Pinφ (2.5 8 Washer (OD18 x ID8.4 x 1t 3 Cut Finger Label 1 Wheel Cover 4 Axle Pressure Plate 6 Base (Lock Handle 2 Screw (M4 x 18 mm, Torx Pan Hd 12 Rear Lift Rod 1 Height Adjustment Handle 1 Screw (M3 x 9 mm, Flat Hd 2 Height Adjustment Lever 1 Torsion Spring (Height Adjustment 1 Height Adjustment Bracket 1 Axle (Height Adjustment 1 Key Part No. Number Description...
... 2 Grass Protector (Right 1 Grass Protector (Left 1 Height Adjust Label 1 Washer (OD20 x ID13 x 1t 4 Mulching Plug 1 Rear Cover 1 Front Wheel (6 in., Inc. Key No. 81)..... 2 Rear Wheel Axle 1 Cotter Pinφ (2.5 8 Washer (OD18 x ID8.4 x 1t 3 Cut Finger Label 1 Wheel Cover 4 Axle Pressure Plate 6 Base (Lock Handle 2 Screw (M4 x 18 mm, Torx Pan Hd 12 Rear Lift Rod 1 Height Adjustment Handle 1 Screw (M3 x 9 mm, Flat Hd 2 Height Adjustment Lever 1 Torsion Spring (Height Adjustment 1 Height Adjustment Bracket 1 Axle (Height Adjustment 1 Key Part No. Number Description...
Parts Diagram 2
Page 4
... Press Cover (Battery Connect 2 57 300001067 Plate (Battery Connect 2 58 526978001 Base (Battery Connect 2 59 200707001 AC Plug Housing Assembly 1 60 526872001 Battery Cover 1 61 694051001 Torsion Spring (Battery Door 1 62 660713001 Screw (M5 x 16 mm, Pan Hd 2 4 Always mention the model number in all correspondence regarding your LAWN MOWER or when ordering replacement parts. RYOBI P1102 18 VOLT LAWN MOWER The model number will be found on a label attached to the deck. FIGURE A PARTS LIST Key Part Key Part...
... Press Cover (Battery Connect 2 57 300001067 Plate (Battery Connect 2 58 526978001 Base (Battery Connect 2 59 200707001 AC Plug Housing Assembly 1 60 526872001 Battery Cover 1 61 694051001 Torsion Spring (Battery Door 1 62 660713001 Screw (M5 x 16 mm, Pan Hd 2 4 Always mention the model number in all correspondence regarding your LAWN MOWER or when ordering replacement parts. RYOBI P1102 18 VOLT LAWN MOWER The model number will be found on a label attached to the deck. FIGURE A PARTS LIST Key Part Key Part...
Parts Diagram 2
Page 5
...:01) Operator's Manual 5 Key No. 81)..... 2 Rear Wheel Axle 1 Cotter Pinφ (2.5 8 Washer (OD18 x ID8.4 x 1t 3 Cut Finger Label 1 Wheel Cover 4 Axle Pressure Plate 6 Base (Lock Handle 2 Screw (M4 x 18 mm, T20 Torx Pan Hd 16 Rear Lift Rod 1 Height Adjustment Handle 1 Screw (M3 x 9 mm, Flat Hd 2 Height Adjustment Lever 1 Torsion Spring (Height Adjustment 1 Height Adjustment Bracket 1 Key Part No. RYOBI P1102 18 VOLT LAWN MOWER The model number will be found on a label attached to the deck. Always mention the model number in all...
...:01) Operator's Manual 5 Key No. 81)..... 2 Rear Wheel Axle 1 Cotter Pinφ (2.5 8 Washer (OD18 x ID8.4 x 1t 3 Cut Finger Label 1 Wheel Cover 4 Axle Pressure Plate 6 Base (Lock Handle 2 Screw (M4 x 18 mm, T20 Torx Pan Hd 16 Rear Lift Rod 1 Height Adjustment Handle 1 Screw (M3 x 9 mm, Flat Hd 2 Height Adjustment Lever 1 Torsion Spring (Height Adjustment 1 Height Adjustment Bracket 1 Key Part No. RYOBI P1102 18 VOLT LAWN MOWER The model number will be found on a label attached to the deck. Always mention the model number in all...


