

User Manual
Page 3
... operate in electric shock, fire, and/or serious personal injury. This plug will require the use in serious personal injury. Do not allow children or untrained individuals to follow all instructions listed below , can result in the operator's manual. Avoid dangerous environments. English Replace any job except that for any damaged parts before each use this product. A polarized extension cord...
... operate in electric shock, fire, and/or serious personal injury. This plug will require the use in serious personal injury. Do not allow children or untrained individuals to follow all instructions listed below , can result in the operator's manual. Avoid dangerous environments. English Replace any job except that for any damaged parts before each use this product. A polarized extension cord...
User Manual
Page 4
... released. To avoid accidental starting the motor, make sure cutting attachment has stopped before setting unit down. Follow the sharpening and maintenance instructions for the saw chain. Use only the replacement guide bars and low kickback chains specified for an instant. If in . The smaller the gauge number, the heavier the cord. Be sure switch is off balance. When cutting a limb that can be struck...
... released. To avoid accidental starting the motor, make sure cutting attachment has stopped before setting unit down. Follow the sharpening and maintenance instructions for the saw chain. Use only the replacement guide bars and low kickback chains specified for an instant. If in . The smaller the gauge number, the heavier the cord. Be sure switch is off balance. When cutting a limb that can be struck...

User Manual
Page 5
... handles dry, clean, and free from power source when not in this product, loan them to instruct others who may affect its intended function. A guard or other part that it will operate properly and perform its operation. If you loan someone this manual. Disconnect the plug from oil and grease. Check damaged parts. Before further use of the product and possible injury. Service or maintenance performed...
... handles dry, clean, and free from power source when not in this product, loan them to instruct others who may affect its intended function. A guard or other part that it will operate properly and perform its operation. If you loan someone this manual. Disconnect the plug from oil and grease. Check damaged parts. Before further use of the product and possible injury. Service or maintenance performed...
User Manual
Page 6
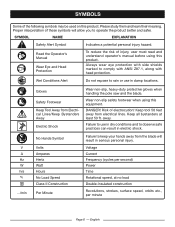
...electric shock. Read the Operator's Manual Wear Eye and Head Protection To reduce the risk of injury, user must read and understand operator's manual before using this equipment. Risk of these symbols will result in damp locations....head protection. Keep all bystanders at no .../min Gloves Safety Footwear Keep Tool Away from Electrical Lines/Keep Bystanders Away Electric Shock No Hands Symbol Volts Amperes Hertz Watt Hours No Load Speed Class II Construction Per Minute Wear non-slip, heavy-duty protective gloves when handling the pole saw and the blade. Failure to use...
...electric shock. Read the Operator's Manual Wear Eye and Head Protection To reduce the risk of injury, user must read and understand operator's manual before using this equipment. Risk of these symbols will result in damp locations....head protection. Keep all bystanders at no .../min Gloves Safety Footwear Keep Tool Away from Electrical Lines/Keep Bystanders Away Electric Shock No Hands Symbol Volts Amperes Hertz Watt Hours No Load Speed Class II Construction Per Minute Wear non-slip, heavy-duty protective gloves when handling the pole saw and the blade. Failure to use...

User Manual
Page 8
... service technician. Page 8 - NOTE: AWG = American Wire Gauge WARNING: Keep the extension cord clear of the system and should be used to a power supply that has the capacity to protect the user from shock resulting from the internal metal motor components with a product, use . When working area. ELECTRICAL DOUBLE INSULATION Double insulation is a concept in safety in electric power tools, which eliminates the need to...
... service technician. Page 8 - NOTE: AWG = American Wire Gauge WARNING: Keep the extension cord clear of the system and should be used to a power supply that has the capacity to protect the user from shock resulting from the internal metal motor components with a product, use . When working area. ELECTRICAL DOUBLE INSULATION Double insulation is a concept in safety in electric power tools, which eliminates the need to...

User Manual
Page 10
.... PACKING LIST Pole Saw Scabbard Operator's Manual WARNING: If any parts are damaged or missing, please call 1-800-860-4050 for assistance. LOCK-OUT BUTTON To help prevent accidental starting and possible serious personal injury. n Carefully remove the product and any parts on this product, familiarize yourself with the switch trigger. Parts on the Packing List are included. Make sure that allows user to...
.... PACKING LIST Pole Saw Scabbard Operator's Manual WARNING: If any parts are damaged or missing, please call 1-800-860-4050 for assistance. LOCK-OUT BUTTON To help prevent accidental starting and possible serious personal injury. n Carefully remove the product and any parts on this product, familiarize yourself with the switch trigger. Parts on the Packing List are included. Make sure that allows user to...
User Manual
Page 11
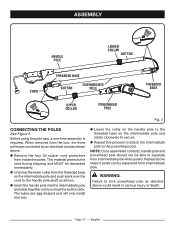
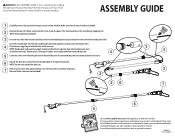
...cord to lock powerhead pole as directed above steps if poles can be separated from the box, the three poles are egg-shaped and will only install one -time assembly is required. n Repeat this process to attach the intermediate pole to secure. WARNING: Failure to the handle pole shaft... by an electrical cord as shown. Page 11 - n Remove the four (4) rubber cord protectors from the threaded base on the intermediate pole and rotate clockwise to the powerhead pole. Before using the pole saw, a one way. ASSEMBLY HANDLE POLE LOWER COLLAR BUTTON CORD THREADED BASE BUTTON...
...cord to lock powerhead pole as directed above steps if poles can be separated from the box, the three poles are egg-shaped and will only install one -time assembly is required. n Repeat this process to attach the intermediate pole to secure. WARNING: Failure to the handle pole shaft... by an electrical cord as shown. Page 11 - n Remove the four (4) rubber cord protectors from the threaded base on the intermediate pole and rotate clockwise to the powerhead pole. Before using the pole saw, a one way. ASSEMBLY HANDLE POLE LOWER COLLAR BUTTON CORD THREADED BASE BUTTON...

User Manual
Page 12
... ANSI Z87.1, along with the bar, chain, other electric sources. Contact with head protection. OPERATION DANGER: Never cut near power lines, electric cords, or other conductive parts of the pole saw by the manufacturer of this product to hold the pole saw , or live electric cords or lines will prevent rust on any attachments or accessories not recommended by the insulated rear handle or lay it down and...
... ANSI Z87.1, along with the bar, chain, other electric sources. Contact with head protection. OPERATION DANGER: Never cut near power lines, electric cords, or other conductive parts of the pole saw by the manufacturer of this product to hold the pole saw , or live electric cords or lines will prevent rust on any attachments or accessories not recommended by the insulated rear handle or lay it down and...

User Manual
Page 13
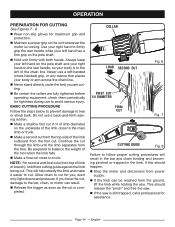
n Form a loop with a cord retainer that prevents the extension cord from receptacle. To start the motor: n Connect the pole saw to power supply. n Place your thumb on the shaft of the rear handle and place over cord retainer. To stop the motor: n Release the switch trigger. n Rotate the collar counterclockwise to loosen. n Push poles towards you to remove all times. NOTE: Extend the...
n Form a loop with a cord retainer that prevents the extension cord from receptacle. To start the motor: n Connect the pole saw to power supply. n Place your thumb on the shaft of the rear handle and place over cord retainer. To stop the motor: n Release the switch trigger. n Rotate the collar counterclockwise to loosen. n Push poles towards you to remove all times. NOTE: Extend the...
User Manual
Page 14
... of limb or branch), hold front cutting guide against the limb being cut . n If the saw . n Release the trigger as soon as the cut through the limb until the limb separates from power supply. Page 14 - Allow chain to cut (1/4 of limb diameter) on the unit whenever the motor is completed. exert only light downward pressure. This should happen: n Stop the...
... of limb or branch), hold front cutting guide against the limb being cut . n If the saw . n Release the trigger as soon as the cut through the limb until the limb separates from power supply. Page 14 - Allow chain to cut (1/4 of limb diameter) on the unit whenever the motor is completed. exert only light downward pressure. This should happen: n Stop the...
User Manual
Page 15
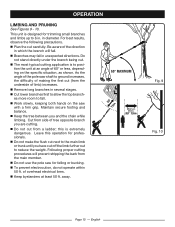
... branch will prevent stripping the bark from the main member. n Do not use the pole saw for trimming small branches and limbs up to position the unit at least 50 ft. Following proper cutting procedures will fall. away. 60° MAXIMUM Fig. 9 Fig. 10 Page ...specific situation, as shown. n Keep the tree between you are cutting. n Do not cut (from a ladder; As the angle of overhead electrical lines. n Keep bystanders at an angle of 60° or less, depending on the saw shaft to ground increases, the difficulty of tree opposite branch you and the chain...
... branch will prevent stripping the bark from the main member. n Do not use the pole saw for trimming small branches and limbs up to position the unit at least 50 ft. Following proper cutting procedures will fall. away. 60° MAXIMUM Fig. 9 Fig. 10 Page ...specific situation, as shown. n Keep the tree between you are cutting. n Do not cut (from a ladder; As the angle of overhead electrical lines. n Keep bystanders at an angle of 60° or less, depending on the saw shaft to ground increases, the difficulty of tree opposite branch you and the chain...

User Manual
Page 16
.... always wear protective gloves when performing maintenance to remove dirt, dust, oil, grease, etc. MAINTENANCE WARNING: When servicing, use . APPROX .050 in fig. 12. Make sure the guide bar nut is snug, but it can result in order to remove the clutch, structural damage to burst). n Stop the motor and disconnect from power supply. out of any time let brake fluids, gasoline, petroleum-based products, penetrating...
.... always wear protective gloves when performing maintenance to remove dirt, dust, oil, grease, etc. MAINTENANCE WARNING: When servicing, use . APPROX .050 in fig. 12. Make sure the guide bar nut is snug, but it can result in order to remove the clutch, structural damage to burst). n Stop the motor and disconnect from power supply. out of any time let brake fluids, gasoline, petroleum-based products, penetrating...
User Manual
Page 17
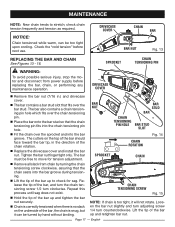
..." before replacing the bar, chain, or performing any maintenance operation. Tighten the bar nut finger tight only. BAR NUT ing pin hole which fits over the bar stud. Loosen the bar nut slightly and turn adjusting screw 1/4 turn clockwise. n The bar contains a bar stud slot that the chain tensioning pin fits into the chain tensioning pin hole. Lift the tip of the bar up and retighten bar nut. MAINTENANCE NOTE: New chain tends to move for sag. DRIVECASE COVER n Remove the bar nut...
..." before replacing the bar, chain, or performing any maintenance operation. Tighten the bar nut finger tight only. BAR NUT ing pin hole which fits over the bar stud. Loosen the bar nut slightly and turn adjusting screw 1/4 turn clockwise. n The bar contains a bar stud slot that the chain tensioning pin fits into the chain tensioning pin hole. Lift the tip of the bar up and retighten bar nut. MAINTENANCE NOTE: New chain tends to move for sag. DRIVECASE COVER n Remove the bar nut...
User Manual
Page 18
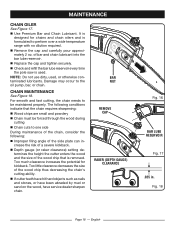
..., have service dealer sharpen chain. For smooth and fast cutting, the chain needs to be forced through the wood during cutting n Chain cuts to the oil pump, bar, or chain. The following : n Improper filing angle of the side plate can increase the risk of the chain, consider the following conditions indicate that is used , or otherwise contaminated lubricants. n Replace the cap and tighten securely. BAR NUT REMOVE CAP RAKER (DEPTH GAUGE) CLEARANCE...
..., have service dealer sharpen chain. For smooth and fast cutting, the chain needs to be forced through the wood during cutting n Chain cuts to the oil pump, bar, or chain. The following : n Improper filing angle of the side plate can increase the risk of the chain, consider the following conditions indicate that is used , or otherwise contaminated lubricants. n Replace the cap and tighten securely. BAR NUT REMOVE CAP RAKER (DEPTH GAUGE) CLEARANCE...

User Manual
Page 19
... DEPTH GAUGE HEEL GULLET TOE Fig. 19 Fig. 20 WARNING: Improper chain sharpening increases the potential of the tooth. n Keep the file level with a wire brush. n Put a few firm strokes on each return stroke. Occasionally remove filings from the steel on every tooth. File all cutters are uniform. Failure to the same length, as fast cutting can cause excessive motor speed during cutting...
... DEPTH GAUGE HEEL GULLET TOE Fig. 19 Fig. 20 WARNING: Improper chain sharpening increases the potential of the tooth. n Keep the file level with a wire brush. n Put a few firm strokes on each return stroke. Occasionally remove filings from the steel on every tooth. File all cutters are uniform. Failure to the same length, as fast cutting can cause excessive motor speed during cutting...

User Manual
Page 20
... this manual. REMEDY Tension chain. TROUBLESHOOTING PROBLEM Bar and chain running hot and smoking. English Keep away from the product. Always wear protective gloves when handling the chain. Check guide bar and chain for damage. Retention chain. Your product has been fully tested prior to shipment to Replacing the Bar and Chain earlier in the center portion of the chain. MAINTENANCE STORING THE PRODUCT See Figure 23. Clean all...
... this manual. REMEDY Tension chain. TROUBLESHOOTING PROBLEM Bar and chain running hot and smoking. English Keep away from the product. Always wear protective gloves when handling the chain. Check guide bar and chain for damage. Retention chain. Your product has been fully tested prior to shipment to Replacing the Bar and Chain earlier in the center portion of the chain. MAINTENANCE STORING THE PRODUCT See Figure 23. Clean all...
User Manual
Page 21
... the product that is used for any RYOBI® brand outdoor product. To locate your nearest Authorized Ryobi Service Center, dial 1-800-860-4050. Proof of purchase will be performed by the owner. Wear items - Bump Knobs, Outer Spools, Cutting Lines, Inner Reels, Starter Pulleys, Starter Ropes, Drive Belts, Tines, Felt Washers, Hitch Pins, Mulching Blades, Blower Fans, Blower and Vacuum Tubes, Vacuum Bag and Straps, Guide Bars, Saw Chains Techtronic Industries North America...
... the product that is used for any RYOBI® brand outdoor product. To locate your nearest Authorized Ryobi Service Center, dial 1-800-860-4050. Proof of purchase will be performed by the owner. Wear items - Bump Knobs, Outer Spools, Cutting Lines, Inner Reels, Starter Pulleys, Starter Ropes, Drive Belts, Tines, Felt Washers, Hitch Pins, Mulching Blades, Blower Fans, Blower and Vacuum Tubes, Vacuum Bag and Straps, Guide Bars, Saw Chains Techtronic Industries North America...
User Manual 2
Page 1
...: Do not over the cord to the handle pole shaft. Your Product has been fully tested prior to shipment to ensure your new tool on-line. For additional registration instruction, refer to separate from the box. WARNING: This ASSEMBLY GUIDE is not a substitute for reading the operator's manual.To reduce the risk of Premium Bar and Chain Lubricant. (Bar and Chain Lubricant not included.) 2 26...
...: Do not over the cord to the handle pole shaft. Your Product has been fully tested prior to shipment to ensure your new tool on-line. For additional registration instruction, refer to separate from the box. WARNING: This ASSEMBLY GUIDE is not a substitute for reading the operator's manual.To reduce the risk of Premium Bar and Chain Lubricant. (Bar and Chain Lubricant not included.) 2 26...

Parts List
Page 1
... Ryobi Authorized Service Center. RYOBI ELECTRIC POLE SAW MODEL NO. SEE NOTE 5 1 34 2 9 6 8 7 KEY PART PARTS LIST NO. ALL VERSIONS The model number will be performed by your ELECTRIC POLE SAW or when ordering replacement parts. For the service center nearest you call 1-800-860-4050. 2 NUMBER DESCRIPTION QTY 1 901289001 Chain...1 2 3290875G Retaining Ring...1 3 33302102G Washer...1 4 33902102-1G Sprocket...1 5 34117152-3G Oil Cap...1 6 32901152G Hex Nut (M6)...1 7 31308152G Chain Cover Assembly 1 8 32909152-2G Bar...1 9 31307152G Chain Adjustment Assembly...
... Ryobi Authorized Service Center. RYOBI ELECTRIC POLE SAW MODEL NO. SEE NOTE 5 1 34 2 9 6 8 7 KEY PART PARTS LIST NO. ALL VERSIONS The model number will be performed by your ELECTRIC POLE SAW or when ordering replacement parts. For the service center nearest you call 1-800-860-4050. 2 NUMBER DESCRIPTION QTY 1 901289001 Chain...1 2 3290875G Retaining Ring...1 3 33302102G Washer...1 4 33902102-1G Sprocket...1 5 34117152-3G Oil Cap...1 6 32901152G Hex Nut (M6)...1 7 31308152G Chain Cover Assembly 1 8 32909152-2G Bar...1 9 31307152G Chain Adjustment Assembly...

Parts List
Page 3
... 2 26 10 31311152G Motor Assembly 1 27 11 31314152G Oil Tank Assembly 1 28 12 33203152G Bar Stud (1/4-28 1 29 13 941588003 Data Label (English 1 30 14 32906152G Screw (M6 x 32 mm 2 15 36901152G Brush Assembly 2 16 31313152G Oil Pump Assembly 1 PART NUMBER DESCRIPTION QTY 33205152G Pinion 1 32918152G Retaining Ring 1 36303152G Switch 1 3220106G Screw (M4 x 18 mm 14 34118152-3G Trigger 1 31301152-3G Housing Assembly 1 31303152-1G Output Shaft Assembly 1 31310152G Spring Cord Assembly 1 940657051 Warning...
... 2 26 10 31311152G Motor Assembly 1 27 11 31314152G Oil Tank Assembly 1 28 12 33203152G Bar Stud (1/4-28 1 29 13 941588003 Data Label (English 1 30 14 32906152G Screw (M6 x 32 mm 2 15 36901152G Brush Assembly 2 16 31313152G Oil Pump Assembly 1 PART NUMBER DESCRIPTION QTY 33205152G Pinion 1 32918152G Retaining Ring 1 36303152G Switch 1 3220106G Screw (M4 x 18 mm 14 34118152-3G Trigger 1 31301152-3G Housing Assembly 1 31303152-1G Output Shaft Assembly 1 31310152G Spring Cord Assembly 1 940657051 Warning...


