
User Manual
Page 2
Consulter l'encart à volets afin d'examiner toutes les figures mentionnées dans le manuel d'utilisation. ii Consulte esta sección desplegable para ver todas las figuras a las que se hace referencia en el manual del operador. See this fold-out section for all of the figures referenced in the operator's manual.
Consulter l'encart à volets afin d'examiner toutes les figures mentionnées dans le manuel d'utilisation. ii Consulte esta sección desplegable para ver todas las figuras a las que se hace referencia en el manual del operador. See this fold-out section for all of the figures referenced in the operator's manual.
User Manual
Page 7
... built into the power cord plug. Do not rush. Do not operate the product while under the influence of electric shock. Do not direct discharge stream at all connections dry and off the ground. These extension cords are doing and use only identical replacement parts. WARNING: Risk of electrocution, keep all times. Follow the maintenance instructions specified in use damaged extension cords...
... built into the power cord plug. Do not rush. Do not operate the product while under the influence of electric shock. Do not direct discharge stream at all connections dry and off the ground. These extension cords are doing and use only identical replacement parts. WARNING: Risk of electrocution, keep all times. Follow the maintenance instructions specified in use damaged extension cords...
User Manual
Page 8
... fit, obtain a correct polarized extension cord. A wire gauge size (A.W.G.) of at least 14 is wider than the other conditions that could cause discolored spots on grass. Know your extension cord is damaged must be thrown or become entangled in doubt, use . Keep handles dry, clean, and free from heat, oil, sharp edges, or moving parts, breakage of electric shock. Ground Fault...
... fit, obtain a correct polarized extension cord. A wire gauge size (A.W.G.) of at least 14 is wider than the other conditions that could cause discolored spots on grass. Know your extension cord is damaged must be thrown or become entangled in doubt, use . Keep handles dry, clean, and free from heat, oil, sharp edges, or moving parts, breakage of electric shock. Ground Fault...
User Manual
Page 9
... hands. Expect the trigger handle to move when the trigger is pulled due to relieve stored pressure in serious personal injury. For outdoor use them these instructions. Failure to do so could cause loss of control and injury to cool. When servicing use cold water. Make sure minimum clearance of any other parts may cause serious motor problems. Before...
... hands. Expect the trigger handle to move when the trigger is pulled due to relieve stored pressure in serious personal injury. For outdoor use them these instructions. Failure to do so could cause loss of control and injury to cool. When servicing use cold water. Make sure minimum clearance of any other parts may cause serious motor problems. Before...

User Manual
Page 10
...use in dry conditions and to rain or use in damp locations. Wet Conditions Alert Risk of Injection Kickback Electric... to explain the levels of risk associated with side shields marked to operate the product better and... people or pets or place any body part in death or serious injury. To reduce...used on . WARNING: Indicates a potentially hazardous situation, which , if not avoided, will allow you to comply with both hands when the machine is on this product. Read Operator's Manual To reduce the risk of injury, user must read and understand operator's manual before using...
...use in dry conditions and to rain or use in damp locations. Wet Conditions Alert Risk of Injection Kickback Electric... to explain the levels of risk associated with side shields marked to operate the product better and... people or pets or place any body part in death or serious injury. To reduce...used on . WARNING: Indicates a potentially hazardous situation, which , if not avoided, will allow you to comply with both hands when the machine is on this product. Read Operator's Manual To reduce the risk of injury, user must read and understand operator's manual before using...

User Manual
Page 11
Proper interpretation of current no No Load Speed Rotational speed, at no load Class II Construction Double-insulated construction .../min Per Minute Revolutions, strokes, surface speed, orbits etc., per second) W Watt Power Alternating Current Type of these symbols will allow you to operate the product better and safer. English Please study them and learn their meaning. SYMBOL NAME DESIGNATION/EXPLANATION V Volts Voltage A Amperes Current Hz Hertz Frequency (cycles per minute 7 - SYMBOLS Some of the following symbols may be used on this product.
Proper interpretation of current no No Load Speed Rotational speed, at no load Class II Construction Double-insulated construction .../min Per Minute Revolutions, strokes, surface speed, orbits etc., per second) W Watt Power Alternating Current Type of these symbols will allow you to operate the product better and safer. English Please study them and learn their meaning. SYMBOL NAME DESIGNATION/EXPLANATION V Volts Voltage A Amperes Current Hz Hertz Frequency (cycles per minute 7 - SYMBOLS Some of the following symbols may be used on this product.

User Manual
Page 12
... shocks. Wire Size (A.W.G.) 14 12 Not Allowed NOTE: A.W.G. = American Wire Gauge WARNING: Keep the extension cord clear of power, and/or circuit breaker or GFCI tripping. NOTE: To ensure readiness for repair. Only round jacketed cords listed by a qualified service technician. Make a knot, then connect the plug end of the power cord into an outlet, double-check the power supply. Never use original factory replacement parts when servicing. If...
... shocks. Wire Size (A.W.G.) 14 12 Not Allowed NOTE: A.W.G. = American Wire Gauge WARNING: Keep the extension cord clear of power, and/or circuit breaker or GFCI tripping. NOTE: To ensure readiness for repair. Only round jacketed cords listed by a qualified service technician. Make a knot, then connect the plug end of the power cord into an outlet, double-check the power supply. Never use original factory replacement parts when servicing. If...

User Manual
Page 13
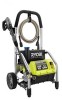
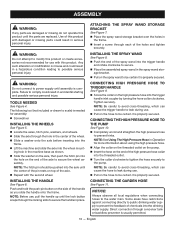
... 3. High Pressure Hose Handle Trigger Handle Spray Wand Spray Wand Storage Bracket Screws (2) Wheels (2) Axles (2) Hitch Pins (2) Nozzles (15º, Turbo, Soap) Operator's Manual 9 - DETERGENT TANK Remove the cap from the box. The lock-out provides protection against short circuits, overloads, or shocks. English ASSEMBLY UNPACKING This product requires assembly. WARNING: Do not use of this product requires an understanding of ground fault currents. FEATURES PRODUCT SPECIFICATIONS Maximum...
... 3. High Pressure Hose Handle Trigger Handle Spray Wand Spray Wand Storage Bracket Screws (2) Wheels (2) Axles (2) Hitch Pins (2) Nozzles (15º, Turbo, Soap) Operator's Manual 9 - DETERGENT TANK Remove the cap from the box. The lock-out provides protection against short circuits, overloads, or shocks. English ASSEMBLY UNPACKING This product requires assembly. WARNING: Do not use of this product requires an understanding of ground fault currents. FEATURES PRODUCT SPECIFICATIONS Maximum...
User Manual
Page 14
... damaged or missing parts could result in accidental starting and possible serious personal injury. CONNECTING HIGH PRESSURE HOSE TO TRIGGER HANDLE See Figure 9. n Screw the collar on the pump. NOTE: Be careful to avoid cross-threading, which can cause the trigger handle to modify this product or create accessories not recommended for more information about using the high pressure hose. n Turn the collar...
... damaged or missing parts could result in accidental starting and possible serious personal injury. CONNECTING HIGH PRESSURE HOSE TO TRIGGER HANDLE See Figure 9. n Screw the collar on the pump. NOTE: Be careful to avoid cross-threading, which can cause the trigger handle to modify this product or create accessories not recommended for more information about using the high pressure hose. n Turn the collar...

User Manual
Page 15
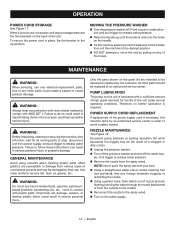
... at the factory and is dirty, clean it before initial use the machine until the screen has been replaced. n If the screen is maintenance free. APPLICATIONS You may use any electrical device. PUMP LUBRICANT The pressure washer pump has been filled with ANSI Z87.1. WARNING: Never direct a water stream toward people or pets, or any attachments or accessories not recommended by hand...
... at the factory and is dirty, clean it before initial use the machine until the screen has been replaced. n If the screen is maintenance free. APPLICATIONS You may use any electrical device. PUMP LUBRICANT The pressure washer pump has been filled with ANSI Z87.1. WARNING: Never direct a water stream toward people or pets, or any attachments or accessories not recommended by hand...

User Manual
Page 16
... release water pressure. Engage the lock-out on the trigger handle by high pressure hose. If the spray is achieved. Before starting any other objects that could cause personal injury. Completely unwind the hose from the cleaning surface. n Pull back and hold the trigger to stop the motor, release the trigger and press OFF ( O ) on the switch. OPERATION STARTING AND STOPPING THE PRESSURE WASHER See...
... release water pressure. Engage the lock-out on the trigger handle by high pressure hose. If the spray is achieved. Before starting any other objects that could cause personal injury. Completely unwind the hose from the cleaning surface. n Pull back and hold the trigger to stop the motor, release the trigger and press OFF ( O ) on the switch. OPERATION STARTING AND STOPPING THE PRESSURE WASHER See...

User Manual
Page 17
... instructed on the surface. NOTE: Use a funnel, if needed, to prevent accidental spilling of the area to use household detergents, acids, alkalines, bleaches, solvents, flammable material, or industrial grade solutions, which can damage the pump. Before shutting off the motor: Fill the detergent tank with a second tank of clean water. Shut off the motor. Pull trigger to appear. Start the pressure...
... instructed on the surface. NOTE: Use a funnel, if needed, to prevent accidental spilling of the area to use household detergents, acids, alkalines, bleaches, solvents, flammable material, or industrial grade solutions, which can damage the pump. Before shutting off the motor: Fill the detergent tank with a second tank of clean water. Shut off the motor. Pull trigger to appear. Start the pressure...
User Manual
Page 18
... repaired or replaced by pulling on any other parts should be done by their use. n Unplug the pressure washer. n Remove the nozzle from power supply, and pull trigger to avoid a safety hazard. MAINTENANCE WARNING: When servicing, use , the power cord may be damaged by an authorized service center in order to release water pressure. Use clean cloths to comply with side shields marked to remove dirt, dust, oil, grease, etc. POWER SUPPLY CORD REPLACEMENT If replacement...
... repaired or replaced by pulling on any other parts should be done by their use. n Unplug the pressure washer. n Remove the nozzle from power supply, and pull trigger to avoid a safety hazard. MAINTENANCE WARNING: When servicing, use , the power cord may be damaged by an authorized service center in order to release water pressure. Use clean cloths to comply with side shields marked to remove dirt, dust, oil, grease, etc. POWER SUPPLY CORD REPLACEMENT If replacement...
User Manual
Page 19
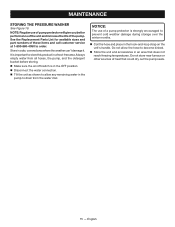
... on /off switch is in a dry, covered area where the weather can't damage it. MAINTENANCE STORING THE PRESSURE WASHER See Figure 19. NOTE: Regular use of the pump. Always empty water from the water inlet. English See the Replacement Parts List for available sizes and part numbers of heat that... does not reach freezing temperatures. Do not store near furnace or other sources of these items and call customer service at 1-800-860-4050 to become kinked. n Make sure the on the unit's handle. Store in the OFF position...
... on /off switch is in a dry, covered area where the weather can't damage it. MAINTENANCE STORING THE PRESSURE WASHER See Figure 19. NOTE: Regular use of the pump. Always empty water from the water inlet. English See the Replacement Parts List for available sizes and part numbers of heat that... does not reach freezing temperatures. Do not store near furnace or other sources of these items and call customer service at 1-800-860-4050 to become kinked. n Make sure the on the unit's handle. Store in the OFF position...
User Manual
Page 20
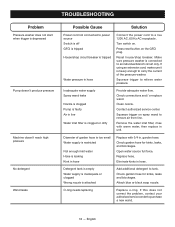
.... TROUBLESHOOTING Problem Pressure washer does not start when trigger is depressed Pump doesn't produce pressure Machine doesn't reach high pressure No detergent Wand leaks Possible Cause Solution Power cord not connected to power source Switch is off GFCI is tripped House/shop circuit breaker is tripped Water pressure in hose Connect the power cord to an individual branch circuit only. Squeeze trigger on spray wand to remove air from line. Check garden...
.... TROUBLESHOOTING Problem Pressure washer does not start when trigger is depressed Pump doesn't produce pressure Machine doesn't reach high pressure No detergent Wand leaks Possible Cause Solution Power cord not connected to power source Switch is off GFCI is tripped House/shop circuit breaker is tripped Water pressure in hose Connect the power cord to an individual branch circuit only. Squeeze trigger on spray wand to remove air from line. Check garden...
User Manual
Page 21
.... Hoses, connector fittings, spray nozzles, trigger handle, spray wand, wheels, detergent bucket, detergent tank Techtronic Industries North America, Inc., reserves the right to misuse, neglect, negligence, or accident, or that has been operated in material or workmanship will be cause for parts and labor by a RYOBI® Authorized Service Center. This warranty gives you specific legal rights, and you may...
.... Hoses, connector fittings, spray nozzles, trigger handle, spray wand, wheels, detergent bucket, detergent tank Techtronic Industries North America, Inc., reserves the right to misuse, neglect, negligence, or accident, or that has been operated in material or workmanship will be cause for parts and labor by a RYOBI® Authorized Service Center. This warranty gives you specific legal rights, and you may...
User Manual 2
Page 1
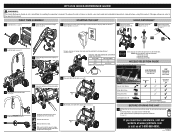
FIRST TIME ASSEMBLY STARTING THE UNIT USING DETERGENT 1 Install the wheels (see page 10). 5 Connect the high pressure hose to the trigger handle (see page 10). 1 Connect the pressure washer to stop the motor (see page 12). Wire Size (A.W.G.) 14 50 ft. 100 ft. NOTE: A.W.G. = American Wire Gauge 12 Not Allowed Use of the tool plug getting wet (see pages 3 and 8). SWITCH ON 3 When finished, press switch OFF to the power supply. This...
FIRST TIME ASSEMBLY STARTING THE UNIT USING DETERGENT 1 Install the wheels (see page 10). 5 Connect the high pressure hose to the trigger handle (see page 10). 1 Connect the pressure washer to stop the motor (see page 12). Wire Size (A.W.G.) 14 50 ft. 100 ft. NOTE: A.W.G. = American Wire Gauge 12 Not Allowed Use of the tool plug getting wet (see pages 3 and 8). SWITCH ON 3 When finished, press switch OFF to the power supply. This...
User Manual 5
Page 3
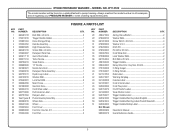
RY14122 The model number will be found on a plate attached to pump housing. Bolt (M6 x 20 mm 2 Trigger Handle Holder 1 Hose Storage Strap 1 Handle Assembly 1 High Pressure Hose 1 Screw (M6 x 40 mm 6 Detergent Tank Cap 1 Quick Start Label 1 Turbo Nozzle 1 Soap Nozzle 1 15° Nozzle 1 Nozzle Grommet 3 Detergent Tank Assembly 1 Ryobi Logo Label 1 Washer (M6 2 Lock Nut (M6 6 Main Frame 1 Injection Hose 1 Cord Wrap Label 1 Performance Label 1 Danger Label 1 Pump Housing Assembly 1 Wheel Axle 2 Wheel 2 Foot Cover 2 Foot (Inc. Spring Clip...
RY14122 The model number will be found on a plate attached to pump housing. Bolt (M6 x 20 mm 2 Trigger Handle Holder 1 Hose Storage Strap 1 Handle Assembly 1 High Pressure Hose 1 Screw (M6 x 40 mm 6 Detergent Tank Cap 1 Quick Start Label 1 Turbo Nozzle 1 Soap Nozzle 1 15° Nozzle 1 Nozzle Grommet 3 Detergent Tank Assembly 1 Ryobi Logo Label 1 Washer (M6 2 Lock Nut (M6 6 Main Frame 1 Injection Hose 1 Cord Wrap Label 1 Performance Label 1 Danger Label 1 Pump Housing Assembly 1 Wheel Axle 2 Wheel 2 Foot Cover 2 Foot (Inc. Spring Clip...

User Manual 5
Page 7
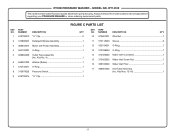
... 1 15 661610008 Screw (M3.5 x 20 mm 2 16 570570002 Bushing 2 7 525894001 Lower Gasket 1 8 570740016 Switch Cover Gasket 1 9 570417002 Switch Cover 1 17 290426012 Power Cord 1 18 561383025 Grommet 1 19 980414010 Foam Pad 1 10 661403015 Screw (M3 x 14 mm 4 7 RYOBI PRESSURE WASHER − MODEL NO. RY14122 The model number will be found on a plate attached to pump housing. Always mention the model number in all correspondence regarding your PRESSURE WASHER or when ordering replacement parts.
... 1 15 661610008 Screw (M3.5 x 20 mm 2 16 570570002 Bushing 2 7 525894001 Lower Gasket 1 8 570740016 Switch Cover Gasket 1 9 570417002 Switch Cover 1 17 290426012 Power Cord 1 18 561383025 Grommet 1 19 980414010 Foam Pad 1 10 661403015 Screw (M3 x 14 mm 4 7 RYOBI PRESSURE WASHER − MODEL NO. RY14122 The model number will be found on a plate attached to pump housing. Always mention the model number in all correspondence regarding your PRESSURE WASHER or when ordering replacement parts.
User Manual 5
Page 11
RYOBI PRESSURE WASHER − MODEL NO. RY14122 The model number will be found on a plate attached to pump housing. Always mention the model number in all correspondence regarding your PRESSURE WASHER or when ordering replacement parts. Key No. 4 1 6 638397003 Washer (Brass 1 7 570742071 O-Ring 1 8 310870002 Pressure Switch 1 14 310423002 Water Inlet Connector 1 15 310422002 Water Inlet Screw Nut 1 16 308103009 Water Inlet Filter 1 17 308861005 Inlet Tube Assembly (Inc. Key Nos. 12...
RYOBI PRESSURE WASHER − MODEL NO. RY14122 The model number will be found on a plate attached to pump housing. Always mention the model number in all correspondence regarding your PRESSURE WASHER or when ordering replacement parts. Key No. 4 1 6 638397003 Washer (Brass 1 7 570742071 O-Ring 1 8 310870002 Pressure Switch 1 14 310423002 Water Inlet Connector 1 15 310422002 Water Inlet Screw Nut 1 16 308103009 Water Inlet Filter 1 17 308861005 Inlet Tube Assembly (Inc. Key Nos. 12...


