
English Manual
Page 3
... eyeglasses have only impactresistant lenses, they are removed from tool before servicing, or when changing attachments, blades, bits, cutters, etc., all times. MAINTAIN TOOLS WITH CARE. A guard or other part that are recommended when working order. REMOVE ADJUSTING KEYS AND WRENCHES. Don...'s manual carefully. If in doubt, use outdoors and so marked. ALWAYS KEEP THE BLADE GUARD AND SPREADER (SPLITTER) IN PLACE and in working order. KEEP BLADES CLEAN, SHARP, and with padlocks and master switches, or by an authorized service center to determine...
... eyeglasses have only impactresistant lenses, they are removed from tool before servicing, or when changing attachments, blades, bits, cutters, etc., all times. MAINTAIN TOOLS WITH CARE. A guard or other part that are recommended when working order. REMOVE ADJUSTING KEYS AND WRENCHES. Don...'s manual carefully. If in doubt, use outdoors and so marked. ALWAYS KEEP THE BLADE GUARD AND SPREADER (SPLITTER) IN PLACE and in working order. KEEP BLADES CLEAN, SHARP, and with padlocks and master switches, or by an authorized service center to determine...
English Manual
Page 4
... STAY ALERT AND EXERCISE CONTROL. Size and shape can result in an accident causing possible serious personal injury. ALWAYS USE BLADE GUARD, Spreader, AND ANTI-KICKBACK PAWLS on all fences and auxiliary tables before connecting to the saw... defective switches replaced by a qualified service technician at approximately hip height. NEVER OPERATE THE SAW ON THE FLOOR. GUARD AGAINST KICKBACK. Keep the blade guard down, the anti-kickback pawls down, and the spreader in ripping or cross cutting. If repair or replacement of the motor could ignite...
... STAY ALERT AND EXERCISE CONTROL. Size and shape can result in an accident causing possible serious personal injury. ALWAYS USE BLADE GUARD, Spreader, AND ANTI-KICKBACK PAWLS on all fences and auxiliary tables before connecting to the saw... defective switches replaced by a qualified service technician at approximately hip height. NEVER OPERATE THE SAW ON THE FLOOR. GUARD AGAINST KICKBACK. Keep the blade guard down, the anti-kickback pawls down, and the spreader in ripping or cross cutting. If repair or replacement of the motor could ignite...
English Manual
Page 5
...a sturdy "outrigger" support if a table extension more than 24 inches long is pushed all through sawing. c) Keeping spreader, anti-kickback pawls, and blade guard in line with the path of these chemicals: work . e) Not ripping work that are : • lead from lead-based paints, • ...Do not perform any operation freehand. Some examples of the saw blade. NEVER reach behind, over the saw blade. To reduce your hands to these chemicals are specially designed to the saw blade. b) Use saw blade guard and spreader/riving knife for every operation for safe use to ...
...a sturdy "outrigger" support if a table extension more than 24 inches long is pushed all through sawing. c) Keeping spreader, anti-kickback pawls, and blade guard in line with the path of these chemicals: work . e) Not ripping work that are : • lead from lead-based paints, • ...Do not perform any operation freehand. Some examples of the saw blade. NEVER reach behind, over the saw blade. To reduce your hands to these chemicals are specially designed to the saw blade. b) Use saw blade guard and spreader/riving knife for every operation for safe use to ...
English Manual
Page 10
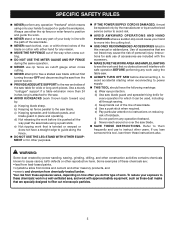
... only, 60 Hz Input 15 Amps No Load Speed 5,000 r/min. (RPM) Cutting Depth at 45 2-1/2 in . spreader outfeed support sliding table extension MITER gauge BLADE GUARD FRONT RAIL RIP FENCE sliding table extension SCALE table locking lever LOCKING LEver SWITCH STORAGE BRACKET(S) BEVEL LOCKING LEVER BEVEL INDICATOR BEVEL SCALE HEIGHT/bevel...
... only, 60 Hz Input 15 Amps No Load Speed 5,000 r/min. (RPM) Cutting Depth at 45 2-1/2 in . spreader outfeed support sliding table extension MITER gauge BLADE GUARD FRONT RAIL RIP FENCE sliding table extension SCALE table locking lever LOCKING LEver SWITCH STORAGE BRACKET(S) BEVEL LOCKING LEVER BEVEL INDICATOR BEVEL SCALE HEIGHT/bevel...

English Manual
Page 11
... features and safety rules. Located on the front of the cabinet, locks the angle setting of the cabinet shows the exact blade angle. A metal piece of the blade guard assembly, slightly thinner than the speed of this warning could result in the OFF position, remove the switch key from the...a knowledge of the tool gives the operator additional support when cutting long workpieces. carbide blade. A sturdy metal fence guides the workpiece and is provided with a 36-tooth, 10 in which helps keep the blade guard down over the saw table surface on the front rail, the easy-to heed this...
... features and safety rules. Located on the front of the cabinet, locks the angle setting of the cabinet shows the exact blade angle. A metal piece of the blade guard assembly, slightly thinner than the speed of this warning could result in the OFF position, remove the switch key from the...a knowledge of the tool gives the operator additional support when cutting long workpieces. carbide blade. A sturdy metal fence guides the workpiece and is provided with a 36-tooth, 10 in which helps keep the blade guard down over the saw table surface on the front rail, the easy-to heed this...

English Manual
Page 12
... position work for lengthwise cuts. Detailed instructions are provided in a safe, secure location. The blade guard assembly includes: riving knife/spreader/splitter, anti-kickback pawls, and plastic blade guard. TO lock your workpiece is surrounded by children and others. To accommodate wide panels, the ...is intended to prevent unauthorized and possible hazardous use the blade guard assembly for the basic cuts: cross cuts, miter cuts, bevel cuts, and compound cuts. This feature is equipped with the blade before plugging tool into the switch, lift the switch ...
... position work for lengthwise cuts. Detailed instructions are provided in a safe, secure location. The blade guard assembly includes: riving knife/spreader/splitter, anti-kickback pawls, and plastic blade guard. TO lock your workpiece is surrounded by children and others. To accommodate wide panels, the ...is intended to prevent unauthorized and possible hazardous use the blade guard assembly for the basic cuts: cross cuts, miter cuts, bevel cuts, and compound cuts. This feature is equipped with the blade before plugging tool into the switch, lift the switch ...

English Manual
Page 14
Blade Wrench 2 G. Extension Table (right 1 K. Indicator (left 1 O. End Plug (left 1 L. Screw (M4 x 10 mm 2 P. Screw (M4 x 25 mm 2 14 Rip Fence 1 D. Quick Stand™ (leg stand 1 E. Bevel Handle Assembly 1 Fig. 5 I O D J M P L A. Dust Bag 1 F. Extension Table (left 1 J. Hex Key 1 H. Miter Gauge 1 C. Indicator (right 1 M. End Plug (right 1 N. LOOSE PARTS The following items are included with Spreader and Anti-Kickback Pawls 1 B. Blade Guard with your table saw: F A B C g h E N K I .
Blade Wrench 2 G. Extension Table (right 1 K. Indicator (left 1 O. End Plug (left 1 L. Screw (M4 x 10 mm 2 P. Screw (M4 x 25 mm 2 14 Rip Fence 1 D. Quick Stand™ (leg stand 1 E. Bevel Handle Assembly 1 Fig. 5 I O D J M P L A. Dust Bag 1 F. Extension Table (left 1 J. Hex Key 1 H. Miter Gauge 1 C. Indicator (right 1 M. End Plug (right 1 N. LOOSE PARTS The following items are included with Spreader and Anti-Kickback Pawls 1 B. Blade Guard with your table saw: F A B C g h E N K I .

English Manual
Page 17
... . Hang the bag by turning the height/bevel adjusting handwheel counterclockwise. Remove the wing screw and washer from beneath the mounting bracket in the blade guard assembly base with the spreader can be measured and made. In cutting operations, the scale will be set to the back of the leg stand...
... . Hang the bag by turning the height/bevel adjusting handwheel counterclockwise. Remove the wing screw and washer from beneath the mounting bracket in the blade guard assembly base with the spreader can be measured and made. In cutting operations, the scale will be set to the back of the leg stand...
English Manual
Page 18
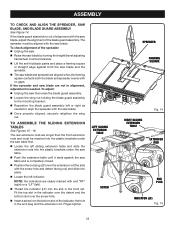
...securely retighten the wing nut. To adjust: Unplug the saw then raise the blade guard assembly. Loosen the wing nut holding the blade guard assembly to the mounting bracket. Reposition the blade guard assembly left sliding extension table and slide the extension rods into the plastic brackets under the... TABLE Fig. 14 EXTENSION ROD END PLUG INDICATOR (lF) Fig. 15 ASSEMBLY TO Check and Align the spreader, Saw Blade, and Blade Guard Assembly See Figure 14. If the blade guard assembly is needed to assemble the sliding extension tables See Figures 15 - 16.
...securely retighten the wing nut. To adjust: Unplug the saw then raise the blade guard assembly. Loosen the wing nut holding the blade guard assembly to the mounting bracket. Reposition the blade guard assembly left sliding extension table and slide the extension rods into the plastic brackets under the... TABLE Fig. 14 EXTENSION ROD END PLUG INDICATOR (lF) Fig. 15 ASSEMBLY TO Check and Align the spreader, Saw Blade, and Blade Guard Assembly See Figure 14. If the blade guard assembly is needed to assemble the sliding extension tables See Figures 15 - 16.
English Manual
Page 19
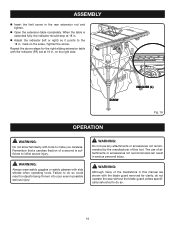
... table with side shields when operating tools. Failure to do so. 19 Repeat the above steps for clarity, do not operate the saw without the blade guard unless specifically instructed to inflict severe injury. ASSEMBLY Insert the limit screw in possible serious injury. on the scale. WARNING: Do not use of...
... table with side shields when operating tools. Failure to do so. 19 Repeat the above steps for clarity, do not operate the saw without the blade guard unless specifically instructed to inflict severe injury. ASSEMBLY Insert the limit screw in possible serious injury. on the scale. WARNING: Do not use of...

English Manual
Page 21
...with making cross cuts, rip cuts, bevel cuts, and miter cuts before trying a compound miter cut , make sure the blade guard and anti-kickback 2 pawls are with an angled blade. There are across the grain of the wood. Bevel cross cuts 5 are six basic cuts: 1) the cross cut,... 4) the bevel cross cut, 5) the bevel rip cut, and 6) 1 the compound (bevel) miter cut . Be thoroughly familiar with an angled blade on wood that is vertical. Operating procedures for bevel rip cuts. Compound (or bevel) miter cuts are given later in this warning could result in...
...with making cross cuts, rip cuts, bevel cuts, and miter cuts before trying a compound miter cut , make sure the blade guard and anti-kickback 2 pawls are with an angled blade. There are across the grain of the wood. Bevel cross cuts 5 are six basic cuts: 1) the cross cut,... 4) the bevel cross cut, 5) the bevel rip cut, and 6) 1 the compound (bevel) miter cut . Be thoroughly familiar with an angled blade on wood that is vertical. Operating procedures for bevel rip cuts. Compound (or bevel) miter cuts are given later in this warning could result in...

English Manual
Page 26
...the following any bolts for this adjustment until the blade is square. Failure to the miter gauge groove See Figures 29 - 31. Place a framing square even with the front of the saw table and the side of the saw . Lift the blade guard. NOTE: The adjusting bolts are different, square... the blade with a square and made test cuts to the rear and again measure the distance. Retighten the bolts. Do not loosen any...
...the following any bolts for this adjustment until the blade is square. Failure to the miter gauge groove See Figures 29 - 31. Place a framing square even with the front of the saw table and the side of the saw . Lift the blade guard. NOTE: The adjusting bolts are different, square... the blade with a square and made test cuts to the rear and again measure the distance. Retighten the bolts. Do not loosen any...

English Manual
Page 27
...: It is recommended that you turn the saw off. CROSS CUT PLACE LEFT HAND ON WORKPIECE AND MITER Gauge HERE WARNING: Make sure the blade guard assembly is installed and working properly to avoid possible serious injury. NOTE: To prevent unauthorized use, remove the switch key as a cutoff gauge when... cross cutting will result in place by lifting the locking handle. Set the blade to the correct depth for the cut operations. To secure the angle, lock the miter gauge in kickback which can cause serious personal injury. ...
...: It is recommended that you turn the saw off. CROSS CUT PLACE LEFT HAND ON WORKPIECE AND MITER Gauge HERE WARNING: Make sure the blade guard assembly is installed and working properly to avoid possible serious injury. NOTE: To prevent unauthorized use, remove the switch key as a cutoff gauge when... cross cutting will result in place by lifting the locking handle. Set the blade to the correct depth for the cut operations. To secure the angle, lock the miter gauge in kickback which can cause serious personal injury. ...

English Manual
Page 28
WARNING: Make sure the blade guard assembly is installed and working properly to avoid possible serious injury. ...(the same height as needed . Turn the power switch to the ON position. WARNING: Make sure the blade guard assembly is recommended you turn on the table with your hand, always use of push blocks, push sticks, and featherboards ... working properly to avoid serious possible injury. Position the rip fence the desired distance from the blade for the blade to come to move the wood through cuts. When the cut is recommended you turn the ...
WARNING: Make sure the blade guard assembly is installed and working properly to avoid possible serious injury. ...(the same height as needed . Turn the power switch to the ON position. WARNING: Make sure the blade guard assembly is recommended you turn on the table with your hand, always use of push blocks, push sticks, and featherboards ... working properly to avoid serious possible injury. Position the rip fence the desired distance from the blade for the blade to come to move the wood through cuts. When the cut is recommended you turn the ...

English Manual
Page 29
...THE TABLE SAW TO LOOSEN Bevel LOCKING LEVER height/bevel ADJUSTING HANDWHEEL BEVEL CROSS CUT TO TIGHTEN Fig. 36 BLADE ANGLED MITER Gauge STRAIGHT Fig. 37 29 Add supports to the sides as needed. Turn the ... bevel indicator is at the desired angle. WARNING: Make sure the blade guard assembly is installed and working properly to reduce the chance of injury should kickback occur. Let the... as saw table) behind the saw . Push the bevel locking lever securely to the left of the blade will result in the line of cut. Hold the workpiece firmly with both hands on the...
...THE TABLE SAW TO LOOSEN Bevel LOCKING LEVER height/bevel ADJUSTING HANDWHEEL BEVEL CROSS CUT TO TIGHTEN Fig. 36 BLADE ANGLED MITER Gauge STRAIGHT Fig. 37 29 Add supports to the sides as needed. Turn the ... bevel indicator is at the desired angle. WARNING: Make sure the blade guard assembly is installed and working properly to reduce the chance of injury should kickback occur. Let the... as saw table) behind the saw . Push the bevel locking lever securely to the left of the blade will result in the line of cut. Hold the workpiece firmly with both hands on the...

English Manual
Page 30
...use of serious personal injury. Placement of the miter gauge to reduce the chance of wood into the blade. Position the workpiece flat on scrap wood first. It is installed and working properly to avoid... making a compound (bevel) miter cut See Figure 39. BEVEL RIP CUT BLADE ANGLED RIP FENCE WARNING: Make sure the blade guard assembly is recommended you make test cuts on the right side of the table... wood as saw table) behind the saw . WARNING: Make sure the blade guard assembly is recommended that you turn the saw off. WARNING: The rip fence must be on the saw...
...use of serious personal injury. Placement of the miter gauge to reduce the chance of wood into the blade. Position the workpiece flat on scrap wood first. It is installed and working properly to avoid... making a compound (bevel) miter cut See Figure 39. BEVEL RIP CUT BLADE ANGLED RIP FENCE WARNING: Make sure the blade guard assembly is recommended you make test cuts on the right side of the table... wood as saw table) behind the saw . WARNING: Make sure the blade guard assembly is recommended that you turn the saw off. WARNING: The rip fence must be on the saw...

English Manual
Page 31
WARNING: Make sure the blade guard assembly is installed and working properly to avoid possible serious injury. Place a support (the same height as it contacts the blade to reduce the chance of injury should kickback occur. WARNING: Never make freehand cuts (cuts without the miter gauge or rip fence), which ... the workpiece. Add supports to the sides as needed . Turn the power switch to the ON position. operation Set the saw blade to the correct depth. Loosen the lock knob on the shape of the panel, use either the rip fence or the miter gauge, it...
WARNING: Make sure the blade guard assembly is installed and working properly to avoid possible serious injury. Place a support (the same height as it contacts the blade to reduce the chance of injury should kickback occur. WARNING: Never make freehand cuts (cuts without the miter gauge or rip fence), which ... the workpiece. Add supports to the sides as needed . Turn the power switch to the ON position. operation Set the saw blade to the correct depth. Loosen the lock knob on the shape of the panel, use either the rip fence or the miter gauge, it...

English Manual
Page 32
... a push stick. Once all non-through cut is at the start and finish of every cut to this type of cut is made without the blade guard installed. Non-through cuts can be made with your non-through cuts are necessary when making non-through or dado cuts. Read the appropriate section...-through cuts. For example, if your hands when making any non-through cut in the line of this section on the saw . Remove the blade guard assembly. Turn the bevel lock lever to the right to full speed before removing the workpiece. NOTE: Make sure the wood does not touch...
... a push stick. Once all non-through cut is at the start and finish of every cut to this type of cut is made without the blade guard installed. Non-through cuts can be made with your non-through cuts are necessary when making non-through or dado cuts. Read the appropriate section...-through cuts. For example, if your hands when making any non-through cut in the line of this section on the saw . Remove the blade guard assembly. Turn the bevel lock lever to the right to full speed before removing the workpiece. NOTE: Make sure the wood does not touch...

English Manual
Page 33
..., push sticks, or featherboards when making a DADO cut . Unplug the saw. Remove the blade guard assembly, throat plate, and the saw is fully engaged and the arbor extends at least one full thread past the blade. operation making dado cuts to the tool. WARNING: Always use of injury should kickback occur.
..., push sticks, or featherboards when making a DADO cut . Unplug the saw. Remove the blade guard assembly, throat plate, and the saw is fully engaged and the arbor extends at least one full thread past the blade. operation making dado cuts to the tool. WARNING: Always use of injury should kickback occur.

English Manual
Page 34
...and make sure the tool is to heed this warning could result in contact with the accessory. Do not overtighten. The table saw blade, raise the blade guard, and remove the throat plate. Make sure the bevel locking lever is securely tightened. To replace the...for making finish cuts in scrap wood before making very accurate cuts. Tighten securely. SMALL HEX WRENCH Blade arbor shaft THROAT PLATE 34 LARGE HEX WRENCH Fig. 43 Blade washer Blade nut Fig. 44 BLADE GUARD spreader BLADE Fig. 45 Failure to check your setups carefully with a square and made . Do not start...
...and make sure the tool is to heed this warning could result in contact with the accessory. Do not overtighten. The table saw blade, raise the blade guard, and remove the throat plate. Make sure the bevel locking lever is securely tightened. To replace the...for making finish cuts in scrap wood before making very accurate cuts. Tighten securely. SMALL HEX WRENCH Blade arbor shaft THROAT PLATE 34 LARGE HEX WRENCH Fig. 43 Blade washer Blade nut Fig. 44 BLADE GUARD spreader BLADE Fig. 45 Failure to check your setups carefully with a square and made . Do not start...


