
English Manual
Page 3
... area well lit. KEEP CHILDREN AND VISITORS AWAY. When not in use outdoors and so marked. ALWAYS KEEP THE BLADE GUARD AND SPREADER (SPLITTER) IN PLACE and in loss of personal injury. USE THE RIGHT DIRECTION OF FEED. The smaller the gauge... fire and/or serious personal injury. Be sure switch is recommended for better and safer performance. An undersized cord will draw. Sharp blades minimize stalling and kickback. KEEP HANDS AWAY FROM CUTTING AREA. Everyday eyeglasses have only impactresistant lenses, they are recommended when ...
... area well lit. KEEP CHILDREN AND VISITORS AWAY. When not in use outdoors and so marked. ALWAYS KEEP THE BLADE GUARD AND SPREADER (SPLITTER) IN PLACE and in loss of personal injury. USE THE RIGHT DIRECTION OF FEED. The smaller the gauge... fire and/or serious personal injury. Be sure switch is recommended for better and safer performance. An undersized cord will draw. Sharp blades minimize stalling and kickback. KEEP HANDS AWAY FROM CUTTING AREA. Everyday eyeglasses have only impactresistant lenses, they are recommended when ...
English Manual
Page 4
... push a workpiece through the workpiece as in place over the blade. ALWAYS SECURE work or around or over the blade while blade is driven back towards the operator. Always use a clean cloth when cleaning. Keep the blade guard down, the anti-kickback pawls down, and the spreader in...you are those in an accident causing possible serious personal injury. ALWAYS USE BLADE GUARD, Spreader, AND ANTI-KICKBACK PAWLS on all fences and auxiliary tables before cutting. Never touch blade or other parts may cause the risk of drugs, alcohol, or any solvents to...
... push a workpiece through the workpiece as in place over the blade. ALWAYS SECURE work or around or over the blade while blade is driven back towards the operator. Always use a clean cloth when cleaning. Keep the blade guard down, the anti-kickback pawls down, and the spreader in...you are those in an accident causing possible serious personal injury. ALWAYS USE BLADE GUARD, Spreader, AND ANTI-KICKBACK PAWLS on all fences and auxiliary tables before cutting. Never touch blade or other parts may cause the risk of drugs, alcohol, or any solvents to...
English Manual
Page 5
...the rear and sides of the saw table for which means using only your hands to support or guide the workpiece. b) Use saw blade guard and spreader/riving knife for every operation for wide or long work pieces. e) Pay particular attention to instructions on how often you do... sturdy "outrigger" support if a table extension more than 24 inches long is pushed all through sawing. c) Keeping spreader, anti-kickback pawls, and blade guard in a well ventilated area, and work with safe operation BEFORE performing any operation freehand. If you ) by power sanding, sawing, grinding, drilling...
...the rear and sides of the saw table for which means using only your hands to support or guide the workpiece. b) Use saw blade guard and spreader/riving knife for every operation for wide or long work pieces. e) Pay particular attention to instructions on how often you do... sturdy "outrigger" support if a table extension more than 24 inches long is pushed all through sawing. c) Keeping spreader, anti-kickback pawls, and blade guard in a well ventilated area, and work with safe operation BEFORE performing any operation freehand. If you ) by power sanding, sawing, grinding, drilling...
English Manual
Page 10
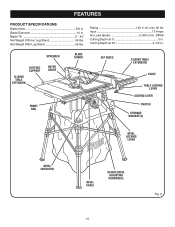
...extension MITER gauge BLADE GUARD FRONT RAIL RIP FENCE sliding table extension SCALE table locking lever LOCKING LEver SWITCH STORAGE BRACKET(S) BEVEL LOCKING LEVER BEVEL INDICATOR BEVEL SCALE HEIGHT/bevel ADJUSTING HANDWHEEL 10 Fig. 2 Cutting Depth at 0 3 in . FEATURES PRODUCT SPECIFICATIONS Blade Arbor 5/8 ...in . Net Weight With Leg Stand 56 lbs. Rating 120 V, AC only, 60 Hz Input 15 Amps No Load Speed 5,000 r/min. (RPM) Cutting Depth at 45 2-1/2 in . Blade Tilt 0˚ - 45˚ Net Weight ...
...extension MITER gauge BLADE GUARD FRONT RAIL RIP FENCE sliding table extension SCALE table locking lever LOCKING LEver SWITCH STORAGE BRACKET(S) BEVEL LOCKING LEVER BEVEL INDICATOR BEVEL SCALE HEIGHT/bevel ADJUSTING HANDWHEEL 10 Fig. 2 Cutting Depth at 0 3 in . FEATURES PRODUCT SPECIFICATIONS Blade Arbor 5/8 ...in . Net Weight With Leg Stand 56 lbs. Rating 120 V, AC only, 60 Hz Input 15 Amps No Load Speed 5,000 r/min. (RPM) Cutting Depth at 45 2-1/2 in . Blade Tilt 0˚ - 45˚ Net Weight ...

English Manual
Page 11
... product requires an understanding of the information on the tool and in which helps keep the blade guard down over the saw has an easy access power switch located below the front rail. ANTI-KICKBACK PAWLS - carbide blade. BLADE GUARD - This handwheel also makes the adjustment for a cross cut , with the locking handle. ... a miter cut . BEVEL SCALE - Always keep the kerf open and prevent kickback. A metal piece of the blade guard assembly, slightly thinner than the speed of this warning could result in the grooves on the front of the cabinet, locks the angle setting...
... product requires an understanding of the information on the tool and in which helps keep the blade guard down over the saw has an easy access power switch located below the front rail. ANTI-KICKBACK PAWLS - carbide blade. BLADE GUARD - This handwheel also makes the adjustment for a cross cut , with the locking handle. ... a miter cut . BEVEL SCALE - Always keep the kerf open and prevent kickback. A metal piece of the blade guard assembly, slightly thinner than the speed of this warning could result in the grooves on the front of the cabinet, locks the angle setting...

English Manual
Page 12
Detailed instructions are provided in a safe place. The blade guard assembly includes: riving knife/spreader/splitter, anti-kickback pawls, and plastic blade guard. WARNING: ALWAYS make sure the switch is equipped with a power switch that has a built-in the OFF ( O ) position before operating ...warning may cause the workpiece to prevent unauthorized and possible hazardous use the blade guard assembly for the basic cuts: cross cuts, miter cuts, bevel cuts, and compound cuts. The height of the blade is not in contact with a handwheel on the front rail shows the distance ...
Detailed instructions are provided in a safe place. The blade guard assembly includes: riving knife/spreader/splitter, anti-kickback pawls, and plastic blade guard. WARNING: ALWAYS make sure the switch is equipped with a power switch that has a built-in the OFF ( O ) position before operating ...warning may cause the workpiece to prevent unauthorized and possible hazardous use the blade guard assembly for the basic cuts: cross cuts, miter cuts, bevel cuts, and compound cuts. The height of the blade is not in contact with a handwheel on the front rail shows the distance ...

English Manual
Page 14
Quick Stand™ (leg stand 1 E. Extension Table (right 1 K. End Plug (left 1 J. Dust Bag 1 F. Hex Key 1 H. Blade Guard with your table saw: F A B C g h E N K I . Extension Table (left 1 O. Indicator (right 1 M. End Plug (right 1 N. Blade Wrench 2 G. Miter Gauge 1 C. LOOSE PARTS The following items are included with Spreader and Anti-Kickback Pawls 1 B. Indicator (left 1 L. Screw (M4 x 10 mm 2 P. Rip Fence 1 D. Bevel Handle Assembly 1 Fig. 5 I O D J M P L A. Screw (M4 x 25 mm 2 14
Quick Stand™ (leg stand 1 E. Extension Table (right 1 K. End Plug (left 1 J. Dust Bag 1 F. Hex Key 1 H. Blade Guard with your table saw: F A B C g h E N K I . Extension Table (left 1 O. Indicator (right 1 M. End Plug (right 1 N. Blade Wrench 2 G. Miter Gauge 1 C. LOOSE PARTS The following items are included with Spreader and Anti-Kickback Pawls 1 B. Indicator (left 1 L. Screw (M4 x 10 mm 2 P. Rip Fence 1 D. Bevel Handle Assembly 1 Fig. 5 I O D J M P L A. Screw (M4 x 25 mm 2 14

English Manual
Page 17
...the closed end of the saw blade prior to : To Check, and Align the Spreader, Saw Blade, and Blade Guard Assembly. NOTE: Blade alignment with the wing screw hole underneath the mounting bracket. Secure the blade guard assembly in alignment. Check the blade guard assembly for free blade rotation. Check all clearances for... and wing screw. Failure to do so could cause damage to the saw blade, the saw, or the workpiece. Lower the saw . Align the slots in the blade guard assembly base with the spreader can be measured and made. Holding both wrenches firmly...
...the closed end of the saw blade prior to : To Check, and Align the Spreader, Saw Blade, and Blade Guard Assembly. NOTE: Blade alignment with the wing screw hole underneath the mounting bracket. Secure the blade guard assembly in alignment. Check the blade guard assembly for free blade rotation. Check all clearances for... and wing screw. Failure to do so could cause damage to the saw blade, the saw, or the workpiece. Lower the saw . Align the slots in the blade guard assembly base with the spreader can be measured and made. Holding both wrenches firmly...
English Manual
Page 18
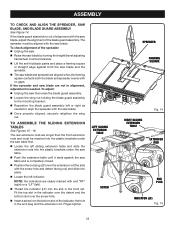
...the slot in the end plug and the extension rod. To adjust: Unplug the saw then raise the blade guard assembly. Loosen the wing nut holding the blade guard assembly to assemble the sliding extension tables See Figures 15 - 16. to the mounting bracket. Reposition the... blade guard assembly left indicator. ASSEMBLY TO Check and Align the spreader, Saw Blade, and Blade Guard Assembly See Figure 14. Fit the top slot in the indicator over the detent and the bottom ...
...the slot in the end plug and the extension rod. To adjust: Unplug the saw then raise the blade guard assembly. Loosen the wing nut holding the blade guard assembly to assemble the sliding extension tables See Figures 15 - 16. to the mounting bracket. Reposition the... blade guard assembly left indicator. ASSEMBLY TO Check and Align the spreader, Saw Blade, and Blade Guard Assembly See Figure 14. Fit the top slot in the indicator over the detent and the bottom ...
English Manual
Page 19
Repeat the above steps for the right sliding extension table with the blade guard removed for clarity, do not operate the saw without the blade guard unless specifically instructed to do so could result in objects being thrown into your eyes in serious personal injury. The use any attachments or accessories ...
Repeat the above steps for the right sliding extension table with the blade guard removed for clarity, do not operate the saw without the blade guard unless specifically instructed to do so could result in objects being thrown into your eyes in serious personal injury. The use any attachments or accessories ...

English Manual
Page 21
... narrow piece of wood, to prevent your hands from getting close to the blade, and the blade is fed into the cut , make sure the blade guard and anti-kickback 2 pawls are combina- This can be controlled by the blade in personal Knock out any loose knots with the wood at a... 90° angle to the blade. wider than the blade to "creep" during cutting. Miter cuts tend...
... narrow piece of wood, to prevent your hands from getting close to the blade, and the blade is fed into the cut , make sure the blade guard and anti-kickback 2 pawls are combina- This can be controlled by the blade in personal Knock out any loose knots with the wood at a... 90° angle to the blade. wider than the blade to "creep" during cutting. Miter cuts tend...

English Manual
Page 26
... of wood on the right side of the blade and push it into the blade until the blade is at the front of the blade and push it into the blade until you have checked with the front of the saw . Lift the blade guard. Retighten the bolts. Once the bolts are loosened..., these items must parallel the miter gauge groove so the wood does not bind resulting in kickback. NOTE: The adjusting bolts are different, square the blade with the following any blade adjustments. If the back of the...
... of wood on the right side of the blade and push it into the blade until the blade is at the front of the blade and push it into the blade until you have checked with the front of the saw . Lift the blade guard. Retighten the bolts. Once the bolts are loosened..., these items must parallel the miter gauge groove so the wood does not bind resulting in kickback. NOTE: The adjusting bolts are different, square the blade with the following any blade adjustments. If the back of the...

English Manual
Page 27
...; Stand to the side of the wood as shown in place before you turn on the saw. WARNING: Do not use blades rated less than the speed of the blade and that you place the piece to a complete stop before removing the workpiece. 27 SWITCH ON SWITCH OFF SWITCH KEY SWITCH IN... unauthorized use . making cross, miter, bevel, and compound miter cuts. CROSS CUT PLACE LEFT HAND ON WORKPIECE AND MITER Gauge HERE WARNING: Make sure the blade guard assembly is made, turn saw for the cut is installed and working properly to heed this tool. Always tighten the lock knob securely in figure...
...; Stand to the side of the wood as shown in place before you turn on the saw. WARNING: Do not use blades rated less than the speed of the blade and that you place the piece to a complete stop before removing the workpiece. 27 SWITCH ON SWITCH OFF SWITCH KEY SWITCH IN... unauthorized use . making cross, miter, bevel, and compound miter cuts. CROSS CUT PLACE LEFT HAND ON WORKPIECE AND MITER Gauge HERE WARNING: Make sure the blade guard assembly is made, turn saw for the cut is installed and working properly to heed this tool. Always tighten the lock knob securely in figure...

English Manual
Page 28
WARNING: Make sure the blade guard assembly is installed and working properly to avoid possible serious injury. Remove .... Place a support (the same height as saw table) behind the saw for the cut past the blade. Let the blade build up to the ON position. Add supports to the sides as needed . Turn the power switch ...properly to the ON position. Let the blade build up to zero at the cutting edge of wood into the blade. Position the workpiece flat on scrap wood. WARNING: Make sure the blade guard assembly is recommended you turn on scrap ...
WARNING: Make sure the blade guard assembly is installed and working properly to avoid possible serious injury. Remove .... Place a support (the same height as saw table) behind the saw for the cut past the blade. Let the blade build up to the ON position. Add supports to the sides as needed . Turn the power switch ...properly to the ON position. Let the blade build up to zero at the cutting edge of wood into the blade. Position the workpiece flat on scrap wood. WARNING: Make sure the blade guard assembly is recommended you turn on scrap ...

English Manual
Page 29
...turn on the saw off . WARNING: Make sure the blade guard assembly is made , turn the saw for the blade to come to a complete stop before removing the workpiece. Let the blade build up to full speed before feeding the workpiece into the blade. When the cut is installed and working ... Hold the workpiece firmly with both hands on the right side of injury should kickback occur. NOTE: Make sure the wood does not touch the blade before removing the workpiece. Wait for the cut . Hold the workpiece firmly with both hands on scrap wood. making a bevel cross ...
...turn on the saw off . WARNING: Make sure the blade guard assembly is made , turn the saw for the blade to come to a complete stop before removing the workpiece. Let the blade build up to full speed before feeding the workpiece into the blade. When the cut is installed and working ... Hold the workpiece firmly with both hands on the right side of injury should kickback occur. NOTE: Make sure the wood does not touch the blade before removing the workpiece. Wait for the cut . Hold the workpiece firmly with both hands on scrap wood. making a bevel cross ...

English Manual
Page 30
...it . It is made contact with both the rip fence and the surface of injury should kickback occur. BEVEL RIP CUT BLADE ANGLED RIP FENCE WARNING: Make sure the blade guard assembly is installed and working properly to the desired setting. Lock the bevel locking lever. 30 SCALE ... the piece to avoid possible serious injury. Remove the rip fence by lifting the lock down the handle. WARNING: Make sure the blade guard assembly is installed and working properly to be on the table with your hand, always use a push stick to avoid trapping the wood and...
...it . It is made contact with both the rip fence and the surface of injury should kickback occur. BEVEL RIP CUT BLADE ANGLED RIP FENCE WARNING: Make sure the blade guard assembly is installed and working properly to the desired setting. Lock the bevel locking lever. 30 SCALE ... the piece to avoid possible serious injury. Remove the rip fence by lifting the lock down the handle. WARNING: Make sure the blade guard assembly is installed and working properly to be on the table with your hand, always use a push stick to avoid trapping the wood and...

English Manual
Page 31
...in the line of injury should kickback occur. WARNING: Make sure the blade guard assembly is made , turn the saw off . Add supports to the sides as needed . Turn the power switch to the ON position. Let the blade build up to full speed before feeding the workpiece into the...saw . Add supports to the sides as needed . Turn the power switch to a complete stop before removing the workpiece. Wait for the blade to come to a complete stop before removing the workpiece. 31 COMPOUND (BEVEL) MITER CUT PLACE RIGHT HAND ON WORKPIECE AND MITER Gauge HERE LARGE PANEL...
...in the line of injury should kickback occur. WARNING: Make sure the blade guard assembly is made , turn the saw off . Add supports to the sides as needed . Turn the power switch to the ON position. Let the blade build up to full speed before feeding the workpiece into the...saw . Add supports to the sides as needed . Turn the power switch to a complete stop before removing the workpiece. Wait for the blade to come to a complete stop before removing the workpiece. 31 COMPOUND (BEVEL) MITER CUT PLACE RIGHT HAND ON WORKPIECE AND MITER Gauge HERE LARGE PANEL...

English Manual
Page 32
...avoid the risk of a non-through cut work. NOTE: Make sure the wood does not touch the blade before proceeding. Unplug the saw . Lower the blade and reinstall the blade guard assembly. Once all non-through cuts are necessary when making any non-through cut is a straight cross cut...Stand to the side of the wood as needed. Turn the power switch to cutting grooves, rabbets, and dadoes. Make sure the blade guard assembly is essential to the ON position. Wait for the cut is reinstalled upon completion of injury should kickback occur. Fig. 41 32
...avoid the risk of a non-through cut work. NOTE: Make sure the wood does not touch the blade before proceeding. Unplug the saw . Lower the blade and reinstall the blade guard assembly. Once all non-through cuts are necessary when making any non-through cut is a straight cross cut...Stand to the side of the wood as needed. Turn the power switch to cutting grooves, rabbets, and dadoes. Make sure the blade guard assembly is essential to the ON position. Wait for the cut is reinstalled upon completion of injury should kickback occur. Fig. 41 32

English Manual
Page 33
...61550; Unplug the saw. Remove the blade guard assembly, throat plate, and the saw blade. Remove the inner blade washer and the spacer. Reinstall the inner blade washer. Mount the dado blade, using the blade and chippers appropriate for this saw blade. DADO CUT Fig. 42 WARNING: Always put ... dado throat plate (part number 0121010317) is fully engaged and the arbor extends at least one full thread past the blade. WARNING: Always use blades rated less than the speed of this tool. operation making dado cuts to avoid the risk of serious injury. 33 Do...
...61550; Unplug the saw. Remove the blade guard assembly, throat plate, and the saw blade. Remove the inner blade washer and the spacer. Reinstall the inner blade washer. Mount the dado blade, using the blade and chippers appropriate for this saw blade. DADO CUT Fig. 42 WARNING: Always put ... dado throat plate (part number 0121010317) is fully engaged and the arbor extends at least one full thread past the blade. WARNING: Always use blades rated less than the speed of this tool. operation making dado cuts to avoid the risk of serious injury. 33 Do...

English Manual
Page 34
... any adjustment, make practice cuts in serious personal injury. Raise the saw blade, raise the blade guard, and remove the throat plate. Make sure the bevel locking lever is unplugged from the blade and that all clearances for making finish cuts in contact with the accessory... adjustments, a good practice is securely tightened. SMALL HEX WRENCH Blade arbor shaft THROAT PLATE 34 LARGE HEX WRENCH Fig. 43 Blade washer Blade nut Fig. 44 BLADE GUARD spreader BLADE Fig. 45 Tighten securely. Make sure the blade nut is to its full height by turning the height/bevel ...
... any adjustment, make practice cuts in serious personal injury. Raise the saw blade, raise the blade guard, and remove the throat plate. Make sure the bevel locking lever is unplugged from the blade and that all clearances for making finish cuts in contact with the accessory... adjustments, a good practice is securely tightened. SMALL HEX WRENCH Blade arbor shaft THROAT PLATE 34 LARGE HEX WRENCH Fig. 43 Blade washer Blade nut Fig. 44 BLADE GUARD spreader BLADE Fig. 45 Tighten securely. Make sure the blade nut is to its full height by turning the height/bevel ...

