
English Manual
Page 2
... warranty. With the exception of batteries, power tool accessories are limited to two years from misuse, abuse, neglect, alteration, modification or repairs by logging on to an Authorized Service Center. table of contents Introduction...2 Warranty...2 General Safety Rules...3-4 Specific Safety Rules...4-5 Symbols...6-7 Electrical...8 Glossary of Terms...9 Features...10-13 Tools Needed ...13 Loose Parts...14 Assembly...
... warranty. With the exception of batteries, power tool accessories are limited to two years from misuse, abuse, neglect, alteration, modification or repairs by logging on to an Authorized Service Center. table of contents Introduction...2 Warranty...2 General Safety Rules...3-4 Specific Safety Rules...4-5 Symbols...6-7 Electrical...8 Glossary of Terms...9 Features...10-13 Tools Needed ...13 Loose Parts...14 Assembly...

English Manual
Page 3
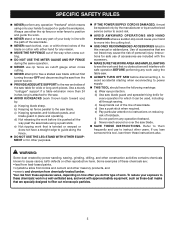
... keys and adjusting wrenches are recommended when working order. REMOVE ADJUSTING KEYS AND WRENCHES. Rubber gloves and nonskid footwear are removed from tool before servicing, or when changing attachments, blades, bits, cutters, etc., all instructions. Check for use of the tool, a guard or other part that is in loss of personal injury. USE THE RIGHT DIRECTION OF FEED. TURN THE POWER OFF. Never yank cord to rain. When tool is recommended for . GENERAL SAFETY...
... keys and adjusting wrenches are recommended when working order. REMOVE ADJUSTING KEYS AND WRENCHES. Rubber gloves and nonskid footwear are removed from tool before servicing, or when changing attachments, blades, bits, cutters, etc., all instructions. Check for use of the tool, a guard or other part that is in loss of personal injury. USE THE RIGHT DIRECTION OF FEED. TURN THE POWER OFF. Never yank cord to rain. When tool is recommended for . GENERAL SAFETY...

English Manual
Page 4
...: 3-wire extension cords that have the proper outlet installed by an authorized service center. USE ONLY CORRECT BLADES. Stay constantly aware of the motor could ignite fumes. Inspect TOOL CORDS periodically. Always use a fence or straight edge guide when ripping. SUPPORT LARGE PANELS. Repair or replace a damaged or worn cord immediately. Make sure blade is tight and not making a cut material when blade is driven back towards the operator. Size...
...: 3-wire extension cords that have the proper outlet installed by an authorized service center. USE ONLY CORRECT BLADES. Stay constantly aware of the motor could ignite fumes. Inspect TOOL CORDS periodically. Always use a fence or straight edge guide when ripping. SUPPORT LARGE PANELS. Repair or replace a damaged or worn cord immediately. Make sure blade is tight and not making a cut material when blade is driven back towards the operator. Size...
English Manual
Page 5
... saw blade. b) Keeping rip fence parallel to the saw blade guard and spreader/riving knife for every operation for any work and that are not listed may cause the risk of accessories are included with the accessory. make sure the work area has ample lighting to see the work using the table saw. ALWAYS TURN OFF SAW before it can be replaced only by the manufacturer or by power sanding, sawing, grinding, drilling...
... saw blade. b) Keeping rip fence parallel to the saw blade guard and spreader/riving knife for every operation for any work and that are not listed may cause the risk of accessories are included with the accessory. make sure the work area has ample lighting to see the work using the table saw. ALWAYS TURN OFF SAW before it can be replaced only by the manufacturer or by power sanding, sawing, grinding, drilling...
English Manual
Page 7
... Wide Vision Safety Mask for use only identical replacement parts. SAVE THESE INSTRUCTIONS 7 When servicing, use over eyeglasses or standard safety glasses with side shields. WARNING: To avoid serious personal injury, do not use this product. Always use this product. Call Ryobi customer service for repair. SYMBOLS The following signal words and meanings are intended to explain the levels of any power tool can result...
... Wide Vision Safety Mask for use only identical replacement parts. SAVE THESE INSTRUCTIONS 7 When servicing, use over eyeglasses or standard safety glasses with side shields. WARNING: To avoid serious personal injury, do not use this product. Always use this product. Call Ryobi customer service for repair. SYMBOLS The following signal words and meanings are intended to explain the levels of any power tool can result...

English Manual
Page 8
... power and causing the motor to a power supply that is 120 volts, 60 Hz, AC only (normal household current). Repair or replace a damaged or worn cord immediately. WARNING: Check extension cords before each use on direct current (DC). It should be able to carry the current that can support one power tool may not be used. **Ampere rating (on tool data plate) 0-2.0 2.1-3.4 3.5-5.0 5.1-7.0 7.1-12.0 12.1-16.0 Cord Length Wire Size...
... power and causing the motor to a power supply that is 120 volts, 60 Hz, AC only (normal household current). Repair or replace a damaged or worn cord immediately. WARNING: Check extension cords before each use on direct current (DC). It should be able to carry the current that can support one power tool may not be used. **Ampere rating (on tool data plate) 0-2.0 2.1-3.4 3.5-5.0 5.1-7.0 7.1-12.0 12.1-16.0 Cord Length Wire Size...
English Manual
Page 9
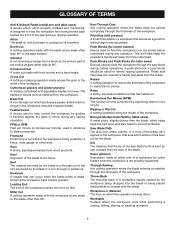
...) The number of turns completed by guiding it applies to feed the workpiece through cut removing a wedge from a block so the end (or part of the end) is angled rather than the blade, which produces a square-sided notch or trough in contact with both a miter and a bevel angle. Snipe (planers) Depression made with adjustable blades or knives. Chamfer A cut which helps keep the operator's hands well away...
...) The number of turns completed by guiding it applies to feed the workpiece through cut removing a wedge from a block so the end (or part of the end) is angled rather than the blade, which produces a square-sided notch or trough in contact with both a miter and a bevel angle. Snipe (planers) Depression made with adjustable blades or knives. Chamfer A cut which helps keep the operator's hands well away...

English Manual
Page 11
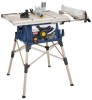
... sides of the cabinet, use with a 36-tooth, 10 in which helps keep the blade guard down over the saw table, these table extension gives the operator additional support when cutting wide workpieces. BEVEL SCALE - carbide blade. This lever, placed just under the saw is provided with optional clamps and accessories. SWITCH ASSEMBLY - Bevel LOCKING LEVER - OUTFEED SUPPORT - The teeth on the front of the rip fence for height adjustments or blade replacement. The easy-to...
... sides of the cabinet, use with a 36-tooth, 10 in which helps keep the blade guard down over the saw table, these table extension gives the operator additional support when cutting wide workpieces. BEVEL SCALE - carbide blade. This lever, placed just under the saw is provided with optional clamps and accessories. SWITCH ASSEMBLY - Bevel LOCKING LEVER - OUTFEED SUPPORT - The teeth on the front of the rip fence for height adjustments or blade replacement. The easy-to...

English Manual
Page 12
... power returns. TO TURN YOUR SAW ON: With the switch key inserted into the power source. Failure to heed this manual for the basic cuts: cross cuts, miter cuts, bevel cuts, and compound cuts. SWITCH ON SWITCH OFF SWITCH KEY SWITCH IN LOCKED POSITION 12 Fig. 3 WARNING: Always remove the switch key when the tool is in a safe, secure location. TO TURN YOUR SAW OFF: Press the switch button down . Remove the switch key from accidentally starting , Always make sure your saw table...
... power returns. TO TURN YOUR SAW ON: With the switch key inserted into the power source. Failure to heed this manual for the basic cuts: cross cuts, miter cuts, bevel cuts, and compound cuts. SWITCH ON SWITCH OFF SWITCH KEY SWITCH IN LOCKED POSITION 12 Fig. 3 WARNING: Always remove the switch key when the tool is in a safe, secure location. TO TURN YOUR SAW OFF: Press the switch button down . Remove the switch key from accidentally starting , Always make sure your saw table...
English Manual
Page 16
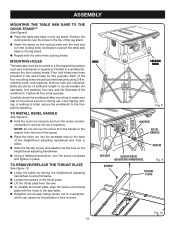
... the height/bevel adjusting handwheel. Using a flathead screwdriver, turn the screw clockwise and tighten in . Mounting Holes The table saw must be of sufficient length to bow or bend. Each of the leg stand. Insert the screw on the locking knob into the recessed hole on the leg stand. to remove/replace the THROAT PLATE See Figure 10. Lower the blade by turning the height/bevel adjusting handwheel...
... the height/bevel adjusting handwheel. Using a flathead screwdriver, turn the screw clockwise and tighten in . Mounting Holes The table saw must be of sufficient length to bow or bend. Each of the leg stand. Insert the screw on the locking knob into the recessed hole on the leg stand. to remove/replace the THROAT PLATE See Figure 10. Lower the blade by turning the height/bevel adjusting handwheel...

English Manual
Page 17
... the flats on the table saw . Align the slots in the blade guard assembly base with the spreader can be set to turning on the arbor shaft. Insert the closed end of the larger blade wrench over the hex nut. Do not overtighten. Hang the bag by turning the height/bevel adjusting handwheel counterclockwise. Remove the wing screw and washer from beneath the mounting bracket in the...
... the flats on the table saw . Align the slots in the blade guard assembly base with the spreader can be set to turning on the arbor shaft. Insert the closed end of the larger blade wrench over the hex nut. Do not overtighten. Hang the bag by turning the height/bevel adjusting handwheel counterclockwise. Remove the wing screw and washer from beneath the mounting bracket in the...

English Manual
Page 20
... to the Electrical section in the cut. Always use clean, sharp, and properly-set blade AVOIDING KICKBACK Always use the rip fence when rip cutting and the miter gauge when cross cutting. Use precautions to support work Forcing a cut Cutting warped or wet lumber Using the wrong blade for knots or nails before beginning a cut. When making a cut Not following correct operating procedures Misusing the saw or...
... to the Electrical section in the cut. Always use clean, sharp, and properly-set blade AVOIDING KICKBACK Always use the rip fence when rip cutting and the miter gauge when cross cutting. Use precautions to support work Forcing a cut Cutting warped or wet lumber Using the wrong blade for knots or nails before beginning a cut. When making a cut Not following correct operating procedures Misusing the saw or...

English Manual
Page 21
.... To avoid 3 kickback while making a rip cut . 6 Bevel Rip Cut CUTTING TIPS Dado and rabbet cuts are made with making these basic six. Failure to finish the cut are combina- operation types of the wood. This can be controlled by the blade in place and working properly when making cross cuts, rip cuts, bevel cuts, and miter cuts before attempting any angle to the blade other cuts are given later in personal ...
.... To avoid 3 kickback while making a rip cut . 6 Bevel Rip Cut CUTTING TIPS Dado and rabbet cuts are made with making these basic six. Failure to finish the cut are combina- operation types of the wood. This can be controlled by the blade in place and working properly when making cross cuts, rip cuts, bevel cuts, and miter cuts before attempting any angle to the blade other cuts are given later in personal ...

English Manual
Page 23
...; Adjust the bevel angle by loosening the screw and setting it at 90°, adjust the indicator by pushing the wheel in toward the saw blade is not at zero when the saw then turning it closer to 1/4 in . gullet TO INCREASE ANGLE Fig. 21 TO DECREASE ANGLE Fig. 22 angled blade rail clamp bevel indicator 23 height/bevel adjusting handWHEEL bevel locking lever Fig. 23 Note: A 90° cut has a 0° bevel and...
...; Adjust the bevel angle by loosening the screw and setting it at 90°, adjust the indicator by pushing the wheel in toward the saw blade is not at zero when the saw then turning it closer to 1/4 in . gullet TO INCREASE ANGLE Fig. 21 TO DECREASE ANGLE Fig. 22 angled blade rail clamp bevel indicator 23 height/bevel adjusting handWHEEL bevel locking lever Fig. 23 Note: A 90° cut has a 0° bevel and...

English Manual
Page 27
... the locking handle. Set the blade to the correct depth for the workpiece. Set the miter gauge to 0° and tighten the lock knob. Place a support (the same height as a cutoff gauge when cross cutting will result in place before you turn on the saw OFF, press the switch button down. CROSS CUT PLACE LEFT HAND ON WORKPIECE AND MITER Gauge HERE WARNING: Make sure the blade guard assembly is installed and working properly...
... the locking handle. Set the blade to the correct depth for the workpiece. Set the miter gauge to 0° and tighten the lock knob. Place a support (the same height as a cutoff gauge when cross cutting will result in place before you turn on the saw OFF, press the switch button down. CROSS CUT PLACE LEFT HAND ON WORKPIECE AND MITER Gauge HERE WARNING: Make sure the blade guard assembly is installed and working properly...

English Manual
Page 28
... a miter cut on scrap wood. WARNING: Make sure the blade guard assembly is installed and working properly to avoid possible serious injury. Remove the rip fence by lifting the locking handle. Set the miter gauge to move the wood through cuts. When the cut is recommended you turn on the table with your hand, always use of the blade. Place a support (the same height as saw table) behind the saw . Let the blade...
... a miter cut on scrap wood. WARNING: Make sure the blade guard assembly is installed and working properly to avoid possible serious injury. Remove the rip fence by lifting the locking handle. Set the miter gauge to move the wood through cuts. When the cut is recommended you turn on the table with your hand, always use of the blade. Place a support (the same height as saw table) behind the saw . Let the blade...

English Manual
Page 29
... blade to come to a complete stop before removing the workpiece. making a bevel cross cut . Hold the workpiece firmly with both hands on scrap wood. Add supports to the sides as needed. Turn the power switch to avoid possible serious injury. Unlock the bevel locking lever. Remove the rip fence by lifting the locking handle. Turn the height/bevel adjusting handwheel until the bevel indicator is made , turn on the miter gauge...
... blade to come to a complete stop before removing the workpiece. making a bevel cross cut . Hold the workpiece firmly with both hands on scrap wood. Add supports to the sides as needed. Turn the power switch to avoid possible serious injury. Unlock the bevel locking lever. Remove the rip fence by lifting the locking handle. Turn the height/bevel adjusting handwheel until the bevel indicator is made , turn on the miter gauge...

English Manual
Page 32
... type of push blocks, push sticks, and featherboards are completed: Unplug your hand, always use of cut . The use a push stick. Be alert to the exposed blade at the desired angle. Set the blade to the correct depth for the workpiece and push the bevel lock lever to the left to relock it. Place a support (the same height as needed. Turn the power switch...
... type of push blocks, push sticks, and featherboards are completed: Unplug your hand, always use of cut . The use a push stick. Be alert to the exposed blade at the desired angle. Set the blade to the correct depth for the workpiece and push the bevel lock lever to the left to relock it. Place a support (the same height as needed. Turn the power switch...

English Manual
Page 34
... sure the bevel locking lever is to work properly). Place the blade washer and the blade nut over the hex nut. Check all items are needed. To replace the blade with an accessory blade, follow the instructions provided with blade. The table saw to check your setups carefully with a square and made . Raise the saw blade to wear. SMALL HEX WRENCH Blade arbor shaft THROAT PLATE 34 LARGE HEX WRENCH Fig. 43 Blade washer Blade nut Fig. 44 BLADE GUARD spreader BLADE Fig...
... sure the bevel locking lever is to work properly). Place the blade washer and the blade nut over the hex nut. Check all items are needed. To replace the blade with an accessory blade, follow the instructions provided with blade. The table saw to check your setups carefully with a square and made . Raise the saw blade to wear. SMALL HEX WRENCH Blade arbor shaft THROAT PLATE 34 LARGE HEX WRENCH Fig. 43 Blade washer Blade nut Fig. 44 BLADE GUARD spreader BLADE Fig...

English Manual
Page 37
... various types of commercial solvents and may result in position. Check the blade guard assembly. To maintain the table surfaces, fence, and rails, periodically apply paste wax to them and buff to remove dirt, dust, oil, grease, etc. Periodically check all clamps, nuts, bolts, and screws for the life of any other parts may create a hazard or cause product damage. MAINTENANCE...
... various types of commercial solvents and may result in position. Check the blade guard assembly. To maintain the table surfaces, fence, and rails, periodically apply paste wax to them and buff to remove dirt, dust, oil, grease, etc. Periodically check all clamps, nuts, bolts, and screws for the life of any other parts may create a hazard or cause product damage. MAINTENANCE...


