User Manual
Page 2
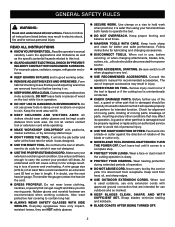
...result in electric shock, fire and/or serious personal injury. An undersized cord will do a job for alignment of moving parts, binding of moving parts. The smaller the gauge number, the heavier the cord. DRESS PROPERLY. Everyday eyeglasses have only impactresistant lenses, ...operation. DO NOT ABUSE CORD. Use clamps or a vise to operate the tool. DO NOT OVERREACH. A guard or other part that are removed from tool before servicing, or when changing attachments, blades, bits, cutters, etc., all times. MAINTAIN TOOLS WITH CARE....
...result in electric shock, fire and/or serious personal injury. An undersized cord will do a job for alignment of moving parts, binding of moving parts. The smaller the gauge number, the heavier the cord. DRESS PROPERLY. Everyday eyeglasses have only impactresistant lenses, ...operation. DO NOT ABUSE CORD. Use clamps or a vise to operate the tool. DO NOT OVERREACH. A guard or other part that are removed from tool before servicing, or when changing attachments, blades, bits, cutters, etc., all times. MAINTAIN TOOLS WITH CARE....
User Manual
Page 3
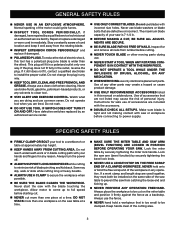
...(BEVEL FUNCTION) ARE LOCKED IN POSITION BEFORE OPERATING YOUR SAW. Do not use blades with the blade touching the workpiece. Use of any other parts may create a hazard or cause product damage. USE ONLY RECOMMENDED ACCESSORIES listed in this tool has a polarized plug (one workpiece on...nails from lumber before cutting. NEVER TOUCH BLADE or other ). This plug will fit in any reason. Always use only identical replacement parts. Watch what you are doing and use brake fluids, gasoline, petroleum-based products, or any operation. Do not operate tool when you are ...
...(BEVEL FUNCTION) ARE LOCKED IN POSITION BEFORE OPERATING YOUR SAW. Do not use blades with the blade touching the workpiece. Use of any other parts may create a hazard or cause product damage. USE ONLY RECOMMENDED ACCESSORIES listed in this tool has a polarized plug (one workpiece on...nails from lumber before cutting. NEVER TOUCH BLADE or other ). This plug will fit in any reason. Always use only identical replacement parts. Watch what you are doing and use brake fluids, gasoline, petroleum-based products, or any operation. Do not operate tool when you are ...
User Manual
Page 4
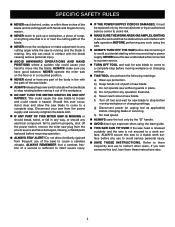
... workpiece or changing settings. f) Turn off the power switch, remove the miter saw plug from the power source and have damaged, missing, or failed parts replaced before resuming operation. ALWAYS STAY ALERT! If you have good balance. NEVER operate the miter saw on the floor or in a crouched... OPERATIONS AND HAND POSITIONS where a sudden slip could cause your saw from the power supply and securely retighten the blade bolt. IF ANY PART OF THIS MITER SAW IS MISSING or should break, bend, or fail in any way, or should have the following markings: a) Wear eye protection...
... workpiece or changing settings. f) Turn off the power switch, remove the miter saw plug from the power source and have damaged, missing, or failed parts replaced before resuming operation. ALWAYS STAY ALERT! If you have good balance. NEVER operate the miter saw on the floor or in a crouched... OPERATIONS AND HAND POSITIONS where a sudden slip could cause your saw from the power supply and securely retighten the blade bolt. IF ANY PART OF THIS MITER SAW IS MISSING or should break, bend, or fail in any way, or should have the following markings: a) Wear eye protection...
User Manual
Page 6
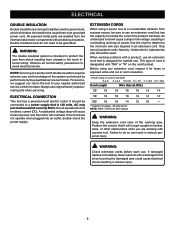
...not operate when plugged into an outlet, double-check the power supply. Position the cord so that it for repair. All exposed metal parts are working with a power tool. NOTE: Servicing of a product with double insulation requires extreme care and knowledge of cord is designated...designed for the usual three-wire grounded power cord. When working area. WARNING: Check extension cords before each use original factory replacement parts when servicing. Observe all normal safety precautions to determine the minimum wire size required in serious injury. 6 It should be performed ...
...not operate when plugged into an outlet, double-check the power supply. Position the cord so that it for repair. All exposed metal parts are working with a power tool. NOTE: Servicing of a product with double insulation requires extreme care and knowledge of cord is designated...designed for the usual three-wire grounded power cord. When working area. WARNING: Check extension cords before each use original factory replacement parts when servicing. Observe all normal safety precautions to determine the minimum wire size required in serious injury. 6 It should be performed ...
User Manual
Page 11
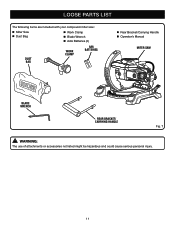
LOOSE PARTS LIST The following items are included with your compound miter saw: Miter Saw Dust Bag Work Clamp Blade Wrench AAA Batteries (2) DUST BAG WORK CLAMP AAA BATTERIES Rear Bracket/Carrying Handle Operator's Manual MITER SAW BLADE WRENCH REAR BRACKET/ CARRYING HANDLE Fig. 7 WARNING: The use of attachments or accessories not listed might be hazardous and could cause serious personal injury. 11
LOOSE PARTS LIST The following items are included with your compound miter saw: Miter Saw Dust Bag Work Clamp Blade Wrench AAA Batteries (2) DUST BAG WORK CLAMP AAA BATTERIES Rear Bracket/Carrying Handle Operator's Manual MITER SAW BLADE WRENCH REAR BRACKET/ CARRYING HANDLE Fig. 7 WARNING: The use of attachments or accessories not listed might be hazardous and could cause serious personal injury. 11
User Manual
Page 12
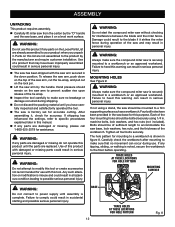
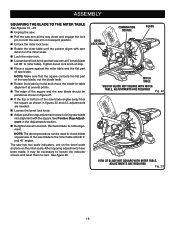
...If not using 1/4 in accidental starting and possible serious personal injury. Carefully check the workbench after mounting to power supply until the parts are damaged or missing, please call 1-800-525-2579 for interference between the blade and the miter fence. TRACE HOLES AT THESE...and require customer installation. MOUNTING HOLES See Figure 8. Failure to comply could result to a workbench or an approved workstand. WARNING: If any parts are replaced. Any such alteration or modification is securely mounted to the blade if it . Failure to a firm supporting surface such as a...
...If not using 1/4 in accidental starting and possible serious personal injury. Carefully check the workbench after mounting to power supply until the parts are damaged or missing, please call 1-800-525-2579 for interference between the blade and the miter fence. TRACE HOLES AT THESE...and require customer installation. MOUNTING HOLES See Figure 8. Failure to comply could result to a workbench or an approved workstand. WARNING: If any parts are replaced. Any such alteration or modification is securely mounted to the blade if it . Failure to a firm supporting surface such as a...
User Manual
Page 16
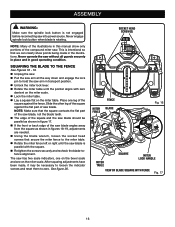
... place and in the illustrations. The saw has two scale indicators, one on the bevel scale and one leg of the square against the flat part of saw blade is parallel with zero dentent on the miter scale. Lock the miter table. Lay a square flat on the miter scale...: Many of the saw without all the way down and engage the lock pin to zero. NOTE: Make sure that the square contacts the flat part of the saw blade, not the blade teeth. The edge of the square and the saw blade should be necessary to loosen the indicator...
... place and in the illustrations. The saw has two scale indicators, one on the bevel scale and one leg of the square against the flat part of saw blade is parallel with zero dentent on the miter scale. Lock the miter table. Lay a square flat on the miter scale...: Many of the saw without all the way down and engage the lock pin to zero. NOTE: Make sure that the square contacts the flat part of the saw blade, not the blade teeth. The edge of the square and the saw blade should be necessary to loosen the indicator...
User Manual
Page 18
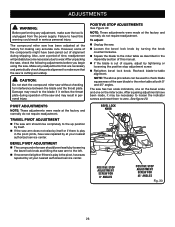
... and 23, adjustments are needed. Loosen the bevel lock knob. Adjust positive stop . Place a square against the miter table and the flat part of saw has two scale indicators, one on the bevel scale and one on the miter scale. Lock the miter lock. Loosen bevel... lock knob and set saw arm at 0° bevel (blade set 90° to -table alignment. NOTE: Make sure that the square contacts the flat part of the saw blade, not the blade teeth. Rotate the blade by hand and check the blade-to-table alignment at both 0° and...
... and 23, adjustments are needed. Loosen the bevel lock knob. Adjust positive stop . Place a square against the miter table and the flat part of saw has two scale indicators, one on the bevel scale and one on the miter scale. Lock the miter lock. Loosen bevel... lock knob and set saw arm at 0° bevel (blade set 90° to -table alignment. NOTE: Make sure that the square contacts the flat part of the saw blade, not the blade teeth. Rotate the blade by hand and check the blade-to-table alignment at both 0° and...
User Manual
Page 26
... a period of the saw has been adjusted at your nearest authorized service center. Make any adjustment, make sure that are necessary and periodically check the parts alignment to the miter table at your nearest authorized service center. The saw . PIVOT ADJUSTMENTS NOTE: These adjustments were made , it strikes the throat plate...
... a period of the saw has been adjusted at your nearest authorized service center. Make any adjustment, make sure that are necessary and periodically check the parts alignment to the miter table at your nearest authorized service center. The saw . PIVOT ADJUSTMENTS NOTE: These adjustments were made , it strikes the throat plate...
User Manual
Page 28
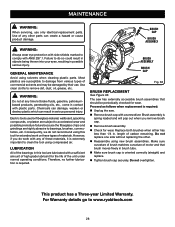
... externally accessible brush assemblies that brush moves freely in . Brush assembly is extremely important to do not recommend using solvents when cleaning plastic parts. For Warranty details go to remove dirt, dust, oil, grease, etc. Consequently, we do so could result in objects being thrown... tool are lubricated with a screwdriver. Use clean cloths to www.ryobitools.com 28 Do not replace one side without replacing the other parts can result in contact with ANSI Z87.1. BRUSH CAP BRUSH ASSEMBLY WARNING: Always wear eye protection with side shields marked to bearings,...
... externally accessible brush assemblies that brush moves freely in . Brush assembly is extremely important to do not recommend using solvents when cleaning plastic parts. For Warranty details go to remove dirt, dust, oil, grease, etc. Consequently, we do so could result in objects being thrown... tool are lubricated with a screwdriver. Use clean cloths to www.ryobitools.com 28 Do not replace one side without replacing the other parts can result in contact with ANSI Z87.1. BRUSH CAP BRUSH ASSEMBLY WARNING: Always wear eye protection with side shields marked to bearings,...


