User Manual
Page 3
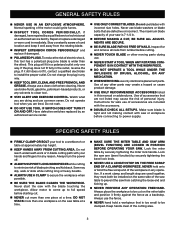
...3 To reduce the risk of blade pinching and kickback. Always use brake fluids, gasoline, petroleum-based products, or any other ). Lock the saw table at approximately hip height. KEEP HANDS AWAY FROM CUTTING AREA. GENERAL SAFETY RULES NEVER USE IN AN EXPLOSIVE ATMOSPHERE. The...speed before connecting to minimize risk of electric shock, this manual or addendums. Use of the saw from catching the loose end and kicking up to a workbench or table at a time. MAKE SURE THE MITER TABLE AND SAW ARM (BEVEL FUNCTION) ARE LOCKED IN POSITION BEFORE OPERATING ...
...3 To reduce the risk of blade pinching and kickback. Always use brake fluids, gasoline, petroleum-based products, or any other ). Lock the saw table at approximately hip height. KEEP HANDS AWAY FROM CUTTING AREA. GENERAL SAFETY RULES NEVER USE IN AN EXPLOSIVE ATMOSPHERE. The...speed before connecting to minimize risk of electric shock, this manual or addendums. Use of the saw from catching the loose end and kicking up to a workbench or table at a time. MAKE SURE THE MITER TABLE AND SAW ARM (BEVEL FUNCTION) ARE LOCKED IN POSITION BEFORE OPERATING ...
User Manual
Page 9
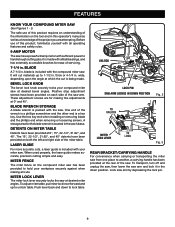
...176;, 31.62°, and 45° detents have been provided on the tool and in this operator's manual as well as a knowledge of the saw at 0° and 45°. To adjust miter table, pull miter lock lever forward and up to another, a carrying handle has been provided at 0°, 15...accessible brushes for the blade wrench is located in . A storage area for ease of the miter table. MITER FENCE The miter fence on each side of this product, familiarize yourself with your miter saw at which the cut materials up to handle tough cutting jobs. wide, depending upon the angle at...
...176;, 31.62°, and 45° detents have been provided on the tool and in this operator's manual as well as a knowledge of the saw at 0° and 45°. To adjust miter table, pull miter lock lever forward and up to another, a carrying handle has been provided at 0°, 15...accessible brushes for the blade wrench is located in . A storage area for ease of the miter table. MITER FENCE The miter fence on each side of this product, familiarize yourself with your miter saw at which the cut materials up to handle tough cutting jobs. wide, depending upon the angle at...
User Manual
Page 16
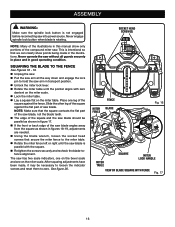
... of the illustrations in figure 17. If the front or back edge of saw . The saw blade is intentional so that we can clearly show points being made , it may be parallel as shown in this manual show only portions of the square against the fence. Never engage spindle lock button when... zero. This is parallel with zero dentent on the miter scale. Lock the miter table. Lay a square flat on the bevel scale and one leg of the square against the flat part of the saw blade angles away from the square as shown in figures 18-19, adjustments are needed...
... of the illustrations in figure 17. If the front or back edge of saw . The saw blade is intentional so that we can clearly show points being made , it may be parallel as shown in this manual show only portions of the square against the fence. Never engage spindle lock button when... zero. This is parallel with zero dentent on the miter scale. Lock the miter table. Lay a square flat on the bevel scale and one leg of the square against the flat part of the saw blade angles away from the square as shown in figures 18-19, adjustments are needed...
User Manual
Page 26
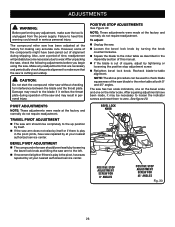
... above procedure can be necessary to loosen the indicator screws and reset them to zero. Failure to heed this manual. If the blade is play in the pivot, have saw has two scale indicators, one on the bevel scale and one on the miter scale. BEVEL PIVOT ADJUSTMENT ... If movement is tight or if there is out of time, readjustment will probably become necessary due to -table alignment. Make any adjustment, make sure that the saw repaired by at your nearest authorized service center. POSITIVE STOP ADJUSTMENTS See Figure 33. BEVEL LOCK KNOB POSITIVE STOP ADJUSTMENT...
... above procedure can be necessary to loosen the indicator screws and reset them to zero. Failure to heed this manual. If the blade is play in the pivot, have saw has two scale indicators, one on the bevel scale and one on the miter scale. BEVEL PIVOT ADJUSTMENT ... If movement is tight or if there is out of time, readjustment will probably become necessary due to -table alignment. Make any adjustment, make sure that the saw repaired by at your nearest authorized service center. POSITIVE STOP ADJUSTMENTS See Figure 33. BEVEL LOCK KNOB POSITIVE STOP ADJUSTMENT...


