
Operation Manual
Page 3
..., cutters, etc., all times. MAINTAIN TOOLS WITH CARE. Do not use the next heavier gauge. Keep the work area. Consult the operator's manual for better and safer performance. Serious injury could occur if the tool is dusty. PROTECT YOUR HEARING. Read the operator...'s manual carefully. Do not let visitors contact tool or extension cord while operating. MAKE WORKSHOP CHILDPROOF with padlocks, master switches, or by ...
..., cutters, etc., all times. MAINTAIN TOOLS WITH CARE. Do not use the next heavier gauge. Keep the work area. Consult the operator's manual for better and safer performance. Serious injury could occur if the tool is dusty. PROTECT YOUR HEARING. Read the operator...'s manual carefully. Do not let visitors contact tool or extension cord while operating. MAKE WORKSHOP CHILDPROOF with padlocks, master switches, or by ...
Operation Manual
Page 4
...; Never touch blade or other ). Do not change the plug in this tool has a polarized plug (one way. Do not use of electric shock, this manual or addendums. Use of accessories that are not listed may create a hazard or cause product damage. Use only recommended accessories listed in any solvents...
...; Never touch blade or other ). Do not change the plug in this tool has a polarized plug (one way. Do not use of electric shock, this manual or addendums. Use of accessories that are not listed may create a hazard or cause product damage. Use only recommended accessories listed in any solvents...

Operation Manual
Page 6
...on this tool. CAUTION: Indicates a potentially hazardous situation, which, if not avoided, may result in serious personal injury. Read Operator's Manual Eye Protection To reduce the risk of risk associated with ANSI Z87.1. V A Hz min no load Double-insulated construction Revolutions, strokes,...Type of the following signal words and meanings are intended to explain the levels of injury, user must read and understand operator's manual before using this product. Please study them and learn their meaning. CAUTION: (Without Safety Alert Symbol) Indicates a situation that...
...on this tool. CAUTION: Indicates a potentially hazardous situation, which, if not avoided, may result in serious personal injury. Read Operator's Manual Eye Protection To reduce the risk of risk associated with ANSI Z87.1. V A Hz min no load Double-insulated construction Revolutions, strokes,...Type of the following signal words and meanings are intended to explain the levels of injury, user must read and understand operator's manual before using this product. Please study them and learn their meaning. CAUTION: (Without Safety Alert Symbol) Indicates a situation that...
Operation Manual
Page 9
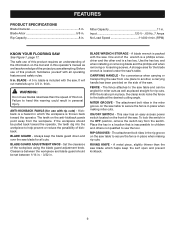
... the locator pin in place when making rip cuts. MITER GROOVE - The attachment bolt rides in the miter groove on the side of this operator's manual as well as placed straight for all operating features and safety rules. 5 in . ON/OFF SWITCH - RIP GROOVES - Miter Capacity 11 in the OFF position...
... the locator pin in place when making rip cuts. MITER GROOVE - The attachment bolt rides in the miter groove on the side of this operator's manual as well as placed straight for all operating features and safety rules. 5 in . ON/OFF SWITCH - RIP GROOVES - Miter Capacity 11 in the OFF position...
Operation Manual
Page 10
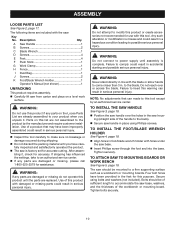
... and possible serious personal injury. A Saw Handle 1 B Screws 2 C Blade Wrench 1 D Screws 4 E Feet 4 F Push Stick 1 G Work Clamp 1 H Fence 1 I Dust Bag 1 J Screws 2 K Foot/Blade Wrench Holder 1 Operator's Manual (not shown 1 UNPACKING This product requires assembly. Carefully lift saw to come closer than 3 in line with the saw is complete. Use of this...
... and possible serious personal injury. A Saw Handle 1 B Screws 2 C Blade Wrench 1 D Screws 4 E Feet 4 F Push Stick 1 G Work Clamp 1 H Fence 1 I Dust Bag 1 J Screws 2 K Foot/Blade Wrench Holder 1 Operator's Manual (not shown 1 UNPACKING This product requires assembly. Carefully lift saw to come closer than 3 in line with the saw is complete. Use of this...
Operation Manual
Page 14
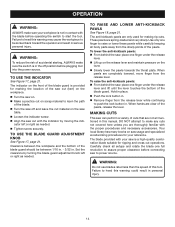
.... - 3/32 in personal injury. 14 To lower the anti-kickback pawls: From behind the saw, place one finger to learn the path of this manual. The blade provided with the blade before plugging tool into the power source. Failure to start the tool. To use the blade guard adjustment knob...
.... - 3/32 in personal injury. 14 To lower the anti-kickback pawls: From behind the saw, place one finger to learn the path of this manual. The blade provided with the blade before plugging tool into the power source. Failure to start the tool. To use the blade guard adjustment knob...
Repair Sheet
Page 3
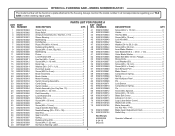
MODEL NUMBER RLS1351 The model number will be found on a plate attached to the housing. NUMBER DESCRIPTION QTY. 1 089230100063 Power Cord 1 2 ...D8 1 72 089230100702 Motor Assembly (Inc Key Nos. 1-41 1 73 089230100031 Blade Guard Adjustment Knob 1 74 089230100134 Switch Key 1 Not Shown: 988000099 Operator's Manual 1 6-24-10 (Rev:01) 3 Key Nos. 74 1 26 089230100025 Screw (M4.2 × 32 mm 1 27 089230100026 Field Assembly 1 28 089230100027 ...Blade (D5/8 in. × D5 in all correspondence regarding your TILE SAW or when ordering repair parts. RYOBI 5 in.
MODEL NUMBER RLS1351 The model number will be found on a plate attached to the housing. NUMBER DESCRIPTION QTY. 1 089230100063 Power Cord 1 2 ...D8 1 72 089230100702 Motor Assembly (Inc Key Nos. 1-41 1 73 089230100031 Blade Guard Adjustment Knob 1 74 089230100134 Switch Key 1 Not Shown: 988000099 Operator's Manual 1 6-24-10 (Rev:01) 3 Key Nos. 74 1 26 089230100025 Screw (M4.2 × 32 mm 1 27 089230100026 Field Assembly 1 28 089230100027 ...Blade (D5/8 in. × D5 in all correspondence regarding your TILE SAW or when ordering repair parts. RYOBI 5 in.


